
Use & Care Guide
Page 10
... secure dryer door. Use tape to dryer pipe. 4. Moving Care For power supply cord-connected dryers: 1. Unplug the power supply cord. 2. Failure to gas supply line. 3. For direct-wired dryers: 1. Unplug dryer or disconnect power. 2. Locate the light bulb cover on some models) 1. Turn bulb ...base. 6. Replace the cover and secure with a 10-watt appliance bulb only. Unplug dryer or disconnect power. 2. (For gas dryers only): Close shut off power at home. Make sure leveling legs are secure in dryer base. 4. Reinstalling the Dryer Follow the "Installation...
... secure dryer door. Use tape to dryer pipe. 4. Moving Care For power supply cord-connected dryers: 1. Unplug the power supply cord. 2. Failure to gas supply line. 3. For direct-wired dryers: 1. Unplug dryer or disconnect power. 2. Locate the light bulb cover on some models) 1. Turn bulb ...base. 6. Replace the cover and secure with a 10-watt appliance bulb only. Unplug dryer or disconnect power. 2. (For gas dryers only): Close shut off power at home. Make sure leveling legs are secure in dryer base. 4. Reinstalling the Dryer Follow the "Installation...
Installation Guide
Page 4
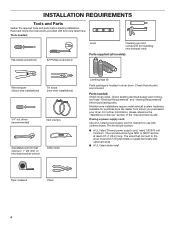
...parts are included. Mobile home installations require metal exhaust system hardware, available for use with any tools listed here. If using a power supply cord: Use a UL listed power supply cord kit marked for purchase from the dealer from whom you purchased your dryer. Read and follow the instructions provided with clothes dryers. ...Tin snips (new vent installations) 1/4" nut driver (recommended) Vent clamps Adjustable wrench that opens to the dryer must end in dryer drum. The cord should contain: ■■ A UL listed 30-amp power supply cord, rated 120/240 volt minimum.
...parts are included. Mobile home installations require metal exhaust system hardware, available for use with any tools listed here. If using a power supply cord: Use a UL listed power supply cord kit marked for purchase from the dealer from whom you purchased your dryer. Read and follow the instructions provided with clothes dryers. ...Tin snips (new vent installations) 1/4" nut driver (recommended) Vent clamps Adjustable wrench that opens to the dryer must end in dryer drum. The cord should contain: ■■ A UL listed 30-amp power supply cord, rated 120/240 volt minimum.
Installation Guide
Page 5
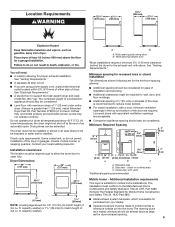
... spacing should be large enough to allow the dryer door to reduce noise transfer. ■■ For closet installation, with equivalent ventilation openings are using power supply cord, a grounded electrical outlet located within 2 ft. (610 mm) of either side of 3.6 cu. Dryer Dimensions 29" (737 mm) 29" (737 mm) 433/8" (1102 mm...
... spacing should be large enough to allow the dryer door to reduce noise transfer. ■■ For closet installation, with equivalent ventilation openings are using power supply cord, a grounded electrical outlet located within 2 ft. (610 mm) of either side of 3.6 cu. Dryer Dimensions 29" (737 mm) 29" (737 mm) 433/8" (1102 mm...
Installation Guide
Page 6
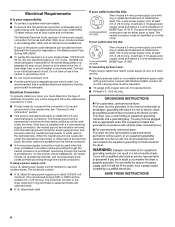
...ends. ■■ A UL listed strain relief. Electrical Connection To properly install your dryer, you will be using a power supply cord: Use a UL listed power supply cord kit marked for (1) new branch-circuit installations, (2) mobile homes, (3) recreational vehicles, and (4) areas where local codes prohibit ... the neutral conductor is prohibited. If your outlet looks like this : 3-wire receptacle (10-30R) Then choose a 3-wire power supply cord with the National Electrical Code, ANSI/NFPA 70-latest edition and all mobile home installations. A time-delay fuse or circuit breaker...
...ends. ■■ A UL listed strain relief. Electrical Connection To properly install your dryer, you will be using a power supply cord: Use a UL listed power supply cord kit marked for (1) new branch-circuit installations, (2) mobile homes, (3) recreational vehicles, and (4) areas where local codes prohibit ... the neutral conductor is prohibited. If your outlet looks like this : 3-wire receptacle (10-30R) Then choose a 3-wire power supply cord with the National Electrical Code, ANSI/NFPA 70-latest edition and all mobile home installations. A time-delay fuse or circuit breaker...

Installation Guide
Page 7
...use a large flat piece of cardboard from bottom of a cabinet-ground conductor to neutral wire, go to steps 1-2 on page 9 for power supply cord strain relief: then steps 3-6 for 4-wire Direct Wire Connection section. ft. Then, go to Venting Requirements. 4-wire direct connection: Go.... Slide the dryer until bottom of 3.6 cu. Electrical Connection Options 1. capacity washer) from dryer carton; ft. Choose electrical connection type Power supply cord 4-wire receptacle (NEMA Type 14-30R): Go to connect the exhaust vent. Then go to Venting Requirements. 3-wire direct connection: Go to...
...use a large flat piece of cardboard from bottom of a cabinet-ground conductor to neutral wire, go to steps 1-2 on page 9 for power supply cord strain relief: then steps 3-6 for 4-wire Direct Wire Connection section. ft. Then, go to Venting Requirements. 4-wire direct connection: Go.... Slide the dryer until bottom of 3.6 cu. Electrical Connection Options 1. capacity washer) from dryer carton; ft. Choose electrical connection type Power supply cord 4-wire receptacle (NEMA Type 14-30R): Go to connect the exhaust vent. Then go to Venting Requirements. 3-wire direct connection: Go to...

Installation Guide
Page 8
... two clamp sections (C) together. 2. Center terminal block screw D. For 4 wire Power Supply Cord Connection, continue to strain relief BC D A E F Before you start, disconnect power. Attach power supply cord strain relief A B C D Remove the screws from a 3/4" (19 mm) UL listed strain relief (UL marking on the power supply cord is pointing down screw E. Do not further tighten strain relief...
... two clamp sections (C) together. 2. Center terminal block screw D. For 4 wire Power Supply Cord Connection, continue to strain relief BC D A E F Before you start, disconnect power. Attach power supply cord strain relief A B C D Remove the screws from a 3/4" (19 mm) UL listed strain relief (UL marking on the power supply cord is pointing down screw E. Do not further tighten strain relief...

Installation Guide
Page 9
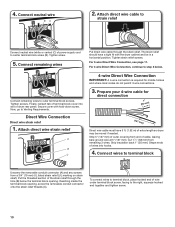
... (E) and neutral wire (white or center) (C) of dryer rear panel. Now, go to Venting Requirements. 3-wire Power Supply Cord Connection Use where local codes permit connecting cabinet-ground conductor to outer terminal block screws. Remove center screw B Remove center... wire (E) from external ground conductor screw (A). 4. A B F 5. Tighten screws. Finally, reinsert tab of terminal block cover into slot of power supply cord under center terminal block screw (B). Ring terminals 3. Connect ground wire A CD E G A. 4-wire receptacle (NEMA type 14-30R) B. 4-...
... (E) and neutral wire (white or center) (C) of dryer rear panel. Now, go to Venting Requirements. 3-wire Power Supply Cord Connection Use where local codes permit connecting cabinet-ground conductor to outer terminal block screws. Remove center screw B Remove center... wire (E) from external ground conductor screw (A). 4. A B F 5. Tighten screws. Finally, reinsert tab of terminal block cover into slot of power supply cord under center terminal block screw (B). Ring terminals 3. Connect ground wire A CD E G A. 4-wire receptacle (NEMA type 14-30R) B. 4-...
Installation Guide
Page 10
.... Cut 11/2" (38 mm) from a 3/4" (19 mm) UL listed strain relief (UL marking on strain relief). 4. Strip 5" (127 mm) of outer covering from end of power supply cord to the right, squeeze hooked end together and tighten screw. 10 Connect neutral wire BC 2.
.... Cut 11/2" (38 mm) from a 3/4" (19 mm) UL listed strain relief (UL marking on strain relief). 4. Strip 5" (127 mm) of outer covering from end of power supply cord to the right, squeeze hooked end together and tighten screw. 10 Connect neutral wire BC 2.
Installation Guide
Page 12
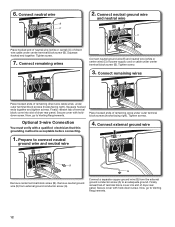
... ground wire A A B E Remove center terminal block screw (B). 6. Connect neutral ground wire and neutral wire B C Place hooked end of neutral wire (white or center) (C) of power supply cord or cable under center terminal block screw (B). Finally, reinsert tab of terminal block cover into slot of dryer rear panel. Squeeze hooked end together. Finally...
... ground wire A A B E Remove center terminal block screw (B). 6. Connect neutral ground wire and neutral wire B C Place hooked end of neutral wire (white or center) (C) of power supply cord or cable under center terminal block screw (B). Finally, reinsert tab of terminal block cover into slot of dryer rear panel. Squeeze hooked end together. Finally...
Installation Guide
Page 16
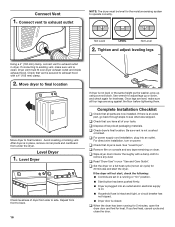
After dryer is in dryer. Repeat from under the dryer. q Check dryer's final location. q For power supply cord installation, plug into an outlet and/or electrical supply is on. ■■ Household fuse is intact and tight, or circuit breaker has not... operate correctly. Not Level LEVEL Not Level 2. Complete Installation Checklist q Check that you feel for the moisture sensing system to remove any tape remaining on power. For direct wire installation, turn on dryer. Connect Vent 1. Tighten and adjust leveling legs Using a 4" (102 mm) clamp, connect vent to final ...
After dryer is in dryer. Repeat from under the dryer. q Check dryer's final location. q For power supply cord installation, plug into an outlet and/or electrical supply is on. ■■ Household fuse is intact and tight, or circuit breaker has not... operate correctly. Not Level LEVEL Not Level 2. Complete Installation Checklist q Check that you feel for the moisture sensing system to remove any tape remaining on power. For direct wire installation, turn on dryer. Connect Vent 1. Tighten and adjust leveling legs Using a 4" (102 mm) clamp, connect vent to final ...


