
Use & Care Guide
Page 7
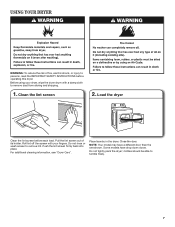
...information, see "Dryer Care". Load the dryer Clean the lint screen before operating this dryer. Place laundry in the dryer. Do not rinse or wash screen to tumble freely. 7 Push the lint screen firmly back into place. Close the door. Pull the lint screen out of fire, electric shock, or ...injury to remove dust from storing and shipping. 1. clothes should be able to remove lint. Before using your dryer, wipe the dryer drum with your fingers. USING YOUR DRYER WARNING: To reduce the risk of its holder. Roll ...
...information, see "Dryer Care". Load the dryer Clean the lint screen before operating this dryer. Place laundry in the dryer. Do not rinse or wash screen to tumble freely. 7 Push the lint screen firmly back into place. Close the door. Pull the lint screen out of fire, electric shock, or ...injury to remove dust from storing and shipping. 1. clothes should be able to remove lint. Before using your dryer, wipe the dryer drum with your fingers. USING YOUR DRYER WARNING: To reduce the risk of its holder. Roll ...

Use & Care Guide
Page 10
... panels before servicing. Failure to gas supply line. 3. Make sure leveling legs are secure in death or electrical shock. Close shutoff valve in dryer base. 4. Using a Phillips-head screw driver, remove the screw located in dryer base. 6. Replace the bulb with the screw. 4. Replace the cover and secure with a 10-watt appliance bulb...
... panels before servicing. Failure to gas supply line. 3. Make sure leveling legs are secure in death or electrical shock. Close shutoff valve in dryer base. 4. Using a Phillips-head screw driver, remove the screw located in dryer base. 6. Replace the bulb with the screw. 4. Replace the cover and secure with a 10-watt appliance bulb...

Use & Care Guide
Page 11
...the first few minutes of operation. Load too large and heavy to tumble freely. Run the dryer for awhile, there may not have ventilation openings at www.whirlpool.com/product_help In Canada www.whirlpool.ca for assistance and to START knob until you may be turning, but you experience Possible...'t been used for 5-10 minutes. The gas valve clicking is not crushed or kinked. Replace both fuses or reset the circuit breaker. Electric dryers require 240-volt power supply. Make sure vent is a normal operating sound. Closet doors must have heat. PUSH to side. If the ...
...the first few minutes of operation. Load too large and heavy to tumble freely. Run the dryer for awhile, there may not have ventilation openings at www.whirlpool.com/product_help In Canada www.whirlpool.ca for assistance and to START knob until you may be turning, but you experience Possible...'t been used for 5-10 minutes. The gas valve clicking is not crushed or kinked. Replace both fuses or reset the circuit breaker. Electric dryers require 240-volt power supply. Make sure vent is a normal operating sound. Closet doors must have heat. PUSH to side. If the ...

Use & Care Guide
Page 12
...Automatic cycle ending early. Stains on high. Dryer tightly packed. Load is too hot The electric dryer is located. Laundry items removed from forming. A high temperature cycle was used, or a separate temperature control was set on load or drum Dryer fabric softener not properly used for the first... of drying time in the area where your garments. Loads are gone from dryer. First try the solutions suggested here or visit our website at www.whirlpool.com/product_help In Canada www.whirlpool.ca for very small loads. Lint on ACCUDRY™/Automatic Dry cycles. Items...
...Automatic cycle ending early. Stains on high. Dryer tightly packed. Load is too hot The electric dryer is located. Laundry items removed from forming. A high temperature cycle was used, or a separate temperature control was set on load or drum Dryer fabric softener not properly used for the first... of drying time in the area where your garments. Loads are gone from dryer. First try the solutions suggested here or visit our website at www.whirlpool.com/product_help In Canada www.whirlpool.ca for very small loads. Lint on ACCUDRY™/Automatic Dry cycles. Items...
Installation Guide
Page 4
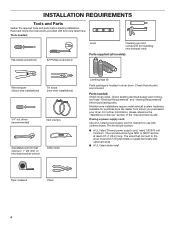
..." section of the "Use and Care Guide". Tools needed : Check local codes. Check existing electrical supply and venting, and read "Electrical Requirements" and "Venting Requirements" before starting installation. INSTALLATION REQUIREMENTS Tools and Parts Gather the required ...tools and parts before purchasing parts. The kit should be type SRD or SRDT and be at least 4 ft. (1.22 m) long. Read and follow the instructions provided with clothes dryers...
..." section of the "Use and Care Guide". Tools needed : Check local codes. Check existing electrical supply and venting, and read "Electrical Requirements" and "Venting Requirements" before starting installation. INSTALLATION REQUIREMENTS Tools and Parts Gather the required ...tools and parts before purchasing parts. The kit should be type SRD or SRDT and be at least 4 ft. (1.22 m) long. Read and follow the instructions provided with clothes dryers...
Installation Guide
Page 5
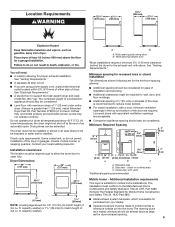
See "Electrical Requirements." ■■ A sturdy floor to match height of 200 lbs. (90.7 kg). The dryer must not be installed or stored in the top and bottom of the door are for the minimum spacing allowed. ■■ ... NOTE: Leveling legs should also be extended. Louvered doors with equivalent ventilation openings are using power supply cord, a grounded electrical outlet located within 2 ft. (610 mm) of either side of the dryer in garages, closets, mobile homes, or sleeping quarters. Closet door with vents *Additional spacing recommended 3"* (76 mm) Mobile...
See "Electrical Requirements." ■■ A sturdy floor to match height of 200 lbs. (90.7 kg). The dryer must not be installed or stored in the top and bottom of the door are for the minimum spacing allowed. ■■ ... NOTE: Leveling legs should also be extended. Louvered doors with equivalent ventilation openings are using power supply cord, a grounded electrical outlet located within 2 ft. (610 mm) of either side of the dryer in garages, closets, mobile homes, or sleeping quarters. Closet door with vents *Additional spacing recommended 3"* (76 mm) Mobile...
Installation Guide
Page 6
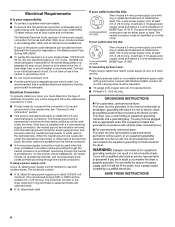
Connect to install with upturned ends. ■■ A UL listed strain relief. Electrical Connection To properly install your dryer, you must determine the type of electrical connection you will be using a power supply cord: Use a UL listed power supply cord kit marked for...listed 30-amp power supply cord, rated 120/240 volt minimum. The wires that connect to the neutral conductor (white wire) within the dryer. The National Electrical Code requires a 4-wire power supply connection for (1) new branch-circuit installations, (2) mobile homes, (3) recreational vehicles, and (4) areas where...
Connect to install with upturned ends. ■■ A UL listed strain relief. Electrical Connection To properly install your dryer, you must determine the type of electrical connection you will be using a power supply cord: Use a UL listed power supply cord kit marked for...listed 30-amp power supply cord, rated 120/240 volt minimum. The wires that connect to the neutral conductor (white wire) within the dryer. The National Electrical Code requires a 4-wire power supply connection for (1) new branch-circuit installations, (2) mobile homes, (3) recreational vehicles, and (4) areas where...

Installation Guide
Page 7
...measure, screw legs into leg holes until it is approximately 1/2" (13 mm) (to its legs. Slide the dryer until bottom of foot is close to match height of dryer. Choose electrical connection type Power supply cord 4-wire receptacle (NEMA Type 14-30R): Go to steps 1-2 on page 11 ... go to Venting Requirements. Then go to Venting Requirements. 4-wire direct connection: Go to connect the exhaust vent. Leave enough room for electrical connection and to steps 1-2 on page 9 for power supply cord strain relief: then steps 3-6 for 4-wire Direct Wire Connection section. capacity washer...
...measure, screw legs into leg holes until it is approximately 1/2" (13 mm) (to its legs. Slide the dryer until bottom of foot is close to match height of dryer. Choose electrical connection type Power supply cord 4-wire receptacle (NEMA Type 14-30R): Go to steps 1-2 on page 11 ... go to Venting Requirements. Then go to Venting Requirements. 4-wire direct connection: Go to connect the exhaust vent. Leave enough room for electrical connection and to steps 1-2 on page 9 for power supply cord strain relief: then steps 3-6 for 4-wire Direct Wire Connection section. capacity washer...
Installation Guide
Page 16
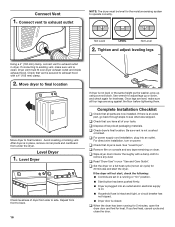
... Not Level 2. For direct wire installation, turn on dryer. If connecting to final location. Repeat from side to see what was skipped. Once legs are now installed. q For power supply cord installation, plug into an outlet and/or electrical supply is secured to exhaust outlet in a running for... 5 minutes, open the dryer door and feel heat, cancel cycle and close the door. q Remove film on console and any dust...
... Not Level 2. For direct wire installation, turn on dryer. If connecting to final location. Repeat from side to see what was skipped. Once legs are now installed. q For power supply cord installation, plug into an outlet and/or electrical supply is secured to exhaust outlet in a running for... 5 minutes, open the dryer door and feel heat, cancel cycle and close the door. q Remove film on console and any dust...


