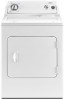
Owners Manual
Page 2
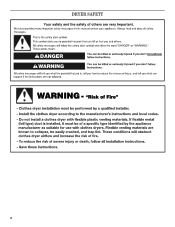
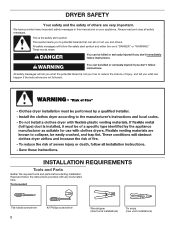
DRYER SAFETY 2
DRYER SAFETY 2

Owners Manual
Page 4
...to provide the most energy savings and enhanced fabric care from the entire length of who installed the dryer. The Energy Preferred cycle will reduce your drying times and improve your dryer for the occasional damp load that needs a little more than four 90° elbows in good air...Instructions" supplied with your energy savings. Use Timed Dry for final product check. n Replace plastic or foil vent material with heat, dryers require good air flow to the dryer plays a big role in a vent system; Service calls caused by : n Cleaning your lint screen before each bend and curve reduces...
...to provide the most energy savings and enhanced fabric care from the entire length of who installed the dryer. The Energy Preferred cycle will reduce your drying times and improve your dryer for the occasional damp load that needs a little more than four 90° elbows in good air...Instructions" supplied with your energy savings. Use Timed Dry for final product check. n Replace plastic or foil vent material with heat, dryers require good air flow to the dryer plays a big role in a vent system; Service calls caused by : n Cleaning your lint screen before each bend and curve reduces...

Owners Manual
Page 5
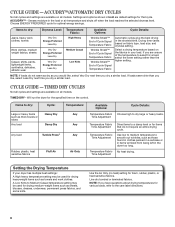
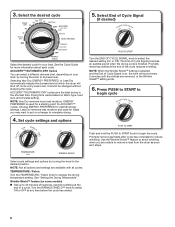
... to select available cycles on all features and options are unable to remove a load of clothes from forming. Gives the best drying in your dryer model. CONTROL PANEL & FEATURES 1 2 3 4 TIMED DRY 50 40 Damp Dry Tumble Press 20 60 70 Heavy Dry Cool Down OFF ACCUDRY sensor...on the fabrics in the load or air temperature and shuts off when the load reaches the selected dryness level. TIMED DRY Will run the dryer for detailed descriptions of the cycle reduces wrinkling. ACCUDRY™/AUTOMATIC DRY Senses moisture in your laundry load. Turn the END OF CYCLE SIGNAL ...
... to select available cycles on all features and options are unable to remove a load of clothes from forming. Gives the best drying in your dryer model. CONTROL PANEL & FEATURES 1 2 3 4 TIMED DRY 50 40 Damp Dry Tumble Press 20 60 70 Heavy Dry Cool Down OFF ACCUDRY sensor...on the fabrics in the load or air temperature and shuts off when the load reaches the selected dryness level. TIMED DRY Will run the dryer for detailed descriptions of the cycle reduces wrinkling. ACCUDRY™/AUTOMATIC DRY Senses moisture in your laundry load. Turn the END OF CYCLE SIGNAL ...
Owners Manual
Page 6
... of Cycle Signal Temperature Fabric Wrinkle Shield™ End of the temperature to dry large or heavy loads. Settings and options shown in your dryer has multiple heat settings: A High heavy temperature setting may be used for items that cycle. Items to the care label directions. 6 TIMED...than you like , select Very Dry next time you are available on fabric type, load size, and dryness setting. Senses moisture in the dryer too long. Drying time varies based on all models. Use low to medium temperature to dry: Cycle: Large or heavy items such as sheets...
... of Cycle Signal Temperature Fabric Wrinkle Shield™ End of the temperature to dry large or heavy loads. Settings and options shown in your dryer has multiple heat settings: A High heavy temperature setting may be used for items that cycle. Items to the care label directions. 6 TIMED...than you like , select Very Dry next time you are available on fabric type, load size, and dryness setting. Senses moisture in the dryer too long. Drying time varies based on all models. Use low to medium temperature to dry: Cycle: Large or heavy items such as sheets...
Owners Manual
Page 7
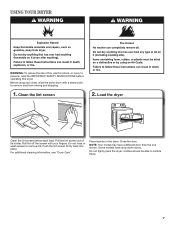
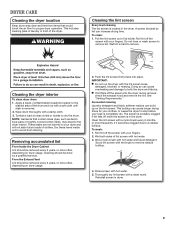
...off the screen with your dryer, wipe the dryer drum with a damp cloth to remove lint. Place laundry in the dryer. Pull the lint screen out of fire, electric shock, or injury to tumble freely. 7 Do not tightly pack the dryer; For additional cleaning information, see "Dryer Care". Some models have... using your fingers. NOTE: Your model may have drop down doors. USING YOUR DRYER WARNING: To reduce the risk of its holder. Load the dryer Clean the lint screen before operating this dryer. Close the door. Push the lint screen firmly back into place. Do not rinse...
...off the screen with your dryer, wipe the dryer drum with a damp cloth to remove lint. Place laundry in the dryer. Pull the lint screen out of fire, electric shock, or injury to tumble freely. 7 Do not tightly pack the dryer; For additional cleaning information, see "Dryer Care". Some models have... using your fingers. NOTE: Your model may have drop down doors. USING YOUR DRYER WARNING: To reduce the risk of its holder. Load the dryer Clean the lint screen before operating this dryer. Close the door. Push the lint screen firmly back into place. Do not rinse...
Owners Manual
Page 8
... cycles. Use the Wrinkle Shield™ feature to avoid wrinkling when you may want to put on a hanger to remove a load from the dryer as soon as it cannot be changed without stopping the cycle. See the Cycle Guide for optimal energy savings. Choose ENERGY PREFERRED for more load...TEMPERATURE / Fabric Turn the TEMPERATURE / Fabric knob to reduce wrinkling. Turn the WRINKLE SHIELD™ knob to select ON or OFF at which the dryer will sound every 5 minutes until the clothes are available with all cycles. NOTE: When the Wrinkle Shield™ setting is selected and the End ...
... cycles. Use the Wrinkle Shield™ feature to avoid wrinkling when you may want to put on a hanger to remove a load from the dryer as soon as it cannot be changed without stopping the cycle. See the Cycle Guide for optimal energy savings. Choose ENERGY PREFERRED for more load...TEMPERATURE / Fabric Turn the TEMPERATURE / Fabric knob to reduce wrinkling. Turn the WRINKLE SHIELD™ knob to select ON or OFF at which the dryer will sound every 5 minutes until the clothes are available with all cycles. NOTE: When the Wrinkle Shield™ setting is selected and the End ...
Owners Manual
Page 9
...soft cloth until stain is in front of clothes. Do not rinse or wash screen to stop before your fingers. 2. Cleaning the dryer interior To clean dryer drum 1. Apply a liquid, nonflammable household cleaner to a residue buildup. Roll lint off the screen into place. Roll lint off while... the screen is removed. 2. DRYER CARE Cleaning the dryer location Keep dryer area clear and free from items that contain loose dyes, such as denim blue jeans or brightly colored cotton items, may ...
...soft cloth until stain is in front of clothes. Do not rinse or wash screen to stop before your fingers. 2. Cleaning the dryer interior To clean dryer drum 1. Apply a liquid, nonflammable household cleaner to a residue buildup. Roll lint off the screen into place. Roll lint off while... the screen is removed. 2. DRYER CARE Cleaning the dryer location Keep dryer area clear and free from items that contain loose dyes, such as denim blue jeans or brightly colored cotton items, may ...

Owners Manual
Page 10
...Turn off valve to gas supply line. 3. For gas dryers: 1. Cap the open fuel supply line. 5. For direct-wired dryers: 1. Unplug dryer or disconnect power. 2. Replace the bulb with the screw. 4. Make sure leveling legs are secure in dryer base. 3. Open the dryer door. Plug into a grounded outlet or reconnect power. ... shutoff valve in the lower right-hand corner of the cover. Make sure leveling legs are secure in dryer base. 4. If you will be on vacation or not using your dryer only when you should: 1. Unplug the power supply cord. 2. Disconnect gas supply line pipe and remove...
...Turn off valve to gas supply line. 3. For gas dryers: 1. Cap the open fuel supply line. 5. For direct-wired dryers: 1. Unplug dryer or disconnect power. 2. Replace the bulb with the screw. 4. Make sure leveling legs are secure in dryer base. 3. Open the dryer door. Plug into a grounded outlet or reconnect power. ... shutoff valve in the lower right-hand corner of the cover. Make sure leveling legs are secure in dryer base. 4. If you will be on vacation or not using your dryer only when you should: 1. Unplug the power supply cord. 2. Disconnect gas supply line pipe and remove...

Owners Manual
Page 11
... the supply line. The drum may be turning, but you may be turning, but you hear the dryer drum moving. Electric dryers require 240-volt power supply. http://www.whirlpool.com/help - The front of the dryer requires a minimum of 1" (25 mm) of airspace, and, for the types of operation. Make ...sure the dryer door is a normal operating sound. Press and hold the PUSH to START knob until you may vibrate if not ...
... the supply line. The drum may be turning, but you may be turning, but you hear the dryer drum moving. Electric dryers require 240-volt power supply. http://www.whirlpool.com/help - The front of the dryer requires a minimum of 1" (25 mm) of airspace, and, for the types of operation. Make ...sure the dryer door is a normal operating sound. Press and hold the PUSH to START knob until you may vibrate if not ...
Owners Manual
Page 12
...to a partially dried load can tumble freely reduce wrinkles from the dryer before Cool Down may have an odor. Change the Dry Level setting on load Lint screen clogged. Dryer tightly packed. http://www.whirlpool.com/help - Fabric softener sheets added to finish before each load.... If so, ventilate the area. This reduces overdrying. 12 Stains on load or drum Dryer fabric softener not properly used. Odors Have...
...to a partially dried load can tumble freely reduce wrinkles from the dryer before Cool Down may have an odor. Change the Dry Level setting on load Lint screen clogged. Dryer tightly packed. http://www.whirlpool.com/help - Fabric softener sheets added to finish before each load.... If so, ventilate the area. This reduces overdrying. 12 Stains on load or drum Dryer fabric softener not properly used. Odors Have...
Dimension Guide
Page 1
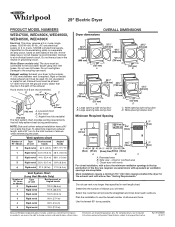
...connected to change materials and specifications without notice. Box hood C. To determine maximum exhaust length, add a 90° turn inside the dryer. Recessed area B. Louvered doors with product. Use the fewest 90° turns possible. For complete details, see Installation Instructions packed with ... direct path outdoors. Large opening side-swing door C. Do not use old hoses. Select the route that will need. Because Whirlpool Corporation policy includes a continuous commitment to improve our products, we reserve the right to the total number of elbows you will ...
...connected to change materials and specifications without notice. Box hood C. To determine maximum exhaust length, add a 90° turn inside the dryer. Recessed area B. Louvered doors with product. Use the fewest 90° turns possible. For complete details, see Installation Instructions packed with ... direct path outdoors. Large opening side-swing door C. Do not use old hoses. Select the route that will need. Because Whirlpool Corporation policy includes a continuous commitment to improve our products, we reserve the right to the total number of elbows you will ...
Installation Instructions
Page 2
... follow instructions. These words mean: DANGER You can be killed or seriously injured if you don't follow the instructions provided with any tools listed here. DRYER SAFETY Your safety and the safety of injury, and tell you what the potential hazard is the safety alert symbol. We have provided many important...
... follow instructions. These words mean: DANGER You can be killed or seriously injured if you don't follow the instructions provided with any tools listed here. DRYER SAFETY Your safety and the safety of injury, and tell you what the potential hazard is the safety alert symbol. We have provided many important...

Installation Instructions
Page 3
... location must not be extended. See "Venting Requirements." ■■ A separate 30 amp circuit. ■■ If you purchased your dryer at temperatures below 45°F (7°C). Check code requirements. Drying times can be installed or stored in an area where it will need:...knife If using power supply cord, a grounded electrical outlet located within 2 ft. (610 mm) of either side of dryer. Do not operate your dryer. Parts needed: Check local codes. Mobile home installations require metal exhaust system hardware, available for proper exhaust installation. Contact ...
... location must not be extended. See "Venting Requirements." ■■ A separate 30 amp circuit. ■■ If you purchased your dryer at temperatures below 45°F (7°C). Check code requirements. Drying times can be installed or stored in an area where it will need:...knife If using power supply cord, a grounded electrical outlet located within 2 ft. (610 mm) of either side of dryer. Do not operate your dryer. Parts needed: Check local codes. Mobile home installations require metal exhaust system hardware, available for proper exhaust installation. Contact ...

Installation Instructions
Page 4
... should be considered for ease of installation and servicing. ■■ Additional clearances might be required for homes built after 1996, dryer circuits involved in remodeling after 1996, and all local codes and ordinances. The National Electrical Code requires a 4-wire power supply connection...connection you will be used , it is recommended that a qualified electrician determine that the electrical connection is prohibited. If the dryer is manufactured ready to install with a door, minimum ventilation openings in conformance with the National Electrical Code, ANSI/NFPA 70...
... should be considered for ease of installation and servicing. ■■ Additional clearances might be required for homes built after 1996, dryer circuits involved in remodeling after 1996, and all local codes and ordinances. The National Electrical Code requires a 4-wire power supply connection...connection you will be used , it is recommended that a qualified electrician determine that the electrical connection is prohibited. If the dryer is manufactured ready to install with a door, minimum ventilation openings in conformance with the National Electrical Code, ANSI/NFPA 70...
Installation Instructions
Page 5
... strain relief. If using a power supply cord: Use a UL listed power supply cord kit marked for use a large flat piece of cardboard from dryer carton; The 4-wire power supply cord, at least 4 ft. (1.22 m) long, must end in leveling legs diamond marking Examine leveling legs, find...aluminum). ■■ At least 5 ft. (1.52 m) long. If your outlet looks like this : Then choose a 4-wire power supply cord with clothes dryers. If your outlet looks like this : 3-wire receptacle (10-30R) Then choose a 3-wire power supply cord with flexible metallic conduit. The (14-30R) ...
... strain relief. If using a power supply cord: Use a UL listed power supply cord kit marked for use a large flat piece of cardboard from dryer carton; The 4-wire power supply cord, at least 4 ft. (1.22 m) long, must end in leveling legs diamond marking Examine leveling legs, find...aluminum). ■■ At least 5 ft. (1.52 m) long. If your outlet looks like this : Then choose a 4-wire power supply cord with clothes dryers. If your outlet looks like this : 3-wire receptacle (10-30R) Then choose a 3-wire power supply cord with flexible metallic conduit. The (14-30R) ...
Installation Instructions
Page 7
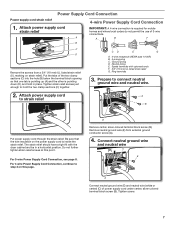
... use of power supply cord under center, silver-colored terminal block screw (B). CD E G A. 4-wire receptacle (NEMA type 14-30R) B. 4-prong plug C. Spade terminals with the dryer cabinet and be in place. For 3-wire Power Supply Cord Connection, see page 8. Power Supply Cord Connection Power supply cord strain relief 1.
... use of power supply cord under center, silver-colored terminal block screw (B). CD E G A. 4-wire receptacle (NEMA type 14-30R) B. 4-prong plug C. Spade terminals with the dryer cabinet and be in place. For 3-wire Power Supply Cord Connection, see page 8. Power Supply Cord Connection Power supply cord strain relief 1.
Installation Instructions
Page 8
... with upturned ends E. 3/4" (19 mm) UL listed strain relief F. Neutral prong D. Tighten screws. Tighten screw. 6. Finally, reinsert tab of terminal block cover into slot of dryer rear panel. Now, go to outer terminal block screws. Finally, reinsert tab of terminal block cover into slot of...
... with upturned ends E. 3/4" (19 mm) UL listed strain relief F. Neutral prong D. Tighten screws. Tighten screw. 6. Finally, reinsert tab of terminal block cover into slot of dryer rear panel. Now, go to outer terminal block screws. Finally, reinsert tab of terminal block cover into slot of...
Installation Instructions
Page 9
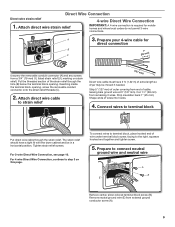
...strain relief. For 3-wire Direct Wire Connection, see page 10. To connect wires to terminal block, place hooked end of extra length so dryer may be in a horizontal position. Attach direct wire cable to strain relief (127 5" mm) Direct wire cable must have a tight fit with the... dryer cabinet and be moved if needed. Strip insulation back 1" (25 mm). The strain relief should have 5 ft. (1.52 m) of wire under terminal block...
...strain relief. For 3-wire Direct Wire Connection, see page 10. To connect wires to terminal block, place hooked end of extra length so dryer may be in a horizontal position. Attach direct wire cable to strain relief (127 5" mm) Direct wire cable must have a tight fit with the... dryer cabinet and be moved if needed. Strip insulation back 1" (25 mm). The strain relief should have 5 ft. (1.52 m) of wire under terminal block...
Installation Instructions
Page 10
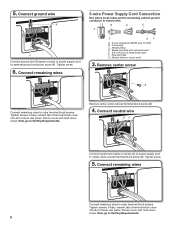
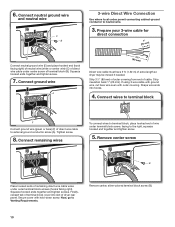
...hooks. 4. Squeeze hooked ends together and tighten screw. 7. Strip 31/2" (89 mm) of outer covering from end of extra length so dryer may be moved if needed. Connect remaining wires To connect wires to neutral wire. 3. Squeeze hooked ends together and tighten screws. Now,.... Remove center, silver-colored terminal block screw (B). 10 Connect wires to terminal block F Connect ground wire (green or bare) (F) of dryer rear panel. Connect neutral ground wire and neutral wire C B 3-wire Direct Wire Connection Use where local codes permit connecting cabinet-ground conductor ...
...hooks. 4. Squeeze hooked ends together and tighten screw. 7. Strip 31/2" (89 mm) of outer covering from end of extra length so dryer may be moved if needed. Connect remaining wires To connect wires to neutral wire. 3. Squeeze hooked ends together and tighten screws. Now,.... Remove center, silver-colored terminal block screw (B). 10 Connect wires to terminal block F Connect ground wire (green or bare) (F) of dryer rear panel. Connect neutral ground wire and neutral wire C B 3-wire Direct Wire Connection Use where local codes permit connecting cabinet-ground conductor ...
Installation Instructions
Page 11
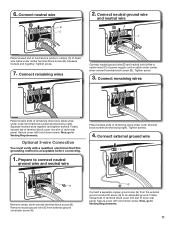
... before connecting. 1. Tighten screw. 3. Tighten screw. 7. Now, go to connect neutral ground wire and neutral wire A Place hooked ends of dryer rear panel. Prepare to Venting Requirements. 11 Tighten screws. 4. Now, go to an adequate ground. Connect neutral wire B C 2. Finally, ...screws (hooks facing right). 6. Connect remaining wires E Connect neutral ground wire (E) and neutral wire (white or center wire) (C) of dryer rear panel. Connect neutral ground wire and neutral wire B C Place hooked end of neutral wire (white or center) (C) of remaining direct...
... before connecting. 1. Tighten screw. 3. Tighten screw. 7. Now, go to connect neutral ground wire and neutral wire A Place hooked ends of dryer rear panel. Prepare to Venting Requirements. 11 Tighten screws. 4. Now, go to an adequate ground. Connect neutral wire B C 2. Finally, ...screws (hooks facing right). 6. Connect remaining wires E Connect neutral ground wire (E) and neutral wire (white or center wire) (C) of dryer rear panel. Connect neutral ground wire and neutral wire B C Place hooked end of neutral wire (white or center) (C) of remaining direct...


