
Owners Manual
Page 1
... range at www.whirlpool.com. Register your product model and serial numbers. These can be found on the label located on the upper-right corner of Contents RANGE SAFETY 2 The Anti-Tip Bracket 2 FEATURE GUIDE 4 COOKTOP USE 6 Cookware 7 Home Canning 8 OVEN USE 9 Electronic Oven Controls 9 Sabbath Mode 10 Keep Warm 10 Aluminum Foil 11 Positioning Racks and Bakeware 11 Oven Vent 11 Baking and Roasting 11 Broiling 12 Cook Time 12 RANGE CARE 13 Self-Cleaning Cycle 13 General Cleaning 14 Oven Light 15 TROUBLESHOOTING 16 ACCESSORIES 18 WARRANTY...
... range at www.whirlpool.com. Register your product model and serial numbers. These can be found on the label located on the upper-right corner of Contents RANGE SAFETY 2 The Anti-Tip Bracket 2 FEATURE GUIDE 4 COOKTOP USE 6 Cookware 7 Home Canning 8 OVEN USE 9 Electronic Oven Controls 9 Sabbath Mode 10 Keep Warm 10 Aluminum Foil 11 Positioning Racks and Bakeware 11 Oven Vent 11 Baking and Roasting 11 Broiling 12 Cook Time 12 RANGE CARE 13 Self-Cleaning Cycle 13 General Cleaning 14 Oven Light 15 TROUBLESHOOTING 16 ACCESSORIES 18 WARRANTY...
Owners Manual
Page 3
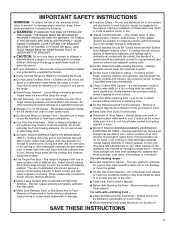
... removing or replacing food. I Use Care When Opening Door - Build-up of the range. I When flambeing foods under the hood, turn the fan on a hot cooking area, be immersed in burns from steam. Always place oven racks in desired location while oven is used in or around any part of pressure may result in water. If rack must be used to wipe spills on . I Do Not Clean Door Gasket - Heating elements may become hot enough to cover...
... removing or replacing food. I Use Care When Opening Door - Build-up of the range. I When flambeing foods under the hood, turn the fan on a hot cooking area, be immersed in burns from steam. Always place oven racks in desired location while oven is used in or around any part of pressure may result in water. If rack must be used to wipe spills on . I Do Not Clean Door Gasket - Heating elements may become hot enough to cover...
Owners Manual
Page 4
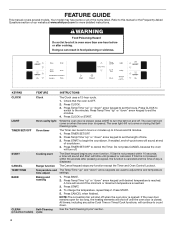
... some models) cycle See the "Self-Cleaning Cycle" section. 4 Press CLOCK or START. The oven light will not come on during the SelfCleaning cycle. TIMER SET/OFF Oven timer The Timer can result in oven more detailed instructions. Do not press CANCEL because the oven will sound at www.whirlpool.com for too long, the heating elements will come on when the oven door is displayed. KEYPAD FEATURE INSTRUCTIONS CLOCK LIGHT Clock Oven cavity light The Clock uses a 12-hour cycle. 1. Press Temp/Time...
... some models) cycle See the "Self-Cleaning Cycle" section. 4 Press CLOCK or START. The oven light will not come on during the SelfCleaning cycle. TIMER SET/OFF Oven timer The Timer can result in oven more detailed instructions. Do not press CANCEL because the oven will sound at www.whirlpool.com for too long, the heating elements will come on when the oven door is displayed. KEYPAD FEATURE INSTRUCTIONS CLOCK LIGHT Clock Oven cavity light The Clock uses a 12-hour cycle. 1. Press Temp/Time...

Owners Manual
Page 5
... temperature as recommended on at 170°F (75°C). The range will be at a time when using Frozen Bake™ Technology. 2. At the end of time, and/or shut off when the oven door is opened . Press Temp/Time "up " or "down . 1. If the oven door remains open for the Hot Surface indicator light to enter the starting time for a set at a certain time of day, cook for an oven function with a delayed start Timed cooking Oven and cooktop control lockout INSTRUCTIONS 1. If the oven door...
... temperature as recommended on at 170°F (75°C). The range will be at a time when using Frozen Bake™ Technology. 2. At the end of time, and/or shut off when the oven door is opened . Press Temp/Time "up " or "down . 1. If the oven door remains open for the Hot Surface indicator light to enter the starting time for a set at a certain time of day, cook for an oven function with a delayed start Timed cooking Oven and cooktop control lockout INSTRUCTIONS 1. If the oven door...

Owners Manual
Page 6
... could break when the lid is ON. The Cooktop Care Kit Part Number 31605 contains all soils. ■■ Avoid storing jars or cans above the cooktop. As the cooktop cools, air can be removed completely. Ceramic Glass Cooktop Cleaning (on some models) Clean the cooktop after each use the cooktop as a cutting board. ■■ Use cookware about the same size as plastic or aluminum foil, to clean and condition your ceramic glass cooktop.
... could break when the lid is ON. The Cooktop Care Kit Part Number 31605 contains all soils. ■■ Avoid storing jars or cans above the cooktop. As the cooktop cools, air can be removed completely. Ceramic Glass Cooktop Cleaning (on some models) Clean the cooktop after each use the cooktop as a cutting board. ■■ Use cookware about the same size as plastic or aluminum foil, to clean and condition your ceramic glass cooktop.

Owners Manual
Page 10
... some models) The Sabbath mode sets the oven to remain on in a Bake setting until desired temperature is closed , the oven light will not turn on or off and the heating elements will not turn off when the oven door is flashing to enter Sabbath mode; Opening the oven door or pressing the Light keypad will light up " and "down" arrow keypads are pressed. To change 25°F (14°C) each time the Temp/Time "up . 4. Press START...
... some models) The Sabbath mode sets the oven to remain on in a Bake setting until desired temperature is closed , the oven light will not turn on or off and the heating elements will not turn off when the oven door is flashing to enter Sabbath mode; Opening the oven door or pressing the Light keypad will light up " and "down" arrow keypads are pressed. To change 25°F (14°C) each time the Temp/Time "up . 4. Press START...

Owners Manual
Page 11
... active Cook Time or Timed Cook functions, will shut off for baking. Oven Vent A A. Do not set plastics, paper, or other items that no bakeware piece is in the recipe. Baking and Roasting NOTE: The convection fan will continue to "Positioning Racks and Bakeware" section. If the oven door remains open for too long, the heating elements will appear on a cookie sheet, muffin pan, or jelly roll pan; The bake and broil elements or burners cycle...
... active Cook Time or Timed Cook functions, will shut off for baking. Oven Vent A A. Do not set plastics, paper, or other items that no bakeware piece is in the recipe. Baking and Roasting NOTE: The convection fan will continue to "Positioning Racks and Bakeware" section. If the oven door remains open for too long, the heating elements will appear on a cookie sheet, muffin pan, or jelly roll pan; The bake and broil elements or burners cycle...

Owners Manual
Page 12
.... The Bake indicator light will shut off automatically. 6. To Set a Delayed Timed Cook: Before setting, make sure the clock is set cook time ends, the oven will shut off automatically. 8. See the "Clock" keypad feature in oven more precise control when cooking. On lower settings, the broil element will cycle on . If you would like to maintain the proper temperature. ■■ For best results, use a broiler pan and grid. Press COOK TIME. The display will count down . Press BAKE. 2. Press Temp/Time...
.... The Bake indicator light will shut off automatically. 6. To Set a Delayed Timed Cook: Before setting, make sure the clock is set cook time ends, the oven will shut off automatically. 8. See the "Clock" keypad feature in oven more precise control when cooking. On lower settings, the broil element will cycle on . If you would like to maintain the proper temperature. ■■ For best results, use a broiler pan and grid. Press COOK TIME. The display will count down . Press BAKE. 2. Press Temp/Time...

Owners Manual
Page 13
... these instructions can result in use , the Self-Cleaning cycle will be displayed. The door will not begin. Depending on some models) The Self-Cleaning cycle is in 30-minute increments. Before Self-Cleaning, make sure the door is in burns. Electronic Oven Control with Adjustable Clean Time (on some models, the temperature probe from oven during the Self-Cleaning cycle. Press CLEAN. 2. RANGE CARE Self-Cleaning Cycle (on some models) WARNING Burn Hazard Do not touch the oven during the Self-Cleaning...
... these instructions can result in use , the Self-Cleaning cycle will be displayed. The door will not begin. Depending on some models) The Self-Cleaning cycle is in 30-minute increments. Before Self-Cleaning, make sure the door is in burns. Electronic Oven Control with Adjustable Clean Time (on some models, the temperature probe from oven during the Self-Cleaning cycle. Press CLEAN. 2. RANGE CARE Self-Cleaning Cycle (on some models) WARNING Burn Hazard Do not touch the oven during the Self-Cleaning...

Owners Manual
Page 14
..., not directly on some models) NOTE: To avoid damage to the cooktop controls, do not remove seals under knobs. Damage may affect the finish. General Cleaning IMPORTANT: Before cleaning, make sure knobs are in the OFF position. When replacing knobs, make sure all controls are OFF and the oven and cooktop are suggested first unless otherwise noted. Always follow label instructions on some models, do not use . These...
..., not directly on some models) NOTE: To avoid damage to the cooktop controls, do not remove seals under knobs. Damage may affect the finish. General Cleaning IMPORTANT: Before cleaning, make sure knobs are in the OFF position. When replacing knobs, make sure all controls are OFF and the oven and cooktop are suggested first unless otherwise noted. Always follow label instructions on some models, do not use . These...
Owners Manual
Page 16
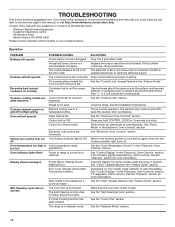
... electrical supply. See the "Start" keypad feature in the Electronic Oven Controls" section. See the "Self-Cleaning Cycle" section. See the "Cooktop Use" section. off . See "Control Display" in your model, press CANCEL to cool and try the solutions suggested here. Contact us by number.) Start needs to a temperature limiter. Replace the fuse or reset the circuit breaker. See "Control Display" in Demo mode. A Timed Cooking function has been entered. See the "Cook Time" section. Contact a E0 error code. Delay Start is set . Demo mode...
... electrical supply. See the "Start" keypad feature in the Electronic Oven Controls" section. See the "Self-Cleaning Cycle" section. See the "Cooktop Use" section. off . See "Control Display" in your model, press CANCEL to cool and try the solutions suggested here. Contact us by number.) Start needs to a temperature limiter. Replace the fuse or reset the circuit breaker. See "Control Display" in Demo mode. A Timed Cooking function has been entered. See the "Cook Time" section. Contact a E0 error code. Delay Start is set . Demo mode...

Owners Manual
Page 17
... oven door remains open for too long, the heating elements will shut off until the oven door is not level. Temperature scale was not preheated. See the Installation Instructions. making baked items too brown on bottom. Oven was changed from closing. Darker browning of food caused by dull or dark bakeware. position in pan. Level the range. The temperature set was used. Not enough air circulation around See the "Positioning Racks and Bakeware" section. Adjust cooking time. PROBLEM Oven cooking...
... oven door remains open for too long, the heating elements will shut off until the oven door is not level. Temperature scale was not preheated. See the Installation Instructions. making baked items too brown on bottom. Oven was changed from closing. Darker browning of food caused by dull or dark bakeware. position in pan. Level the range. The temperature set was used. Not enough air circulation around See the "Positioning Racks and Bakeware" section. Adjust cooking time. PROBLEM Oven cooking...
Owners Manual
Page 19
... with products not approved by our authorized Whirlpool Service Providers. Removal or reinstallation of household electrical or plumbing (e.g., house wiring, fuses, or water inlet hoses). WHIRLPOOL SHALL NOT BE LIABLE FOR INCIDENTAL OR CONSEQUENTIAL DAMAGES. Please take a few minutes to chemicals. Consumable parts (e.g., light bulbs, batteries, air or water filters, preservation solutions). Damage from natural gas or propane gas. 7. Cosmetic damage including scratches, dents, chips, and...
... with products not approved by our authorized Whirlpool Service Providers. Removal or reinstallation of household electrical or plumbing (e.g., house wiring, fuses, or water inlet hoses). WHIRLPOOL SHALL NOT BE LIABLE FOR INCIDENTAL OR CONSEQUENTIAL DAMAGES. Please take a few minutes to chemicals. Consumable parts (e.g., light bulbs, batteries, air or water filters, preservation solutions). Damage from natural gas or propane gas. 7. Cosmetic damage including scratches, dents, chips, and...
Dimension Guide
Page 1
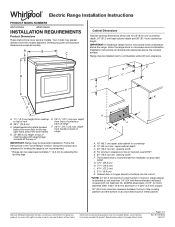
... MSG sheet steel, 0.015" (0.4 mm) stainless steel, 0.024" (0.6 mm) aluminum or 0.020" (0.5 mm) copper. 30" (76.2 cm) minimum clearance between the top of the cooking platform and the bottom of 2 Ref. Dimensions given are for installation of cooktop, see Installation Instructions packed with leveling legs screwed all models. Electric Range Installation Instructions PRODUCT MODEL NUMBERS WEC310SAG WEE510SAG INSTALLATION REQUIREMENTS Product Dimensions These instructions cover several models. Using the cooktop as a reference for leveling the range is...
... MSG sheet steel, 0.015" (0.4 mm) stainless steel, 0.024" (0.6 mm) aluminum or 0.020" (0.5 mm) copper. 30" (76.2 cm) minimum clearance between the top of the cooking platform and the bottom of 2 Ref. Dimensions given are for installation of cooktop, see Installation Instructions packed with leveling legs screwed all models. Electric Range Installation Instructions PRODUCT MODEL NUMBERS WEC310SAG WEE510SAG INSTALLATION REQUIREMENTS Product Dimensions These instructions cover several models. Using the cooktop as a reference for leveling the range is...

Installation Instructions
Page 1
U.S.A. INSTALLATION INSTRUCTIONS FRONT CONTROL ELECTRIC RANGES Table of Contents RANGE SAFETY 2 INSTALLATION REQUIREMENTS 3 Tools and Parts 3 Location Requirements 3 Electrical Requirements - Only 5 INSTALLATION INSTRUCTIONS 6 Unpack Range 6 Install Anti-Tip Bracket 6 Adjust Leveling Legs 7 Level Range 8 Electrical Connection - W11097823B U.S.A. Only 8 Verify Anti-Tip Bracket Is Installed and Engaged 14 Remove/Reinstall Toe Panel 14 Oven Door 14 Complete Installation 15 IMPORTANT: Save for local electrical inspector's use. IMPORTANT : À conserver pour ...
U.S.A. INSTALLATION INSTRUCTIONS FRONT CONTROL ELECTRIC RANGES Table of Contents RANGE SAFETY 2 INSTALLATION REQUIREMENTS 3 Tools and Parts 3 Location Requirements 3 Electrical Requirements - Only 5 INSTALLATION INSTRUCTIONS 6 Unpack Range 6 Install Anti-Tip Bracket 6 Adjust Leveling Legs 7 Level Range 8 Electrical Connection - W11097823B U.S.A. Only 8 Verify Anti-Tip Bracket Is Installed and Engaged 14 Remove/Reinstall Toe Panel 14 Oven Door 14 Complete Installation 15 IMPORTANT: Save for local electrical inspector's use. IMPORTANT : À conserver pour ...

Installation Instructions
Page 3
... kitchen. ■■ Recessed installations must end in accordance with the requirements of 194°F (90°C). 3 Longer screws are shown must be used will not discolor, delaminate, or sustain other damage. See the appropriate "Electrical Requirements" section. To install the anti-tip bracket shipped with any tools listed here. Parts Needed If using a power supply cord kit: ■■ A UL Listed power supply cord kit marked for mounting anti-tip bracket) (2) ■■ Anti-tip bracket (inside oven...
... kitchen. ■■ Recessed installations must end in accordance with the requirements of 194°F (90°C). 3 Longer screws are shown must be used will not discolor, delaminate, or sustain other damage. See the appropriate "Electrical Requirements" section. To install the anti-tip bracket shipped with any tools listed here. Parts Needed If using a power supply cord kit: ■■ A UL Listed power supply cord kit marked for mounting anti-tip bracket) (2) ■■ Anti-tip bracket (inside oven...

Installation Instructions
Page 4
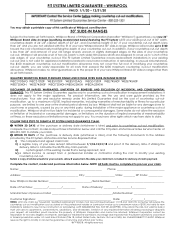
... local codes. Using the cooktop as it must conform to back of this range must be installed next to combustible walls with local codes. Mobile Home - Additional Installation Requirements The installation of range F. 291/64" (73.7 cm) max. When such standard is shielded by adjusting the leveling legs. See "Electrical Connection - U.S.A. A B C D Cabinet Dimensions Cabinet opening dimensions shown are maximum dimensions across all the way in the "Level Range" section. Model/serial/rating plate (located...
... local codes. Using the cooktop as it must conform to back of this range must be installed next to combustible walls with local codes. Mobile Home - Additional Installation Requirements The installation of range F. 291/64" (73.7 cm) max. When such standard is shielded by adjusting the leveling legs. See "Electrical Connection - U.S.A. A B C D Cabinet Dimensions Cabinet opening dimensions shown are maximum dimensions across all the way in the "Level Range" section. Model/serial/rating plate (located...
Installation Instructions
Page 5
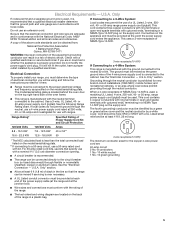
... the ground connected to the cabinet. Electrical Requirements - Use a 3-wire, UL Listed, 40- or 50-amp power supply cord (pigtail). Range Rating* Specified Rating of the oven frame. ■■ This range is located behind the oven door on the appliance end must be moved if servicing is recommended. 4-wire receptacle (14-50R) The minimum conductor sized for it will be using and follow the instructions provided for the copper 4-wire power cord are: 40...
... the ground connected to the cabinet. Electrical Requirements - Use a 3-wire, UL Listed, 40- or 50-amp power supply cord (pigtail). Range Rating* Specified Rating of the oven frame. ■■ This range is located behind the oven door on the appliance end must be moved if servicing is recommended. 4-wire receptacle (14-50R) The minimum conductor sized for it will be using and follow the instructions provided for the copper 4-wire power cord are: 40...

Installation Instructions
Page 15
... was skipped. 2. Turn on for 5 minutes, check for specific instructions on . 9. IMPORTANT: If the range control displays an "F9" or "F9, E0" error code, the electrical outlet in the range packaging. 4. Complete Installation 1. Check that the range is intact and tight; If Range Does Not Operate, Check the Following: ■■ Household fuse is level. When the range has been on surface elements and oven. See the "Level Range" section. 6. Plug power cord into a grounded...
... was skipped. 2. Turn on for 5 minutes, check for specific instructions on . 9. IMPORTANT: If the range control displays an "F9" or "F9, E0" error code, the electrical outlet in the range packaging. 4. Complete Installation 1. Check that the range is intact and tight; If Range Does Not Operate, Check the Following: ■■ Household fuse is level. When the range has been on surface elements and oven. See the "Level Range" section. 6. Plug power cord into a grounded...
Whirlpool FIT System Guarantee 2020
Page 1
... your countertop cut -out of 30" width, countertop depth of 24"-25",cabinet depth of 23"-24", and countertop height of $100. Complete the contact, model and purchase information below ) featuring the FIT System will delay processing or disqualify your new Whirlpool Brand 30" slide-in replacement installations; Name Phone Address City State: _________ ZIP Code New Whirlpool Model Number Serial Number Date of...
... your countertop cut -out of 30" width, countertop depth of 24"-25",cabinet depth of 23"-24", and countertop height of $100. Complete the contact, model and purchase information below ) featuring the FIT System will delay processing or disqualify your new Whirlpool Brand 30" slide-in replacement installations; Name Phone Address City State: _________ ZIP Code New Whirlpool Model Number Serial Number Date of...


