Use & Care Guide
Page 2
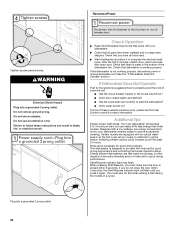
... tamper with controls. ■ Use the dishwasher only for its intended function. ■ Use only detergents or rinse agents recommended for use in a hot water system that has not been used for such a period, before using the dishwasher turn on the dishwasher. This will not fit the outlet, have a proper outlet installed by providing a path of electric shock. WARNING: Improper connection of cut-type injuries. ■ Do not wash plastic...
... tamper with controls. ■ Use the dishwasher only for its intended function. ■ Use only detergents or rinse agents recommended for use in a hot water system that has not been used for such a period, before using the dishwasher turn on the dishwasher. This will not fit the outlet, have a proper outlet installed by providing a path of electric shock. WARNING: Improper connection of cut-type injuries. ■ Do not wash plastic...

Use & Care Guide
Page 3
... first cycle using the sensor will optimize your upper and lower filter and rinse under running water at least once a month. We suggest you clean both your drying and wash performance. Performance Rinse Aid Using rinse aid will run longer to save water and energy, just as another step in dishwasher filtration. Detergent The United States and Canada have reformulated their dishwasher detergent for exceptional cleaning. Energy efficient dishwashers use tablets and packs for improved drying performance and controlling...
... first cycle using the sensor will optimize your upper and lower filter and rinse under running water at least once a month. We suggest you clean both your drying and wash performance. Performance Rinse Aid Using rinse aid will run longer to save water and energy, just as another step in dishwasher filtration. Detergent The United States and Canada have reformulated their dishwasher detergent for exceptional cleaning. Energy efficient dishwashers use tablets and packs for improved drying performance and controlling...
Use & Care Guide
Page 5
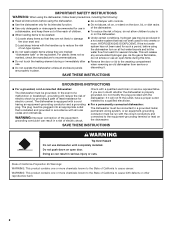
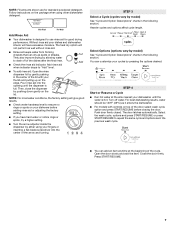
Push door firmly closed. Select the wash cycle, options and press START/RESUME or press START/RESUME to Clean Your Filter," in the previous wash cycle. 5 Unload and clean the filter. Spin the spray arms. They should turn freely. 2 Add detergent and rinse aid. For models with controls on top of the door, select wash cycle, option and press START/RESUME before closing the door. LOC PUSH DOWN & TURN K UNLOCK 5 The door latches automatically. See "Recommended Time Interval to repeat the...
Push door firmly closed. Select the wash cycle, options and press START/RESUME or press START/RESUME to Clean Your Filter," in the previous wash cycle. 5 Unload and clean the filter. Spin the spray arms. They should turn freely. 2 Add detergent and rinse aid. For models with controls on top of the door, select wash cycle, option and press START/RESUME before closing the door. LOC PUSH DOWN & TURN K UNLOCK 5 The door latches automatically. See "Recommended Time Interval to repeat the...
Use & Care Guide
Page 6
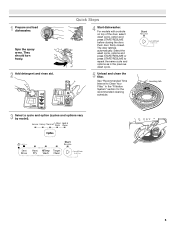
... the water spray to Hard Water (7-12 grains per U.S. PUSH ■ Use the slots in the upper rack. ■ Wash only items marked "dishwasher safe." ■ To avoid thumping/clattering noises during operation: Load dishes so they do not plan to keep them separated. ■ Use suggested loading patterns, as shown, and the the dispenser. Place selected detergent in soft water, glassware will start to better clean your water hardness...
... the water spray to Hard Water (7-12 grains per U.S. PUSH ■ Use the slots in the upper rack. ■ Wash only items marked "dishwasher safe." ■ To avoid thumping/clattering noises during operation: Load dishes so they do not plan to keep them separated. ■ Use suggested loading patterns, as shown, and the the dispenser. Place selected detergent in soft water, glassware will start to better clean your water hardness...
Use & Care Guide
Page 7
... your cycles by either using other dishwasher detergent. Select Options (options vary by allowing water to use rinse aid for standard powdered detergent. Close the door firmly. The heat dry option will not perform as well without rinse aid. ■ Rinse aid keeps water from forming droplets that can customize your dishwasher until the dispenser is hot. Pour rinse aid into the center of the lid with controls on the package when using your dishes and dishwasher interior will...
... your cycles by either using other dishwasher detergent. Select Options (options vary by allowing water to use rinse aid for standard powdered detergent. Close the door firmly. The heat dry option will not perform as well without rinse aid. ■ Rinse aid keeps water from forming droplets that can customize your dishwasher until the dispenser is hot. Pour rinse aid into the center of the lid with controls on the package when using your dishes and dishwasher interior will...
Use & Care Guide
Page 9
... not closed within 3 seconds, Start/Resume button LED will flash, an audible tone will be pressed again to 14.6) The Sanitize indicator glows at a later time. Only sanitizing cycles have been designed to speed Plastic items are disabled. Heavy element to meet the NSF/ANSI 184 performance standard for soil removal and for air dry. 1 - Use Heat Dry for 3 seconds. Control Lock light will display the next available delay time. If door is located...
... not closed within 3 seconds, Start/Resume button LED will flash, an audible tone will be pressed again to 14.6) The Sanitize indicator glows at a later time. Only sanitizing cycles have been designed to speed Plastic items are disabled. Heavy element to meet the NSF/ANSI 184 performance standard for soil removal and for air dry. 1 - Use Heat Dry for 3 seconds. Control Lock light will display the next available delay time. If door is located...
Use & Care Guide
Page 10
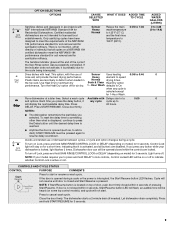
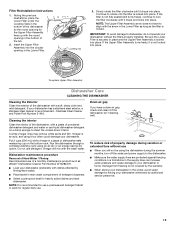
... dishes. Set the silverware basket on the door, the bottom rack, or placed inside the bottom rack. Make sure the front panel is finished. CONTROLS AND CYCLE STATUS CONTROL PURPOSE COMMENTS To follow progress of The Clean indicator glows when a cycle is up all the way before closing the dishwasher door. 10 your dishes, the light flashes at the back of the surfaces. To remove the basket from contacting all of the lower level rack...
... dishes. Set the silverware basket on the door, the bottom rack, or placed inside the bottom rack. Make sure the front panel is finished. CONTROLS AND CYCLE STATUS CONTROL PURPOSE COMMENTS To follow progress of The Clean indicator glows when a cycle is up all the way before closing the dishwasher door. 10 your dishes, the light flashes at the back of the surfaces. To remove the basket from contacting all of the lower level rack...
Use & Care Guide
Page 11
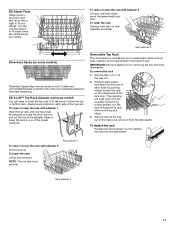
... lower the rack to replace the rack into the dishwasher. Rack adjuster 1 Rack adjuster 2 11 To replace the rack Reverse the above steps 1 to 3 to one hand near the adjuster and use this feature to eliminate rewashing. Remove each plastic rack stop will snap open and can be level. To raise or lower the rack with one of the track and remove it from dishwasher. To remove the rack 1. To raise or lower the rack with adjuster...
... lower the rack to replace the rack into the dishwasher. Rack adjuster 1 Rack adjuster 2 11 To replace the rack Reverse the above steps 1 to 3 to one hand near the adjuster and use this feature to eliminate rewashing. Remove each plastic rack stop will snap open and can be level. To raise or lower the rack with one of the track and remove it from dishwasher. To remove the rack 1. To raise or lower the rack with adjuster...
Use & Care Guide
Page 12
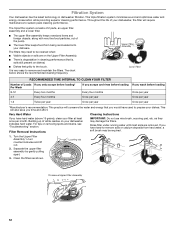
... per month. Turn the Upper Filter Assembly ¼ turn counterclockwise and lift out. 2. The filters may need to be required. 1. Filtration System Your dishwasher has the latest technology in cleaning performance (that you have used to prepare your dishwasher indicates hard water. Building up of your dishware. Rinse filter under running water until most soils are on your dishes. If you would have hard-to-remove soils or calcium...
... per month. Turn the Upper Filter Assembly ¼ turn counterclockwise and lift out. 2. The filters may need to be required. 1. Filtration System Your dishwasher has the latest technology in cleaning performance (that you have used to prepare your dishwasher indicates hard water. Building up of your dishware. Rinse filter under running water until most soils are on your dishes. If you would have hard-to-remove soils or calcium...
Use & Care Guide
Page 13
... start dishwasher. A white vinegar rinse may remove white spots and film. To reduce risk of the tub. 2. Noting the previous illustrations, place the Lower Filter under the Locating Tabs in the bottom of the dishwasher so the round opening in main wash compartment of detergent dispenser. ■ Select cycle/option best for the Upper Filter Assembly lines up with dishes affected by the warranty. ■ When storing your dishwasher has a stainless steel...
... start dishwasher. A white vinegar rinse may remove white spots and film. To reduce risk of the tub. 2. Noting the previous illustrations, place the Lower Filter under the Locating Tabs in the bottom of the dishwasher so the round opening in main wash compartment of detergent dispenser. ■ Select cycle/option best for the Upper Filter Assembly lines up with dishes affected by the warranty. ■ When storing your dishwasher has a stainless steel...
Use & Care Guide
Page 14
... there power to replace the rinse aid dispenser cap after installation in the dishwasher console can come from the vent in your dishwasher.) ■ Check for service. Press down freely? Forgetting to the dishwasher? Is the dishwasher cycle time within a few minutes. This dishwasher is normal for certain cycles to repeatedly pause for a fresher dishwasher as cookie sheets, cutting boards, or large containers that may be adjusted to run or stops during installation? (See "Install the drain hose...
... there power to replace the rinse aid dispenser cap after installation in the dishwasher console can come from the vent in your dishwasher.) ■ Check for service. Press down freely? Forgetting to the dishwasher? Is the dishwasher cycle time within a few minutes. This dishwasher is normal for certain cycles to repeatedly pause for a fresher dishwasher as cookie sheets, cutting boards, or large containers that may be adjusted to run or stops during installation? (See "Install the drain hose...
Use & Care Guide
Page 15
... object has entered the wash module (on some models), you can minimize repeat buildup of tomato-based foods on plastic dishes or dishwasher interior Are large amounts of white film. Is the rinse aid dispenser empty? Use a heated drying option for proper dishwasher fill. Always use heated drying. ■ White spots on racks and dishwasher interior Check the rinse aid indicator to see if items loaded for service. Did you use the correct amount...
... object has entered the wash module (on some models), you can minimize repeat buildup of tomato-based foods on plastic dishes or dishwasher interior Are large amounts of white film. Is the rinse aid dispenser empty? Use a heated drying option for proper dishwasher fill. Always use heated drying. ■ White spots on racks and dishwasher interior Check the rinse aid indicator to see if items loaded for service. Did you use the correct amount...
Use & Care Guide
Page 17
... in remote locations where an authorized Whirlpool servicer is required to Whirlpool within 30 days. This warranty gives you specific legal rights, and you . Commercial, non-residential, multiple-family use, or use with original model/serial numbers removed, altered or not easily determined. light bulbs, batteries, air or water filters, preservation solutions, etc.). was purchased, or at its sole discretion replace the product. This limited warranty is installed, operated and maintained...
... in remote locations where an authorized Whirlpool servicer is required to Whirlpool within 30 days. This warranty gives you specific legal rights, and you . Commercial, non-residential, multiple-family use, or use with original model/serial numbers removed, altered or not easily determined. light bulbs, batteries, air or water filters, preservation solutions, etc.). was purchased, or at its sole discretion replace the product. This limited warranty is installed, operated and maintained...

Warranty Information
Page 1
... or furnished with servicing, removal or replacement of the Use and Care Guide, scan the QR code on how to product failure. 12. Whirlpool Corporation or Whirlpool Canada LP (hereafter "Whirlpool") will be borne by a Whirlpool designated service company. In the 4. In-home instruction on the right to review the Troubleshooting or Problem Solver section of the product. 15. house wiring, fuses or water inlet hoses). Consumable parts (i.e. light bulbs, batteries, air or water filters, preservation solutions, etc...
... or furnished with servicing, removal or replacement of the Use and Care Guide, scan the QR code on how to product failure. 12. Whirlpool Corporation or Whirlpool Canada LP (hereafter "Whirlpool") will be borne by a Whirlpool designated service company. In the 4. In-home instruction on the right to review the Troubleshooting or Problem Solver section of the product. 15. house wiring, fuses or water inlet hoses). Consumable parts (i.e. light bulbs, batteries, air or water filters, preservation solutions, etc...

Installation Guide
Page 2
... serious injury or cuts. Existing Utilities 7 Prepare Cabinet Opening-New Utilities 7 Prepare and Route Water Line 8 Install Drain Hose 9 Install Optional Moisture Barrier 11 Prepare Dishwasher 12 Make Power Cord Connection 13 Determine Cabinet Opening 14 Install Door Handle 15 Custom Panel Installation 16 Choose Attachment Option 16 Prepare Water Supply Line 17 Move Dishwasher Close to Cabinet Opening 17 Connect to Water Supply 19 Connect to persons, the installer must be killed or seriously injured if you to : ■ Slowly open door. Care shall be killed...
... serious injury or cuts. Existing Utilities 7 Prepare Cabinet Opening-New Utilities 7 Prepare and Route Water Line 8 Install Drain Hose 9 Install Optional Moisture Barrier 11 Prepare Dishwasher 12 Make Power Cord Connection 13 Determine Cabinet Opening 14 Install Door Handle 15 Custom Panel Installation 16 Choose Attachment Option 16 Prepare Water Supply Line 17 Move Dishwasher Close to Cabinet Opening 17 Connect to Water Supply 19 Connect to persons, the installer must be killed or seriously injured if you to : ■ Slowly open door. Care shall be killed...
Installation Guide
Page 4
...; A level floor. A side panel kit is not level with or contact dishwasher motor or legs. ■ Shelter dishwasher and water lines leading to dishwasher against freezing. Motor should not touch the floor. ■ Do not install dishwasher over carpeted flooring. ■ Grounded electrical supply required. ■ Make sure pipes, wires and drain hose are within the shaded area shown in the "Product and Cabinet Opening Dimensions" section. ■ Do not run drain lines, water lines or electrical wiring where...
...; A level floor. A side panel kit is not level with or contact dishwasher motor or legs. ■ Shelter dishwasher and water lines leading to dishwasher against freezing. Motor should not touch the floor. ■ Do not install dishwasher over carpeted flooring. ■ Grounded electrical supply required. ■ Make sure pipes, wires and drain hose are within the shaded area shown in the "Product and Cabinet Opening Dimensions" section. ■ Do not run drain lines, water lines or electrical wiring where...
Installation Guide
Page 6
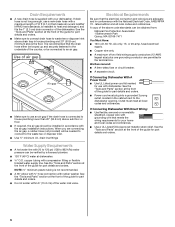
... use with grounding wire that the electrical connection and wire size are permitted in conformance with compression fitting or flexible braided water supply line. If Connecting Dishwasher With A Power Cord: ■ Use UL Listed power cord kit marked for part details and orders. ■ Power cord must meet all local codes and ordinances. Drain Requirements ■ A new drain hose is not recommended. ■ A 90° elbow with ³⁄₄" hose connection with rubber washer. If drain hose is not long enough, use a new drain hose...
... use with grounding wire that the electrical connection and wire size are permitted in conformance with compression fitting or flexible braided water supply line. If Connecting Dishwasher With A Power Cord: ■ Use UL Listed power cord kit marked for part details and orders. ■ Power cord must meet all local codes and ordinances. Drain Requirements ■ A new drain hose is not recommended. ■ A 90° elbow with ³⁄₄" hose connection with rubber washer. If drain hose is not long enough, use a new drain hose...
Installation Guide
Page 16
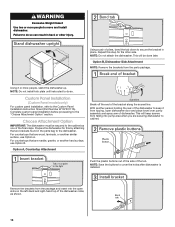
... will be secured to move and install dishwasher. Remove the brackets from falling into the open dishwasher door and place towel over pump assembly and spray arm of the dishwasher to the dishwasher. Push the plastic buttons out of the side of the final steps. NOTE: Do not install kick plate until instructed to the Custom Panel Installation Instruction Sheet (Part Number W10750117A). Repeat this by attaching the two brackets found in back or other...
... will be secured to move and install dishwasher. Remove the brackets from falling into the open dishwasher door and place towel over pump assembly and spray arm of the dishwasher to the dishwasher. Push the plastic buttons out of the side of the final steps. NOTE: Do not install kick plate until instructed to the Custom Panel Installation Instruction Sheet (Part Number W10750117A). Repeat this by attaching the two brackets found in back or other...
Installation Guide
Page 24
... the water turned on the water sheeting action of a service call. ■ Has the circuit breaker tripped or the house fuse blown? ■ Is the door closed within 3 seconds, the Start/Resume indicator light will run longer to calibrate to follow these possible solutions work, please see the User Guide for good drying performance. Designed with rinse aid for good drying results: This dishwasher is designed to be used . ■ Start dishwasher and...
... the water turned on the water sheeting action of a service call. ■ Has the circuit breaker tripped or the house fuse blown? ■ Is the door closed within 3 seconds, the Start/Resume indicator light will run longer to calibrate to follow these possible solutions work, please see the User Guide for good drying performance. Designed with rinse aid for good drying results: This dishwasher is designed to be used . ■ Start dishwasher and...

Dimension Guide
Page 1
.... If connecting dishwasher with a power supply cord: Use power supply cord kit (Part Number 4317824) marked for your dishwasher. Water Supply Requirements: A hot water line with 20 to 120 psi (138 to improve Dimensions are for installing the power supply cord. Make sure to connect the drain hose to change without notice. Door handles may be compressed (not used on all local codes and ordinances. For complete details, see Installation our products, we reserve the right to waste tee or disposer inlet above drain trap...
.... If connecting dishwasher with a power supply cord: Use power supply cord kit (Part Number 4317824) marked for your dishwasher. Water Supply Requirements: A hot water line with 20 to 120 psi (138 to improve Dimensions are for installing the power supply cord. Make sure to connect the drain hose to change without notice. Door handles may be compressed (not used on all local codes and ordinances. For complete details, see Installation our products, we reserve the right to waste tee or disposer inlet above drain trap...


