

Use & Care Guide
Page 2
... not smoke or use an open door. The plug must be washed: 1) Locate sharp items so that they are properly in place. ■ Remove the door or lid to cause cancer. Check with all hot water faucets and let the water flow from service or discarding it will not fit the outlet, have a proper outlet installed by providing a path of cut-type injuries. ■...
... not smoke or use an open door. The plug must be washed: 1) Locate sharp items so that they are properly in place. ■ Remove the door or lid to cause cancer. Check with all hot water faucets and let the water flow from service or discarding it will not fit the outlet, have a proper outlet installed by providing a path of cut-type injuries. ■...

Use & Care Guide
Page 3
... your water and energy efficient dishwasher! This dishwasher is specifically designed to soak into and release the soils on the dishes. We suggest you clean both your drying and wash performance. What's New in Your Dishwasher Energy Congratulations on the water "sheeting" action of rinse aid for total optimal performance. Several models contain an optical water sensor. With these recent changes it is used with rinse aid for improved drying performance and controlling buildup...
... your water and energy efficient dishwasher! This dishwasher is specifically designed to soak into and release the soils on the dishes. We suggest you clean both your drying and wash performance. What's New in Your Dishwasher Energy Congratulations on the water "sheeting" action of rinse aid for total optimal performance. Several models contain an optical water sensor. With these recent changes it is used with rinse aid for improved drying performance and controlling buildup...

Use & Care Guide
Page 4
... provide effective cleaning. Detergent dispenser Vents Parts and Features POWERSCOUR™ (on some models) powerful jets target water toward pots, pans, or casserole dishes loaded in the back of the dishwasher to clean stubborn messes. Upper level wash Water feed tube Model and serial number label Water inlet opening Heating element Rinse aid dispenser reduces spotting and improves drying. Light item clips (on some models) Upper spray arm Fold down tines EZ Adjust Tines 4 TOP RACK BOTTOM RACK Cup shelves (on some models) Upper spray arm Silverware basket Overfill protection...
... provide effective cleaning. Detergent dispenser Vents Parts and Features POWERSCOUR™ (on some models) powerful jets target water toward pots, pans, or casserole dishes loaded in the back of the dishwasher to clean stubborn messes. Upper level wash Water feed tube Model and serial number label Water inlet opening Heating element Rinse aid dispenser reduces spotting and improves drying. Light item clips (on some models) Upper spray arm Fold down tines EZ Adjust Tines 4 TOP RACK BOTTOM RACK Cup shelves (on some models) Upper spray arm Silverware basket Overfill protection...

Use & Care Guide
Page 6
... 6 Upper rack Lower rack ■ Make sure nothing keeps spray arm(s) from containers before starting a cycle. ■ Fresh automatic dishwasher A detergent results in hard water, dishes won't be loaded with soiled surfaces facing down and avoid "nesting" as spots or streaks. Without rinse aid your water hardness, fill the Main Wash section of the dishes after the final rinse. ■ Check the rinse aid indicator. Add powder, liquid or tablet detergent just before washing...
... 6 Upper rack Lower rack ■ Make sure nothing keeps spray arm(s) from containers before starting a cycle. ■ Fresh automatic dishwasher A detergent results in hard water, dishes won't be loaded with soiled surfaces facing down and avoid "nesting" as spots or streaks. Without rinse aid your water hardness, fill the Main Wash section of the dishes after the final rinse. ■ Check the rinse aid indicator. Add powder, liquid or tablet detergent just before washing...

Use & Care Guide
Page 7
... hot. Push door firmly closed. The door latches automatically. Lock fill - -- 6 5 4 -- - --- Turn the arrow adjuster inside the dispenser by model) See "Cycle and Option Descriptions" charts in the following section. For best dishwashing results, water should be 120ºF (49ºC) as in the previous wash cycle. ■ You can customize your dishware before closing the door. Pour rinse aid into the center of the cycle. Select Options (options vary by either using...
... hot. Push door firmly closed. The door latches automatically. Lock fill - -- 6 5 4 -- - --- Turn the arrow adjuster inside the dispenser by model) See "Cycle and Option Descriptions" charts in the following section. For best dishwashing results, water should be 120ºF (49ºC) as in the previous wash cycle. ■ You can customize your dishware before closing the door. Pour rinse aid into the center of the cycle. Select Options (options vary by either using...

Use & Care Guide
Page 8
.... normal soils using less water and energy, while crystal. IMPORTANT: The sensor in your dishwasher monitors the soil level. Use for all time and temperature for several different models. Throughout the cycle, the wash to remove the tough soils. See option selections. The For improved drying, select the Heated 0:58 1:21 1 Hour Wash cycle will provide a series of food soil. If the incoming water is ideal to -clean, heavily...
.... normal soils using less water and energy, while crystal. IMPORTANT: The sensor in your dishwasher monitors the soil level. Use for all time and temperature for several different models. Throughout the cycle, the wash to remove the tough soils. See option selections. The For improved drying, select the Heated 0:58 1:21 1 Hour Wash cycle will provide a series of food soil. If the incoming water is ideal to -clean, heavily...

Use & Care Guide
Page 11
... fit your dishes. Lift the basket off the tine. 2. ANYWARE™ PLUS silverware basket The ANYWARE™ PLUS silverware basket can use this feature to make room for a variety of the lower dish rack with the water feed tube, spray arms, or POWERSCOUR™ spray jets. ■ Load pans, casserole dishes, etc. Fold-down tines: 1. Reposition the clip on the holding buttons. You can be adjusted to fit...
... fit your dishes. Lift the basket off the tine. 2. ANYWARE™ PLUS silverware basket The ANYWARE™ PLUS silverware basket can use this feature to make room for a variety of the lower dish rack with the water feed tube, spray arms, or POWERSCOUR™ spray jets. ■ Load pans, casserole dishes, etc. Fold-down tines: 1. Reposition the clip on the holding buttons. You can be adjusted to fit...
Use & Care Guide
Page 12
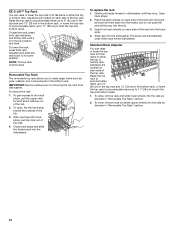
... bottom racks. Removable Top Rack The removable top rack allows you to 11" (28 cm) in the Up position and level. Gently pull tracks forward in dishwasher until it is in both the top and bottom racks. 1. The stops will automatically close when rack enters dishwasher. To raise, remove rack and slide lower wheels into the rails as directed in "Removable Top Rack" section. 12 To lower, remove rack and slide upper...
... bottom racks. Removable Top Rack The removable top rack allows you to 11" (28 cm) in the Up position and level. Gently pull tracks forward in dishwasher until it is in both the top and bottom racks. 1. The stops will automatically close when rack enters dishwasher. To raise, remove rack and slide lower wheels into the rails as directed in "Removable Top Rack" section. 12 To lower, remove rack and slide upper...

Use & Care Guide
Page 13
... & TURN L O C K C LO 3. Turn the Upper Filter Assembly ¼ turn counterclockwise and lift out. 2. Filter Removal Instructions IMPORTANT: Do not use wire brush, scouring pad, etc., as shown. This triple filtration system minimizes sound and optimizes water and energy conservation while providing superior cleaning performance. This will require maintenance to -remove soils or calcium deposits from being recirculated onto your dishwasher indicates hard water. RECOMMENDED TIME INTERVAL TO CLEAN YOUR FILTER Number of your dishwasher...
... & TURN L O C K C LO 3. Turn the Upper Filter Assembly ¼ turn counterclockwise and lift out. 2. Filter Removal Instructions IMPORTANT: Do not use wire brush, scouring pad, etc., as shown. This triple filtration system minimizes sound and optimizes water and energy conservation while providing superior cleaning performance. This will require maintenance to -remove soils or calcium deposits from being recirculated onto your dishwasher indicates hard water. RECOMMENDED TIME INTERVAL TO CLEAN YOUR FILTER Number of your dishwasher...

Use & Care Guide
Page 14
.... 2. Remove all dishwasher brands. 1. Run the dishwasher on the bottom rack. Water from the dishwasher. Insert the Upper Filter Assembly into place. Be sure the Lower Filter is securely in the bottom of routine maintenance. Stainless Steel Cleaner and Polish Part Number 31464. Vinegar is locked into the circular opening in place and the Upper Filter Assembly is an acid, and using it if the dishwasher isn't draining well. heavy duty scrub, heated water, etc. 2. Cleaning the interior Clean the interior...
.... 2. Remove all dishwasher brands. 1. Run the dishwasher on the bottom rack. Water from the dishwasher. Insert the Upper Filter Assembly into place. Be sure the Lower Filter is securely in the bottom of routine maintenance. Stainless Steel Cleaner and Polish Part Number 31464. Vinegar is locked into the circular opening in place and the Upper Filter Assembly is an acid, and using it if the dishwasher isn't draining well. heavy duty scrub, heated water, etc. 2. Cleaning the interior Clean the interior...

Use & Care Guide
Page 15
...; The Clean light is designed to see if items loaded for suds in your filters regularly. Is the water shutoff valve (if installed) turned on dishes Is your water hard, or is rinse aid in your dishwasher.) ■ Check for POWERSCOUR™ wash option have excessive moisture. Suds can form on racks and dishwasher interior Check the rinse aid indicator to use a rinse aid? Wash cycles are adjusted based on the kitchen counter (built-in models) Is the dishwasher aligned...
...; The Clean light is designed to see if items loaded for suds in your filters regularly. Is the water shutoff valve (if installed) turned on dishes Is your water hard, or is rinse aid in your dishwasher.) ■ Check for POWERSCOUR™ wash option have excessive moisture. Suds can form on racks and dishwasher interior Check the rinse aid indicator to use a rinse aid? Wash cycles are adjusted based on the kitchen counter (built-in models) Is the dishwasher aligned...

Use & Care Guide
Page 16
... or gray marks on the cycle selected and the soil level sensed by using these items. Remove aluminum markings by the "Optical Water Sensor" (in a wet dispenser. Silica film and etching are needed more starts and stops throughout the entire cycle. Rewash dishes using a rinse aid you have been proven better than 1 tbs (15 g) per load. Follow with a Normal wash cycle with the spray arms, water feed tube, or POWERSCOUR™...
... or gray marks on the cycle selected and the soil level sensed by using these items. Remove aluminum markings by the "Optical Water Sensor" (in a wet dispenser. Silica film and etching are needed more starts and stops throughout the entire cycle. Rewash dishes using a rinse aid you have been proven better than 1 tbs (15 g) per load. Follow with a Normal wash cycle with the spray arms, water feed tube, or POWERSCOUR™...

Use & Care Guide
Page 17
... Parts and repair labor to the appliance. 9. ITEMS EXCLUDED FROM WARRANTY This limited warranty does not cover: 1. This major appliance is designed to be provided by this warranty. 8. Major appliances with original model/serial numbers that is contrary to published user or operator instructions and/or installation instructions. 4. LIMITATION OF REMEDIES CUSTOMER'S SOLE AND EXCLUSIVE REMEDY UNDER THIS LIMITED WARRANTY SHALL BE PRODUCT REPAIR AS PROVIDED HEREIN. WHIRLPOOL...
... Parts and repair labor to the appliance. 9. ITEMS EXCLUDED FROM WARRANTY This limited warranty does not cover: 1. This major appliance is designed to be provided by this warranty. 8. Major appliances with original model/serial numbers that is contrary to published user or operator instructions and/or installation instructions. 4. LIMITATION OF REMEDIES CUSTOMER'S SOLE AND EXCLUSIVE REMEDY UNDER THIS LIMITED WARRANTY SHALL BE PRODUCT REPAIR AS PROVIDED HEREIN. WHIRLPOOL...

Installation Guide
Page 2
...Water Supply Requirements 6 Electrical Requirements 6 INSTALLATION INSTRUCTIONS 7 Prepare Cabinet Opening-Existing Utilities 7 Prepare Cabinet Opening-New Utilities 7 Prepare and Route Water Line 8 Install Drain Hose 9 Install Moisture Barrier (under a wood countertop 11 Prepare Dishwasher 11 INSTALLATION INSTRUCTIONS (CONT.) Make Power Supply Cord Connection 13 Determine Cabinet Opening 14 Choose Attachment Option 15 Move Dishwasher Close to Cabinet Opening 16 Connect to Water Supply 19 Connect to Drain 19 Make Direct Wire Electrical Connection 20 Secure Dishwasher in Cabinet...
...Water Supply Requirements 6 Electrical Requirements 6 INSTALLATION INSTRUCTIONS 7 Prepare Cabinet Opening-Existing Utilities 7 Prepare Cabinet Opening-New Utilities 7 Prepare and Route Water Line 8 Install Drain Hose 9 Install Moisture Barrier (under a wood countertop 11 Prepare Dishwasher 11 INSTALLATION INSTRUCTIONS (CONT.) Make Power Supply Cord Connection 13 Determine Cabinet Opening 14 Choose Attachment Option 15 Move Dishwasher Close to Cabinet Opening 16 Connect to Water Supply 19 Connect to Drain 19 Make Direct Wire Electrical Connection 20 Secure Dishwasher in Cabinet...

Installation Guide
Page 4
... dishwasher is not level with or contact dishwasher motor or legs. Make sure pipes, wires and drain hose are within the shaded area shown in the dishwasher opening is uneven (example: Flooring extends only partway into opening is level if the floor in the "Product and Cabinet Opening Dimensions" section. 4 Do not run drain lines, water lines or electrical wiring where they can interfere with floor at the end of your dealer for installing...
... dishwasher is not level with or contact dishwasher motor or legs. Make sure pipes, wires and drain hose are within the shaded area shown in the dishwasher opening is uneven (example: Flooring extends only partway into opening is level if the floor in the "Product and Cabinet Opening Dimensions" section. 4 Do not run drain lines, water lines or electrical wiring where they can interfere with floor at the end of your dealer for installing...

Installation Guide
Page 6
... long enough, use a new drain hose with a maximum length of the counter, or be obtained from: National Fire Protection Association 1 Batterymarch Park Quincy, MA 02269 You must have: ■ 120-volt, 60 Hz, AC-only, 15- We recommend: ■ A time-delay fuse or circuit breaker. ■ A separate circuit. If connecting dishwasher with a power supply cord: ■ Use UL Listed power supply cord kit (Part Number 4317824) marked for your dishwasher. If connecting dishwasher with direct wiring...
... long enough, use a new drain hose with a maximum length of the counter, or be obtained from: National Fire Protection Association 1 Batterymarch Park Quincy, MA 02269 You must have: ■ 120-volt, 60 Hz, AC-only, 15- We recommend: ■ A time-delay fuse or circuit breaker. ■ A separate circuit. If connecting dishwasher with a power supply cord: ■ Use UL Listed power supply cord kit (Part Number 4317824) marked for your dishwasher. If connecting dishwasher with direct wiring...

Installation Guide
Page 11
...-type clamps (not provided) to connect from waste tee to air gap. Do not push down on some models. Option D, No waste disposer - NOTE: Do not cut if needed. Use a rubber hose (not provided) with air gap Prepare Dishwasher WARNING 1. Failure to squeeze clamp open door. If your model does not have insulation, proceed to air gap with large blue drain hose clamp (provided). Make sure the area...
...-type clamps (not provided) to connect from waste tee to air gap. Do not push down on some models. Option D, No waste disposer - NOTE: Do not cut if needed. Use a rubber hose (not provided) with air gap Prepare Dishwasher WARNING 1. Failure to squeeze clamp open door. If your model does not have insulation, proceed to air gap with large blue drain hose clamp (provided). Make sure the area...

Installation Guide
Page 16
... correct placement of the door panel. Push bracket into the cabinet opening and drain hose is moved into slot on wheels and move dishwasher close to move and install dishwasher. Plastic Tub Models For marble, granite, or other injury. Check that it keeps the bracket in back or other hard surface countertops Order Mounting Bracket Kit Part Number 8212560. NOTE: Do not attach the dishwasher. Failure to prohibit them...
... correct placement of the door panel. Push bracket into the cabinet opening and drain hose is moved into slot on wheels and move dishwasher close to move and install dishwasher. Plastic Tub Models For marble, granite, or other injury. Check that it keeps the bracket in back or other hard surface countertops Order Mounting Bracket Kit Part Number 8212560. NOTE: Do not attach the dishwasher. Failure to prohibit them...

Installation Guide
Page 23
... the hose for good drying performance. If none of rinse aid for future reference. 23 After the first 2 minutes, unlatch door, wait 5 seconds, then open door. Energy efficient dishwashers use an extension cord. Start/Resume light may flash: When pressing Start/Resume, you press it to lock into place. Plug into a grounded 3 prong outlet. Reconnect Power Using a flat-blade screwdriver, turn the fasteners ¹⁄₄ turn to complete the shortest wash cycle...
... the hose for good drying performance. If none of rinse aid for future reference. 23 After the first 2 minutes, unlatch door, wait 5 seconds, then open door. Energy efficient dishwashers use an extension cord. Start/Resume light may flash: When pressing Start/Resume, you press it to lock into place. Plug into a grounded 3 prong outlet. Reconnect Power Using a flat-blade screwdriver, turn the fasteners ¹⁄₄ turn to complete the shortest wash cycle...

Dimension Guide
Page 1
... 1 of the water inlet valve. W10350361A 6/10/11 If connecting dishwasher with a power supply cord: Use Power Supply Cord Kit (Part Number 4317824) marked for your dishwasher. Use ¹⁄₂" (1.3 cm) minimum I.D. PRODUCT DIMENSIONS Because Whirlpool Corporation policy includes a continuous commitment to the waste tee or disposer unit. Water temperature must be installed in house plumbing and 20" (50.8 cm) minimum above subfloor or floor. Drain Requirements: A new drain hose is resistant to heat and detergent, and...
... 1 of the water inlet valve. W10350361A 6/10/11 If connecting dishwasher with a power supply cord: Use Power Supply Cord Kit (Part Number 4317824) marked for your dishwasher. Use ¹⁄₂" (1.3 cm) minimum I.D. PRODUCT DIMENSIONS Because Whirlpool Corporation policy includes a continuous commitment to the waste tee or disposer unit. Water temperature must be installed in house plumbing and 20" (50.8 cm) minimum above subfloor or floor. Drain Requirements: A new drain hose is resistant to heat and detergent, and...

