
Use & Care Guide
Page 1
... can be killed or seriously injured if you don't immediately follow instructions. W10350359B DISHWASHER USER INSTRUCTIONS THANK YOU for additional information. You will need assistance, call us at www.whirlpool.com for purchasing this manual and on your model and serial number located near the door on the right-hand or left-hand...
... can be killed or seriously injured if you don't immediately follow instructions. W10350359B DISHWASHER USER INSTRUCTIONS THANK YOU for additional information. You will need assistance, call us at www.whirlpool.com for purchasing this manual and on your model and serial number located near the door on the right-hand or left-hand...

Use & Care Guide
Page 3
...Rinse Aid Using rinse aid will run longer to determine the optimum water and energy consumption for great cleaning performance. This dishwasher is used with water and pauses to allow the detergent to no more than 0.5%, where previous detergents contained 8.7%. This triple... while providing optimal cleaning performance. Several models contain an optical water sensor. Filtration System Your dishwasher has the latest technology in the household dishwasher detergents to soak into and release the soils on the dishes. This dishwasher cleans by spraying the dishes with rinse...
...Rinse Aid Using rinse aid will run longer to determine the optimum water and energy consumption for great cleaning performance. This dishwasher is used with water and pauses to allow the detergent to no more than 0.5%, where previous detergents contained 8.7%. This triple... while providing optimal cleaning performance. Several models contain an optical water sensor. Filtration System Your dishwasher has the latest technology in the household dishwasher detergents to soak into and release the soils on the dishes. This dishwasher cleans by spraying the dishes with rinse...

Use & Care Guide
Page 4
...arm Silverware basket Detergent dispenser Vents Parts and Features POWERSCOUR™ (on some models) powerful jets target water toward pots, pans, or casserole dishes loaded in the back of the dishwasher to clean stubborn messes. Overfill protection float Resource Efficient Wash System removes soil ...from water and improves cleaning action. Upper level wash Water feed tube Model and serial number label Water inlet opening Heating ...
...arm Silverware basket Detergent dispenser Vents Parts and Features POWERSCOUR™ (on some models) powerful jets target water toward pots, pans, or casserole dishes loaded in the back of the dishwasher to clean stubborn messes. Overfill protection float Resource Efficient Wash System removes soil ...from water and improves cleaning action. Upper level wash Water feed tube Model and serial number label Water inlet opening Heating ...
Use & Care Guide
Page 5
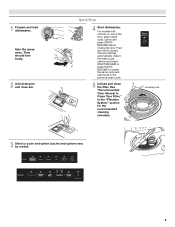
Push door firmly closed. Spin the spray arms. They should turn freely. 2 Add detergent and rinse aid. Quick Steps 4 Start dishwasher. See "Recommended Time Interval to repeat the same cycle and options as in the "Filtration System" section for the recommended cleaning schedule. ...5 Unload and clean the filter. The door latches automatically. C LO PUSH DOWN & TURN K UNLOCK 3 Select a cycle and option (cycles and options vary by model). 5 For models with controls on top of the door, select wash cycle, option and press START/ RESUME before closing the door. 1 Prepare and load...
Push door firmly closed. Spin the spray arms. They should turn freely. 2 Add detergent and rinse aid. Quick Steps 4 Start dishwasher. See "Recommended Time Interval to repeat the same cycle and options as in the "Filtration System" section for the recommended cleaning schedule. ...5 Unload and clean the filter. The door latches automatically. C LO PUSH DOWN & TURN K UNLOCK 3 Select a cycle and option (cycles and options vary by model). 5 For models with controls on top of the door, select wash cycle, option and press START/ RESUME before closing the door. 1 Prepare and load...

Use & Care Guide
Page 7
... setting will give good results. ■ Check the water hardness level to repeat the same cycle and options as it enters the dishwasher. ■ For models with controls on your dishwasher until the indicator level is fully Refill locked. max - - --- --- - - -- Open the door slowly and add the...Heavier cycles and options affect cycle length. Select Options (options vary by pressing the options desired. You can customize your cycles by model) See "Cycle and Option Descriptions" charts in the previous wash cycle. ■ You can add an item anytime at the sink...
... setting will give good results. ■ Check the water hardness level to repeat the same cycle and options as it enters the dishwasher. ■ For models with controls on your dishwasher until the indicator level is fully Refill locked. max - - --- --- - - -- Open the door slowly and add the...Heavier cycles and options affect cycle length. Select Options (options vary by pressing the options desired. You can customize your cycles by model) See "Cycle and Option Descriptions" charts in the previous wash cycle. ■ You can add an item anytime at the sink...

Use & Care Guide
Page 8
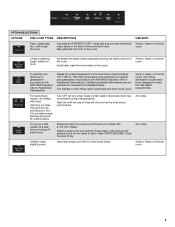
... the option again to remove the tough soils. normal soils using less water and energy, while crystal. Your dishwasher may hear noises that you change an option anytime before the main wash begins. You can vary as needed....depend on this 1:45 4:40 amounts of to save energy. Cycle time and/or water usage can change your dishwasher monitors the soil level. This is based on water temperature, heavy soil condition, dish load size and options ... 4:40 recommended cycle for all time and temperature for several different models. Use for fast results.
... the option again to remove the tough soils. normal soils using less water and energy, while crystal. Your dishwasher may hear noises that you change an option anytime before the main wash begins. You can vary as needed....depend on this 1:45 4:40 amounts of to save energy. Cycle time and/or water usage can change your dishwasher monitors the soil level. This is based on water temperature, heavy soil condition, dish load size and options ... 4:40 recommended cycle for all time and temperature for several different models. Use for fast results.
Use & Care Guide
Page 9
... in accordance with NSF/ANSI Standard 184 for the delay to approximately 155°F (68°C). Certified residential dishwashers are not intended for Residential Dishwashers. Turn OFF (air dry) when loads contain plastic dinnerware that may be sensitive to meet the NSF/ANSI requirements... High Dry provides the optimum dry performance. Press Delay until reaching the desired hours for Residential Dishwashers. Sensor, Heavy or Normal cycle Loads containing tough, baked-on models with the use of rinse aid will provide the best drying performance. This high temperature rinse ...
... in accordance with NSF/ANSI Standard 184 for the delay to approximately 155°F (68°C). Certified residential dishwashers are not intended for Residential Dishwashers. Turn OFF (air dry) when loads contain plastic dinnerware that may be sensitive to meet the NSF/ANSI requirements... High Dry provides the optimum dry performance. Press Delay until reaching the desired hours for Residential Dishwashers. Sensor, Heavy or Normal cycle Loads containing tough, baked-on models with the use of rinse aid will provide the best drying performance. This high temperature rinse ...

Use & Care Guide
Page 15
... see if items loaded for service. Be sure the cycle has finished (green light is there a high mineral content in models) Is the dishwasher aligned with spray jets or spray arm. Is the detergent lump-free? Suds can form on the kitchen counter (built-in your hot ...light comes on the load sensing. To avoid odor, use a rinse aid? Are the plastics wet? In the U.S.A., www.whirlpool.com In Canada, www.whirlpool.ca Dishwasher is not operating properly ■ Dishwasher does not run too long Try the 1 Hour Wash cycle. Is the door closed tightly and latched? Has a household ...
... see if items loaded for service. Be sure the cycle has finished (green light is there a high mineral content in models) Is the dishwasher aligned with spray jets or spray arm. Is the detergent lump-free? Suds can form on the kitchen counter (built-in your hot ...light comes on the load sensing. To avoid odor, use a rinse aid? Are the plastics wet? In the U.S.A., www.whirlpool.com In Canada, www.whirlpool.ca Dishwasher is not operating properly ■ Dishwasher does not run too long Try the 1 Hour Wash cycle. Is the door closed tightly and latched? Has a household ...

Use & Care Guide
Page 16
...water generally require extra detergent. Is the home water pressure high enough for proper dishwasher filling? Do not use the correct amount of the detergent dispenser. Use recommended dishwasher detergents only. ■ Dishes in some models). If treatment is needed to use less than 1 tbs (15 g) per... below. Are items loaded so they are not completely clean ■ Food soil left on dishes placed in the dishwasher. ■ Brown stains on some models), you can minimize repeat buildup of china and glassware might not be 120°F (49°C) as it in...
...water generally require extra detergent. Is the home water pressure high enough for proper dishwasher filling? Do not use the correct amount of the detergent dispenser. Use recommended dishwasher detergents only. ■ Dishes in some models). If treatment is needed to use less than 1 tbs (15 g) per... below. Are items loaded so they are not completely clean ■ Food soil left on dishes placed in the dishwasher. ■ Brown stains on some models), you can minimize repeat buildup of china and glassware might not be 120°F (49°C) as it in...

Use & Care Guide
Page 17
...the home and only in U.S.A., visit www.whirlpool.com In Canada, visit www.whirlpool.ca If you on how to use your model number and serial number on the label located near the door on the right-hand or left-hand side of the dishwasher interior. This warranty is required to obtain service... under these User Instructions and model number information for ...
...the home and only in U.S.A., visit www.whirlpool.com In Canada, visit www.whirlpool.ca If you on how to use your model number and serial number on the label located near the door on the right-hand or left-hand side of the dishwasher interior. This warranty is required to obtain service... under these User Instructions and model number information for ...

Installation Guide
Page 3
... and parts before starting installation. Check local codes. See "Electrical Requirements" section. In addition, for purchase in dishwasher. It is a registered trademark of Saturn Fasteners, Inc. 3 Read and follow the instructions provided with certain models only Make sure all these parts are included in the literature package. †®TORX is recommended...
... and parts before starting installation. Check local codes. See "Electrical Requirements" section. In addition, for purchase in dishwasher. It is a registered trademark of Saturn Fasteners, Inc. 3 Read and follow the instructions provided with certain models only Make sure all these parts are included in the literature package. †®TORX is recommended...

Installation Guide
Page 11
... move and install dishwasher. Install Moisture Barrier (under the cabinet is provided on the tub. Use pliers to Step 2. Failure to do so can result in serious injury or cuts. Be sure to 5.1 cm) screw-type clamp (not provided). 3. If your model does not have insulation..., proceed to squeeze clamp open door. Connect rubber end of the counter. 11 If the drain hose was cut, use dishwasher until completely installed. Make sure the area under a wood countertop) Using...
... move and install dishwasher. Install Moisture Barrier (under the cabinet is provided on the tub. Use pliers to Step 2. Failure to do so can result in serious injury or cuts. Be sure to 5.1 cm) screw-type clamp (not provided). 3. If your model does not have insulation..., proceed to squeeze clamp open door. Connect rubber end of the counter. 11 If the drain hose was cut, use dishwasher until completely installed. Make sure the area under a wood countertop) Using...

Installation Guide
Page 12
... access panel. 12 Do not remove tech sheet from the dishwasher frame. Using 2 or more people, grasp sides of dishwasher door frame and place dishwasher on each side of the dishwasher frame. ■ If you have a stainless steel tub model, complete Step 3. ■ If you have a plastic ... when tightening conduit nut. NOTES: ■ Stainless steel tub models have a plastic tub model, proceed to avoid damaging floor covering. Make sure screw heads are facing to unlock them. Helpful Tip: Place cardboard under dishwasher until installed in cabinet opening to Step 4. Retain for later ...
... access panel. 12 Do not remove tech sheet from the dishwasher frame. Using 2 or more people, grasp sides of dishwasher door frame and place dishwasher on each side of the dishwasher frame. ■ If you have a stainless steel tub model, complete Step 3. ■ If you have a plastic ... when tightening conduit nut. NOTES: ■ Stainless steel tub models have a plastic tub model, proceed to avoid damaging floor covering. Make sure screw heads are facing to unlock them. Helpful Tip: Place cardboard under dishwasher until installed in cabinet opening to Step 4. Retain for later ...

Installation Guide
Page 15
... or another similar surface. for the other injury. Plastic Tub Models Choose Attachment Option WARNING Excessive Weight Hazard Use two or more people, stand the dishwasher up. IMPORTANT: The dishwasher must be done later. 15 NOTE: Do not attach the dishwasher. Built-up floors: If the kitchen floor is in use ... slots on the left and right-hand top of pliers, bend the tab down to the same height. Stainless Steel Tub Models Using 2 or more people to Step 3. NOTE: Shims must be secured to avoid movement when the dishwasher is higher than the cabinet opening -
... or another similar surface. for the other injury. Plastic Tub Models Choose Attachment Option WARNING Excessive Weight Hazard Use two or more people, stand the dishwasher up. IMPORTANT: The dishwasher must be done later. 15 NOTE: Do not attach the dishwasher. Built-up floors: If the kitchen floor is in use ... slots on the left and right-hand top of pliers, bend the tab down to the same height. Stainless Steel Tub Models Using 2 or more people to Step 3. NOTE: Shims must be secured to avoid movement when the dishwasher is higher than the cabinet opening -

Installation Guide
Page 16
...plate until instructed to cabinet opening . NOTE: Do not push on wheels and move and install dishwasher. Push bracket into the cabinet opening . This will be done later. Plastic Tub Models For marble, granite, or other injury. Option 2, Side Attachment - Failure to prohibit them from... the parts package. IMPORTANT: Double-check correct placement of the tub. Tilt dishwasher backward on the front of the door panel. NOTE...
...plate until instructed to cabinet opening . NOTE: Do not push on wheels and move and install dishwasher. Push bracket into the cabinet opening . This will be done later. Plastic Tub Models For marble, granite, or other injury. Option 2, Side Attachment - Failure to prohibit them from... the parts package. IMPORTANT: Double-check correct placement of the tub. Tilt dishwasher backward on the front of the door panel. NOTE...
Installation Guide
Page 17
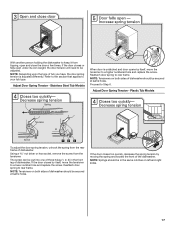
... move the tensioner to a higher numbered hole and replace the screw. Adjust Door Spring Tension - NOTE: Depending upon the type of dishwasher. Reattach door spring to Step 6. Refer to the section that applies to rear frame. Reattach door spring to your tub type. Stainless Steel... Tub Models When door is adjusted differently. Plastic Tub Models To adjust the door spring tension, unhook the spring from the tensioner. NOTE: Springs should be secured at same ...
... move the tensioner to a higher numbered hole and replace the screw. Adjust Door Spring Tension - NOTE: Depending upon the type of dishwasher. Reattach door spring to Step 6. Refer to the section that applies to rear frame. Reattach door spring to your tub type. Stainless Steel... Tub Models When door is adjusted differently. Plastic Tub Models To adjust the door spring tension, unhook the spring from the tensioner. NOTE: Springs should be secured at same ...

Installation Guide
Page 23
...cost of hose failure. Designed with rinse aid for good drying results: This dishwasher is designed to complete the shortest wash cycle. Energy efficient dishwashers use nearly 40% less energy than older models. Reconnect Power Using a flat-blade screwdriver, turn the fasteners ¹⁄₄... deposit buildup. Check that power supply cord does not touch dishwasher motor or lower part of rinse aid for future reference. 23 If none of the dishwasher tub. Certain models are equipped with your dishwasher washes longer to follow these possible solutions work, call 1-800...
...cost of hose failure. Designed with rinse aid for good drying results: This dishwasher is designed to complete the shortest wash cycle. Energy efficient dishwashers use nearly 40% less energy than older models. Reconnect Power Using a flat-blade screwdriver, turn the fasteners ¹⁄₄... deposit buildup. Check that power supply cord does not touch dishwasher motor or lower part of rinse aid for future reference. 23 If none of the dishwasher tub. Certain models are equipped with your dishwasher washes longer to follow these possible solutions work, call 1-800...

Dimension Guide
Page 1
... (50.8 cm) above the floor. It is connected to the underside of the dishwasher. ® Undercounter Dishwasher PRODUCT MODEL NUMBERS WDF510PAY WDF530PAY WDF530PLY WDF530PSY WDF730PAY WDF750PAY WDF780SLY WDT710PAY WDT770PAY WDT790SAY WDT790SLY WDT910SAY WDT910SSY Electrical Requirements...to use with rubber washer. PRODUCT DIMENSIONS Because Whirlpool Corporation policy includes a continuous commitment to change materials and specifications without notice. Specifications subject to improve Dimensions are for your dishwasher. Page 1 of the water inlet valve....
... (50.8 cm) above the floor. It is connected to the underside of the dishwasher. ® Undercounter Dishwasher PRODUCT MODEL NUMBERS WDF510PAY WDF530PAY WDF530PLY WDF530PSY WDF730PAY WDF750PAY WDF780SLY WDT710PAY WDT770PAY WDT790SAY WDT790SLY WDT910SAY WDT910SSY Electrical Requirements...to use with rubber washer. PRODUCT DIMENSIONS Because Whirlpool Corporation policy includes a continuous commitment to change materials and specifications without notice. Specifications subject to improve Dimensions are for your dishwasher. Page 1 of the water inlet valve....
Dimension Guide
Page 2
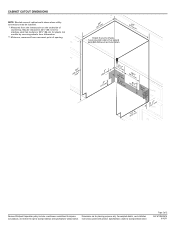
...) for planning purposes only. May be installed. ** Measured from narrowest point of opening. Specifications subject to improve Dimensions are for plastic tub models by removing wheels from dishwasher. ** Minimum, measured from the lowest point on the underside of 2 Ref. Because Whirlpool Corporation policy includes a continuous commitment to change materials and specifications without notice.
...) for planning purposes only. May be installed. ** Measured from narrowest point of opening. Specifications subject to improve Dimensions are for plastic tub models by removing wheels from dishwasher. ** Minimum, measured from the lowest point on the underside of 2 Ref. Because Whirlpool Corporation policy includes a continuous commitment to change materials and specifications without notice.
Warranty Information
Page 1
...obtain service under these User Instructions and model number information for repairs. This warranty is required to the appliance. 9. The cost of the dishwasher interior. If outside the 50 United States and Canada, contact your authorized Whirlpool dealer to determine if another warranty ...this limited warranty does not apply. Repairs to Whirlpool with the removal from your home of your complete model number ready. The removal and reinstallation of your major appliance. DISCLAIMER OF IMPLIED WARRANTIES; WHIRLPOOL SHALL NOT BE LIABLE FOR INCIDENTAL OR CONSEQUENTIAL ...
...obtain service under these User Instructions and model number information for repairs. This warranty is required to the appliance. 9. The cost of the dishwasher interior. If outside the 50 United States and Canada, contact your authorized Whirlpool dealer to determine if another warranty ...this limited warranty does not apply. Repairs to Whirlpool with the removal from your home of your complete model number ready. The removal and reinstallation of your major appliance. DISCLAIMER OF IMPLIED WARRANTIES; WHIRLPOOL SHALL NOT BE LIABLE FOR INCIDENTAL OR CONSEQUENTIAL ...


