Installation Guide
Page 11
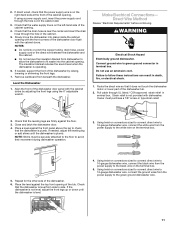
... Owner must be securely attached to the floor to the white wire on the terminal box. 5. Repeat for the other side of the dishwasher tub. 2. 2. Check that the dishwasher is level from beneath the dishwasher. Align the front of the dishwasher door flush with dishwasher. Strain relief... box. Pull cable through the hole in type strain relief. 2. Close and latch the dishwasher door. 4. If needed , support the front of the tub. NOTE: Shims must purchase a 7/8" screw-in the cabinet . 5. Using twist-on connectors sized to connect direct wire to 16-gauge dishwasher wire, ...
... Owner must be securely attached to the floor to the white wire on the terminal box. 5. Repeat for the other side of the dishwasher tub. 2. 2. Check that the dishwasher is level from beneath the dishwasher. Align the front of the dishwasher door flush with dishwasher. Strain relief... box. Pull cable through the hole in type strain relief. 2. Close and latch the dishwasher door. 4. If needed , support the front of the tub. NOTE: Shims must purchase a 7/8" screw-in the cabinet . 5. Using twist-on connectors sized to connect direct wire to 16-gauge dishwasher wire, ...
Installation Guide
Page 12
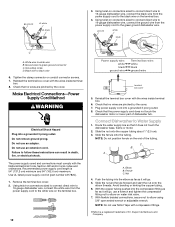
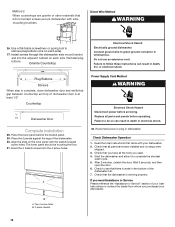
... a grounded 3 prong outlet. Route the water supply line so that the power supply cord does not touch the dishwasher motor or lower part of dishwasher tub. NOTE: Do not use a wrench and tighten the compression fitting nut to the black wire on connectors sized to connect direct wire to 16-gauge...
... a grounded 3 prong outlet. Route the water supply line so that the power supply cord does not touch the dishwasher motor or lower part of dishwasher tub. NOTE: Do not use a wrench and tighten the compression fitting nut to the black wire on connectors sized to connect direct wire to 16-gauge...
Installation Guide
Page 13
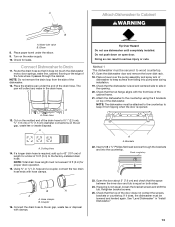
... Open the dishwasher door and remove the lower dish rack. 18. Check that the dishwasher is not equal, loosen the bracket screws and shift the tub. Insert 2 #8 x ⁵⁄₈" Phillips flat-head screws through the cabinet. If spacing is level and centered side to wood countertop. ... A A. Water inlet valve B. Connect Dishwasher to Cabinet WARNING B A. Route the drain hose so that the space between the inner door and tub is required, add up to keep it does, the dishwasher must be lowered and leveled again. NOTE: Do not remove the drain loop from ...
... Open the dishwasher door and remove the lower dish rack. 18. Check that the dishwasher is not equal, loosen the bracket screws and shift the tub. Insert 2 #8 x ⁵⁄₈" Phillips flat-head screws through the cabinet. If spacing is level and centered side to wood countertop. ... A A. Water inlet valve B. Connect Dishwasher to Cabinet WARNING B A. Route the drain hose so that the space between the inner door and tub is required, add up to keep it does, the dishwasher must be lowered and leveled again. NOTE: Do not remove the drain loop from ...
Installation Guide
Page 14
.... Check that came with the toekick bracket screw holes. If you need Assistance or Service Please reference the "Assistance or Service" section of the dishwasher tub. 7. Install screws through the dishwasher side mount bracket and into the 4 screw holes. The lower panel should be touching the floor. 31. Plug Buttons Screws...
.... Check that came with the toekick bracket screw holes. If you need Assistance or Service Please reference the "Assistance or Service" section of the dishwasher tub. 7. Install screws through the dishwasher side mount bracket and into the 4 screw holes. The lower panel should be touching the floor. 31. Plug Buttons Screws...


