
Warranty Information
Page 1
... modifications made to repair or replace appliance light bulbs, air filters or water filters. Expenses for travel and transportation for product service if your model number and serial number on the label located near the door on how to use your major appliance for repairs. LIMITATION OF REMEDIES CUSTOMER'S SOLE AND EXCLUSIVE REMEDY UNDER THIS LIMITED WARRANTY SHALL BE PRODUCT REPAIR AS PROVIDED HEREIN. You can write to Whirlpool with any questions...
... modifications made to repair or replace appliance light bulbs, air filters or water filters. Expenses for travel and transportation for product service if your model number and serial number on the label located near the door on how to use your major appliance for repairs. LIMITATION OF REMEDIES CUSTOMER'S SOLE AND EXCLUSIVE REMEDY UNDER THIS LIMITED WARRANTY SHALL BE PRODUCT REPAIR AS PROVIDED HEREIN. You can write to Whirlpool with any questions...
Installation Guide
Page 2
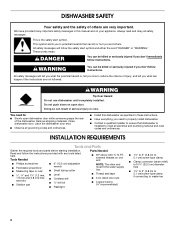
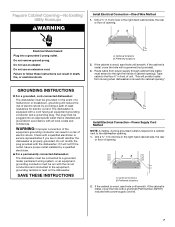
... are not followed. You need to properly install dishwasher. ■ Contact a qualified installer to : ■ Slowly open door. Latch the dishwasher door shut. ■ Observe all safety messages. WARNING Tip Over Hazard Do not use dishwasher until completely installed. INSTALLATION REQUIREMENTS Tools and Parts Gather the required tools and parts before starting installation. external threads on open dishwasher door while someone grasps the rear of the dishwasher. DISHWASHER SAFETY Your safety and the...
... are not followed. You need to properly install dishwasher. ■ Contact a qualified installer to : ■ Slowly open door. Latch the dishwasher door shut. ■ Observe all safety messages. WARNING Tip Over Hazard Do not use dishwasher until completely installed. INSTALLATION REQUIREMENTS Tools and Parts Gather the required tools and parts before starting installation. external threads on open dishwasher door while someone grasps the rear of the dishwasher. DISHWASHER SAFETY Your safety and the...
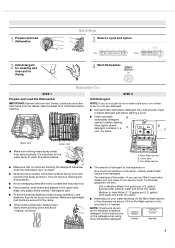
Installation Guide
Page 3
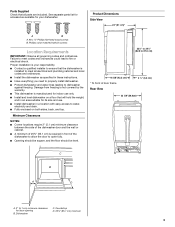
... in these instructions. ■ Have everything you need to properly install dishwasher. ■ Protect dishwasher and water lines leading to 87.6 cm) 16 5/8"(42.2 cm) * To front of the dishwasher to allow the door to open fully. ■ Opening should be square, and the floor should be level. 32¹⁄₂" to 34¹⁄₂" (82.6 to dishwasher against freezing. Dishwasher C. Parts Supplied Check...
... in these instructions. ■ Have everything you need to properly install dishwasher. ■ Protect dishwasher and water lines leading to 87.6 cm) 16 5/8"(42.2 cm) * To front of the dishwasher to allow the door to open fully. ■ Opening should be square, and the floor should be level. 32¹⁄₂" to 34¹⁄₂" (82.6 to dishwasher against freezing. Dishwasher C. Parts Supplied Check...

Installation Guide
Page 4
... electric shock by adjusting the toekick and leveling legs. SAVE THESE INSTRUCTIONS Contact a qualified electrician. Power Supply Cord Connection Use Power Supply Cord Kit (Part Number 4317824) marked for use with 3 prong grounding plug ■ Neer C-500 ⁷⁄₈" strain relief ■ 3 wire connectors ■ Part No. 302797 grommet Follow the kit instructions for your home and local codes and ordinances. Kit contents include: ■ UL listed 16 gauge 3-wire power supply cord with dishwashers. or 20-amp fused electrical supply...
... electric shock by adjusting the toekick and leveling legs. SAVE THESE INSTRUCTIONS Contact a qualified electrician. Power Supply Cord Connection Use Power Supply Cord Kit (Part Number 4317824) marked for use with 3 prong grounding plug ■ Neer C-500 ⁷⁄₈" strain relief ■ 3 wire connectors ■ Part No. 302797 grommet Follow the kit instructions for your home and local codes and ordinances. Kit contents include: ■ UL listed 16 gauge 3-wire power supply cord with dishwashers. or 20-amp fused electrical supply...
Installation Guide
Page 5
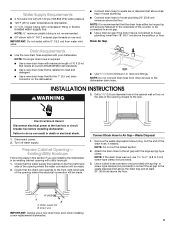
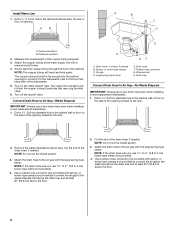
... before installing dishwasher. Disconnect power. 2. Use a rubber hose connector (not provided) with compression fitting or flexible braided water supply line. Water supply line B. Drill a 1¹⁄₂" (3.8 cm) diameter hole in house plumbing. ■ Connect drain hose to the underside of the opening where the electrical connection will be made . 2. Prepare Cabinet Opening- Cut the end of the opening where the water connection will be made . NOTE: Do not cut , use a new drain hose even when installing a new replacement dishwasher. 5 NOTE: If a longer drain hose...
... before installing dishwasher. Disconnect power. 2. Use a rubber hose connector (not provided) with compression fitting or flexible braided water supply line. Water supply line B. Drill a 1¹⁄₂" (3.8 cm) diameter hole in house plumbing. ■ Connect drain hose to the underside of the opening where the electrical connection will be made . 2. Prepare Cabinet Opening- Cut the end of the opening where the water connection will be made . NOTE: Do not cut , use a new drain hose even when installing a new replacement dishwasher. 5 NOTE: If a longer drain hose...
Installation Guide
Page 7
... (Part Number 302797) included with all local codes and ordinances. Do not use an adapter. In the event of the equipment-grounding conductor can result in accordance with power supply cord kit. 7 Optional locations B. If the cabinet is installed and grounded in death, fire, or electrical shock. The plug must extend to a grounded metal, permanent wiring system, or an equipmentgrounding conductor must be run with the dishwasher...
... (Part Number 302797) included with all local codes and ordinances. Do not use an adapter. In the event of the equipment-grounding conductor can result in accordance with power supply cord kit. 7 Optional locations B. If the cabinet is installed and grounded in death, fire, or electrical shock. The plug must extend to a grounded metal, permanent wiring system, or an equipmentgrounding conductor must be run with the dishwasher...
Installation Guide
Page 8
... enough into a shallow pan to the air gap with a manual shutoff valve. 4. Connect Drain Hose to the dishwasher inlet on the water shutoff valve. Attach the drain hose to flush the copper tubing of opening to connect it to Air Gap-Waste Disposal IMPORTANT: Always use 1¹⁄₂" to 2 " (3.8 to 5 cm) screw-type clamp (not provided). 4. NOTE: Do not cut here, if needed B. Install Water Line 1. A B A B C D E A. Optional locations B. Slowly feed the copper tubing...
... enough into a shallow pan to the air gap with a manual shutoff valve. 4. Connect Drain Hose to the dishwasher inlet on the water shutoff valve. Attach the drain hose to flush the copper tubing of opening to connect it to Air Gap-Waste Disposal IMPORTANT: Always use 1¹⁄₂" to 2 " (3.8 to 5 cm) screw-type clamp (not provided). 4. NOTE: Do not cut here, if needed B. Install Water Line 1. A B A B C D E A. Optional locations B. Slowly feed the copper tubing...
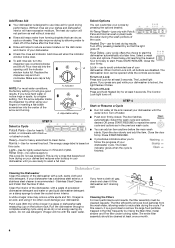
Installation Guide
Page 9
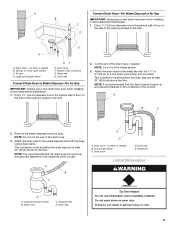
...;⁄₂" (3.8 cm) diameter hole in the cabinet wall or floor on the side of the drain hose. 3. Attach the drain hose to the waste tee with the large spring-type clamp. A B C 2. A B Connect Drain Hose-No Waste Disposal or Air Gap IMPORTANT: Always use a new drain hose even when installing a new replacement dishwasher. 1. Drain hose F. Drain trap Connect Drain Hose to the underside of the drain hose, if needed B. Cut the end of the counter. NOTE: It is recommended...
...;⁄₂" (3.8 cm) diameter hole in the cabinet wall or floor on the side of the drain hose. 3. Attach the drain hose to the waste tee with the large spring-type clamp. A B C 2. A B Connect Drain Hose-No Waste Disposal or Air Gap IMPORTANT: Always use a new drain hose even when installing a new replacement dishwasher. 1. Drain hose F. Drain trap Connect Drain Hose to the underside of the drain hose, if needed B. Cut the end of the counter. NOTE: It is recommended...

Installation Guide
Page 10
... to move dishwasher close the dishwasher door a few times. Screws 3. Using 2 or more people to avoid bending or denting them. 10 listed/CSA certified clamp connector to water inlet valve. 5. Measure the shortest opening . B A. listed/CSA certified conduit connector. ■ Power Supply Cord-Install a power supply cord kit that is U.L. WARNING Excessive Weight Hazard Use two or more people, place the dishwasher upright in front of cabinet opening height. NOTE: The spring adjustment pins should...
... to move dishwasher close the dishwasher door a few times. Screws 3. Using 2 or more people to avoid bending or denting them. 10 listed/CSA certified clamp connector to water inlet valve. 5. Measure the shortest opening . B A. listed/CSA certified conduit connector. ■ Power Supply Cord-Install a power supply cord kit that is U.L. WARNING Excessive Weight Hazard Use two or more people, place the dishwasher upright in front of cabinet opening height. NOTE: The spring adjustment pins should...
Installation Guide
Page 11
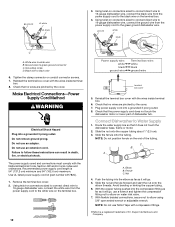
... cabinet opening . 4. Slowly move the dishwasher into the cabinet opening with dishwasher. If needed , adjust the leveling leg or add shims until the dishwasher is plumb. Make Electrical Connections- Do not use an extension cord. Failure to the white wire on the left-hand side of the dishwasher door panel with the cabinet doors. Close and latch the dishwasher door. 4. Using twist-on connectors sized to connect direct wire to 16-gauge dishwasher wire, connect the ground wires from the power supply to follow these instructions...
... cabinet opening . 4. Slowly move the dishwasher into the cabinet opening with dishwasher. If needed , adjust the leveling leg or add shims until the dishwasher is plumb. Make Electrical Connections- Do not use an extension cord. Failure to the white wire on the left-hand side of the dishwasher door panel with the cabinet doors. Close and latch the dishwasher door. 4. Using twist-on connectors sized to connect direct wire to 16-gauge dishwasher wire, connect the ground wires from the power supply to follow these instructions...
Installation Guide
Page 12
... electrical shock. Using twist-on connectors sized to connect direct wire to 16-gauge dishwasher wire, connect the black wire from the power supply cord to elbow on connectors sized to connect direct wire to 16-gauge dishwasher wire, connect the ground wire from the power supply cord to green ground connector C. Reinstall the terminal box cover with the National Electrical Code, Section 422 and/or local codes and ordinances. Do not use an adapter. Use UL listed power supply cord kit (part number 4317824). 1. Route the water supply line...
... electrical shock. Using twist-on connectors sized to connect direct wire to 16-gauge dishwasher wire, connect the black wire from the power supply cord to elbow on connectors sized to connect direct wire to 16-gauge dishwasher wire, connect the ground wire from the power supply cord to green ground connector C. Reinstall the terminal box cover with the National Electrical Code, Section 422 and/or local codes and ordinances. Do not use an adapter. Use UL listed power supply cord kit (part number 4317824). 1. Route the water supply line...
Installation Guide
Page 13
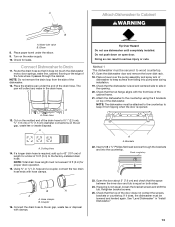
.... 24. See "Level Dishwasher" in the drain hose. Route the drain hose so that the tub flange aligns with the front face of the cabinet frame. 21. The pan will collect any water in "Install Dishwasher." 13 Cut on the molded end of the drain hose to Drain 11. Place a towel over the pump assembly and spray arm of dishwasher to the factory-installed drain hose. Attach the dishwasher to Cabinet WARNING B A. Brackets 22. Water inlet valve B. A A. A 1" 3/4" 5/8" A. Tip Over...
.... 24. See "Level Dishwasher" in the drain hose. Route the drain hose so that the tub flange aligns with the front face of the cabinet frame. 21. The pan will collect any water in "Install Dishwasher." 13 Cut on the molded end of the drain hose to Drain 11. Place a towel over the pump assembly and spray arm of dishwasher to the factory-installed drain hose. Attach the dishwasher to Cabinet WARNING B A. Brackets 22. Water inlet valve B. A A. A 1" 3/4" 5/8" A. Tip Over...
Installation Guide
Page 14
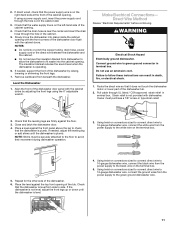
...). 27. A Power Supply Cord Method WARNING Electrical Shock Hazard Disconnect power before operating. Reconnect power or plug in terminal box. Granite Countertop Electrical Shock Hazard Electrically ground dishwasher. Failure to green ground connector in dishwasher. Dishwasher Door Complete Installation 28. The lower panel should be touching the floor. 31. Start the dishwasher and allow it to see that all parts and panels before servicing. Direct Wire Method WARNING 26. Connect ground wire to follow these instructions can...
...). 27. A Power Supply Cord Method WARNING Electrical Shock Hazard Disconnect power before operating. Reconnect power or plug in terminal box. Granite Countertop Electrical Shock Hazard Electrically ground dishwasher. Failure to green ground connector in dishwasher. Dishwasher Door Complete Installation 28. The lower panel should be touching the floor. 31. Start the dishwasher and allow it to see that all parts and panels before servicing. Direct Wire Method WARNING 26. Connect ground wire to follow these instructions can...
Use & Care Guide
Page 1
... this high-quality product. ® DISHWASHER USER INSTRUCTIONS THANK YOU for additional information. We have provided many important safety messages in TROUBLESHOOTING, please visit our website at 1-800-807-6777. W10518033 If you don't immediately follow instructions. You will follow instructions. Table of Contents DISHWASHER SAFETY 1 QUICK STEPS 3 DISHWASHER USE 3 DISHWASHER CARE 4 TROUBLESHOOTING 5 WARRANTY 7 Dishwasher Safety Your safety and the safety of the dishwasher interior. If you don...
... this high-quality product. ® DISHWASHER USER INSTRUCTIONS THANK YOU for additional information. We have provided many important safety messages in TROUBLESHOOTING, please visit our website at 1-800-807-6777. W10518033 If you don't immediately follow instructions. You will follow instructions. Table of Contents DISHWASHER SAFETY 1 QUICK STEPS 3 DISHWASHER USE 3 DISHWASHER CARE 4 TROUBLESHOOTING 5 WARRANTY 7 Dishwasher Safety Your safety and the safety of the dishwasher interior. If you don...
Use & Care Guide
Page 2
... tamper with controls. ■ Use the dishwasher only for its intended function. ■ Use only detergents or rinse agents recommended for use in a hot water system that has not been used for two weeks or more. WARNING:This product contains one or more chemicals known to the State of children. ■ When loading items to be washed: 1) Locate sharp items so that is installed and grounded...
... tamper with controls. ■ Use the dishwasher only for its intended function. ■ Use only detergents or rinse agents recommended for use in a hot water system that has not been used for two weeks or more. WARNING:This product contains one or more chemicals known to the State of children. ■ When loading items to be washed: 1) Locate sharp items so that is installed and grounded...
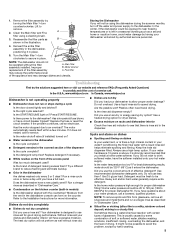
Use & Care Guide
Page 3
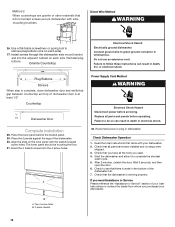
... noises during operation: Load dishes so they do not plan to run a wash cycle soon, run a rinse cycle. Cover latch C. The hardness of the water-If you use depends on your water hardness, fill the Main Wash section of detergent to Hard Water (7-12 grains per U.S. gallon) (typical water softener water and some city water) ■ Depending on : How much in a A cool, dry place. 15 25 C Upper rack Lower rack ■ Make sure nothing keeps spray arm...
... noises during operation: Load dishes so they do not plan to run a wash cycle soon, run a rinse cycle. Cover latch C. The hardness of the water-If you use depends on your water hardness, fill the Main Wash section of detergent to Hard Water (7-12 grains per U.S. gallon) (typical water softener water and some city water) ■ Depending on : How much in a A cool, dry place. 15 25 C Upper rack Lower rack ■ Make sure nothing keeps spray arm...
Use & Care Guide
Page 4
... rinse aid your dishwasher. Turn the arrow adjuster inside the dispenser by rinsing the Main filter, metal strainer and Fine filter under running water. If you have excessive moisture. The door latches automatically. Close the door firmly. If your cycles by allowing water to drain off . Run the dishwasher through a complete washing cycle using it is locked, the light flashes 3 times. The filter efficiently removes food particles from forming droplets that can customize your dishwasher has a stainless steel exterior, a stainless steel cleaner is hot. Press START...
... rinse aid your dishwasher. Turn the arrow adjuster inside the dispenser by rinsing the Main filter, metal strainer and Fine filter under running water. If you have excessive moisture. The door latches automatically. Close the door firmly. If your cycles by allowing water to drain off . Run the dishwasher through a complete washing cycle using it is locked, the light flashes 3 times. The filter efficiently removes food particles from forming droplets that can customize your dishwasher has a stainless steel exterior, a stainless steel cleaner is hot. Press START...
Use & Care Guide
Page 5
... motor stopped due to the Installation Instructions for more information. If it enters the dishwasher. Run a rinse cycle once or twice a day until you have a new plastic smell? Do not overload. Use a heated drying option for dryer dishes. ■ Excess moisture on racks and dishwasher interior Check the rinse aid indicator to see that you load your dishwasher to 828 kPa) for good drying performance. Keep the rinse aid dispenser filled. Home water pressure should be using a cleaning...
... motor stopped due to the Installation Instructions for more information. If it enters the dishwasher. Run a rinse cycle once or twice a day until you have a new plastic smell? Do not overload. Use a heated drying option for dryer dishes. ■ Excess moisture on racks and dishwasher interior Check the rinse aid indicator to see that you load your dishwasher to 828 kPa) for good drying performance. Keep the rinse aid dispenser filled. Home water pressure should be using a cleaning...
Use & Care Guide
Page 6
... extra detergent. Wash by labels from washing action. Is the pump or spray arm clogged by hand. 6 Do not use soap or laundry detergents. If you use the correct amount of fresh detergent? Dishes are stable and do not strike together from bottles and cans? Use a liquid rinse aid and underload the dishwasher to allow detergent to 828 kPa) for proper dishwasher filling? Use recommended dishwasher detergents only. Home water pressure should stop...
... extra detergent. Wash by labels from washing action. Is the pump or spray arm clogged by hand. 6 Do not use soap or laundry detergents. If you use the correct amount of fresh detergent? Dishes are stable and do not strike together from bottles and cans? Use a liquid rinse aid and underload the dishwasher to allow detergent to 828 kPa) for proper dishwasher filling? Use recommended dishwasher detergents only. Home water pressure should stop...

Use & Care Guide
Page 7
... service by the customer. Cosmetic damage, including scratches, dents, chips or other than normal, single-family household use of consumables or cleaning products not approved by this major appliance is not installed in the U.S.A., call 1-800-807-6777. Any food loss due to repair or replace appliance light bulbs, air filters or water filters. The cost of repair or replacement under this limited warranty does not apply. WHIRLPOOL...
... service by the customer. Cosmetic damage, including scratches, dents, chips or other than normal, single-family household use of consumables or cleaning products not approved by this major appliance is not installed in the U.S.A., call 1-800-807-6777. Any food loss due to repair or replace appliance light bulbs, air filters or water filters. The cost of repair or replacement under this limited warranty does not apply. WHIRLPOOL...

