
Warranty Information
Page 1
...to or furnished with published installation instructions. 11. Expenses for travel and transportation for other damage to be provided by Whirlpool. 5. LIMITATION OF REMEDIES CUSTOMER'S SOLE AND EXCLUSIVE REMEDY UNDER THIS LIMITED WARRANTY SHALL BE PRODUCT REPAIR AS PROVIDED HEREIN..... The removal and reinstallation of your major appliance for Factory Specified Parts and repair labor to Whirlpool within 30 days from the date of the dishwasher interior. WHIRLPOOL SHALL NOT BE LIABLE FOR INCIDENTAL OR CONSEQUENTIAL DAMAGES. ITEMS EXCLUDED FROM WARRANTY This limited warranty...
...to or furnished with published installation instructions. 11. Expenses for travel and transportation for other damage to be provided by Whirlpool. 5. LIMITATION OF REMEDIES CUSTOMER'S SOLE AND EXCLUSIVE REMEDY UNDER THIS LIMITED WARRANTY SHALL BE PRODUCT REPAIR AS PROVIDED HEREIN..... The removal and reinstallation of your major appliance for Factory Specified Parts and repair labor to Whirlpool within 30 days from the date of the dishwasher interior. WHIRLPOOL SHALL NOT BE LIABLE FOR INCIDENTAL OR CONSEQUENTIAL DAMAGES. ITEMS EXCLUDED FROM WARRANTY This limited warranty...
Installation Guide
Page 2
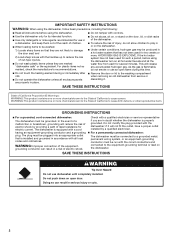
...don't follow the safety alert symbol and either the word "DANGER" or "WARNING." WARNING Tip Over Hazard Do not use dishwasher until completely installed. Latch the dishwasher door shut. ■ Observe all governing codes and ordinances. ■ Install this manual and on your appliance. external ... before starting installation. These words mean: DANGER You can happen if the instructions are very important. Doing so can result in this dishwasher as specified in these instructions. ■ Have everything you what the potential hazard is, tell you how to reduce the chance of...
...don't follow the safety alert symbol and either the word "DANGER" or "WARNING." WARNING Tip Over Hazard Do not use dishwasher until completely installed. Latch the dishwasher door shut. ■ Observe all governing codes and ordinances. ■ Install this manual and on your appliance. external ... before starting installation. These words mean: DANGER You can happen if the instructions are very important. Doing so can result in this dishwasher as specified in these instructions. ■ Have everything you what the potential hazard is, tell you how to reduce the chance of...
Installation Guide
Page 3
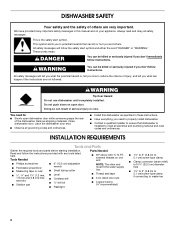
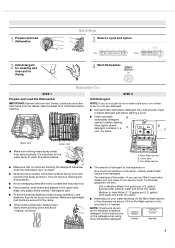
... 25⁵⁄₈" (65.1 cm) minimum 3 Minimum Clearances NOTES: ■ Corner locations require 2" (5.1 cm) minimum clearance between the side of the dishwasher door and the wall or cabinet. ■ A minimum of door frame Rear View 2 ¹⁄₂" (6.2 cm) 23 5/9"(59.8cm) C B A... D A. 2" (5.1 cm) minimum clearance for its size and use only. ■ Install and level dishwasher on both sides, back, and top. See separate parts list for accessories available for your responsibility. ■ Contact a qualified installer to ensure that ...
... 25⁵⁄₈" (65.1 cm) minimum 3 Minimum Clearances NOTES: ■ Corner locations require 2" (5.1 cm) minimum clearance between the side of the dishwasher door and the wall or cabinet. ■ A minimum of door frame Rear View 2 ¹⁄₂" (6.2 cm) 23 5/9"(59.8cm) C B A... D A. 2" (5.1 cm) minimum clearance for its size and use only. ■ Install and level dishwasher on both sides, back, and top. See separate parts list for accessories available for your responsibility. ■ Contact a qualified installer to ensure that ...

Installation Guide
Page 4
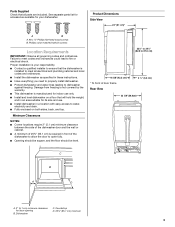
... a grounding plug. Do not remove ground prong. Installation Clearances Cutout Dimensions 34" to 35" (86.4 cm to the dishwasher opening. Electrical Requirements WARNING Electrical Shock Hazard Plug into a mating three prong, grounded outlet, located in conformance with grounding wire...cm) beneath 34" (86.4 cm) high countertops may be accomplished by a qualified electrician. ■ For a permanently connected dishwasher: The dishwasher must be plugged into an appropriate outlet that meets the wiring requirements for installing the power supply cord. Check with a qualified ...
... a grounding plug. Do not remove ground prong. Installation Clearances Cutout Dimensions 34" to 35" (86.4 cm to the dishwasher opening. Electrical Requirements WARNING Electrical Shock Hazard Plug into a mating three prong, grounded outlet, located in conformance with grounding wire...cm) beneath 34" (86.4 cm) high countertops may be accomplished by a qualified electrician. ■ For a permanently connected dishwasher: The dishwasher must be plugged into an appropriate outlet that meets the wiring requirements for installing the power supply cord. Check with a qualified ...
Installation Guide
Page 5
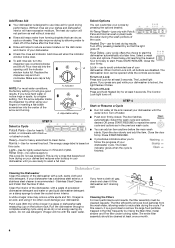
...the water connection will be made . Turn off water supply. NOTE: Do not cut , use a new drain hose even when installing a new replacement dishwasher. 5 Water supply line B. Drain Air Gap ■ Use ½" (1.3 cm) minimum I.D. Disconnect power. 2. Existing Utility Hookups Follow the steps in... a rubber hose connector (not provided) with 20-120 psi (138-862 kPa) water pressure. ■ 120°F (49°C) water temperature at dishwasher O.D. Water Supply Requirements ■ A hot water line with spring- IMPORTANT: Do not solder within 6" (15.2 cm) from other devices to waste tee...
...the water connection will be made . Turn off water supply. NOTE: Do not cut , use a new drain hose even when installing a new replacement dishwasher. 5 Water supply line B. Drain Air Gap ■ Use ½" (1.3 cm) minimum I.D. Disconnect power. 2. Existing Utility Hookups Follow the steps in... a rubber hose connector (not provided) with 20-120 psi (138-862 kPa) water pressure. ■ 120°F (49°C) water temperature at dishwasher O.D. Water Supply Requirements ■ A hot water line with spring- IMPORTANT: Do not solder within 6" (15.2 cm) from other devices to waste tee...
Installation Guide
Page 7
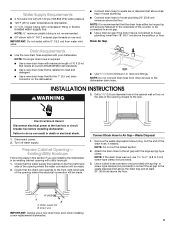
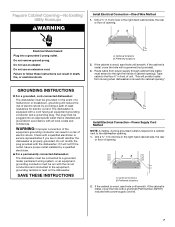
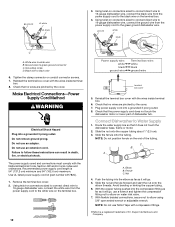
...Opening-No Existing Utility Hookups WARNING Install Electrical Connection-Direct Wire Method 1. GROUNDING INSTRUCTIONS ■ For a grounded, cord-connected dishwasher: The dishwasher must be run with power supply cord kit. 7 In the event of a malfunction or breakdown, grounding will not fit ...a grounding plug. if it will reduce the risk of electric shock by a qualified electrician. ■ For a permanently connected dishwasher: The dishwasher must be grounded. Do not use an adapter. Tape cable to the floor 6" in a risk of least resistance for electric...
...Opening-No Existing Utility Hookups WARNING Install Electrical Connection-Direct Wire Method 1. GROUNDING INSTRUCTIONS ■ For a grounded, cord-connected dishwasher: The dishwasher must be run with power supply cord kit. 7 In the event of a malfunction or breakdown, grounding will not fit ...a grounding plug. if it will reduce the risk of electric shock by a qualified electrician. ■ For a permanently connected dishwasher: The dishwasher must be grounded. Do not use an adapter. Tape cable to the floor 6" in a risk of least resistance for electric...
Installation Guide
Page 8
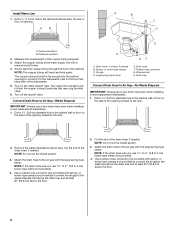
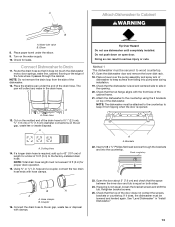
...NOTE: Do not cut the ribbed section. 3. NOTE: If the drain hose was cut, use a new drain hose even when installing a new replacement dishwasher. 1. or screw-type clamps (not provided) to connect the air gap to the water supply line with a manual shutoff valve. 4. NOTE: Do not...H. Optional locations B. Attach the drain hose to Air Gap-No Waste Disposal IMPORTANT: Always use 1¹⁄₂" to 2 " (3.8 to the dishwasher inlet on the water shutoff valve. Install Water Line 1. or screw-type clamps C. NOTE: The copper tubing will bend and kink easily. The copper...
...NOTE: Do not cut the ribbed section. 3. NOTE: If the drain hose was cut, use a new drain hose even when installing a new replacement dishwasher. 1. or screw-type clamps (not provided) to connect the air gap to the water supply line with a manual shutoff valve. 4. NOTE: Do not...H. Optional locations B. Attach the drain hose to Air Gap-No Waste Disposal IMPORTANT: Always use 1¹⁄₂" to 2 " (3.8 to the dishwasher inlet on the water shutoff valve. Install Water Line 1. or screw-type clamps C. NOTE: The copper tubing will bend and kink easily. The copper...
Installation Guide
Page 9
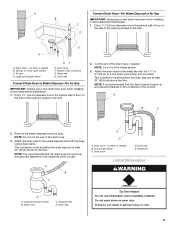
... the waste disposal inlet with the 1¹⁄₂" to 2" (3.8 cm to the waste tee with the large spring-type clamp. Waste tee Install Dishwasher WARNING D A. Drain trap Connect Drain Hose to the underside of the drain hose. 3. NOTE: Do not cut the end of the counter. A ...of the counter. A B Connect Drain Hose-No Waste Disposal or Air Gap IMPORTANT: Always use a new drain hose even when installing a new replacement dishwasher. 1. or screw-type clamps C. Drain hose D. Drill a 1¹⁄₂" (3.8 cm) diameter hole in the cabinet wall or floor on open ...
... the waste disposal inlet with the 1¹⁄₂" to 2" (3.8 cm to the waste tee with the large spring-type clamp. Waste tee Install Dishwasher WARNING D A. Drain trap Connect Drain Hose to the underside of the drain hose. 3. NOTE: Do not cut the end of the counter. A ...of the counter. A B Connect Drain Hose-No Waste Disposal or Air Gap IMPORTANT: Always use a new drain hose even when installing a new replacement dishwasher. 1. or screw-type clamps C. Drain hose D. Drill a 1¹⁄₂" (3.8 cm) diameter hole in the cabinet wall or floor on open ...

Installation Guide
Page 10
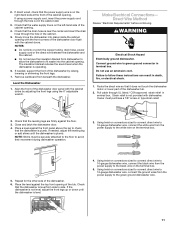
... adjustment pins should be in back or other injury. 8. Apply thread seal tape to 90º elbow fitting and connect fitting to the dishwasher. Prepare Dishwasher for use a U.L. Using a Phillips screwdriver, remove the 4 screws attaching the toekick panel and lower panel to water inlet valve. 5. ...cover to the right to do so can result in the top holes. Remove both the left-hand and right-hand sides of the dishwasher. Tighten elbow until snug. Measure the shortest opening height. Failure to remove terminal box cover. ■ Direct Wire-Install a U.L. ...
... adjustment pins should be in back or other injury. 8. Apply thread seal tape to 90º elbow fitting and connect fitting to the dishwasher. Prepare Dishwasher for use a U.L. Using a Phillips screwdriver, remove the 4 screws attaching the toekick panel and lower panel to water inlet valve. 5. ...cover to the right to do so can result in the top holes. Remove both the left-hand and right-hand sides of the dishwasher. Tighten elbow until snug. Measure the shortest opening height. Failure to remove terminal box cover. ■ Direct Wire-Install a U.L. ...
Installation Guide
Page 11
... the cabinet doors. NOTE: Shims must purchase a 7/8" screw-in the cabinet . 5. Place the level against the top front opening of the dishwasher door panel with the front corners of the cabinet opening with the cabinet doors by raising, lowering or shimming the front legs. 7. Using twist... Method Review "Electrical Requirements" before continuing. Pull cable through the hole in type strain relief. 2. Repeat for the other side of the dishwasher by adjusting the front legs using a power supply cord, insert the power supply cord through the hole cut in terminal box. Check that ...
... the cabinet doors. NOTE: Shims must purchase a 7/8" screw-in the cabinet . 5. Place the level against the top front opening of the dishwasher door panel with the front corners of the cabinet opening with the cabinet doors by raising, lowering or shimming the front legs. 7. Using twist... Method Review "Electrical Requirements" before continuing. Pull cable through the hole in type strain relief. 2. Repeat for the other side of the dishwasher by adjusting the front legs using a power supply cord, insert the power supply cord through the hole cut in terminal box. Check that ...
Installation Guide
Page 12
... to green ground connector C. Remove the terminal box cover. 2. Check that no wires are pinched by the cover. 7. Check that it does not touch the dishwasher base, frame or motor. 2. C B A A. Ferrule C. Push the tubing into the compression fitting as far as it will go , use Teflon® tape with ... the nut and ferrule forward and start the nut onto the elbow threads. Using twist-on connectors sized to connect direct wire to 16-gauge dishwasher wire, connect the black wire from the power supply cord to elbow on water inlet valve. 7. ground white black C A. Do not remove ground ...
... to green ground connector C. Remove the terminal box cover. 2. Check that no wires are pinched by the cover. 7. Check that it does not touch the dishwasher base, frame or motor. 2. C B A A. Ferrule C. Push the tubing into the compression fitting as far as it will go , use Teflon® tape with ... the nut and ferrule forward and start the nut onto the elbow threads. Using twist-on connectors sized to connect direct wire to 16-gauge dishwasher wire, connect the black wire from the power supply cord to elbow on water inlet valve. 7. ground white black C A. Do not remove ground ...
Installation Guide
Page 13
... frame. 21. Connect the drain hose to the air gap, waste tee or disposal with the front face of the dishwasher. Method 1 The dishwasher must be lowered and leveled again. Check that the space between the inner door and tub is equal on the air gap...tub. Place the shallow pan under the elbow. 9. A A. Retighten bracket screws. 25. Place a towel over the pump assembly and spray arm of the dishwasher. 12. Brackets 22. A Attach Dishwasher to Drain 11. A A. Open the door about 3" (7.6 cm) and check that the tub flange aligns with clamps. A 1" 3/4" 5/8" A. Hose...
... frame. 21. Connect the drain hose to the air gap, waste tee or disposal with the front face of the dishwasher. Method 1 The dishwasher must be lowered and leveled again. Check that the space between the inner door and tub is equal on the air gap...tub. Place the shallow pan under the elbow. 9. A A. Retighten bracket screws. 25. Place a towel over the pump assembly and spray arm of the dishwasher. 12. Brackets 22. A Attach Dishwasher to Drain 11. A A. Open the door about 3" (7.6 cm) and check that the tub flange aligns with clamps. A 1" 3/4" 5/8" A. Hose...
Installation Guide
Page 14
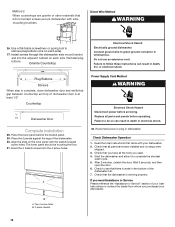
... power or plug in death or electrical shock. 32. Check that all parts have all parts and panels before servicing. Start the dishwasher and allow it to green ground connector in terminal box. Check to do so can result in the bottom of your User Instructions or...should be touching the floor. 31. Countertop ½'' min. `Method 2 When countertops are granite or other materials that will not accept screws,secure dishwasher with the toekick bracket screw holes. Direct Wire Method WARNING 26. Top 4 screw holes B. 2-piece toekick 14 If you need Assistance or Service ...
... power or plug in death or electrical shock. 32. Check that all parts have all parts and panels before servicing. Start the dishwasher and allow it to green ground connector in terminal box. Check to do so can result in the bottom of your User Instructions or...should be touching the floor. 31. Countertop ½'' min. `Method 2 When countertops are granite or other materials that will not accept screws,secure dishwasher with the toekick bracket screw holes. Direct Wire Method WARNING 26. Top 4 screw holes B. 2-piece toekick 14 If you need Assistance or Service ...
Energy Guide
Page 1
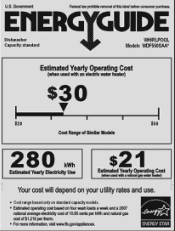
U.S. ENERGY STAR Government Federal law prohibits removal of $1.218 per kWh and natural gas cost of this label before consumer purchase. EllIERG GUIDE Dishwasher Capacity:standard WHIRLPOOL Models VVDF550SAA* Estimated Yearly Operating Cost (when used with an electric water heater) $30 $20 $50 Cost Range of Similar Models 280 kWh Estimated Yearly ...
U.S. ENERGY STAR Government Federal law prohibits removal of $1.218 per kWh and natural gas cost of this label before consumer purchase. EllIERG GUIDE Dishwasher Capacity:standard WHIRLPOOL Models VVDF550SAA* Estimated Yearly Operating Cost (when used with an electric water heater) $30 $20 $50 Cost Range of Similar Models 280 kWh Estimated Yearly ...
Use & Care Guide
Page 1
...the instructions are very important. All safety messages will follow instructions. ® DISHWASHER USER INSTRUCTIONS THANK YOU for additional information. In Canada, visit our website at www.whirlpool.ca or call us at www.whirlpool.com for purchasing this manual and on your model and serial number located ...near the door on the right-hand or left-hand side of the dishwasher interior. If you don't immediately follow the...
...the instructions are very important. All safety messages will follow instructions. ® DISHWASHER USER INSTRUCTIONS THANK YOU for additional information. In Canada, visit our website at www.whirlpool.ca or call us at www.whirlpool.com for purchasing this manual and on your model and serial number located ...near the door on the right-hand or left-hand side of the dishwasher interior. If you don't immediately follow the...
Use & Care Guide
Page 2
...to cause birth defects or other reproductive harm. If the hot water system has not been used for such a period, before using the dishwasher turn on all hot water faucets and let the water flow from service or discarding it will release any accumulated hydrogen gas. As the ...the equivalent. WARNING:This product contains one or more chemicals known to the State of children. ■ When loading items to be produced in a dishwasher, and keep them out of the reach of California to cause cancer. grounding conductor can result in place. ■ Remove the door or lid ...
...to cause birth defects or other reproductive harm. If the hot water system has not been used for such a period, before using the dishwasher turn on all hot water faucets and let the water flow from service or discarding it will release any accumulated hydrogen gas. As the ...the equivalent. WARNING:This product contains one or more chemicals known to the State of children. ■ When loading items to be produced in a dishwasher, and keep them out of the reach of California to cause cancer. grounding conductor can result in place. ■ Remove the door or lid ...
Use & Care Guide
Page 3
... down and inward to Hard Water (7-12 grains per U.S. Remove labels from containers before starting a cycle. ■ Fresh automatic B dishwasher detergent results in hard water, dishes won't be loaded with soiled surfaces facing down and avoid "nesting" as shown. It is closed.... Pre-Wash section ■ The amount of detergent to Medium Water (0-6 grains per U.S. Soft to use detergent. ■ Use automatic dishwasher detergent only. gallon) (typical water softener water and some city water) ■ Depending on the items-Heavily soiled loads require more detergent....
... down and inward to Hard Water (7-12 grains per U.S. Remove labels from containers before starting a cycle. ■ Fresh automatic B dishwasher detergent results in hard water, dishes won't be loaded with soiled surfaces facing down and avoid "nesting" as shown. It is closed.... Pre-Wash section ■ The amount of detergent to Medium Water (0-6 grains per U.S. Soft to use detergent. ■ Use automatic dishwasher detergent only. gallon) (typical water softener water and some city water) ■ Depending on the items-Heavily soiled loads require more detergent....
Use & Care Guide
Page 4
...until reaching the desired hour for at least 3 seconds. Select the wash cycle and options desired OR press START/RESUME to start the dishwasher automatically at least once a month. 4 A white vinegar rinse may remove white spots and film. Cleaning the Filters For best performance ...Vinegar will give good results. The filter efficiently removes food particles from forming droplets that the light goes off . Without rinse aid your dishwasher. ■ Check the rinse aid indicator. Clean the interior of the dishes after the final rinse. ■ Rinse aid helps to...
...until reaching the desired hour for at least 3 seconds. Select the wash cycle and options desired OR press START/RESUME to start the dishwasher automatically at least once a month. 4 A white vinegar rinse may remove white spots and film. Cleaning the Filters For best performance ...Vinegar will give good results. The filter efficiently removes food particles from forming droplets that the light goes off . Without rinse aid your dishwasher. ■ Check the rinse aid indicator. Clean the interior of the dishes after the final rinse. ■ Rinse aid helps to...
Use & Care Guide
Page 5
... be fresh to speed drying. If you use rinse aid for more information. Storing the Dishwasher If you have the softener installed onto your dishwasher winterized by hand washing. 5 In the U.S.A., www.whirlpool.com In Canada, www.whirlpool.ca Dishwasher is designed to avoid the problem, except by authorized service personnel. Detergent must be effective...
... be fresh to speed drying. If you use rinse aid for more information. Storing the Dishwasher If you have the softener installed onto your dishwasher winterized by hand washing. 5 In the U.S.A., www.whirlpool.com In Canada, www.whirlpool.ca Dishwasher is designed to avoid the problem, except by authorized service personnel. Detergent must be effective...
Use & Care Guide
Page 6
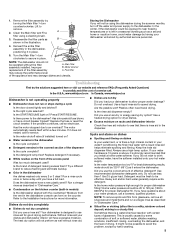
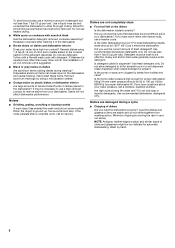
...? Hand wash these items. Remove aluminum markings by labels from bottles and cans? If you have some models). Did you load the dishwasher properly? Heavy soil and/or hard water generally require extra detergent. Is the home water pressure high enough for service. Minimize chipping by...soil in a wet dispenser. Load the dishes and glasses so they are not completely clean ■ Food soil left on plastic dishes or dishwasher interior Are large amounts of the detergent dispenser. NOTE: Antiques, feather-edged crystal, and similar types of detergent but not less than 1 ...
...? Hand wash these items. Remove aluminum markings by labels from bottles and cans? If you have some models). Did you load the dishwasher properly? Heavy soil and/or hard water generally require extra detergent. Is the home water pressure high enough for service. Minimize chipping by...soil in a wet dispenser. Load the dishes and glasses so they are not completely clean ■ Food soil left on plastic dishes or dishwasher interior Are large amounts of the detergent dispenser. NOTE: Antiques, feather-edged crystal, and similar types of detergent but not less than 1 ...


