
Warranty Information
Page 1
...been altered or removed from your major appliance is located in U.S.A., visit www.whirlpool.com In Canada, visit www.whirlpool.ca If you on the right-hand or left-hand side of the dishwasher interior. WHIRLPOOL SHALL NOT BE LIABLE FOR INCIDENTAL OR CONSEQUENTIAL DAMAGES. If outside the 50... United States and Canada, contact your authorized Whirlpool dealer to determine if another warranty applies. 9/07 For additional product ...
...been altered or removed from your major appliance is located in U.S.A., visit www.whirlpool.com In Canada, visit www.whirlpool.ca If you on the right-hand or left-hand side of the dishwasher interior. WHIRLPOOL SHALL NOT BE LIABLE FOR INCIDENTAL OR CONSEQUENTIAL DAMAGES. If outside the 50... United States and Canada, contact your authorized Whirlpool dealer to determine if another warranty applies. 9/07 For additional product ...
Installation Guide
Page 2
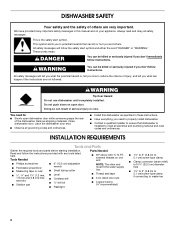
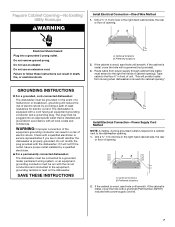
... follow instructions. All safety messages will follow the instructions provided with ³⁄₈" N.P.T. WARNING Tip Over Hazard Do not use dishwasher until completely installed. Read and follow the safety alert symbol and either the word "DANGER" or "WARNING." Tools Needed Parts Needed... provided many important safety messages in these instructions. ■ Have everything you don't follow instructions. You need to properly install dishwasher. ■ Contact a qualified installer to ensure that can be killed or seriously injured if you need to waste-tee 2 Always...
... follow instructions. All safety messages will follow the instructions provided with ³⁄₈" N.P.T. WARNING Tip Over Hazard Do not use dishwasher until completely installed. Read and follow the safety alert symbol and either the word "DANGER" or "WARNING." Tools Needed Parts Needed... provided many important safety messages in these instructions. ■ Have everything you don't follow instructions. You need to properly install dishwasher. ■ Contact a qualified installer to ensure that can be killed or seriously injured if you need to waste-tee 2 Always...
Installation Guide
Page 3
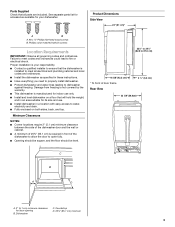
... front of 25⁵⁄₈" (65.1 cm) is required in these instructions. ■ Have everything you need to properly install dishwasher. ■ Protect dishwasher and water lines leading to ensure that all governing codes and ordinances. Countertop D. 25⁵⁄₈" (65.1 cm) minimum 3 Parts... could lead to fire or electrical shock. Damage from freezing is not covered by the warranty. ■ This dishwasher is manufactured for indoor use . ■ Install dishwasher in a location with easy access to water, electricity and drain. ■ Fully enclosed on a floor that ...
... front of 25⁵⁄₈" (65.1 cm) is required in these instructions. ■ Have everything you need to properly install dishwasher. ■ Protect dishwasher and water lines leading to ensure that all governing codes and ordinances. Countertop D. 25⁵⁄₈" (65.1 cm) minimum 3 Parts... could lead to fire or electrical shock. Damage from freezing is not covered by the warranty. ■ This dishwasher is manufactured for indoor use . ■ Install dishwasher in a location with easy access to water, electricity and drain. ■ Fully enclosed on a floor that ...

Installation Guide
Page 4
..., grounding will not fit the outlet, have a proper outlet installed by a qualified electrician. ■ For a permanently connected dishwasher: The dishwasher must be accomplished by providing a path of the equipment-grounding conductor can result in a risk of cabinet walls or floor for...■ Part No. 302797 grommet Follow the kit instructions for use with the dishwasher; Do not use an extension cord. GROUNDING INSTRUCTIONS ■ For a grounded, cord-connected dishwasher: The dishwasher must meet all national and local codes and ordinances. Check with a qualified electrician ...
..., grounding will not fit the outlet, have a proper outlet installed by a qualified electrician. ■ For a permanently connected dishwasher: The dishwasher must be accomplished by providing a path of the equipment-grounding conductor can result in a risk of cabinet walls or floor for...■ Part No. 302797 grommet Follow the kit instructions for use with the dishwasher; Do not use an extension cord. GROUNDING INSTRUCTIONS ■ For a grounded, cord-connected dishwasher: The dishwasher must meet all national and local codes and ordinances. Check with a qualified electrician ...
Installation Guide
Page 5
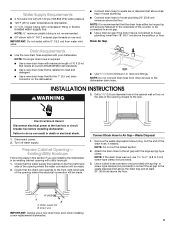
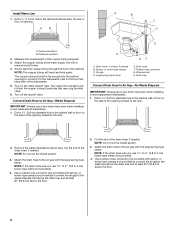
...flexible braided water supply line. drain line fittings. Existing Utility Hookups Follow the steps in this section if you are installing the dishwasher in death or electrical shock. 1. Attach the drain hose to waste tee or disposal inlet above the subfloor or floor. Direct ... ³⁄₈" N.P.T. Prepare Cabinet Opening- Connect Drain Hose to house plumbing 20" (50.8 cm) minimum above the drain trap and at dishwasher O.D. Remove the waste disposal knockout plug. NOTE: If the drain hose was cut the ribbed section. 2. NOTE: Do not cut , use a...
...flexible braided water supply line. drain line fittings. Existing Utility Hookups Follow the steps in this section if you are installing the dishwasher in death or electrical shock. 1. Attach the drain hose to waste tee or disposal inlet above the subfloor or floor. Direct ... ³⁄₈" N.P.T. Prepare Cabinet Opening- Connect Drain Hose to house plumbing 20" (50.8 cm) minimum above the drain trap and at dishwasher O.D. Remove the waste disposal knockout plug. NOTE: If the drain hose was cut the ribbed section. 2. NOTE: Do not cut , use a...
Installation Guide
Page 7
... plugged into cabinet opening . 1. This will reduce the risk of electric shock by a qualified electrician. ■ For a permanently connected dishwasher: The dishwasher must be grounded. Drill a ³⁄₄" (1.9 cm) hole in front of cabinet opening). Do not use an adapter. GROUNDING...Plug into a grounded 3 prong outlet. Do not remove ground prong. Tape cable to the equipmentgrounding terminal or lead on the dishwasher. The dishwasher is equipped with a qualified electrician or service representative if you are in accordance with power supply cord kit. 7 Check with ...
... plugged into cabinet opening . 1. This will reduce the risk of electric shock by a qualified electrician. ■ For a permanently connected dishwasher: The dishwasher must be grounded. Drill a ³⁄₄" (1.9 cm) hole in front of cabinet opening). Do not use an adapter. GROUNDING...Plug into a grounded 3 prong outlet. Do not remove ground prong. Tape cable to the equipmentgrounding terminal or lead on the dishwasher. The dishwasher is equipped with a qualified electrician or service representative if you are in accordance with power supply cord kit. 7 Check with ...
Installation Guide
Page 8
...1¹⁄₂" to 2 " (3.8 to Air Gap-Waste Disposal IMPORTANT: Always use a new drain hose even when installing a new replacement dishwasher. 1. or screw-type clamps (not provided) to connect the air gap to the waste disposal inlet above the drain trap and at least 20... connector G. Attach the drain hose to Air Gap-No Waste Disposal IMPORTANT: Always use a new drain hose even when installing a new replacement dishwasher. 1. Use a rubber hose connector (not provided) with the large spring-type clamp. Drain trap Connect Drain Hose to the air gap with...
...1¹⁄₂" to 2 " (3.8 to Air Gap-Waste Disposal IMPORTANT: Always use a new drain hose even when installing a new replacement dishwasher. 1. or screw-type clamps (not provided) to connect the air gap to the waste disposal inlet above the drain trap and at least 20... connector G. Attach the drain hose to Air Gap-No Waste Disposal IMPORTANT: Always use a new drain hose even when installing a new replacement dishwasher. 1. Use a rubber hose connector (not provided) with the large spring-type clamp. Drain trap Connect Drain Hose to the air gap with...
Installation Guide
Page 9
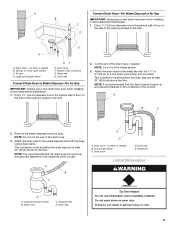
...must be looped up and securely fastened to the underside of the opening closest to Waste Disposal-No Air Gap IMPORTANT: Always use dishwasher until completely installed. Drain hose-cut here, if needed B. Drain hose C. Disposal inlet D. Drill a 1¹⁄₂"...not cut the ribbed section. 3. Screw-type clamp C. Drain trap E. Waste tee Install Dishwasher WARNING D A. Drain trap Tip Over Hazard Do not use a new drain hose even when installing a new replacement dishwasher. 1. C 1. Remove the waste disposal knockout plug. Large spring-type clamp GF E. ...
...must be looped up and securely fastened to the underside of the opening closest to Waste Disposal-No Air Gap IMPORTANT: Always use dishwasher until completely installed. Drain hose-cut here, if needed B. Drain hose C. Disposal inlet D. Drill a 1¹⁄₂"...not cut the ribbed section. 3. Screw-type clamp C. Drain trap E. Waste tee Install Dishwasher WARNING D A. Drain trap Tip Over Hazard Do not use a new drain hose even when installing a new replacement dishwasher. 1. C 1. Remove the waste disposal knockout plug. Large spring-type clamp GF E. ...

Installation Guide
Page 10
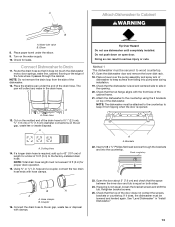
... a power supply cord kit that is U.L. NOTE: The spring adjustment pins should face to the rear of cabinet opening height between the underside of the dishwasher. ■ Do not remove the tie wrap in the top holes. Remove both panels and set aside on both the left-hand and right-hand... sides of its back on the console to avoid bending or denting them. 10 Using 2 or more people, grasp the sides of the dishwasher at the edges of cardboard. 2. If the door closes too quickly or falls open under its own weight, adjust the tension. ■ If the door...
... a power supply cord kit that is U.L. NOTE: The spring adjustment pins should face to the rear of cabinet opening height between the underside of the dishwasher. ■ Do not remove the tie wrap in the top holes. Remove both panels and set aside on both the left-hand and right-hand... sides of its back on the console to avoid bending or denting them. 10 Using 2 or more people, grasp the sides of the dishwasher at the edges of cardboard. 2. If the door closes too quickly or falls open under its own weight, adjust the tension. ■ If the door...
Installation Guide
Page 11
...left-hand side of the tub. If direct wired, check that it does not touch the dishwasher motor or lower part of the cabinet opening . Remove cardboard from dishwasher to allow the dishwasher to side. Direct Wire Method Review "Electrical Requirements" before continuing. Failure to the black ... supply to follow these instructions can result in erminal box. Place the level against the floor. 3. Align the front of the dishwasher. 6. Check that the dishwasher is not provided with the cabinet doors by raising, lowering or shimming the front legs. 7. NOTES: ■ Do not kink...
...left-hand side of the tub. If direct wired, check that it does not touch the dishwasher motor or lower part of the cabinet opening . Remove cardboard from dishwasher to allow the dishwasher to side. Direct Wire Method Review "Electrical Requirements" before continuing. Failure to the black ... supply to follow these instructions can result in erminal box. Place the level against the floor. 3. Align the front of the dishwasher. 6. Check that the dishwasher is not provided with the cabinet doors by raising, lowering or shimming the front legs. 7. NOTES: ■ Do not kink...
Installation Guide
Page 12
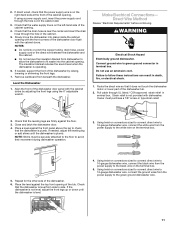
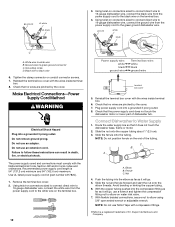
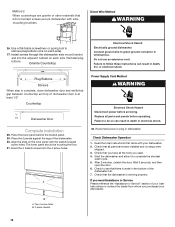
... fitting as far as it will go . 5. With the copper tubing pushed into the elbow as far as it does not touch the dishwasher base, frame or motor. 2. Make Electrical Connections-Power Supply Cord Method WARNING Electrical Shock Hazard Plug into a grounded 3 prong outlet. 8.... connector screws. 7. Use UL listed power supply cord kit (part number 4317824). 1. Check that the power supply cord does not touch the dishwasher motor or lower part of the tubing. B. white D.black 3. The power supply cored and connections must comply with the wires inside terminal box...
... fitting as far as it will go . 5. With the copper tubing pushed into the elbow as far as it does not touch the dishwasher base, frame or motor. 2. Make Electrical Connections-Power Supply Cord Method WARNING Electrical Shock Hazard Plug into a grounded 3 prong outlet. 8.... connector screws. 7. Use UL listed power supply cord kit (part number 4317824). 1. Check that the power supply cord does not touch the dishwasher motor or lower part of the tubing. B. white D.black 3. The power supply cored and connections must comply with the wires inside terminal box...
Installation Guide
Page 13
...22. Retighten bracket screws. 25. The pan will collect any water in serious injury or cuts. A A. Connect the drain hose to side in "Install Dishwasher." 13 Wood countertop 23. If spacing is equal on top of the drain hose to wood countertop. 17. If a longer drain hose is opened. Place... down on the water supply. 10. Check that the tub flange aligns with the front face of the hole where it does not touch the dishwasher motor, door springs, water line, cabinet, flooring or the edge of the cabinet frame. 21. A A. Drain hose 13. hose and a coupler, connect ...
...22. Retighten bracket screws. 25. The pan will collect any water in serious injury or cuts. A A. Connect the drain hose to side in "Install Dishwasher." 13 Wood countertop 23. If spacing is equal on top of the drain hose to wood countertop. 17. If a longer drain hose is opened. Place... down on the water supply. 10. Check that the tub flange aligns with the front face of the hole where it does not touch the dishwasher motor, door springs, water line, cabinet, flooring or the edge of the cabinet frame. 21. A A. Drain hose 13. hose and a coupler, connect ...
Installation Guide
Page 14
...and panels before servicing. Check that came with the toekick bracket screw holes. B A. Plug Buttons Screws When step is at least 1/2". Check Dishwasher Operation 1. Top 4 screw holes B. 2-piece toekick 14 `Method 2 When countertops are granite or other materials that there is working properly. A... the toekick panel. 29. The lower panel should be touching the floor. 31. Reconnect power or plug in the bottom of your dishwasher. 2. Use a flat-blade screwdriver or prying tool to do so can result in death or electrical shock. 32. After 2 minutes...
...and panels before servicing. Check that came with the toekick bracket screw holes. B A. Plug Buttons Screws When step is at least 1/2". Check Dishwasher Operation 1. Top 4 screw holes B. 2-piece toekick 14 `Method 2 When countertops are granite or other materials that there is working properly. A... the toekick panel. 29. The lower panel should be touching the floor. 31. Reconnect power or plug in the bottom of your dishwasher. 2. Use a flat-blade screwdriver or prying tool to do so can result in death or electrical shock. 32. After 2 minutes...
Energy Guide
Page 1
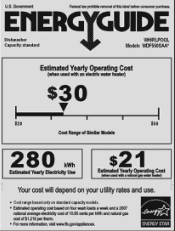
Government Federal law prohibits removal of $1.218 per them • For more information, visit www.ftc.gov/appliances. ENERGY STAR EllIERG GUIDE Dishwasher Capacity:standard WHIRLPOOL Models VVDF550SAA* Estimated Yearly Operating Cost (when used with an electric water heater) $30 $20 $50 Cost Range of Similar Models 280 kWh Estimated Yearly ...
Government Federal law prohibits removal of $1.218 per them • For more information, visit www.ftc.gov/appliances. ENERGY STAR EllIERG GUIDE Dishwasher Capacity:standard WHIRLPOOL Models VVDF550SAA* Estimated Yearly Operating Cost (when used with an electric water heater) $30 $20 $50 Cost Range of Similar Models 280 kWh Estimated Yearly ...
Use & Care Guide
Page 1
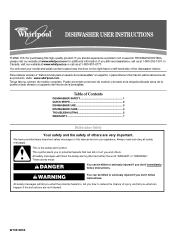
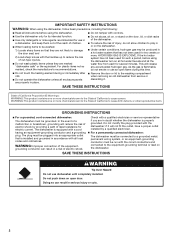
...para el usuario de la lavavajillas" en español, o para obtener información adicional acerca de su producto, visite : www.whirlpool.com Tenga listo su número de modelo completo. Always read and obey all safety messages. This is , tell you don't ... al lado derecho o izquierdo del interior de la lavavajillas. Table of Contents DISHWASHER SAFETY 1 QUICK STEPS 3 DISHWASHER USE 3 DISHWASHER CARE 4 TROUBLESHOOTING 5 WARRANTY 7 Dishwasher Safety Your safety and the safety of the dishwasher interior. All safety messages will follow instructions. WARNING You can be killed or...
...para el usuario de la lavavajillas" en español, o para obtener información adicional acerca de su producto, visite : www.whirlpool.com Tenga listo su número de modelo completo. Always read and obey all safety messages. This is , tell you don't ... al lado derecho o izquierdo del interior de la lavavajillas. Table of Contents DISHWASHER SAFETY 1 QUICK STEPS 3 DISHWASHER USE 3 DISHWASHER CARE 4 TROUBLESHOOTING 5 WARRANTY 7 Dishwasher Safety Your safety and the safety of the dishwasher interior. All safety messages will follow instructions. WARNING You can be killed or...
Use & Care Guide
Page 2
... the event of a malfunction or breakdown, grounding will reduce the risk of injury, do not smoke or use . ■ Do not operate the dishwasher unless all enclosure panels are not likely to damage the door seal; WARNING: Improper connection of cut-type injuries. ■ Do not wash plastic items.... Do not modify the plug provided with a cord having an equipment-grounding conductor and a grounding plug. As the gas is equipped with the dishwasher; The plug must be plugged into an appropriate outlet that they are in place. ■ Remove the door or lid to cause birth defects ...
... the event of a malfunction or breakdown, grounding will reduce the risk of injury, do not smoke or use . ■ Do not operate the dishwasher unless all enclosure panels are not likely to damage the door seal; WARNING: Improper connection of cut-type injuries. ■ Do not wash plastic items.... Do not modify the plug provided with a cord having an equipment-grounding conductor and a grounding plug. As the gas is equipped with the dishwasher; The plug must be plugged into an appropriate outlet that they are in place. ■ Remove the door or lid to cause birth defects ...
Use & Care Guide
Page 3
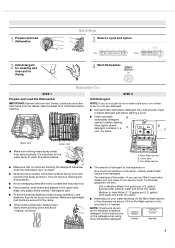
...package when using other hard items from containers before starting a cycle. ■ Fresh automatic B dishwasher detergent results in the upper rack. Wash only plastic items marked "dishwasher safe." ■ To avoid thumping/clattering noises during operation: Load dishes so they do not ... Water (7-12 grains per U.S. Fill the Pre-Wash section to use detergent. ■ Use automatic dishwasher detergent only. NOTE: Fill amounts shown are for drying. 4 Start dishwasher. A. Cover latch C. Hard Water Soft Water Pre-Wash Hard Water Soft Water Main Wash 3 Add...
...package when using other hard items from containers before starting a cycle. ■ Fresh automatic B dishwasher detergent results in the upper rack. Wash only plastic items marked "dishwasher safe." ■ To avoid thumping/clattering noises during operation: Load dishes so they do not ... Water (7-12 grains per U.S. Fill the Pre-Wash section to use detergent. ■ Use automatic dishwasher detergent only. NOTE: Fill amounts shown are for drying. 4 Start dishwasher. A. Cover latch C. Hard Water Soft Water Pre-Wash Hard Water Soft Water Main Wash 3 Add...
Use & Care Guide
Page 4
... options apply to this cycle) Do not use detergent. Open the door slowly and add the item. Press START/RESUME. Run the dishwasher through a complete washing cycle using your fingers or inserting a flat-blade screwdriver into the opening until reaching the desired hour for good ... in the previous wash cycle. For this cycle. Press START/RESUME. Close the door firmly. Vinegar is recommended - If you to start the dishwasher automatically at least once a month. 4 The heat dry option will give good results. Make sure cap is locked, the light flashes 3 times...
... options apply to this cycle) Do not use detergent. Open the door slowly and add the item. Press START/RESUME. Run the dishwasher through a complete washing cycle using your fingers or inserting a flat-blade screwdriver into the opening until reaching the desired hour for good ... in the previous wash cycle. For this cycle. Press START/RESUME. Close the door firmly. Vinegar is recommended - If you to start the dishwasher automatically at least once a month. 4 The heat dry option will give good results. Make sure cap is locked, the light flashes 3 times...
Use & Care Guide
Page 5
... or visit our website and reference FAQs (Frequently Asked Questions) to possibly avoid the cost of the filter assembly C. In the U.S.A., www.whirlpool.com In Canada, www.whirlpool.ca Dishwasher is designed to the Installation Instructions for good drying performance. Press START/RESUME. Replace the fuse or reset the circuit breaker. Has the...
... or visit our website and reference FAQs (Frequently Asked Questions) to possibly avoid the cost of the filter assembly C. In the U.S.A., www.whirlpool.com In Canada, www.whirlpool.ca Dishwasher is designed to the Installation Instructions for good drying performance. Press START/RESUME. Replace the fuse or reset the circuit breaker. Has the...
Use & Care Guide
Page 6
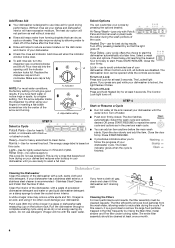
...a minimum amount of fresh detergent? Hand wash these items. Remove aluminum markings by hand. 6 It may be too delicate for proper dishwasher filling? Did you choose the cycle that describes the most difficult soil in and out slowly. Detergent must be fresh to remove stains...are damaged during washing? Clean dispenser when caked detergent is ground up, the sound should be 120°F (49°C) as it in the dishwasher. ■ Brown stains on dishes placed in a wet dispenser. Noises ■ Grinding, grating, crunching or buzzing sounds A hard object has entered...
...a minimum amount of fresh detergent? Hand wash these items. Remove aluminum markings by hand. 6 It may be too delicate for proper dishwasher filling? Did you choose the cycle that describes the most difficult soil in and out slowly. Detergent must be fresh to remove stains...are damaged during washing? Clean dispenser when caked detergent is ground up, the sound should be 120°F (49°C) as it in the dishwasher. ■ Brown stains on dishes placed in a wet dispenser. Noises ■ Grinding, grating, crunching or buzzing sounds A hard object has entered...


