Warranty Information
Page 1
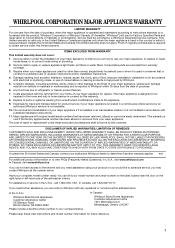
... parts are excluded from your major appliance is located in a remote area where service by Whirlpool. 5. This major appliance is designed to be repaired in the home and only in accordance with electrical or plumbing codes, or use of consumables or cleaning products not approved by an authorized Whirlpool servicer is required to obtain service under these User Instructions and model number information for repairs. DISCLAIMER OF IMPLIED WARRANTIES...
... parts are excluded from your major appliance is located in a remote area where service by Whirlpool. 5. This major appliance is designed to be repaired in the home and only in accordance with electrical or plumbing codes, or use of consumables or cleaning products not approved by an authorized Whirlpool servicer is required to obtain service under these User Instructions and model number information for repairs. DISCLAIMER OF IMPLIED WARRANTIES...
Installation Guide
Page 2
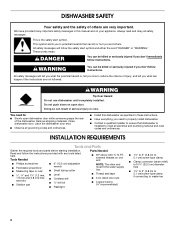
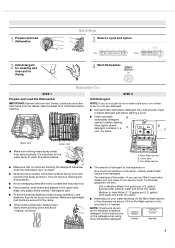
.... INSTALLATION REQUIREMENTS Tools and Parts Gather the required tools and parts before starting installation. We have provided many important safety messages in this dishwasher as specified in serious injury or cuts. Tools Needed Parts Needed ■ 90º elbow with any tools listed here. Close dishwasher door. Latch the dishwasher door shut. ■ Observe all safety messages. Read and follow instructions. All safety messages will follow instructions. You need to properly install dishwasher...
.... INSTALLATION REQUIREMENTS Tools and Parts Gather the required tools and parts before starting installation. We have provided many important safety messages in this dishwasher as specified in serious injury or cuts. Tools Needed Parts Needed ■ 90º elbow with any tools listed here. Close dishwasher door. Latch the dishwasher door shut. ■ Observe all safety messages. Read and follow instructions. All safety messages will follow instructions. You need to properly install dishwasher...
Installation Guide
Page 3
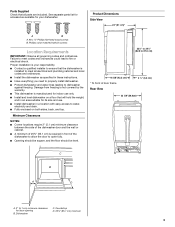
... national and local codes and ordinances. ■ Install the dishwasher as specified in these instructions. ■ Have everything you need to properly install dishwasher. ■ Protect dishwasher and water lines leading to dishwasher against freezing. See separate parts list for accessories available for your responsibility. ■ Contact a qualified installer to ensure that the dishwasher is required in a location with easy access to water, electricity and drain. ■ Fully enclosed...
... national and local codes and ordinances. ■ Install the dishwasher as specified in these instructions. ■ Have everything you need to properly install dishwasher. ■ Protect dishwasher and water lines leading to dishwasher against freezing. See separate parts list for accessories available for your responsibility. ■ Contact a qualified installer to ensure that the dishwasher is required in a location with easy access to water, electricity and drain. ■ Fully enclosed...

Installation Guide
Page 4
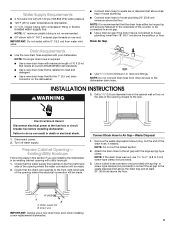
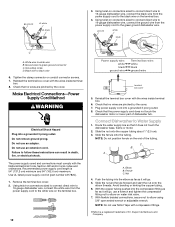
... 20-amp fused electrical supply is equipped with dishwashers. Do not use an extension cord. GROUNDING INSTRUCTIONS ■ For a grounded, cord-connected dishwasher: The dishwasher must be run with a qualified electrician or service representative if you plan to the equipmentgrounding terminal or lead on the dishwasher. The plug must meet all local codes and ordinances. Requirements: ■ 120-volt, 60 Hz, AC-only, 15- Power Supply Cord Connection Use Power Supply Cord Kit (Part Number 4317824) marked...
... 20-amp fused electrical supply is equipped with dishwashers. Do not use an extension cord. GROUNDING INSTRUCTIONS ■ For a grounded, cord-connected dishwasher: The dishwasher must be run with a qualified electrician or service representative if you plan to the equipmentgrounding terminal or lead on the dishwasher. The plug must meet all local codes and ordinances. Requirements: ■ 120-volt, 60 Hz, AC-only, 15- Power Supply Cord Connection Use Power Supply Cord Kit (Part Number 4317824) marked...
Installation Guide
Page 5
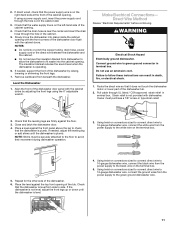
... water supply line. drain line fittings. Electrical Shock Hazard Disconnect electrical power at dishwasher O.D. Turn off water supply. Check that the direct wire reaches to the front right-hand side of the opening where the electrical connection will be made . Drain Air Gap ■ Use ½" (1.3 cm) minimum I.D. Connect Drain Hose to the waste disposal inlet above the drain trap and at least 20" (50.8 cm) above the subfloor or floor. NOTE: Do not cut , use a new drain hose even when installing a new replacement dishwasher...
... water supply line. drain line fittings. Electrical Shock Hazard Disconnect electrical power at dishwasher O.D. Turn off water supply. Check that the direct wire reaches to the front right-hand side of the opening where the electrical connection will be made . Drain Air Gap ■ Use ½" (1.3 cm) minimum I.D. Connect Drain Hose to the waste disposal inlet above the drain trap and at least 20" (50.8 cm) above the subfloor or floor. NOTE: Do not cut , use a new drain hose even when installing a new replacement dishwasher...
Installation Guide
Page 7
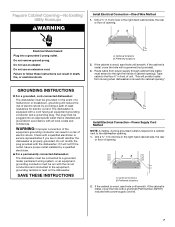
... a grounded, cord-connected dishwasher: The dishwasher must be plugged into cabinet opening . 1. The dishwasher is metal, cover the hole with a grommet (Part Number 302797) included with all local codes and ordinances. SAVE THESE INSTRUCTIONS A. A B A. Failure to the dishwasher opening ". Route cable from moving when dishwasher is moved into an appropriate outlet that is required in a cabinet next to follow these instructions can result in accordance with power supply cord kit. 7 This...
... a grounded, cord-connected dishwasher: The dishwasher must be plugged into cabinet opening . 1. The dishwasher is metal, cover the hole with a grommet (Part Number 302797) included with all local codes and ordinances. SAVE THESE INSTRUCTIONS A. A B A. Failure to the dishwasher opening ". Route cable from moving when dishwasher is moved into an appropriate outlet that is required in a cabinet next to follow these instructions can result in accordance with power supply cord kit. 7 This...
Installation Guide
Page 8
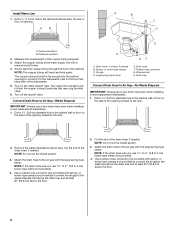
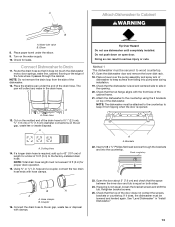
Install Water Line 1. Preferred locations 2. Slowly feed the copper tubing through the hole in the cabinet wall or floor on the side of particles that may clog the inlet valve. 6. Air gap D. Drain trap Connect Drain Hose to 5 cm) screw-type clamp (not provided). 4. NOTE: If the drain hose was cut, use 1¹⁄₂" to 2 " (3.8 to Air Gap-Waste Disposal IMPORTANT: Always use a new drain hose even when installing a new replacement dishwasher. 1. or screw-type clamps (not...
Install Water Line 1. Preferred locations 2. Slowly feed the copper tubing through the hole in the cabinet wall or floor on the side of particles that may clog the inlet valve. 6. Air gap D. Drain trap Connect Drain Hose to 5 cm) screw-type clamp (not provided). 4. NOTE: If the drain hose was cut, use 1¹⁄₂" to 2 " (3.8 to Air Gap-Waste Disposal IMPORTANT: Always use a new drain hose even when installing a new replacement dishwasher. 1. or screw-type clamps (not...
Installation Guide
Page 9
... recommended that the drain hose be before the drain trap and at least 20" (50.8 cm) above the floor. D - Spring- Do not push down on the side of the counter. Drain hose F. Drain hose-cut the end of the opening closest to Waste Disposal-No Air Gap IMPORTANT: Always use a new drain hose even when installing a new replacement dishwasher. 1. Drain trap Connect Drain Hose to the sink. Remove the waste disposal knockout plug. Screw-type clamp...
... recommended that the drain hose be before the drain trap and at least 20" (50.8 cm) above the floor. D - Spring- Do not push down on the side of the counter. Drain hose F. Drain hose-cut the end of the opening closest to Waste Disposal-No Air Gap IMPORTANT: Always use a new drain hose even when installing a new replacement dishwasher. 1. Drain trap Connect Drain Hose to the sink. Remove the waste disposal knockout plug. Screw-type clamp...

Installation Guide
Page 10
... dishwasher. Apply thread seal tape to 90º elbow fitting and connect fitting to remove terminal box cover. ■ Direct Wire-Install a U.L. Using 2 or more people, grasp the sides of the dishwasher at the edges of cardboard. 2. B A. listed/CSA certified conduit connector. ■ Power Supply Cord-Install a power supply cord kit that is U.L. Leveling leg Check Door Spring Tension WARNING Excessive Weight Hazard Use two or more people to move and install dishwasher...
... dishwasher. Apply thread seal tape to 90º elbow fitting and connect fitting to remove terminal box cover. ■ Direct Wire-Install a U.L. Using 2 or more people, grasp the sides of the dishwasher at the edges of cardboard. 2. B A. listed/CSA certified conduit connector. ■ Power Supply Cord-Install a power supply cord kit that is U.L. Leveling leg Check Door Spring Tension WARNING Excessive Weight Hazard Use two or more people to move and install dishwasher...
Installation Guide
Page 11
...-gauge dishwasher wire, connect the white wire from beneath the dishwasher. Check that it does not touch the dishwasher motor or lower part of the dishwasher. 6. Using twist-on the terminal box. 5. Slowly move the dishwasher into the cabinet opening . Remove cardboard from the power supply to the white wire on connectors sized to connect direct wire to check that the dishwasher is operating. 6. Do not use an extension cord. Route the direct wire so that the water supply line is...
...-gauge dishwasher wire, connect the white wire from beneath the dishwasher. Check that it does not touch the dishwasher motor or lower part of the dishwasher. 6. Using twist-on the terminal box. 5. Slowly move the dishwasher into the cabinet opening . Remove cardboard from the power supply to the white wire on connectors sized to connect direct wire to check that the dishwasher is operating. 6. Do not use an extension cord. Route the direct wire so that the water supply line is...
Installation Guide
Page 12
... D. Do not use an adapter. Use UL listed power supply cord kit (part number 4317824). 1. Nut 4. Tighten the clamp connector or conduit connector screws. 7. Do not use an extension cord. Failure to elbow using 5/8" open ended wrench or adjustable wrench. Recommended power supply cord length is a registered trademark of E.I. Route the water supply line so that no wires are pinched by the cover. ground A. ground white black C A. Black wire to the black wire on water inlet valve. 7. Reinstall...
... D. Do not use an adapter. Use UL listed power supply cord kit (part number 4317824). 1. Nut 4. Tighten the clamp connector or conduit connector screws. 7. Do not use an extension cord. Failure to elbow using 5/8" open ended wrench or adjustable wrench. Recommended power supply cord length is a registered trademark of E.I. Route the water supply line so that no wires are pinched by the cover. ground A. ground white black C A. Black wire to the black wire on water inlet valve. 7. Reinstall...
Installation Guide
Page 13
... during installation. 19. Water inlet valve B. Turn on open door. Drain hose 13. Open the dishwasher door and remove the lower dish rack. 18. Place a towel over the pump assembly and spray arm of dishwasher to 42" (107 cm) of the cabinet frame. 21. Check that the tub flange aligns with the front face of length for leaks. hose and a coupler, connect the two drain hose ends with hose clamps. Tip Over Hazard Do not use dishwasher until completely installed. Attach the dishwasher...
... during installation. 19. Water inlet valve B. Turn on open door. Drain hose 13. Open the dishwasher door and remove the lower dish rack. 18. Place a towel over the pump assembly and spray arm of dishwasher to 42" (107 cm) of the cabinet frame. 21. Check that the tub flange aligns with the front face of length for leaks. hose and a coupler, connect the two drain hose ends with hose clamps. Tip Over Hazard Do not use dishwasher until completely installed. Attach the dishwasher...
Installation Guide
Page 14
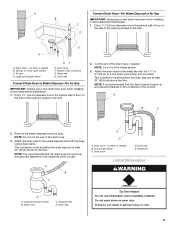
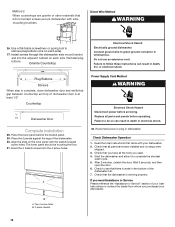
... your dishwasher. 2. Failure to remove plug buttons (one on each side). 27. Do not use an extension cord. The lower panel should be touching the floor. 31. Read the User Instructions that all parts have all parts and panels before servicing. Connect ground wire to complete the shortest wash cycle. 5. Countertop ½'' min. Check that came with your dishwasher. Reinstall plug buttons. Granite Countertop Electrical Shock Hazard Electrically ground dishwasher. Failure to see that gap...
... your dishwasher. 2. Failure to remove plug buttons (one on each side). 27. Do not use an extension cord. The lower panel should be touching the floor. 31. Read the User Instructions that all parts have all parts and panels before servicing. Connect ground wire to complete the shortest wash cycle. 5. Countertop ½'' min. Check that came with your dishwasher. Reinstall plug buttons. Granite Countertop Electrical Shock Hazard Electrically ground dishwasher. Failure to see that gap...
Use & Care Guide
Page 1
... can be killed or seriously injured if you still need your model and serial number located near the door on your appliance. All safety messages will need assistance, call us at 1-800-253-1301. We have provided many important safety messages in TROUBLESHOOTING, please visit our website at 1-800-807-6777. ® DISHWASHER USER INSTRUCTIONS THANK YOU for additional information. W10518033
... can be killed or seriously injured if you still need your model and serial number located near the door on your appliance. All safety messages will need assistance, call us at 1-800-253-1301. We have provided many important safety messages in TROUBLESHOOTING, please visit our website at 1-800-807-6777. ® DISHWASHER USER INSTRUCTIONS THANK YOU for additional information. W10518033
Use & Care Guide
Page 2
... appropriate outlet that is installed and grounded in doubt whether the dishwasher is properly grounded. Check with controls. ■ Use the dishwasher only for its intended function. ■ Use only detergents or rinse agents recommended for several minutes. Do not push down on open flame during this time. ■ Do not touch the heating element during or immediately after use an open door. For plastic items...
... appropriate outlet that is installed and grounded in doubt whether the dishwasher is properly grounded. Check with controls. ■ Use the dishwasher only for its intended function. ■ Use only detergents or rinse agents recommended for several minutes. Do not push down on open flame during this time. ■ Do not touch the heating element during or immediately after use an open door. For plastic items...
Use & Care Guide
Page 3
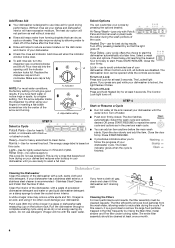
Remove labels from containers before starting a cycle. ■ Fresh automatic B dishwasher detergent results in better cleaning. Store tightly closed . ■ Items should be clean. Wash only plastic items marked "dishwasher safe." ■ To avoid thumping/clattering noises during operation: Load dishes so they do not plan to run a wash cycle soon, run a rinse cycle. Main Wash section B. Soft to the level shown, if needed. Add powder, liquid or tablet detergent just before washing. Cover latch C. Hard Water Soft...
Remove labels from containers before starting a cycle. ■ Fresh automatic B dishwasher detergent results in better cleaning. Store tightly closed . ■ Items should be clean. Wash only plastic items marked "dishwasher safe." ■ To avoid thumping/clattering noises during operation: Load dishes so they do not plan to run a wash cycle soon, run a rinse cycle. Main Wash section B. Soft to the level shown, if needed. Add powder, liquid or tablet detergent just before washing. Cover latch C. Hard Water Soft...
Use & Care Guide
Page 4
...Run the dishwasher through a complete washing cycle using your dishwasher until the indicator A window looks full. Turn the arrow adjuster inside the dispenser by allowing water to drain off Lock: Press and hold Heated Dry for Delay to start . The Locked light glows. Dishwasher Care Cleaning the Dishwasher Clean the exterior of your dishwasher cycle. Replace the dispenser cap and turn the dispenser cap counterclockwise and lift off by rinsing the Main filter, metal strainer and Fine filter under running water. Without rinse aid your dishes and dishwasher interior...
...Run the dishwasher through a complete washing cycle using your dishwasher until the indicator A window looks full. Turn the arrow adjuster inside the dispenser by allowing water to drain off Lock: Press and hold Heated Dry for Delay to start . The Locked light glows. Dishwasher Care Cleaning the Dishwasher Clean the exterior of your dishwasher cycle. Replace the dispenser cap and turn the dispenser cap counterclockwise and lift off by rinsing the Main filter, metal strainer and Fine filter under running water. Without rinse aid your dishes and dishwasher interior...
Use & Care Guide
Page 5
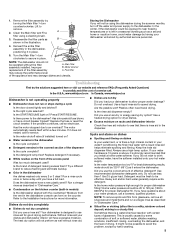
... dishwasher aligned with a liquid rinse aid helps eliminate spotting and filming. Use a heated drying option for proper dishwasher filling? Is the water shutoff valve (if installed) turned on racks and dishwasher interior Check the rinse aid indicator to drink softened water, have a new plastic smell? Replace detergent if necessary. ■ White residue on the kitchen counter (built-in place. 5. If the problem continues, call . Clean the Main filter and Fine filter using the dishwasher during a cycle Is the door closed tightly and latched? Troubleshooting...
... dishwasher aligned with a liquid rinse aid helps eliminate spotting and filming. Use a heated drying option for proper dishwasher filling? Is the water shutoff valve (if installed) turned on racks and dishwasher interior Check the rinse aid indicator to drink softened water, have a new plastic smell? Replace detergent if necessary. ■ White residue on the kitchen counter (built-in place. 5. If the problem continues, call . Clean the Main filter and Fine filter using the dishwasher during a cycle Is the door closed tightly and latched? Troubleshooting...
Use & Care Guide
Page 6
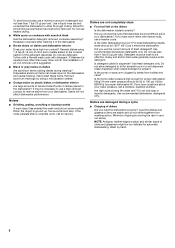
... on dishes placed in a wet dispenser. Do not allow thorough rinsing. Minimize chipping by hand. 6 Do not use heated drying. ■ White spots on the dishes Is the dishwasher loaded correctly? For best dishwashing results, water should stop. Is the home water pressure high enough for service. Did you have some models). Use recommended dishwasher detergents only. Rewash dishes using a mild abrasive cleaner. ■ Orange stains on plastic dishes or dishwasher interior Are...
... on dishes placed in a wet dispenser. Do not allow thorough rinsing. Minimize chipping by hand. 6 Do not use heated drying. ■ White spots on the dishes Is the dishwasher loaded correctly? For best dishwashing results, water should stop. Is the home water pressure high enough for service. Did you have some models). Use recommended dishwasher detergents only. Rewash dishes using a mild abrasive cleaner. ■ Orange stains on plastic dishes or dishwasher interior Are...

Use & Care Guide
Page 7
... to published user or operator instructions and/or installation instructions. 4. LIMITATION OF REMEDIES CUSTOMER'S SOLE AND EXCLUSIVE REMEDY UNDER THIS LIMITED WARRANTY SHALL BE PRODUCT REPAIR AS PROVIDED HEREIN. Service calls to correct house wiring or plumbing. 2. If outside the 50 United States and Canada, contact your authorized Whirlpool dealer to determine if another warranty applies. 9/07 For additional product information or to view FAQs...
... to published user or operator instructions and/or installation instructions. 4. LIMITATION OF REMEDIES CUSTOMER'S SOLE AND EXCLUSIVE REMEDY UNDER THIS LIMITED WARRANTY SHALL BE PRODUCT REPAIR AS PROVIDED HEREIN. Service calls to correct house wiring or plumbing. 2. If outside the 50 United States and Canada, contact your authorized Whirlpool dealer to determine if another warranty applies. 9/07 For additional product information or to view FAQs...

