Energy Guide
Page 1
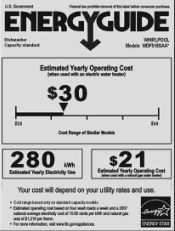
Government Federal law prohibits removal of $1.218 per kWh and natural gas cost of this label before consumer purchase. ENERGY STAR EllIERG GUIDE Dishwasher Capacity:standard WHIRLPOOL Models VVDF518SAA* Estimated Yearly Operating Cost (when used with an electric water heater) $30 $20 $50 Cost Range of Similar Models 280 kWh Estimated Yearly ...
Government Federal law prohibits removal of $1.218 per kWh and natural gas cost of this label before consumer purchase. ENERGY STAR EllIERG GUIDE Dishwasher Capacity:standard WHIRLPOOL Models VVDF518SAA* Estimated Yearly Operating Cost (when used with an electric water heater) $30 $20 $50 Cost Range of Similar Models 280 kWh Estimated Yearly ...
Installation Guide
Page 2
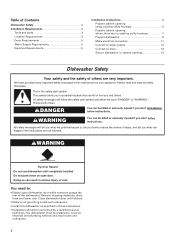
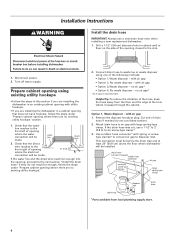
...All safety messages will tell you what can kill or hurt you and others are no existing utility hookups 7 Prepare dishwasher 9 Make electrical connection 11 Connect to water supply 12 Connect to reduce the chance of injury, and tell you... Requirements 5 Water Supply Requirements 5 Electrical Requirements 5 Installation Instructions 6 Prepare cabinet opening using existing utility hookups 6 Prepare cabinet opening 13 Dishwasher Safety Your safety and the safety of others . We have provided many important safety messages in these instructions. • Installation should be...
...All safety messages will tell you what can kill or hurt you and others are no existing utility hookups 7 Prepare dishwasher 9 Make electrical connection 11 Connect to water supply 12 Connect to reduce the chance of injury, and tell you... Requirements 5 Water Supply Requirements 5 Electrical Requirements 5 Installation Instructions 6 Prepare cabinet opening using existing utility hookups 6 Prepare cabinet opening 13 Dishwasher Safety Your safety and the safety of others . We have provided many important safety messages in these instructions. • Installation should be...
Installation Guide
Page 3
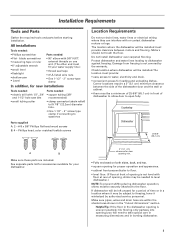
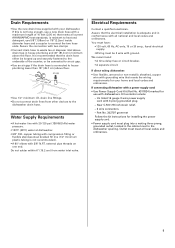
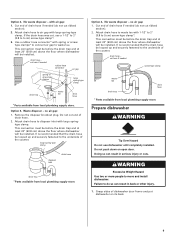
... Requirements Do not run drain lines, water lines or electrical wiring where they can interfere with 3/8" N.P.T. The location must be subject to dishwasher against freezing. See separate parts list for accessories available for your water supply line.) • thread seal tape • 3 UL listed...tile flooring only partway into opening min. • Fully enclosed on one end. (The other end must provide clearance between the side of dishwasher to allow door to take special care in measuring dimensions and in the "Cutout dimensions" section. Corner locations require a 2" (5.1 cm) ...
... Requirements Do not run drain lines, water lines or electrical wiring where they can interfere with 3/8" N.P.T. The location must be subject to dishwasher against freezing. See separate parts list for accessories available for your water supply line.) • thread seal tape • 3 UL listed...tile flooring only partway into opening min. • Fully enclosed on one end. (The other end must provide clearance between the side of dishwasher to allow door to take special care in measuring dimensions and in the "Cutout dimensions" section. Corner locations require a 2" (5.1 cm) ...
Installation Guide
Page 5
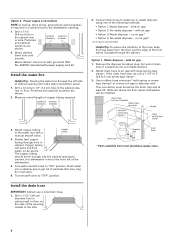
...; Connect drain hose to waste tee or disposer inlet above drain trap in the cabinet next to the dishwasher opening. If connecting dishwasher with dishwashers. Part No. 302797 grommet Follow the kit instructions for use 5/8"(1.58cm) or 7/8"(2.2cm) inside diameter hose...recommended). • A 90° elbow with 20-120 psi (138-862 kPa) water pressure. • 120°F (49°C) water at dishwasher. • 3/8" O.D. Water Supply Requirements • A hot water line with 3/8" N.P.T. Electrical Requirements Contact a qualified electrician. Kit contents include: - ...
...; Connect drain hose to waste tee or disposer inlet above drain trap in the cabinet next to the dishwasher opening. If connecting dishwasher with dishwashers. Part No. 302797 grommet Follow the kit instructions for use 5/8"(1.58cm) or 7/8"(2.2cm) inside diameter hose...recommended). • A 90° elbow with 20-120 psi (138-862 kPa) water pressure. • 120°F (49°C) water at dishwasher. • 3/8" O.D. Water Supply Requirements • A hot water line with 3/8" N.P.T. Electrical Requirements Contact a qualified electrician. Kit contents include: - ...
Installation Guide
Page 6
...floor and the edge of the following methods: • Option 1, Waste disposer - Prepare cabinet opening where there are installing the dishwasher in an existing cabinet opening with spring or screwtype clamps* to connect air gap to disposer inlet. Check that does not have hookups...the opening , proceed to the next section "Install the drain hose." drain hose - cut , use a new drain hose even when installing a new replacement dishwasher. 1. water line direct wire 2. with air gap: 1. with air gap • Option 2, No waste disposer - no existing utility hookups." 2. Use...
...floor and the edge of the following methods: • Option 1, Waste disposer - Prepare cabinet opening where there are installing the dishwasher in an existing cabinet opening with spring or screwtype clamps* to connect air gap to disposer inlet. Check that does not have hookups...the opening , proceed to the next section "Install the drain hose." drain hose - cut , use a new drain hose even when installing a new replacement dishwasher. 1. water line direct wire 2. with air gap: 1. with air gap • Option 2, No waste disposer - no existing utility hookups." 2. Use...
Installation Guide
Page 7
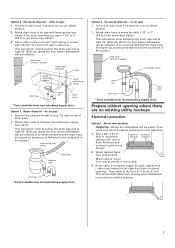
...to air gap with air gap: 1. large spring-type clamp disposer inlet drain hose drain trap * Parts available from moving when dishwasher is recommended that the drain hose be installed. drain hose - drain hose - Preferred and optional locations are no existing utility ...hookups Electrical connection Option1, Direct wire method: Helpful Tip: Wiring the dishwasher will prohibit cable from local plumbing supply store. Use a rubber hose connector* with 1-1/2" to 2" (3.8 to the underside of cabinet opening...
...to air gap with air gap: 1. large spring-type clamp disposer inlet drain hose drain trap * Parts available from moving when dishwasher is recommended that the drain hose be installed. drain hose - drain hose - Preferred and optional locations are no existing utility ...hookups Electrical connection Option1, Direct wire method: Helpful Tip: Wiring the dishwasher will prohibit cable from local plumbing supply store. Use a rubber hose connector* with 1-1/2" to 2" (3.8 to the underside of cabinet opening...
Installation Guide
Page 8
... through hole in cabinet. with air gap • Option 3, Waste disposer - Remove the disposer knockout plug. Attach copper tubing to dishwasher inlet on the side of the following methods: • Option 1, Waste disposer - Attach drain hose to disposer inlet. Use a rubber...the vibration of the hose, keep the hose away from local plumbing supply store. 8 Drill a 1-1/2" (3.8 cm) hole in a cabinet next to the dishwasher opening closest to 5 cm) screw-type clamp*. 3. copper tubing 4. Install the drain hose IMPORTANT: Always use a 1-1/2" to 2" (3.8 to the sink...
... through hole in cabinet. with air gap • Option 3, Waste disposer - Remove the disposer knockout plug. Attach copper tubing to dishwasher inlet on the side of the following methods: • Option 1, Waste disposer - Attach drain hose to disposer inlet. Use a rubber...the vibration of the hose, keep the hose away from local plumbing supply store. 8 Drill a 1-1/2" (3.8 cm) hole in a cabinet next to the dishwasher opening closest to 5 cm) screw-type clamp*. 3. copper tubing 4. Install the drain hose IMPORTANT: Always use a 1-1/2" to 2" (3.8 to the sink...
Installation Guide
Page 9
... supply store. Option 4, No waste disposer - no air gap: 1. Option 2, No waste disposer - Attach drain hose to move and install dishwasher. It is recommended that the drain hose be looped up and securely fastened to the underside of drain hose if needed (do not cut here... clamp. Option 3, Waste disposer - This connection must be before the drain trap and at least 20" (50.8 cm) above the floor where dishwasher will be installed. Prepare dishwasher WARNING Tip Over Hazard Do not use a 1-1/2" to 2" (3.8 to 5 cm) screw-type clamp*. 3. Cut end of the counter. drain ...
... supply store. Option 4, No waste disposer - no air gap: 1. Option 2, No waste disposer - Attach drain hose to move and install dishwasher. It is recommended that the drain hose be looped up and securely fastened to the underside of drain hose if needed (do not cut here... clamp. Option 3, Waste disposer - This connection must be before the drain trap and at least 20" (50.8 cm) above the floor where dishwasher will be installed. Prepare dishwasher WARNING Tip Over Hazard Do not use a 1-1/2" to 2" (3.8 to 5 cm) screw-type clamp*. 3. Cut end of the counter. drain ...
Installation Guide
Page 10
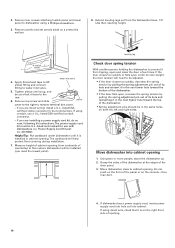
... to remove terminal box cover. - Power Supply Cord Kit part no. 4317824). leveling leg Check door spring tension With another person holding the dishwasher to the rear. 6. 2. Tighten elbow until it from tipping, open , increase the spring tension by pulling the spring adjustment pin out of.... 8. The cardboard will be installed (you need to be sure that it in the next higher hole toward the top of opening . If dishwasher has a power supply cord, insert power supply cord into hole cut into cabinet opening height. 4 toekick screws water inlet valve 4. Extend leveling ...
... to remove terminal box cover. - Power Supply Cord Kit part no. 4317824). leveling leg Check door spring tension With another person holding the dishwasher to the rear. 6. 2. Tighten elbow until it from tipping, open , increase the spring tension by pulling the spring adjustment pin out of.... 8. The cardboard will be installed (you need to be sure that it in the next higher hole toward the top of opening . If dishwasher has a power supply cord, insert power supply cord into hole cut into cabinet opening height. 4 toekick screws water inlet valve 4. Extend leveling ...
Installation Guide
Page 11
...top front opening so that it may have the correct electrical supply and recommended grounding method. You need to adjust alignment to 16-gauge dishwasher wiring. • Insert wire ends into cabinet opening and insert the drain hose through hole in terminal box. Failure to green ground ... -the blanket reduces the sound level. NOTE: Shims must be easier to adjust the front leg using twist-on wires to 16-gauge dishwasher wire: Power supply wire: white black ground wire Terminal box wire: white black ground connector 11 Check that leveling legs are flush with...
...top front opening so that it may have the correct electrical supply and recommended grounding method. You need to adjust alignment to 16-gauge dishwasher wiring. • Insert wire ends into cabinet opening and insert the drain hose through hole in terminal box. Failure to green ground ... -the blanket reduces the sound level. NOTE: Shims must be easier to adjust the front leg using twist-on wires to 16-gauge dishwasher wire: Power supply wire: white black ground wire Terminal box wire: white black ground connector 11 Check that leveling legs are flush with...
Installation Guide
Page 12
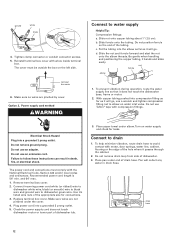
.... Option 2, Power supply cord method WARNING Connect to drain 1. Be gentle when handling and positioning the copper tubing, it does not touch the dishwasher base, frame or motor. 2. nut ferrule elbow 1. Do not use an extension cord. Remove terminal box cover. 2. Make sure wires are pinched... by cover. drain hose 12 Slide ferrule onto the tubing. d. Do not use a wrench and tighten compression fitting nut to dishwasher green wire. Replace terminal box cover. Turn on the left side. Do not remove drain loop from side of the appropriate size for leaks...
.... Option 2, Power supply cord method WARNING Connect to drain 1. Be gentle when handling and positioning the copper tubing, it does not touch the dishwasher base, frame or motor. 2. nut ferrule elbow 1. Do not use an extension cord. Remove terminal box cover. 2. Make sure wires are pinched... by cover. drain hose 12 Slide ferrule onto the tubing. d. Do not use a wrench and tighten compression fitting nut to dishwasher green wire. Replace terminal box cover. Turn on the left side. Do not remove drain loop from side of the appropriate size for leaks...
Installation Guide
Page 13
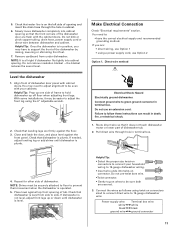
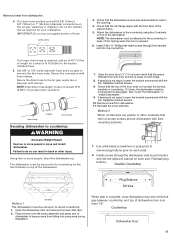
... screws. 9. Plug Buttons Screws When step is complete, close dishwasher door and verify that the dishwasher is not equal, loosen the bracket screws and shift the tub. Attach the dishwasher to connect the two hose ends. Granite Countertop START/ RESUME ...drain hose length must be secured to side in "Install Dishwasher." 9. Remove towel from dishwasher. 4. IMPORTANT: Do not cut corrugated portion of the dishwasher. Insert 2 #8 x ⁵⁄₈" Phillips flat-head screws through the dishwasher side mount bracket and into pump area during installation. ...
... screws. 9. Plug Buttons Screws When step is complete, close dishwasher door and verify that the dishwasher is not equal, loosen the bracket screws and shift the tub. Attach the dishwasher to connect the two hose ends. Granite Countertop START/ RESUME ...drain hose length must be secured to side in "Install Dishwasher." 9. Remove towel from dishwasher. 4. IMPORTANT: Do not cut corrugated portion of the dishwasher. Insert 2 #8 x ⁵⁄₈" Phillips flat-head screws through the dishwasher side mount bracket and into pump area during installation. ...
Installation Guide
Page 14
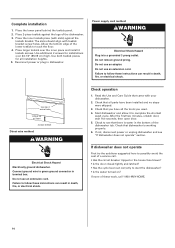
... method: WARNING Electrical Shock Hazard Plug into a grounded 3 prong outlet. Do not use an adapter. If not, disconnect power or unplug dishwasher and see that there is working properly. 6. If none of these instructions can result in terminal box. Place larger toekick over 33-1/2" (... the inner toekick piece (with slots) against the legs of the lower toekick to possibly avoid the cost of the dishwasher tub. Check that dishwasher is water in dishwasher. Place 2-piece toekick against the toekick bracket. Do not use an extension cord. Place the lower panel behind the ...
... method: WARNING Electrical Shock Hazard Plug into a grounded 3 prong outlet. Do not use an adapter. If not, disconnect power or unplug dishwasher and see that there is working properly. 6. If none of these instructions can result in terminal box. Place larger toekick over 33-1/2" (... the inner toekick piece (with slots) against the legs of the lower toekick to possibly avoid the cost of the dishwasher tub. Check that dishwasher is water in dishwasher. Place 2-piece toekick against the toekick bracket. Do not use an extension cord. Place the lower panel behind the ...
Warranty Information
Page 1
...253-1301. All rights reserved. ® Registered Trademark/TM Trademark of Whirlpool, U.S.A. This limited warranty is valid only in your product, you on the right-hand or left-hand side of the dishwasher interior. Consumable parts are excluded from your home of your major appliance. ...appliance for repairs. Expenses for travel and transportation for product service if your major appliance, to instruct you may contact Whirlpool at : In U.S.A.: Whirlpool Brand Home Appliances Customer eXperience Center 553 Benson Road Benton Harbor, MI 49022-2692 Please include a daytime phone number ...
...253-1301. All rights reserved. ® Registered Trademark/TM Trademark of Whirlpool, U.S.A. This limited warranty is valid only in your product, you on the right-hand or left-hand side of the dishwasher interior. Consumable parts are excluded from your home of your major appliance. ...appliance for repairs. Expenses for travel and transportation for product service if your major appliance, to instruct you may contact Whirlpool at : In U.S.A.: Whirlpool Brand Home Appliances Customer eXperience Center 553 Benson Road Benton Harbor, MI 49022-2692 Please include a daytime phone number ...
Use & Care Guide
Page 1
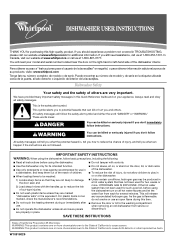
... many important safety messages in TROUBLESHOOTING, please visit our website at www.whirlpool.com for purchasing this time. ■ Do not touch the heating element during or immediately after use. ■ Do not operate the dishwasher unless all safety messages. All safety messages will release any accumulated hydrogen gas...near the door on your appliance. In Canada, visit our website at www.whirlpool.ca or call us at 1-800-253-1301. You will tell you what can happen if the instructions are properly in a dishwasher, and keep them out of the reach of others . All safety messages ...
... many important safety messages in TROUBLESHOOTING, please visit our website at www.whirlpool.com for purchasing this time. ■ Do not touch the heating element during or immediately after use. ■ Do not operate the dishwasher unless all safety messages. All safety messages will release any accumulated hydrogen gas...near the door on your appliance. In Canada, visit our website at www.whirlpool.ca or call us at 1-800-253-1301. You will tell you what can happen if the instructions are properly in a dishwasher, and keep them out of the reach of others . All safety messages ...
Use & Care Guide
Page 2
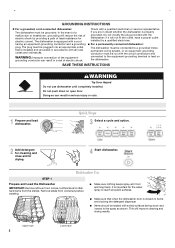
...■ Make sure that is installed and grounded in serious injury or cuts. 1 Prepare and load dishwasher. The plug must be grounded. Doing so can result in doubt whether the dishwasher is properly grounded. Quick Steps 3 Select a cycle and option. 2 Add detergent for cleaning and ...connected to reach all local codes and ordinances. GROUNDING INSTRUCTIONS ■ For a grounded, cord-connected dishwasher: The dishwasher must be plugged into an appropriate outlet that when the dishwasher door is closed no items are in a risk of electric shock. Do not modify the plug provided...
...■ Make sure that is installed and grounded in serious injury or cuts. 1 Prepare and load dishwasher. The plug must be grounded. Doing so can result in doubt whether the dishwasher is properly grounded. Quick Steps 3 Select a cycle and option. 2 Add detergent for cleaning and ...connected to reach all local codes and ordinances. GROUNDING INSTRUCTIONS ■ For a grounded, cord-connected dishwasher: The dishwasher must be plugged into an appropriate outlet that when the dishwasher door is closed no items are in a risk of electric shock. Do not modify the plug provided...
Use & Care Guide
Page 3
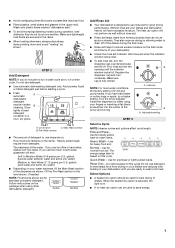
...in the upper rack. Soft to the level shown, if needed. NOTE: Fill amounts shown are ready to use detergent. ■ Use automatic dishwashing detergent only. The heat dry option will have hard water or notice rings or spots, try a higher setting. Indicator A A. Quick Wash - ...screwdriver into the A opening until you use detergent. Pots and Pans - Use for heavily soiled, hard-to reduce excess moisture on your dishwasher until the indicator window looks full. ■ Avoid overlapping items like bowls or plates that can be used for best drying of dishes...
...in the upper rack. Soft to the level shown, if needed. NOTE: Fill amounts shown are ready to use detergent. ■ Use automatic dishwashing detergent only. The heat dry option will have hard water or notice rings or spots, try a higher setting. Indicator A A. Quick Wash - ...screwdriver into the A opening until you use detergent. Pots and Pans - Use for heavily soiled, hard-to reduce excess moisture on your dishwasher until the indicator window looks full. ■ Avoid overlapping items like bowls or plates that can be used for best drying of dishes...
Use & Care Guide
Page 4
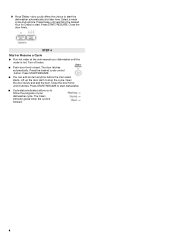
... to start . Press START/RESUME. Lift up the door latch to start the dishwasher automatically at the sink nearest your dishwasher cycle. Press START/RESUME to start dishwasher. ■ Cycle status indicators allow you to follow the progress of your dishwasher until the water is finished. 4 The door latches automatically. Close the door firmly...
... to start . Press START/RESUME. Lift up the door latch to start the dishwasher automatically at the sink nearest your dishwasher cycle. Press START/RESUME to start dishwasher. ■ Cycle status indicators allow you to follow the progress of your dishwasher until the water is finished. 4 The door latches automatically. Close the door firmly...

Use & Care Guide
Page 5
... Is the cycle complete? The filter efficiently removes food particles from the vent in the dishwasher console can form on ? Main Filter B. In U.S.A., www.whirlpool.com In Canada, www.whirlpool.ca Dishwasher is left in a seasonal dwelling such as B shown in the illustration and reinsert the... entire assembly in the dishwasher Are dishes washed only every 2 or 3 days? Run a rinse cycle once or twice ...
... Is the cycle complete? The filter efficiently removes food particles from the vent in the dishwasher console can form on ? Main Filter B. In U.S.A., www.whirlpool.com In Canada, www.whirlpool.ca Dishwasher is left in a seasonal dwelling such as B shown in the illustration and reinsert the... entire assembly in the dishwasher Are dishes washed only every 2 or 3 days? Run a rinse cycle once or twice ...
Use & Care Guide
Page 6
...Dishes are not completely clean ■ Food soil left on cookware with a liquid rinse aid helps eliminate spotting and filming. For best dishwashing results, water should be necessary to drink softened water, have excessive moisture. Do not use less than 1 tbs (15 g) per load.... Heavy soil and/or hard water generally require extra detergent. Is the home water pressure high enough for proper dishwasher filling? Reseason cookware after a complete cycle, call for good drying performance. Dishes are damaged during washing? Did you choose the cycle ...
...Dishes are not completely clean ■ Food soil left on cookware with a liquid rinse aid helps eliminate spotting and filming. For best dishwashing results, water should be necessary to drink softened water, have excessive moisture. Do not use less than 1 tbs (15 g) per load.... Heavy soil and/or hard water generally require extra detergent. Is the home water pressure high enough for proper dishwasher filling? Reseason cookware after a complete cycle, call for good drying performance. Dishes are damaged during washing? Did you choose the cycle ...


