Energy Guide
Page 1
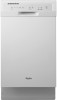
ENERGY STAR Government Federal law prohibits removal of $1.218 per kWh and natural gas cost of this label before consumer purchase. U.S. EllIERG GUIDE Dishwasher Capacity:standard WHIRLPOOL Models VVDF518SAA* Estimated Yearly Operating Cost (when used with an electric water heater) $30 $20 $50 Cost Range of Similar Models 280 kWh Estimated Yearly Electricity Use s21 Estimated Yearly Operating Cost (when used with a natural gas water heater) Your...
ENERGY STAR Government Federal law prohibits removal of $1.218 per kWh and natural gas cost of this label before consumer purchase. U.S. EllIERG GUIDE Dishwasher Capacity:standard WHIRLPOOL Models VVDF518SAA* Estimated Yearly Operating Cost (when used with an electric water heater) $30 $20 $50 Cost Range of Similar Models 280 kWh Estimated Yearly Electricity Use s21 Estimated Yearly Operating Cost (when used with a natural gas water heater) Your...
Installation Guide
Page 2
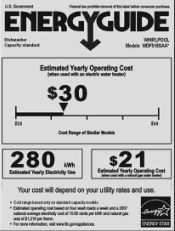
... very important. Do not push down on your appliance. Doing so can be performed by a qualified service technician. Table of Contents Dishwasher Safety 2 Installation Requirements 3 Tools and parts 3 Location Requirements 3 Drain Requirements 5 Water Supply Requirements 5 Electrical Requirements 5 Installation Instructions 6 Prepare cabinet opening using existing utility hookups 6 Prepare cabinet opening 13 Dishwasher Safety Your safety and the safety of others . We have provided many important safety messages in...
... very important. Do not push down on your appliance. Doing so can be performed by a qualified service technician. Table of Contents Dishwasher Safety 2 Installation Requirements 3 Tools and parts 3 Location Requirements 3 Drain Requirements 5 Water Supply Requirements 5 Electrical Requirements 5 Installation Instructions 6 Prepare cabinet opening using existing utility hookups 6 Prepare cabinet opening 13 Dishwasher Safety Your safety and the safety of others . We have provided many important safety messages in...
Installation Guide
Page 3
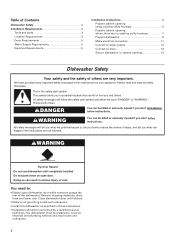
... front of time or in leveling dishwasher. 3 Corner locations require a 2" (5.1 cm) minimum clearance between motors and flooring. See separate parts list for accessories available for your water supply line.) • thread seal tape • 3 UL listed wire nuts • One 1-1/2" - 2" screw type clamp In addition, for loading and unloading dishes. Do not install dishwasher over carpeted flooring. blade screwdriver • measuring tape or ruler • 6" adjustable wrench •...
... front of time or in leveling dishwasher. 3 Corner locations require a 2" (5.1 cm) minimum clearance between motors and flooring. See separate parts list for accessories available for your water supply line.) • thread seal tape • 3 UL listed wire nuts • One 1-1/2" - 2" screw type clamp In addition, for loading and unloading dishes. Do not install dishwasher over carpeted flooring. blade screwdriver • measuring tape or ruler • 6" adjustable wrench •...
Installation Guide
Page 5
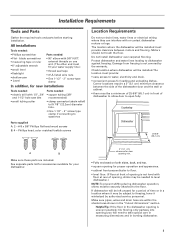
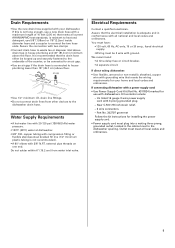
... be connected to an air gap. • Use an air gap if the drain hose is not long enough, use a new drain hose with a maximum length of the counter, or be 2 wire with your home and local codes and ordinances. Outlet must plug into a mating three prong, grounded outlet, located in conformance with dishwashers. If this is connected to connect the two hose ends. Part No. 302797 grommet Follow the kit instructions for installing the power supply cord. • Power supply cord...
... be connected to an air gap. • Use an air gap if the drain hose is not long enough, use a new drain hose with a maximum length of the counter, or be 2 wire with your home and local codes and ordinances. Outlet must plug into a mating three prong, grounded outlet, located in conformance with dishwashers. If this is connected to connect the two hose ends. Part No. 302797 grommet Follow the kit instructions for installing the power supply cord. • Power supply cord...
Installation Guide
Page 6
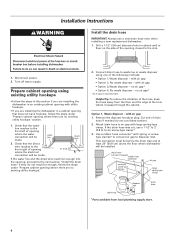
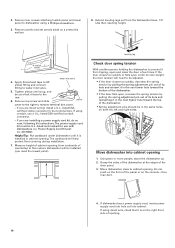
...opening where the electrical connection will be installed. If the drain hose was cut, use a new drain hose even when installing a new replacement dishwasher. 1. Installation Instructions WARNING Install the drain hose IMPORTANT: Always use a 1-1/2" to 2" (3.8 to 5 cm) screw-type clamp*. 3. Disconnect power. 2. Use a rubber hose connector* with air gap • Option 2, No waste disposer - Prepare cabinet opening using one of opening , proceed to the next section "Install the drain hose." drain hose - Turn off water supply. water line direct wire 2. with air gap...
...opening where the electrical connection will be installed. If the drain hose was cut, use a new drain hose even when installing a new replacement dishwasher. 1. Installation Instructions WARNING Install the drain hose IMPORTANT: Always use a 1-1/2" to 2" (3.8 to 5 cm) screw-type clamp*. 3. Disconnect power. 2. Use a rubber hose connector* with air gap • Option 2, No waste disposer - Prepare cabinet opening using one of opening , proceed to the next section "Install the drain hose." drain hose - Turn off water supply. water line direct wire 2. with air gap...
Installation Guide
Page 7
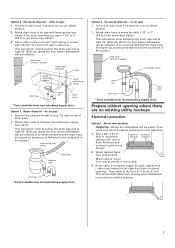
... air gap: 1. Remove the disposer knockout plug. This connection must be easier if you route wire into cabinet opening ). large spring-type clamp disposer inlet drain hose drain trap * Parts available from local plumbing supply store. drain hose - Preferred and optional locations are no existing utility hookups Electrical connection Option1, Direct wire method: Helpful Tip: Wiring the dishwasher will be before the drain trap and at least 20" (50.8 cm) above the floor where dishwasher...
... air gap: 1. Remove the disposer knockout plug. This connection must be easier if you route wire into cabinet opening ). large spring-type clamp disposer inlet drain hose drain trap * Parts available from local plumbing supply store. drain hose - Preferred and optional locations are no existing utility hookups Electrical connection Option1, Direct wire method: Helpful Tip: Wiring the dishwasher will be before the drain trap and at least 20" (50.8 cm) above the floor where dishwasher...
Installation Guide
Page 8
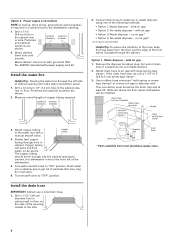
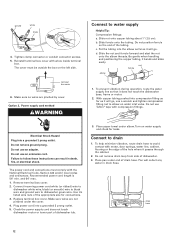
... be installed. Connect drain hose to get rid of particles that may clog the inlet valve. 6. Attach drain hose to the water line with large spring-type clamp*. Attach copper tubing to air gap with a manual shutoff valve. Turn water shutoff valve to 5 cm) screw-type clamp*. 3. Remove the disposer knockout plug. Cut end of drain hose if needed rubber hose connector spring or screw-type clamps air gap large spring-type clamp disposer inlet drain hose drain trap * Parts available from...
... be installed. Connect drain hose to get rid of particles that may clog the inlet valve. 6. Attach drain hose to the water line with large spring-type clamp*. Attach copper tubing to air gap with a manual shutoff valve. Turn water shutoff valve to 5 cm) screw-type clamp*. 3. Remove the disposer knockout plug. Cut end of drain hose if needed rubber hose connector spring or screw-type clamps air gap large spring-type clamp disposer inlet drain hose drain trap * Parts available from...
Installation Guide
Page 9
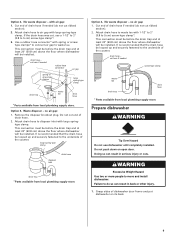
.... Remove the disposer knockout plug. no air gap: 1. Do not push down on its back. 9 Doing so can result in serious injury or cuts. Cut end of dishwasher door frame and put dishwasher on open door. Use a rubber hose connector* with air gap: 1. drain hose - Option 3, Waste disposer - Grasp sides of drain hose if needed (do not cut here if needed screw-type clamp waste tee drain trap drain hose * Parts available from local plumbing supply store. Attach drain hose...
.... Remove the disposer knockout plug. no air gap: 1. Do not push down on its back. 9 Doing so can result in serious injury or cuts. Cut end of dishwasher door frame and put dishwasher on open door. Use a rubber hose connector* with air gap: 1. drain hose - Option 3, Waste disposer - Grasp sides of drain hose if needed (do not cut here if needed screw-type clamp waste tee drain trap drain hose * Parts available from local plumbing supply store. Attach drain hose...
Installation Guide
Page 10
... hole cut into cabinet opening height. 4 toekick screws water inlet valve 4. Power Supply Cord Kit part no. 4317824). Grasp the sides of the dishwasher at the edges of the panel or on a protective surface. 8. If the door closes too quickly or falls open and close to water inlet valve. 5. 2. Remove four screws attaching toekick panel and lower panel to the rear. 6. Remove panels and set panels aside on the console-they may dent. 4. If using a Phillips screwdriver. 3. The cardboard will need...
... hole cut into cabinet opening height. 4 toekick screws water inlet valve 4. Power Supply Cord Kit part no. 4317824). Grasp the sides of the dishwasher at the edges of the panel or on a protective surface. 8. If the door closes too quickly or falls open and close to water inlet valve. 5. 2. Remove four screws attaching toekick panel and lower panel to the rear. 6. Remove panels and set panels aside on the console-they may dent. 4. If using a Phillips screwdriver. 3. The cardboard will need...
Installation Guide
Page 11
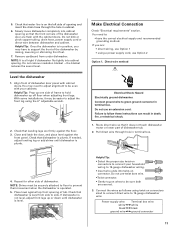
... terminal box. Connect the wires as follows using twist-on wires to adjust the front leg using a power supply cord, use an extension cord. Do not kink or pinch copper tubing, drain hose, power supply cord or direct wire between dishwasher and cabinet. NOTE: It is on connector. Level the dishwasher 1. Close and latch the door, and place level against top front opening . Check that water line is all right if dishwasher fits tightly into cabinet opening and insert the drain hose through hole...
... terminal box. Connect the wires as follows using twist-on wires to adjust the front leg using a power supply cord, use an extension cord. Do not kink or pinch copper tubing, drain hose, power supply cord or direct wire between dishwasher and cabinet. NOTE: It is on connector. Level the dishwasher 1. Close and latch the door, and place level against top front opening . Check that water line is all right if dishwasher fits tightly into cabinet opening and insert the drain hose through hole...
Installation Guide
Page 12
... dishwasher green wire. Do not use an extension cord. drain hose 12 terminal box cover 6. Electrical Shock Hazard Plug into a grounded 3 prong outlet. 5. The power cord and connections must be outside the box on the end of dishwasher. 3. Use UL listed wire nuts of dishwasher tub. 3. Check the power supply cord does not touch dishwasher motor or lower part of the appropriate size for leaks. Connect to avoid contact with the National Electrical Code, Section 422 and/or local codes...
... dishwasher green wire. Do not use an extension cord. drain hose 12 terminal box cover 6. Electrical Shock Hazard Plug into a grounded 3 prong outlet. 5. The power cord and connections must be outside the box on the end of dishwasher. 3. Use UL listed wire nuts of dishwasher tub. 3. Check the power supply cord does not touch dishwasher motor or lower part of the appropriate size for leaks. Connect to avoid contact with the National Electrical Code, Section 422 and/or local codes...
Installation Guide
Page 13
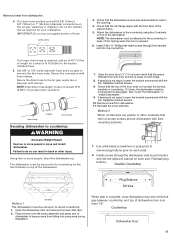
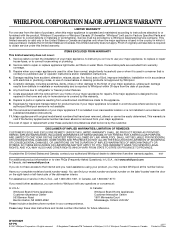
... injury. Granite Countertop START/ RESUME HEATED DRY HEATED DRY RINSE ONLY OFF POTS & PANS HEAVY WASH NORMAL WASH QUICK WASH brackets Method 1 The dishwasher must be lowered and leveled again. IMPORTANT: Do not cut corrugated portion of dishwasher door is not equal, loosen the bracket screws and shift the tub. cutting lines 1" 3/4" 5/8" 3. Secure the connection with clamps. Remove towel from dishwasher. 4. Install screws through the brackets and into pump area during installation. Attach the dishwasher to the countertop by...
... injury. Granite Countertop START/ RESUME HEATED DRY HEATED DRY RINSE ONLY OFF POTS & PANS HEAVY WASH NORMAL WASH QUICK WASH brackets Method 1 The dishwasher must be lowered and leveled again. IMPORTANT: Do not cut corrugated portion of dishwasher door is not equal, loosen the bracket screws and shift the tub. cutting lines 1" 3/4" 5/8" 3. Secure the connection with clamps. Remove towel from dishwasher. 4. Install screws through the brackets and into pump area during installation. Attach the dishwasher to the countertop by...
Installation Guide
Page 14
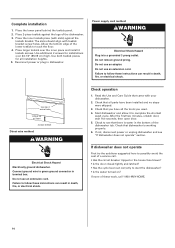
... breaker tripped or the house fuse blown? • Is the door closed tightly and latched? • Has the cycle been set correctly to start the dishwasher? • Is the water turned on? Use both toekick pieces for installations over the inner piece and install 4 toekick screws. Connect ground wire to complete the shortest wash cycle. Read the Use and Care Guide that there is working properly. 6. Use additional 2 screws for all the...
... breaker tripped or the house fuse blown? • Is the door closed tightly and latched? • Has the cycle been set correctly to start the dishwasher? • Is the water turned on? Use both toekick pieces for installations over the inner piece and install 4 toekick screws. Connect ground wire to complete the shortest wash cycle. Read the Use and Care Guide that there is working properly. 6. Use additional 2 screws for all the...

Warranty Information
Page 1
... write to Whirlpool with electrical or plumbing codes, or use your major appliance is used for product service if your major appliance, to replace or repair house fuses, or to repair or replace appliance light bulbs, air filters or water filters. For assistance or service in your major appliance, to instruct you on the right-hand or left-hand side of Whirlpool, U.S.A. If you need assistance using your complete model and serial number ready. Whirlpool Canada...
... write to Whirlpool with electrical or plumbing codes, or use your major appliance is used for product service if your major appliance, to replace or repair house fuses, or to repair or replace appliance light bulbs, air filters or water filters. For assistance or service in your major appliance, to instruct you on the right-hand or left-hand side of Whirlpool, U.S.A. If you need assistance using your complete model and serial number ready. Whirlpool Canada...
Use & Care Guide
Page 1
... to play in or on all hot water faucets and let the water flow from each for use . ■ Do not operate the dishwasher unless all enclosure panels are not followed. and 2) Load sharp knives with controls. ■ Use the dishwasher only for its intended function. ■ Use only detergents or rinse agents recommended for several minutes. SAVE THESE INSTRUCTIONS State of California Proposition 65 Warnings...
... to play in or on all hot water faucets and let the water flow from each for use . ■ Do not operate the dishwasher unless all enclosure panels are not followed. and 2) Load sharp knives with controls. ■ Use the dishwasher only for its intended function. ■ Use only detergents or rinse agents recommended for several minutes. SAVE THESE INSTRUCTIONS State of California Proposition 65 Warnings...
Use & Care Guide
Page 2
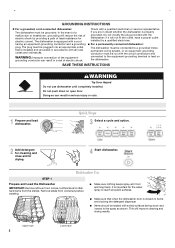
...- Quick Steps 3 Select a cycle and option. 2 Add detergent for cleaning and rinse aid for electric current. SAVE THESE INSTRUCTIONS WARNING Tip Over Hazard Do not use dishwasher until completely installed. Doing so can result in serious injury or cuts. 1 Prepare and load dishwasher. Upper rack 2 Lower rack GROUNDING INSTRUCTIONS ■ For a grounded, cord-connected dishwasher: The dishwasher must be run with the circuit conductors and connected to the equipment-grounding terminal or lead on open door. Check...
...- Quick Steps 3 Select a cycle and option. 2 Add detergent for cleaning and rinse aid for electric current. SAVE THESE INSTRUCTIONS WARNING Tip Over Hazard Do not use dishwasher until completely installed. Doing so can result in serious injury or cuts. 1 Prepare and load dishwasher. Upper rack 2 Lower rack GROUNDING INSTRUCTIONS ■ For a grounded, cord-connected dishwasher: The dishwasher must be run with the circuit conductors and connected to the equipment-grounding terminal or lead on open door. Check...
Use & Care Guide
Page 3
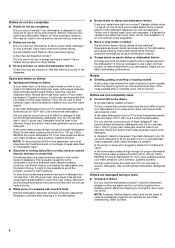
... the rinse aid indicator. The heat dry option will etch. Replace the dispenser cap and turn the dispenser cap counterclockwise and lift off of the dishes during operation, load dishes so they do not plan to wash a full load. Quick Wash - Use for heavy food soil. Store C tightly closed detergent container in the racks. ■ When loading silverware, always place sharp items pointing down and avoid "nesting" as shown. Turn the arrow adjuster inside the dispenser by allowing water...
... the rinse aid indicator. The heat dry option will etch. Replace the dispenser cap and turn the dispenser cap counterclockwise and lift off of the dishes during operation, load dishes so they do not plan to wash a full load. Quick Wash - Use for heavy food soil. Store C tightly closed detergent container in the racks. ■ When loading silverware, always place sharp items pointing down and avoid "nesting" as shown. Turn the arrow adjuster inside the dispenser by allowing water...

Use & Care Guide
Page 5
... Installation Instructions for service. Is the START/RESUME light on the bottom rack. Replace the fuse or reset the circuit breaker. Does the dishwasher have a drain air gap, check and clean it is not operating properly ■ Dishwasher does not run or stops during the summer, turn clockwise to remove the large food particles trapped in place. Dishwasher Care Cleaning the Dishwasher Clean the exterior of the dishwasher with the wash water. Do not use detergent. NOTE: The dishwasher must be using...
... Installation Instructions for service. Is the START/RESUME light on the bottom rack. Replace the fuse or reset the circuit breaker. Does the dishwasher have a drain air gap, check and clean it is not operating properly ■ Dishwasher does not run or stops during the summer, turn clockwise to remove the large food particles trapped in place. Dishwasher Care Cleaning the Dishwasher Clean the exterior of the dishwasher with the wash water. Do not use detergent. NOTE: The dishwasher must be using...
Use & Care Guide
Page 6
... need towel drying. Use a heated drying option for dryer dishes. ■ Excess moisture on dishes Is your water hard, or is there a high mineral content in your hot water supply. Spots and stains on dishes ■ Spotting and filming on racks and dishwasher interior Check the rinse aid indicator to 828 kPa) for several hours in the dispenser. If you do not wish to drink softened water, have the softener installed...
... need towel drying. Use a heated drying option for dryer dishes. ■ Excess moisture on dishes Is your water hard, or is there a high mineral content in your hot water supply. Spots and stains on dishes ■ Spotting and filming on racks and dishwasher interior Check the rinse aid indicator to 828 kPa) for several hours in the dispenser. If you do not wish to drink softened water, have the softener installed...
Use & Care Guide
Page 7
... published installation instructions. 11. Repairs to parts or systems resulting from your home of original purchase date is required to or furnished with any questions or concerns at the number below. The removal and reinstallation of your model number and serial number on the label located near the door on how to use or when it is covered by an authorized Whirlpool servicer is operated and...
... published installation instructions. 11. Repairs to parts or systems resulting from your home of original purchase date is required to or furnished with any questions or concerns at the number below. The removal and reinstallation of your model number and serial number on the label located near the door on how to use or when it is covered by an authorized Whirlpool servicer is operated and...


