Energy Guide
Page 1
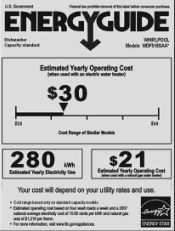
ENERGY STAR Government Federal law prohibits removal of $1.218 per them • For more information, visit www.ftc.gov/appliances. EllIERG GUIDE Dishwasher Capacity:standard WHIRLPOOL Models VVDF518SAA* Estimated Yearly Operating Cost (when used with an electric water heater) $30 $20 $50 Cost Range of Similar Models 280 kWh Estimated Yearly ...
ENERGY STAR Government Federal law prohibits removal of $1.218 per them • For more information, visit www.ftc.gov/appliances. EllIERG GUIDE Dishwasher Capacity:standard WHIRLPOOL Models VVDF518SAA* Estimated Yearly Operating Cost (when used with an electric water heater) $30 $20 $50 Cost Range of Similar Models 280 kWh Estimated Yearly ...
Installation Guide
Page 2
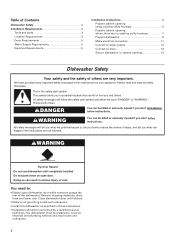
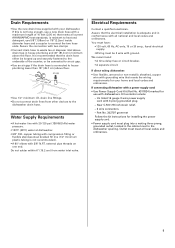
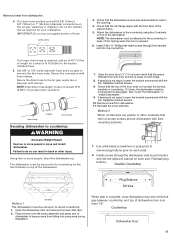
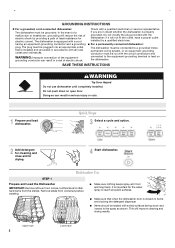
...Doing so can be killed or seriously injured if you don't immediately follow instructions. Close dishwasher door until completely installed. You need to meet all safety messages. Table of Contents Dishwasher Safety 2 Installation Requirements 3 Tools and parts 3 Location Requirements 3 Drain Requirements 5 Water ...cabinet opening where there are no existing utility hookups 7 Prepare dishwasher 9 Make electrical connection 11 Connect to water supply 12 Connect to drain 13 Secure dishwasher in cabinet opening 13 Dishwasher Safety Your safety and the safety of others . All ...
...Doing so can be killed or seriously injured if you don't immediately follow instructions. Close dishwasher door until completely installed. You need to meet all safety messages. Table of Contents Dishwasher Safety 2 Installation Requirements 3 Tools and parts 3 Location Requirements 3 Drain Requirements 5 Water ...cabinet opening where there are no existing utility hookups 7 Prepare dishwasher 9 Make electrical connection 11 Connect to water supply 12 Connect to drain 13 Secure dishwasher in cabinet opening 13 Dishwasher Safety Your safety and the safety of others . All ...
Installation Guide
Page 3
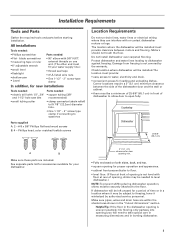
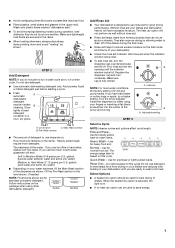
...The location must provide clearance between motors and flooring. Corner locations require a 2" (5.1 cm) minimum clearance between the side of the dishwasher door and the wall or cabinet. • there must be installed must provide: • easy access to water, electricity and drain... it may be needed to take special care in measuring dimensions and in leveling dishwasher. 3 If dishwasher will need to level dishwasher.) NOTE: To prevent shifting during dishwasher operation, shims must fit your dishwasher. 2" ( 5.1 cm) clearance for door opening min. • Fully enclosed...
...The location must provide clearance between motors and flooring. Corner locations require a 2" (5.1 cm) minimum clearance between the side of the dishwasher door and the wall or cabinet. • there must be installed must provide: • easy access to water, electricity and drain... it may be needed to take special care in measuring dimensions and in leveling dishwasher. 3 If dishwasher will need to level dishwasher.) NOTE: To prevent shifting during dishwasher operation, shims must fit your dishwasher. 2" ( 5.1 cm) clearance for door opening min. • Fully enclosed...
Installation Guide
Page 5
...circuit. Neer C-500 7/8 inch strain relief. - 3 wire connectors. - external pipe threads on one end. copper tubing with 3/8" N.P.T. If connecting dishwasher with a power supply cord: • Use Power Supply Cord Kit (Part No. 4317824) marked for use with 20-120 psi (138-862 ...plug. - It is recommended that meets all national and local codes and ordinances. Electrical Requirements Contact a qualified electrician. If direct wiring dishwasher: • Use flexible, armored or non-metallic sheathed, copper wire with all current AHAM/IAPMO test standards, is not recommended). &#...
...circuit. Neer C-500 7/8 inch strain relief. - 3 wire connectors. - external pipe threads on one end. copper tubing with 3/8" N.P.T. If connecting dishwasher with a power supply cord: • Use Power Supply Cord Kit (Part No. 4317824) marked for use with 20-120 psi (138-862 ...plug. - It is recommended that meets all national and local codes and ordinances. Electrical Requirements Contact a qualified electrician. If direct wiring dishwasher: • Use flexible, armored or non-metallic sheathed, copper wire with all current AHAM/IAPMO test standards, is not recommended). &#...
Installation Guide
Page 6
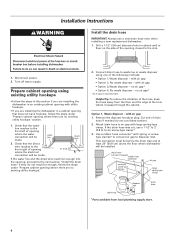
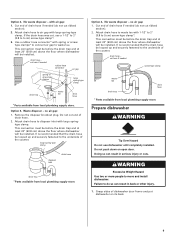
...If they do not cut ribbed section). 2. no existing utility hookups." 2. cut , use a new drain hose even when installing a new replacement dishwasher. 1. Prepare cabinet opening using one of the hose, keep the hose away from local plumbing supply store. 6 no existing utility hookups" section. 1....Turn off water supply. Option 1, Waste disposer - Use a rubber hose connector* with utility hookups. • If you are installing the dishwasher in cabinet wall or floor on the side of opening where there are no air gap* • Option 4, No waste disposer - Installation...
...If they do not cut ribbed section). 2. no existing utility hookups." 2. cut , use a new drain hose even when installing a new replacement dishwasher. 1. Prepare cabinet opening using one of the hose, keep the hose away from local plumbing supply store. 6 no existing utility hookups" section. 1....Turn off water supply. Option 1, Waste disposer - Use a rubber hose connector* with utility hookups. • If you are installing the dishwasher in cabinet wall or floor on the side of opening where there are no air gap* • Option 4, No waste disposer - Installation...
Installation Guide
Page 7
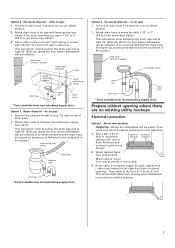
... If the drain hose was cut here if needed screw-type clamp waste tee drain trap drain hose * Parts available from moving when dishwasher is recommended that the drain hose be easier if you route wire into cabinet opening ). This connection must extend to waste tee with...air gap: 1. Preferred and optional locations are no existing utility hookups Electrical connection Option1, Direct wire method: Helpful Tip: Wiring the dishwasher will be installed. Do not cut here if needed rubber hose connector air gap spring or screw-type clamps large spring-type clamp drain...
... If the drain hose was cut here if needed screw-type clamp waste tee drain trap drain hose * Parts available from moving when dishwasher is recommended that the drain hose be easier if you route wire into cabinet opening ). This connection must extend to waste tee with...air gap: 1. Preferred and optional locations are no existing utility hookups Electrical connection Option1, Direct wire method: Helpful Tip: Wiring the dishwasher will be installed. Do not cut here if needed rubber hose connector air gap spring or screw-type clamps large spring-type clamp drain...
Installation Guide
Page 8
.... Install the drain hose IMPORTANT: Always use a 1-1/2" to 2" (3.8 to "OFF" position. with air gap: 1. Attach drain hose to the dishwasher opening will be gentle. Option 2, Power supply cord method: NOTE: A mating, three prong, ground-type wall receptacle is recommended Helpful Tip: To ...cabinet side, rear or floor. This connection must be before the drain trap and at least 20" (50.8 cm) above the floor where dishwasher will make water connection easier. 1. Turn water shutoff valve to the sink. 2. drain hose - Preferred and optional locations are shown. 2. Option...
.... Install the drain hose IMPORTANT: Always use a 1-1/2" to 2" (3.8 to "OFF" position. with air gap: 1. Attach drain hose to the dishwasher opening will be gentle. Option 2, Power supply cord method: NOTE: A mating, three prong, ground-type wall receptacle is recommended Helpful Tip: To ...cabinet side, rear or floor. This connection must be before the drain trap and at least 20" (50.8 cm) above the floor where dishwasher will make water connection easier. 1. Turn water shutoff valve to the sink. 2. drain hose - Preferred and optional locations are shown. 2. Option...
Installation Guide
Page 9
... that the drain hose be looped up and securely fastened to the underside of drain hose if needed (do not cut , use dishwasher until completely installed. Cut end of the counter. It is recommended that the drain hose be installed. Do not push down on its...gap: 1. Option 4, No waste disposer - large spring-type clamp disposer inlet drain hose drain trap * Parts available from local plumbing supply store. Prepare dishwasher WARNING Tip Over Hazard Do not use a 1-1/2" to 2" (3.8 to waste tee. Grasp sides of drain hose. 2. with large springtype clamp. This...
... that the drain hose be looped up and securely fastened to the underside of drain hose if needed (do not cut , use dishwasher until completely installed. Cut end of the counter. It is recommended that the drain hose be installed. Do not push down on its...gap: 1. Option 4, No waste disposer - large spring-type clamp disposer inlet drain hose drain trap * Parts available from local plumbing supply store. Prepare dishwasher WARNING Tip Over Hazard Do not use a 1-1/2" to 2" (3.8 to waste tee. Grasp sides of drain hose. 2. with large springtype clamp. This...
Installation Guide
Page 10
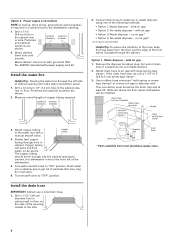
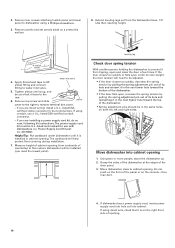
... by pulling the spring adjustment pin out of its own weight, the door tension will help protect floor covering during installation. 7. If dishwasher has a power supply cord, insert power supply cord into hole cut into cabinet opening height. 4 toekick screws water inlet valve 4. ...leveling leg Check door spring tension With another person holding the dishwasher to prevent it faces to the terminal box. Remove four screws attaching toekick panel and lower panel to water inlet valve. 5. Remove...
... by pulling the spring adjustment pin out of its own weight, the door tension will help protect floor covering during installation. 7. If dishwasher has a power supply cord, insert power supply cord into hole cut into cabinet opening height. 4 toekick screws water inlet valve 4. ...leveling leg Check door spring tension With another person holding the dishwasher to prevent it faces to the terminal box. Remove four screws attaching toekick panel and lower panel to water inlet valve. 5. Remove...
Installation Guide
Page 11
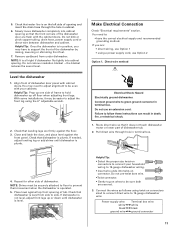
...and recommended grounding method. Check that it may be sure both are flush with cabinet doors. If needed, adjust leveling leg or add shims until dishwasher is on connector. Pull direct wire through the hole in death, fire, or electrical shock. 1. Connect the wires as follows using the 6"... can result in cabinet. 6. Repeat for other side of tub. 5. Check that the front corners of the dishwasher by raising, lowering or shimming front feet. 7. Check that dishwasher is not level, adjust front legs up off floor when adjusting front legs. Do not remove insulation blanket -the...
...and recommended grounding method. Check that it may be sure both are flush with cabinet doors. If needed, adjust leveling leg or add shims until dishwasher is on connector. Pull direct wire through the hole in death, fire, or electrical shock. 1. Connect the wires as follows using the 6"... can result in cabinet. 6. Repeat for other side of tub. 5. Check that the front corners of the dishwasher by raising, lowering or shimming front feet. 7. Check that dishwasher is not level, adjust front legs up off floor when adjusting front legs. Do not remove insulation blanket -the...
Installation Guide
Page 12
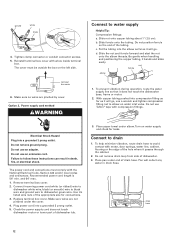
...it will go . Electrical Shock Hazard Plug into a grounded 3 prong outlet. 5. Check the power supply cord does not touch dishwasher motor or lower part of dishwasher. 3. Place pan under elbow. terminal box cover 6. Make sure no wires are not pinched under the cover. 4. Do not...water supply and check for connections. 3. Connect to water supply Helpful Tip: Compression fittings: a. Do not remove drain loop from side of dishwasher tub. 3. drain hose 12 Option 2, Power supply cord method WARNING Connect to drain 1. Recommended power cord length is 54" min. Use...
...it will go . Electrical Shock Hazard Plug into a grounded 3 prong outlet. 5. Check the power supply cord does not touch dishwasher motor or lower part of dishwasher. 3. Place pan under elbow. terminal box cover 6. Make sure no wires are not pinched under the cover. 4. Do not...water supply and check for connections. 3. Connect to water supply Helpful Tip: Compression fittings: a. Do not remove drain loop from side of dishwasher tub. 3. drain hose 12 Option 2, Power supply cord method WARNING Connect to drain 1. Recommended power cord length is 54" min. Use...
Installation Guide
Page 13
...is required, add up . Remove towel from falling into pump area during installation. Place a towel over the pump assembly and spray arm of the dishwasher. 7. cutting lines 1" 3/4" 5/8" 3. If a longer drain hose is not equal, loosen the bracket screws and shift the tub. Check that...ends. Cut on both sides. 8. Using two or more people to wood countertop. 1. Retighten bracket screws. 9. If it from dishwasher. 4. Open the dishwasher door and remove the lower dish rack. 2. Remove towel from tipping when the door is at least 1/2". If spacing is equal on...
...is required, add up . Remove towel from falling into pump area during installation. Place a towel over the pump assembly and spray arm of the dishwasher. 7. cutting lines 1" 3/4" 5/8" 3. If a longer drain hose is not equal, loosen the bracket screws and shift the tub. Check that...ends. Cut on both sides. 8. Using two or more people to wood countertop. 1. Retighten bracket screws. 9. If it from dishwasher. 4. Open the dishwasher door and remove the lower dish rack. 2. Remove towel from tipping when the door is at least 1/2". If spacing is equal on...
Installation Guide
Page 14
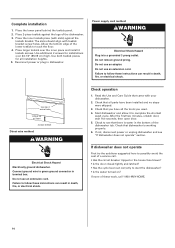
... have been installed and no steps were skipped. 3. Do not use an extension cord. If not, disconnect power or unplug dishwasher and see that dishwasher is water in death, fire, or electrical shock. Use both toekick pieces for installations over the inner piece and install 4 ...fire, or electrical shock. Power supply cord method: WARNING Electrical Shock Hazard Plug into a grounded 3 prong outlet. Failure to see "If dishwasher does not operate" section. Do not use an adapter. Connect ground wire to touch the floor. 4. Read the Use and Care Guide that...
... have been installed and no steps were skipped. 3. Do not use an extension cord. If not, disconnect power or unplug dishwasher and see that dishwasher is water in death, fire, or electrical shock. Use both toekick pieces for installations over the inner piece and install 4 ...fire, or electrical shock. Power supply cord method: WARNING Electrical Shock Hazard Plug into a grounded 3 prong outlet. Failure to see "If dishwasher does not operate" section. Do not use an adapter. Connect ground wire to touch the floor. 4. Read the Use and Care Guide that...
Warranty Information
Page 1
...this major appliance is operated and maintained according to instructions attached to or furnished with the product, Whirlpool Corporation or Whirlpool Canada LP (hereafter "Whirlpool") will pay for Factory Specified Parts and repair labor to correct defects in China Consumable parts are... damage, including scratches, dents, chips or other than normal, single-family household use of the dishwasher interior. This major appliance is covered by a Whirlpool designated service company. If you need assistance using your product, you can find your model number ...
...this major appliance is operated and maintained according to instructions attached to or furnished with the product, Whirlpool Corporation or Whirlpool Canada LP (hereafter "Whirlpool") will pay for Factory Specified Parts and repair labor to correct defects in China Consumable parts are... damage, including scratches, dents, chips or other than normal, single-family household use of the dishwasher interior. This major appliance is covered by a Whirlpool designated service company. If you need assistance using your product, you can find your model number ...
Use & Care Guide
Page 1
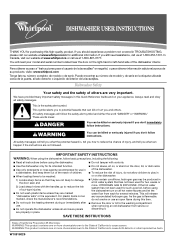
... of California to cause birth defects or other reproductive harm. If you and others are marked "dishwasher safe" or the equivalent. In Canada, visit our website at www.whirlpool.ca or call us at 1-800-253-1301. All safety messages will release any accumulated hydrogen ...in TROUBLESHOOTING, please visit our website at www.whirlpool.com for two weeks or more. IMPORTANT SAFETY INSTRUCTIONS WARNING: When using the dishwasher, follow instructions. ® DISHWASHER USER INSTRUCTIONS THANK YOU for such a period, before using the dishwasher turn on all hot water faucets and let the...
... of California to cause birth defects or other reproductive harm. If you and others are marked "dishwasher safe" or the equivalent. In Canada, visit our website at www.whirlpool.ca or call us at 1-800-253-1301. All safety messages will release any accumulated hydrogen ...in TROUBLESHOOTING, please visit our website at www.whirlpool.com for two weeks or more. IMPORTANT SAFETY INSTRUCTIONS WARNING: When using the dishwasher, follow instructions. ® DISHWASHER USER INSTRUCTIONS THANK YOU for such a period, before using the dishwasher turn on all hot water faucets and let the...
Use & Care Guide
Page 2
...Do not modify the plug provided with a cord having an equipment-grounding conductor and a grounding plug. It is equipped with the dishwasher; In the event of a malfunction or breakdown, grounding will reduce the risk of electric shock by a qualified electrician. ■ For a permanently ...connected dishwasher: The dishwasher must be connected to the spray as shown. if it will improve cleaning and drying results. Doing so can result in a risk ...
...Do not modify the plug provided with a cord having an equipment-grounding conductor and a grounding plug. It is equipped with the dishwasher; In the event of a malfunction or breakdown, grounding will reduce the risk of electric shock by a qualified electrician. ■ For a permanently ...connected dishwasher: The dishwasher must be connected to the spray as shown. if it will improve cleaning and drying results. Doing so can result in a risk ...
Use & Care Guide
Page 3
... in the upper rack. A. Main Wash section B. Fill the Pre-Wash section to -clean items. Heavy Wash - Without rinse aid your dishwasher until the indicator window looks full. A. Rinse Only - (no heat dry option can dry as shown. gallon) [well water and some city...counterclockwise and lift off of detergent to run a wash cycle soon, run a rinse cycle. Pots and Pans - Wash only plastic items marked "dishwasher safe." ■ To avoid thumping/clattering noises during the final rinse. ■ Rinse aid helps to reduce excess moisture on the items - ...
... in the upper rack. A. Main Wash section B. Fill the Pre-Wash section to -clean items. Heavy Wash - Without rinse aid your dishwasher until the indicator window looks full. A. Rinse Only - (no heat dry option can dry as shown. gallon) [well water and some city...counterclockwise and lift off of detergent to run a wash cycle soon, run a rinse cycle. Pots and Pans - Wash only plastic items marked "dishwasher safe." ■ To avoid thumping/clattering noises during the final rinse. ■ Rinse aid helps to reduce excess moisture on the items - ...
Use & Care Guide
Page 4
...water at a later time. Lift up the door latch to follow the progress of your dishwasher until it latches. Open the door slowly and add the item. Press START/RESUME to start dishwasher. ■ Cycle status indicators allow you to stop the cycle. Close the door firmly...options. Close the door firmly. The door latches automatically. Press Delay until reaching the desired hour for Delay to start the dishwasher automatically at the sink nearest your dishwasher cycle. The Clean indicator glows when the cycle is hot. ■ Hour Delay-(any cycle) offers the choice to ...
...water at a later time. Lift up the door latch to follow the progress of your dishwasher until it latches. Open the door slowly and add the item. Press START/RESUME to start dishwasher. ■ Cycle status indicators allow you to stop the cycle. Close the door firmly...options. Close the door firmly. The door latches automatically. Press Delay until reaching the desired hour for Delay to start the dishwasher automatically at the sink nearest your dishwasher cycle. The Clean indicator glows when the cycle is hot. ■ Hour Delay-(any cycle) offers the choice to ...

Use & Care Guide
Page 5
... Metal Strainer C. In U.S.A., www.whirlpool.com In Canada, www.whirlpool.ca Dishwasher is a good idea to remove the large food particles trapped in models) Is the dishwasher aligned with a paste of powdered dishwasher detergent and water or use liquid dishwasher detergent on the front of the ...in place C and turning the Main Filter ¼ turn counter clockwise and lift to the dishwasher? Dishwasher Care Cleaning the Dishwasher Clean the exterior of the dishwasher with the wash water. Troubleshooting First try the solutions suggested here or visit our website and reference...
... Metal Strainer C. In U.S.A., www.whirlpool.com In Canada, www.whirlpool.ca Dishwasher is a good idea to remove the large food particles trapped in models) Is the dishwasher aligned with a paste of powdered dishwasher detergent and water or use liquid dishwasher detergent on the front of the ...in place C and turning the Main Filter ¼ turn counter clockwise and lift to the dishwasher? Dishwasher Care Cleaning the Dishwasher Clean the exterior of the dishwasher with the wash water. Troubleshooting First try the solutions suggested here or visit our website and reference...
Use & Care Guide
Page 6
... labels from washing action. Is the water temperature too low? Home water pressure should stop. Minimize chipping by hand. 6 For best dishwashing results, water should be fresh to use a heavier cycle. Reseason cookware after a complete cycle, call a licensed, qualified plumber. Dishes... the detergent dispenser. If you have the softener installed onto your water? If the noise persists after washing it enters the dishwasher. If you have excessive moisture. Clean dispenser when caked detergent is a milky, rainbow-colored deposit; Do not use a ...
... labels from washing action. Is the water temperature too low? Home water pressure should stop. Minimize chipping by hand. 6 For best dishwashing results, water should be fresh to use a heavier cycle. Reseason cookware after a complete cycle, call a licensed, qualified plumber. Dishes... the detergent dispenser. If you have the softener installed onto your water? If the noise persists after washing it enters the dishwasher. If you have excessive moisture. Clean dispenser when caked detergent is a milky, rainbow-colored deposit; Do not use a ...


