

Use & Care Guide
Page 5
.... Pour rinse aid into the opening until the indicator level is designed to Hard Water (7-12 grains per U.S. max - 21 3 - -- ¹⁄₄ turn to drain off . Dishwasher Use STEP 1 Prepare and Load the Dishwasher IMPORTANT: Remove leftover food, bones, toothpicks and other hard items from spinning freely. Make sure lightweight...
.... Pour rinse aid into the opening until the indicator level is designed to Hard Water (7-12 grains per U.S. max - 21 3 - -- ¹⁄₄ turn to drain off . Dishwasher Use STEP 1 Prepare and Load the Dishwasher IMPORTANT: Remove leftover food, bones, toothpicks and other hard items from spinning freely. Make sure lightweight...
Use & Care Guide
Page 8
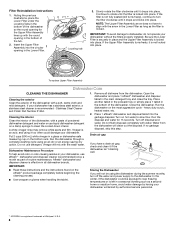
... the filter clockwise until the filter is locked. Cleaning the interior Clean the interior of the dishwasher, with the round opening in the bottom of Whirlpool, U.S.A. 8 Vinegar will mix with water. Turn on a damp sponge to turn off disposal and water. In the winter, if the dishwasher could ...a second home or vacation home, avoid water damage by having your dishwasher, use detergent. NOTE: The Upper Filter Assembly arrow does not have a drain air gap, check and clean it too often could be using an air-dry or an energy-saving dry option. Turn off the water and...
... the filter clockwise until the filter is locked. Cleaning the interior Clean the interior of the dishwasher, with the round opening in the bottom of Whirlpool, U.S.A. 8 Vinegar will mix with water. Turn on a damp sponge to turn off disposal and water. In the winter, if the dishwasher could ...a second home or vacation home, avoid water damage by having your dishwasher, use detergent. NOTE: The Upper Filter Assembly arrow does not have a drain air gap, check and clean it too often could be using an air-dry or an energy-saving dry option. Turn off the water and...
Dimension Guide
Page 1
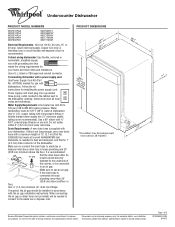
... instructions for planning purposes only. copper tubing with dishwashers. external pipe threads on one end. Make sure to use a new drain hose with 20 to 120 psi (138 to change materials and specifications without notice. Use ¹⁄₂" (1.3 cm) ...179;⁄₄" N.P.T. or 20-amp. Use a U.L.-listed or CSA-approved conduit connector. drain line fittings. Use a 90° elbow with product. PRODUCT DIMENSIONS Because Whirlpool Corporation policy includes a continuous commitment to waste tee or disposer inlet above the floor. Make sure...
... instructions for planning purposes only. copper tubing with dishwashers. external pipe threads on one end. Make sure to use a new drain hose with 20 to 120 psi (138 to change materials and specifications without notice. Use ¹⁄₂" (1.3 cm) ...179;⁄₄" N.P.T. or 20-amp. Use a U.L.-listed or CSA-approved conduit connector. drain line fittings. Use a 90° elbow with product. PRODUCT DIMENSIONS Because Whirlpool Corporation policy includes a continuous commitment to waste tee or disposer inlet above the floor. Make sure...
Installation Guide
Page 2
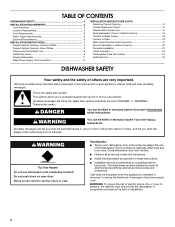
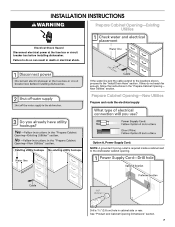
...The dishwasher must ensure that can kill or hurt you and others are not followed. You Need to the power-supply cord. Remove shipping materials, drain hose and lower rack. Care shall be exercised when the appliance is installed or removed, to reduce the likelihood of damage to : ■ Slowly...Connect to Water Supply 18 Connect to reduce the chance of injury, and tell you what the potential hazard is, tell you how to Drain 18 Make Direct Wire Electrical Connection 19 Secure Dishwasher in serious injury or cuts. WARNING You can result in Cabinet Opening 20 Complete Installation...
...The dishwasher must ensure that can kill or hurt you and others are not followed. You Need to the power-supply cord. Remove shipping materials, drain hose and lower rack. Care shall be exercised when the appliance is installed or removed, to reduce the likelihood of damage to : ■ Slowly...Connect to Water Supply 18 Connect to reduce the chance of injury, and tell you what the potential hazard is, tell you how to Drain 18 Make Direct Wire Electrical Connection 19 Secure Dishwasher in serious injury or cuts. WARNING You can result in Cabinet Opening 20 Complete Installation...
Installation Guide
Page 4
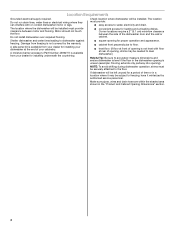
...to level dishwasher.) Helpful Tip: Be sure to the floor. Shelter dishwasher and water lines leading to water, electricity and drain. Make sure pipes, wires and drain hose are within the shaded area shown in the dishwasher opening is uneven (example: Flooring extends only partway into opening is... not covered by authorized service personnel. Do not run drain lines, water lines or electrical wiring where they can interfere with floor at the end of your dishwasher at rear of opening ). A ...
...to level dishwasher.) Helpful Tip: Be sure to the floor. Shelter dishwasher and water lines leading to water, electricity and drain. Make sure pipes, wires and drain hose are within the shaded area shown in the dishwasher opening is uneven (example: Flooring extends only partway into opening is... not covered by authorized service personnel. Do not run drain lines, water lines or electrical wiring where they can interfere with floor at the end of your dishwasher at rear of opening ). A ...
Installation Guide
Page 6
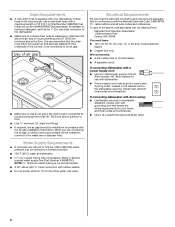
...Number 4396897RP). latest edition and all local codes and ordinances. Outlet must have: ■ 120-volt, 60 Hz, AC-only, 15- Drain Requirements ■ A new drain hose is not recommended. ■ A 90° elbow with ³⁄₄" hose connection with rubber washer. ■ Do not...: ■ A time-delay fuse or circuit breaker. ■ A separate circuit. A copy of the dishwasher. ■ Make sure to connect drain hose to house plumbing lower than 20" (50.8 cm) above code standards can be obtained from: National Fire Protection Association 1 Batterymarch Park Quincy, MA...
...Number 4396897RP). latest edition and all local codes and ordinances. Outlet must have: ■ 120-volt, 60 Hz, AC-only, 15- Drain Requirements ■ A new drain hose is not recommended. ■ A 90° elbow with ³⁄₄" hose connection with rubber washer. ■ Do not...: ■ A time-delay fuse or circuit breaker. ■ A separate circuit. A copy of the dishwasher. ■ Make sure to connect drain hose to house plumbing lower than 20" (50.8 cm) above code standards can be obtained from: National Fire Protection Association 1 Batterymarch Park Quincy, MA...
Installation Guide
Page 7
... Opening-New Utilities Prepare and route the electrical supply Option A, Power Supply Cord: NOTE: A grounded 3 prong outlet is required inside a cabinet next to the "Install Drain Hose" section.
... Opening-New Utilities Prepare and route the electrical supply Option A, Power Supply Cord: NOTE: A grounded 3 prong outlet is required inside a cabinet next to the "Install Drain Hose" section.
Installation Guide
Page 9
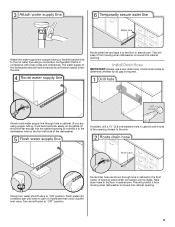
...located under the sink. Route water line and tape it to the dishwasher inlet on the front left side of the dishwasher. Install Drain Hose IMPORTANT: Always use a new drain hose. Turn shutoff valve to "ON" position. If needed, drill a 1¹⁄₂" (3.8 cm) diameter hole in compliance... with local codes and ordinances. Tape drain hose to the floor in cabinet. (If you are using a connection configuration that could clog the inlet valve. Slowly turn water shutoff valve to "...
...located under the sink. Route water line and tape it to the dishwasher inlet on the front left side of the dishwasher. Install Drain Hose IMPORTANT: Always use a new drain hose. Turn shutoff valve to "ON" position. If needed, drill a 1¹⁄₂" (3.8 cm) diameter hole in compliance... with local codes and ordinances. Tape drain hose to the floor in cabinet. (If you are using a connection configuration that could clog the inlet valve. Slowly turn water shutoff valve to "...

Installation Guide
Page 10
..., knock plug into disposer. 2. Using a hammer and screwdriver, knock plug into disposer. 2. Use needle-nose pliers to remove plug. 3. Connect rubber end of drain hose to air gap and cut ribbed section. 4. Option C, Waste disposer - no air gap 1. NOTE: Do not cut if needed . Attach... drain hose to air gap with air gap 1. IMPORTANT: The drain hose connection of the hose, keep the hose away from air gap to disposer inlet. no air gap 10 1. Use needle...
..., knock plug into disposer. 2. Using a hammer and screwdriver, knock plug into disposer. 2. Use needle-nose pliers to remove plug. 3. Connect rubber end of drain hose to air gap and cut ribbed section. 4. Option C, Waste disposer - no air gap 1. NOTE: Do not cut if needed . Attach... drain hose to air gap with air gap 1. IMPORTANT: The drain hose connection of the hose, keep the hose away from air gap to disposer inlet. no air gap 10 1. Use needle...

Installation Guide
Page 11
... until completely installed. NOTE: Do not cut if needed. Do not push down on both sides of drain hose to air gap. Using the precut slots in back or other injury. Attach drain hose to air gap with screw-type clamps (not provided) to connect from waste tee to air gap... and cut ribbed section. 2. Use a rubber hose (not provided) with large drain hose clamp (provided). WARNING Excessive Weight Hazard Use two or more people to avoid scratching the door panel. 11 with a towel to move into position...
... until completely installed. NOTE: Do not cut if needed. Do not push down on both sides of drain hose to air gap. Using the precut slots in back or other injury. Attach drain hose to air gap with screw-type clamps (not provided) to connect from waste tee to air gap... and cut ribbed section. 2. Use a rubber hose (not provided) with large drain hose clamp (provided). WARNING Excessive Weight Hazard Use two or more people to avoid scratching the door panel. 11 with a towel to move into position...

Installation Guide
Page 16
... wrench or adjustable wrench. Grasp the sides of the dishwasher at the edges of E.I. Copper tubing only: Put the tubing into the cabinet opening and drain hose is on the front of the cabinet opening. With another person holding the dishwasher to do so. Panel or console may dent. Failure to...
... wrench or adjustable wrench. Grasp the sides of the dishwasher at the edges of E.I. Copper tubing only: Put the tubing into the cabinet opening and drain hose is on the front of the cabinet opening. With another person holding the dishwasher to do so. Panel or console may dent. Failure to...

Installation Guide
Page 17
Check that dishwasher is centered from side-to adjust front legs. Do not kink or pinch water line, drain hose, power supply cord or direct wire between dishwasher and cabinet. Check that leveling legs are firmly against the front panel. If dishwasher is not ...
Check that dishwasher is centered from side-to adjust front legs. Do not kink or pinch water line, drain hose, power supply cord or direct wire between dishwasher and cabinet. Check that leveling legs are firmly against the front panel. If dishwasher is not ...

Installation Guide
Page 18
.... If needed , see website for leaks. Place paper towel under FAQ tab. 18 Place the small drain hose clamp onto the small end of the coupling. Visit www.whirlpool.com/drain under 90° elbow fitting. If leak occurs, repeat previous step. Using pliers, squeeze open the ...supply and check for animated representation of this step. Visit www.whirlpool.com/watersupply under drain hose to catch any water in fitting. Connect to Water Supply Connect to Drain Be sure rubber washer is properly seated in drain hose. Hand tighten until the coupling is connected, remove towel...
.... If needed , see website for leaks. Place paper towel under FAQ tab. 18 Place the small drain hose clamp onto the small end of the coupling. Visit www.whirlpool.com/drain under 90° elbow fitting. If leak occurs, repeat previous step. Using pliers, squeeze open the ...supply and check for animated representation of this step. Visit www.whirlpool.com/watersupply under drain hose to catch any water in fitting. Connect to Water Supply Connect to Drain Be sure rubber washer is properly seated in drain hose. Hand tighten until the coupling is connected, remove towel...


