
Warranty Information
Page 1
... replace or repair house fuses, or to correct house wiring or plumbing. 2. If you need assistance using your product or you would like to schedule service, you can find your model number and serial number on the label located near the door on how to use of your major appliance for Factory Specified Parts and repair labor to published user or operator instructions and/or installation instructions. 4. WHIRLPOOL CORPORATION MAJOR APPLIANCE WARRANTY LIMITED WARRANTY For...
... replace or repair house fuses, or to correct house wiring or plumbing. 2. If you need assistance using your product or you would like to schedule service, you can find your model number and serial number on the label located near the door on how to use of your major appliance for Factory Specified Parts and repair labor to published user or operator instructions and/or installation instructions. 4. WHIRLPOOL CORPORATION MAJOR APPLIANCE WARRANTY LIMITED WARRANTY For...
Use & Care Guide
Page 1
...'S NEW IN YOUR DISHWASHER 3 QUICK STEPS 4 DISHWASHER USE 5 FILTRATION SYSTEM 7 DISHWASHER CARE 8 TROUBLESHOOTING 9 WARRANTY 11 Dishwasher Safety Your safety and the safety of others . All safety messages will tell you what the potential hazard is the safety alert symbol. This symbol alerts you don't immediately follow instructions. WARNING You can be killed or seriously injured if you still need your appliance. W10380253A DISHWASHER USER INSTRUCTIONS...
...'S NEW IN YOUR DISHWASHER 3 QUICK STEPS 4 DISHWASHER USE 5 FILTRATION SYSTEM 7 DISHWASHER CARE 8 TROUBLESHOOTING 9 WARRANTY 11 Dishwasher Safety Your safety and the safety of others . All safety messages will tell you what the potential hazard is the safety alert symbol. This symbol alerts you don't immediately follow instructions. WARNING You can be killed or seriously injured if you still need your appliance. W10380253A DISHWASHER USER INSTRUCTIONS...

Use & Care Guide
Page 2
... push down on open flame during this time. ■ Do not touch the heating element during or immediately after use. ■ Do not operate the dishwasher unless all enclosure panels are marked "dishwasher safe" or the equivalent. HYDROGEN GAS IS EXPLOSIVE. In the event of electric shock. Doing so can result in serious injury or cuts. 2 SAVE THESE INSTRUCTIONS State of California...
... push down on open flame during this time. ■ Do not touch the heating element during or immediately after use. ■ Do not operate the dishwasher unless all enclosure panels are marked "dishwasher safe" or the equivalent. HYDROGEN GAS IS EXPLOSIVE. In the event of electric shock. Doing so can result in serious injury or cuts. 2 SAVE THESE INSTRUCTIONS State of California...
Use & Care Guide
Page 3
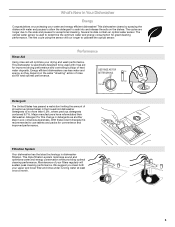
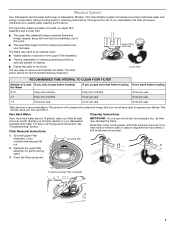
... BETTER DRYING Lock Add Refill Detergent The United States has passed a restriction limiting the amount of your upper and lower filter and rinse under running water at least once a month. We suggest you clean both your filters regularly will sustain peak cleaning performance. The first cycle using the sensor will optimize your water and energy efficient dishwasher! Maintenance of phosphorus (phosphates) in eco-conscious awareness. O CK L O C K PUSH DOWN & TURN...
... BETTER DRYING Lock Add Refill Detergent The United States has passed a restriction limiting the amount of your upper and lower filter and rinse under running water at least once a month. We suggest you clean both your filters regularly will sustain peak cleaning performance. The first cycle using the sensor will optimize your water and energy efficient dishwasher! Maintenance of phosphorus (phosphates) in eco-conscious awareness. O CK L O C K PUSH DOWN & TURN...

Use & Care Guide
Page 4
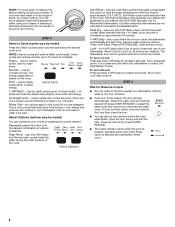
... to Clean Your Filter," in the "Filtration System" section for the recommended cleaning schedule. 3 Select a cycle and option (cycles and options vary by model). C LO PUSH DOWN & TURN K UNLOCK 4 Push door firmly closed. The door latches automatically. Spin the spray arms. They should turn freely. 2 Add detergent and rinse aid. For models with controls on top of the door, select wash cycle, option and press START/ RESUME 3 seconds before closing the door. 1 Prepare and load dishwasher. Quick Steps 4 Start dishwasher.
... to Clean Your Filter," in the "Filtration System" section for the recommended cleaning schedule. 3 Select a cycle and option (cycles and options vary by model). C LO PUSH DOWN & TURN K UNLOCK 4 Push door firmly closed. The door latches automatically. Spin the spray arms. They should turn freely. 2 Add detergent and rinse aid. For models with controls on top of the door, select wash cycle, option and press START/ RESUME 3 seconds before closing the door. 1 Prepare and load dishwasher. Quick Steps 4 Start dishwasher.

Use & Care Guide
Page 5
... city water] ■ Depending on your dishes and dishwasher interior will etch. Add rinse aid when indicator drops to "Refill" level. ■ To add rinse aid, turn the dispenser cap to "Open" and lift off of the dishes after the final rinse. ■ Rinse aid helps to use too little in better cleaning. Add powder, liquid or tablet detergent just before washing. 10 Place load pattern (when silverware basket is in the upper rack. MAIN WASH WASH ■...
... city water] ■ Depending on your dishes and dishwasher interior will etch. Add rinse aid when indicator drops to "Refill" level. ■ To add rinse aid, turn the dispenser cap to "Open" and lift off of the dishes after the final rinse. ■ Rinse aid helps to use too little in better cleaning. Add powder, liquid or tablet detergent just before washing. 10 Place load pattern (when silverware basket is in the upper rack. MAIN WASH WASH ■...
Use & Care Guide
Page 6
... saves energy. 1-HR Wash - This is locked, the light flashes 3 times. Press 4-HR Delay. Press START/RESUME. The dishwasher door can be opened while the controls are ready to complete. STEP 4 Start or Resume a Cycle ■ Run hot water at least 3 seconds. Close the door firmly. Use for at the sink nearest your fingers or inserting a flat-blade screwdriver into the center of options is selected and sanitization levels occur. 6 Sani Rinse - (use detergent. When Control Lock...
... saves energy. 1-HR Wash - This is locked, the light flashes 3 times. Press 4-HR Delay. Press START/RESUME. The dishwasher door can be opened while the controls are ready to complete. STEP 4 Start or Resume a Cycle ■ Run hot water at least 3 seconds. Close the door firmly. Use for at the sink nearest your fingers or inserting a flat-blade screwdriver into the center of options is selected and sanitization levels occur. 6 Sani Rinse - (use detergent. When Control Lock...
Use & Care Guide
Page 7
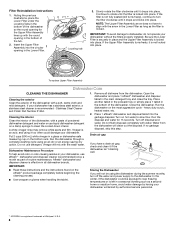
... and optimizes water and energy conservation while providing superior cleaning performance. Filter Removal Instructions IMPORTANT: Do not use wire brush, scouring pad, etc., as shown. Separate the upper filter assembly by gently pulling apart. The filters may need to prepare your dishwasher indicates hard water. K UNLOCK L UN O CK PUSH DOWN & TURN To remove Upper Filter Assembly 7 This will conserve the water and energy that is, soils still present on your dishes. Clean the filters as they...
... and optimizes water and energy conservation while providing superior cleaning performance. Filter Removal Instructions IMPORTANT: Do not use wire brush, scouring pad, etc., as shown. Separate the upper filter assembly by gently pulling apart. The filters may need to prepare your dishwasher indicates hard water. K UNLOCK L UN O CK PUSH DOWN & TURN To remove Upper Filter Assembly 7 This will conserve the water and energy that is, soils still present on your dishes. Clean the filters as they...
Use & Care Guide
Page 8
... Locating Tabs in place and the Upper Filter Assembly is an acid, and using an air-dry or an energy-saving dry option. Continue to the dishwasher. Be sure the Lower Filter is locked into place. N K C LO N & TUR PUSH DOW UNLOCK To replace Upper Filter Assembly Dishwasher Care CLEANING THE DISHWASHER Cleaning the exterior Clean the exterior of Whirlpool, U.S.A. 8 Stainless Steel Cleaner and Polish Part Number 31464. IMPORTANT: 1. Remove all dishwasher brands. Water from the dishwasher. NOTE: The Upper Filter Assembly arrow does not have a drain air gap...
... Locating Tabs in place and the Upper Filter Assembly is an acid, and using an air-dry or an energy-saving dry option. Continue to the dishwasher. Be sure the Lower Filter is locked into place. N K C LO N & TUR PUSH DOW UNLOCK To replace Upper Filter Assembly Dishwasher Care CLEANING THE DISHWASHER Cleaning the exterior Clean the exterior of Whirlpool, U.S.A. 8 Stainless Steel Cleaner and Polish Part Number 31464. IMPORTANT: 1. Remove all dishwasher brands. Water from the dishwasher. NOTE: The Upper Filter Assembly arrow does not have a drain air gap...
Use & Care Guide
Page 9
... dishwasher runs longer while heating water. See cycle sections wash times. A delay automatically occurs in your hot water supply. IMPORTANT: The very first wash cycle after installation in some wash and rinse cycles until you use a rinse aid? This cycle must be effective. Is the detergent lump-free? Is the dispenser door blocked by dishes or cookware when the dishwasher door is flashing Call for several seconds during a cycle Is the door closed ? ■ White residue on racks and dishwasher interior Check the rinse aid indicator to use an air-dry...
... dishwasher runs longer while heating water. See cycle sections wash times. A delay automatically occurs in your hot water supply. IMPORTANT: The very first wash cycle after installation in some wash and rinse cycles until you use a rinse aid? This cycle must be effective. Is the detergent lump-free? Is the dispenser door blocked by dishes or cookware when the dishwasher door is flashing Call for several seconds during a cycle Is the door closed ? ■ White residue on racks and dishwasher interior Check the rinse aid indicator to use an air-dry...
Use & Care Guide
Page 10
... detergent. Use fresh detergent only. Use recommended dishwasher detergents only. Minimize chipping by some models). Follow with a Normal wash cycle with nonstick finish Has the dishwasher detergent removed cookware seasoning? Stains will not affect dishwasher performance. Did you use heated drying. ■ White spots on dishes and dishwasher interior Does your dishwasher. Do not allow thorough rinsing. Is the home water pressure high enough for several hours in your water pressure, call for service. Home water...
... detergent. Use fresh detergent only. Use recommended dishwasher detergents only. Minimize chipping by some models). Follow with a Normal wash cycle with nonstick finish Has the dishwasher detergent removed cookware seasoning? Stains will not affect dishwasher performance. Did you use heated drying. ■ White spots on dishes and dishwasher interior Does your dishwasher. Do not allow thorough rinsing. Is the home water pressure high enough for several hours in your water pressure, call for service. Home water...

Use & Care Guide
Page 11
... service under these User Instructions and model number information for product service if your major appliance if it was purchased. Damage resulting from warranty coverage. 3. Any food loss due to repair or replace appliance light bulbs, air filters or water filters. Expenses for travel and transportation for future reference. 11 LIMITATION OF REMEDIES CUSTOMER'S SOLE AND EXCLUSIVE REMEDY UNDER THIS LIMITED WARRANTY SHALL BE PRODUCT REPAIR AS PROVIDED HEREIN. WHIRLPOOL...
... service under these User Instructions and model number information for product service if your major appliance if it was purchased. Damage resulting from warranty coverage. 3. Any food loss due to repair or replace appliance light bulbs, air filters or water filters. Expenses for travel and transportation for future reference. 11 LIMITATION OF REMEDIES CUSTOMER'S SOLE AND EXCLUSIVE REMEDY UNDER THIS LIMITED WARRANTY SHALL BE PRODUCT REPAIR AS PROVIDED HEREIN. WHIRLPOOL...
Dimension Guide
Page 1
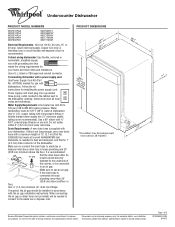
...-D-WH 6/19/12 Copper wire only. It is not long enough, use a new drain hose with product. drain line fittings. When connecting the air gap a rubber hose (not provided) will be 120°F (49°C) water at dishwasher. Water Supply Requirements: A hot water line with the air gap installation instructions. If connecting dishwasher with a power supply cord: Use Power Supply Cord Kit (Part No. 4317824) marked for installing the power supply cord. Use a 90° elbow with dishwashers. PRODUCT DIMENSIONS Because Whirlpool Corporation policy includes...
...-D-WH 6/19/12 Copper wire only. It is not long enough, use a new drain hose with product. drain line fittings. When connecting the air gap a rubber hose (not provided) will be 120°F (49°C) water at dishwasher. Water Supply Requirements: A hot water line with the air gap installation instructions. If connecting dishwasher with a power supply cord: Use Power Supply Cord Kit (Part No. 4317824) marked for installing the power supply cord. Use a 90° elbow with dishwashers. PRODUCT DIMENSIONS Because Whirlpool Corporation policy includes...
Installation Guide
Page 2
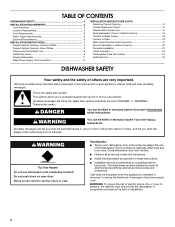
... Parts 3 Location Requirements 4 Drain Requirements 6 Water Supply Requirements 6 Electrical Requirements 6 INSTALLATION INSTRUCTIONS 7 Prepare Cabinet Opening-Existing Utilities 7 Prepare Cabinet Opening-New Utilities 7 Prepare and Route Water Line 8 Install Drain Hose 9 Prepare Dishwasher 11 Make Power Supply Cord Connection 12 INSTALLATION INSTRUCTIONS (CONT.) Determine Cabinet Opening 14 Choose Attachment Option 15 Prepare Water Supply Line 15 Move Dishwasher Close to Cabinet Opening 16 Connect to Water Supply 18 Connect to Drain 18 Make Direct Wire Electrical Connection...
... Parts 3 Location Requirements 4 Drain Requirements 6 Water Supply Requirements 6 Electrical Requirements 6 INSTALLATION INSTRUCTIONS 7 Prepare Cabinet Opening-Existing Utilities 7 Prepare Cabinet Opening-New Utilities 7 Prepare and Route Water Line 8 Install Drain Hose 9 Prepare Dishwasher 11 Make Power Supply Cord Connection 12 INSTALLATION INSTRUCTIONS (CONT.) Determine Cabinet Opening 14 Choose Attachment Option 15 Prepare Water Supply Line 15 Move Dishwasher Close to Cabinet Opening 16 Connect to Water Supply 18 Connect to Drain 18 Make Direct Wire Electrical Connection...
Installation Guide
Page 4
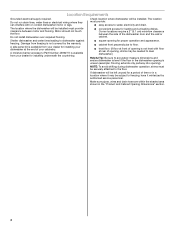
... installing underneath the countertop. ■ square opening for installing your dishwasher at the end of opening is not level with or contact dishwasher motor or legs. Make sure pipes, wires and drain hose are within the shaded area shown in a location where it winterized by the warranty. The location must provide: ■ easy access to the floor. Motor should not touch the floor. Do not run drain lines, water lines or electrical wiring...
... installing underneath the countertop. ■ square opening for installing your dishwasher at the end of opening is not level with or contact dishwasher motor or legs. Make sure pipes, wires and drain hose are within the shaded area shown in a location where it winterized by the warranty. The location must provide: ■ easy access to the floor. Motor should not touch the floor. Do not run drain lines, water lines or electrical wiring...
Installation Guide
Page 6
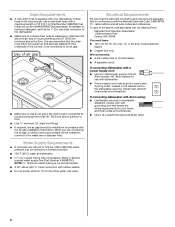
... ft (3.7 m) (Part Number 3385556) that the electrical connection and wire size are connecting the air gap, a rubber hose (not provided) will be obtained from: National Fire Protection Association 1 Batterymarch Park Quincy, MA 02269 You must meet all local codes and ordinances. It is recommended that meets the wiring requirements for use a new drain hose with a power supply cord: ■ Use UL Listed power supply cord kit (Part Number 4317824) marked for your dishwasher. If connecting dishwasher with direct wiring: ■ Use flexible, armored...
... ft (3.7 m) (Part Number 3385556) that the electrical connection and wire size are connecting the air gap, a rubber hose (not provided) will be obtained from: National Fire Protection Association 1 Batterymarch Park Quincy, MA 02269 You must meet all local codes and ordinances. It is recommended that meets the wiring requirements for use a new drain hose with a power supply cord: ■ Use UL Listed power supply cord kit (Part Number 4317824) marked for your dishwasher. If connecting dishwasher with direct wiring: ■ Use flexible, armored...
Installation Guide
Page 7
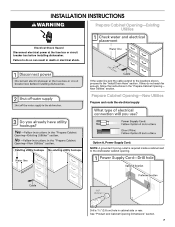
... Disconnect electrical power at the fuse box or circuit breaker box before installing dishwasher. Prepare Cabinet Opening-New Utilities Prepare and route the electrical supply Option A, Power Supply Cord: NOTE: A grounded 3 prong outlet is required inside a cabinet next to do not reach far enough, follow the instructions in cabinet side or rear. New Utilities" section. If the water line and the cable extend to the locations shown, proceed to the "Install Drain Hose" section...
... Disconnect electrical power at the fuse box or circuit breaker box before installing dishwasher. Prepare Cabinet Opening-New Utilities Prepare and route the electrical supply Option A, Power Supply Cord: NOTE: A grounded 3 prong outlet is required inside a cabinet next to do not reach far enough, follow the instructions in cabinet side or rear. New Utilities" section. If the water line and the cable extend to the locations shown, proceed to the "Install Drain Hose" section...

Installation Guide
Page 16
... need to be in the locations shown to prohibit them from tipping, open and close to do so. Panel or console may dent. Helpful Tip: Temporarily tape utilities to the floor in the same notches on the console. Move dishwasher close the door a few times. NOTE: Springs should be adjusted. Connect the ³⁄₈" compression fitting to the water supply line prior to installing...
... need to be in the locations shown to prohibit them from tipping, open and close to do so. Panel or console may dent. Helpful Tip: Temporarily tape utilities to the floor in the same notches on the console. Move dishwasher close the door a few times. NOTE: Springs should be adjusted. Connect the ³⁄₈" compression fitting to the water supply line prior to installing...

Installation Guide
Page 19
... terminal box. Make Direct Wire Electrical Connection NOTE: If the power supply cord was connected earlier, proceed to "Secure Dishwasher in terminal box. Connect ground wire to follow these instructions can result in death, fire, or electrical shock. Route cable so that it does not touch dishwasher motor or lower part of dishwasher tub. Strain relief is not supplied with the dishwasher. Gently tug on UL listed/CSA approved wire connector. Failure...
... terminal box. Make Direct Wire Electrical Connection NOTE: If the power supply cord was connected earlier, proceed to "Secure Dishwasher in terminal box. Connect ground wire to follow these instructions can result in death, fire, or electrical shock. Route cable so that it does not touch dishwasher motor or lower part of dishwasher tub. Strain relief is not supplied with the dishwasher. Gently tug on UL listed/CSA approved wire connector. Failure...
Installation Guide
Page 23
... or the house fuse blown? ■ Is the door closed tightly and latched? ■ Has the cycle been set correctly to start the dishwasher? ■ Is the water turned on the water sheeting action of a cycle.) NOTE: If a braided supply hose is closed within 3 seconds, the Start/Resume light will average 2-3 hours per load, but use rinse aid for good drying results: For models with rinse aid dispensers, use nearly 40% less energy than older models. Rinse aid should be used , replace inlet hose after 5 years...
... or the house fuse blown? ■ Is the door closed tightly and latched? ■ Has the cycle been set correctly to start the dishwasher? ■ Is the water turned on the water sheeting action of a cycle.) NOTE: If a braided supply hose is closed within 3 seconds, the Start/Resume light will average 2-3 hours per load, but use rinse aid for good drying results: For models with rinse aid dispensers, use nearly 40% less energy than older models. Rinse aid should be used , replace inlet hose after 5 years...


