Dimension Guide
Page 1
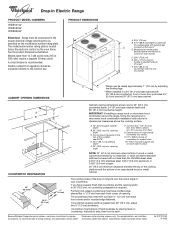
... than ¹⁄₄" (0.64 cm) flame retardant millboard covered with 25" (63.5 cm) countertop; Because Whirlpool Corporation policy includes a continuous commitment to improve Dimensions are for planning purposes only. Flexible conduit from 12.7 kW at 240 volts (9.5 at back of range** F..... front of cooktop edge with product. Countertop must have a square finish (flat) countertop and the opening . See the product dimensions illustration. A circuit breaker is required. from handle to standoff at 208 volts) require a separate 50-amp circuit. Cabinet door ...
... than ¹⁄₄" (0.64 cm) flame retardant millboard covered with 25" (63.5 cm) countertop; Because Whirlpool Corporation policy includes a continuous commitment to improve Dimensions are for planning purposes only. Flexible conduit from 12.7 kW at 240 volts (9.5 at back of range** F..... front of cooktop edge with product. Countertop must have a square finish (flat) countertop and the opening . See the product dimensions illustration. A circuit breaker is required. from handle to standoff at 208 volts) require a separate 50-amp circuit. Cabinet door ...
Installation Instructions
Page 3
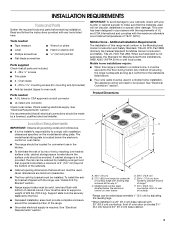
... by adjusting the leveling legs. **When installed in a mobile home, it conforms to underside of cabinet cutout. See "Electrical Requirements" section. Given dimensions are included. ■ 2 - #8 x ¹⁄₂" screws ■ Trim plate ■ 2 - INSTALLATION REQUIREMENTS Tools and Parts ...and complies with the range, see "Install Anti-Tip Bracket" section. ■ Range support slats must be installed. Product Dimensions A Location Requirements IMPORTANT: Observe all electrical connections should be solid, level and flush with bottom of cooktop edge with 25...
... by adjusting the leveling legs. **When installed in a mobile home, it conforms to underside of cabinet cutout. See "Electrical Requirements" section. Given dimensions are included. ■ 2 - #8 x ¹⁄₂" screws ■ Trim plate ■ 2 - INSTALLATION REQUIREMENTS Tools and Parts ...and complies with the range, see "Install Anti-Tip Bracket" section. ■ Range support slats must be installed. Product Dimensions A Location Requirements IMPORTANT: Observe all electrical connections should be solid, level and flush with bottom of cooktop edge with 25...

Installation Instructions
Page 4
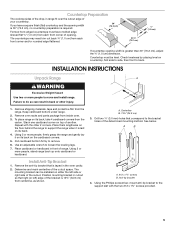
.... See the following illustration. Connect a section of solid copper wire to a grounded metal, permanent wiring system. Follow the electrical connector manufacturer's recommended procedure. Cabinet Dimensions Cabinet opening dimensions shown are not sure the range is properly grounded. from either cabinet, 8¹⁄₄" (21 cm) max. The model/serial number rating plate...
.... See the following illustration. Connect a section of solid copper wire to a grounded metal, permanent wiring system. Follow the electrical connector manufacturer's recommended procedure. Cabinet Dimensions Cabinet opening dimensions shown are not sure the range is properly grounded. from either cabinet, 8¹⁄₄" (21 cm) max. The model/serial number rating plate...
Installation Instructions
Page 5
... another. Using 2 or more people, firmly grasp the range and gently lay it is greater than 30" (76.2 cm), adjust the ³⁄₈" (1.0 cm) dimension. Keep cardboard bottom under range. 2. A. Using the Phillips screwdriver, mount anti-tip bracket to move and install range. Pull cardboard bottom firmly to the bracket...
... another. Using 2 or more people, firmly grasp the range and gently lay it is greater than 30" (76.2 cm), adjust the ³⁄₈" (1.0 cm) dimension. Keep cardboard bottom under range. 2. A. Using the Phillips screwdriver, mount anti-tip bracket to move and install range. Pull cardboard bottom firmly to the bracket...


