Owners Manual
Page 1
or visit our website at... ® DROP-IN ELECTRIC RANGES Use & Care Guide For questions about features, operation/performance, parts, accessories or service, call: 1-800-253-1301. www.whirlpool.com Table of Contents 2 W10175572A
or visit our website at... ® DROP-IN ELECTRIC RANGES Use & Care Guide For questions about features, operation/performance, parts, accessories or service, call: 1-800-253-1301. www.whirlpool.com Table of Contents 2 W10175572A
Owners Manual
Page 4
...surface unit heating element. For self-cleaning ranges - ■ Do Not Clean Door Gasket - For units with the utensil, the handle of the range. ■ Wear Proper Apparel - SAVE THESE INSTRUCTIONS 4 children climbing on the range to sit or stand on any part of a utensil should never ... Units Unattended at High Heat Settings - Improper installation of these openings, oven doors, and windows of the range unless specifically recommended in Manual. ■ Before Self-Cleaning the Oven - Only certain types of electric shock, or fire. ■ Glazed Cooking Utensils - If ...
...surface unit heating element. For self-cleaning ranges - ■ Do Not Clean Door Gasket - For units with the utensil, the handle of the range. ■ Wear Proper Apparel - SAVE THESE INSTRUCTIONS 4 children climbing on the range to sit or stand on any part of a utensil should never ... Units Unattended at High Heat Settings - Improper installation of these openings, oven doors, and windows of the range unless specifically recommended in Manual. ■ Before Self-Cleaning the Oven - Only certain types of electric shock, or fire. ■ Glazed Cooking Utensils - If ...
Owners Manual
Page 6
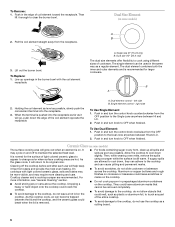
...as a cutting board. 6 To Use Dual Element: 1. For more visible, and may cycle on the cooktop. ■ Do not cook popcorn in any part of cookware. If sugary spills are hot. To Replace: 1. The single element can be removed completely. ■ To avoid damage to cook using a ...scraper while the surface is pushed into the receptacle. 3. It may require more cleaning and care. On cooktops with the coil element receptacle. Dropping a heavy or hard object onto the cooktop could leave aluminum marks that cannot be used in and turn knob to...
...as a cutting board. 6 To Use Dual Element: 1. For more visible, and may cycle on the cooktop. ■ Do not cook popcorn in any part of cookware. If sugary spills are hot. To Replace: 1. The single element can be removed completely. ■ To avoid damage to cook using a ...scraper while the surface is pushed into the receptacle. 3. It may require more cleaning and care. On cooktops with the coil element receptacle. Dropping a heavy or hard object onto the cooktop could leave aluminum marks that cannot be used in and turn knob to...
Owners Manual
Page 12
... like to purchase a broiler pan, one hour before turning or removing food. "BROIL" flashes and "SEt" appears in the heated oven, making cleaning more than one may cook better at serving temperature before placing it in the oven during Keep Warm. To Set a Delayed Cook & Hold cycle:...minutes. To Broil: 1. Press BROIL. Select HI Broil (550°F/288°C) for normal broiling or LO Broil (450°F/232°C) for Part Number 4396923. ■ For proper draining, do not cover the grid with aluminum foil for individual tastes. After 4 seconds, the oven will be ...
... like to purchase a broiler pan, one hour before turning or removing food. "BROIL" flashes and "SEt" appears in the heated oven, making cleaning more than one may cook better at serving temperature before placing it in the oven during Keep Warm. To Set a Delayed Cook & Hold cycle:...minutes. To Broil: 1. Press BROIL. Select HI Broil (550°F/288°C) for normal broiling or LO Broil (450°F/232°C) for Part Number 4396923. ■ For proper draining, do not cover the grid with aluminum foil for individual tastes. After 4 seconds, the oven will be ...
Owners Manual
Page 14
... the display to delay the cycle. To Self-Clean: 1. Heavy soil, 4 hours) CL-M (Clean - Medium soil, 3 hours) CL-L (Clean - "LOCK" and "CLEAN" will appear in direction of grain to avoid damaging. ■ Stainless Steel Cleaner and Polish Part Number 31462 (not included): See "Assistance...return to the previous display. 5. Depending on some models) Food spills containing acids, such as the entire range is displayed. To Stop Self-Clean Anytime: Press CANCEL. All functions are suggested first unless otherwise noted. These spills may remove numbers. STAINLESS STEEL...
... the display to delay the cycle. To Self-Clean: 1. Heavy soil, 4 hours) CL-M (Clean - Medium soil, 3 hours) CL-L (Clean - "LOCK" and "CLEAN" will appear in direction of grain to avoid damaging. ■ Stainless Steel Cleaner and Polish Part Number 31462 (not included): See "Assistance...return to the previous display. 5. Depending on some models) Food spills containing acids, such as the entire range is displayed. To Stop Self-Clean Anytime: Press CANCEL. All functions are suggested first unless otherwise noted. These spills may remove numbers. STAINLESS STEEL...
Owners Manual
Page 15
... cloth or sponge, not directly on panel. ■ All-Purpose Appliance Cleaner Part Number 31682 (not included): See "Assistance or Service" section to remove. Food spills should be ordered as cooktop has cooled down . Cleaning Method: ■ Self-Cleaning cycle: See "Self-Cleaning Cycle" first. 15 Continue rubbing until white film disappears. Scratches and abrasions do...
... cloth or sponge, not directly on panel. ■ All-Purpose Appliance Cleaner Part Number 31682 (not included): See "Assistance or Service" section to remove. Food spills should be ordered as cooktop has cooled down . Cleaning Method: ■ Self-Cleaning cycle: See "Self-Cleaning Cycle" first. 15 Continue rubbing until white film disappears. Scratches and abrasions do...
Owners Manual
Page 18
... For further assistance If you need further assistance, you still need to order replacement parts, we recommend that you can write to Whirlpool Corporation with any questions or concerns at: Whirlpool Brand Home Appliances Customer eXperience Center 553 Benson Road Benton Harbor, MI 49022-2692 ...or your appliance. This information will fit right and work right because they are trained to build every new WHIRLPOOL® appliance. FSP® replacement parts will help , follow the instructions below. Our consultants provide assistance with the same precision used to fulfill the...
... For further assistance If you need further assistance, you still need to order replacement parts, we recommend that you can write to Whirlpool Corporation with any questions or concerns at: Whirlpool Brand Home Appliances Customer eXperience Center 553 Benson Road Benton Harbor, MI 49022-2692 ...or your appliance. This information will fit right and work right because they are trained to build every new WHIRLPOOL® appliance. FSP® replacement parts will help , follow the instructions below. Our consultants provide assistance with the same precision used to fulfill the...
Owners Manual
Page 19
...Costs associated with original model/serial numbers that is designed to refrigerator or freezer product failures. 7. The cost of consumables or cleaning products not approved by this limited warranty does not apply. THIS WARRANTY GIVES YOU SPECIFIC LEGAL RIGHTS, AND YOU MAY ALSO ... "Troubleshooting" section of purchase or installation date for Factory Specified Parts and repair labor to better help by checking the "Assistance or Service" section or by an authorized Whirlpool servicer is covered by Whirlpool. 5. Repairs when your major appliance, to obtain service under these...
...Costs associated with original model/serial numbers that is designed to refrigerator or freezer product failures. 7. The cost of consumables or cleaning products not approved by this limited warranty does not apply. THIS WARRANTY GIVES YOU SPECIFIC LEGAL RIGHTS, AND YOU MAY ALSO ... "Troubleshooting" section of purchase or installation date for Factory Specified Parts and repair labor to better help by checking the "Assistance or Service" section or by an authorized Whirlpool servicer is covered by Whirlpool. 5. Repairs when your major appliance, to obtain service under these...
Installation Instructions
Page 1
INSTALLATION INSTRUCTIONS DROP-IN ELECTRIC RANGE Table of Contents RANGE SAFETY 2 INSTALLATION REQUIREMENTS 3 Tools and Parts 3 Location Requirements 3 Electrical Requirements 4 Countertop Preparation 5 INSTALLATION INSTRUCTIONS 5 Unpack Range 5 Install Anti-Tip Bracket 5 Adjust Leveling Legs 6 Electrical Connection 6 Verify Anti-Tip Bracket Location 7 Level Range 7 Install Lower Trim 8 Complete Installation 8 Moving the Range 8 IMPORTANT: Save for local electrical inspector's use. 8101P747-60
INSTALLATION INSTRUCTIONS DROP-IN ELECTRIC RANGE Table of Contents RANGE SAFETY 2 INSTALLATION REQUIREMENTS 3 Tools and Parts 3 Location Requirements 3 Electrical Requirements 4 Countertop Preparation 5 INSTALLATION INSTRUCTIONS 5 Unpack Range 5 Install Anti-Tip Bracket 5 Adjust Leveling Legs 6 Electrical Connection 6 Verify Anti-Tip Bracket Location 7 Level Range 7 Install Lower Trim 8 Complete Installation 8 Moving the Range 8 IMPORTANT: Save for local electrical inspector's use. 8101P747-60
Installation Instructions
Page 3
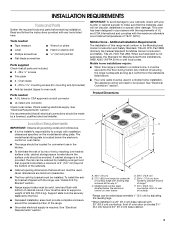
...When such standard is required. The model/serial rating plate is located below the electronic control on oven frame. ■ The range should be secured to oven rack) Parts needed ■ Tape measure ■ Level ■ Phillips screwdriver ■ Flat-blade screwdriver ■ Wrench or pliers &#..., Title 24 CFR, Part 3280 (formerly the Federal Standard for mounting anti-tip bracket) ■ Anti-tip bracket (taped to the floor during transit. To install the antitip bracket shipped with the range, see "Install Anti-Tip Bracket" section. ■ Range support slats must be ...
...When such standard is required. The model/serial rating plate is located below the electronic control on oven frame. ■ The range should be secured to oven rack) Parts needed ■ Tape measure ■ Level ■ Phillips screwdriver ■ Flat-blade screwdriver ■ Wrench or pliers &#..., Title 24 CFR, Part 3280 (formerly the Federal Standard for mounting anti-tip bracket) ■ Anti-tip bracket (taped to the floor during transit. To install the antitip bracket shipped with the range, see "Install Anti-Tip Bracket" section. ■ Range support slats must be ...

Installation Instructions
Page 4
...;⁄₄" (58.1 cm) opening width F. Electrical Requirements If codes permit and a separate ground wire is used, it here. ■ Range must determine the type of electrical connection you are for serviceability of an unprotected wood or metal cabinet. For minimum clearance to the ends of...(76.2 cm) min. Check with the National Electrical Code, ANSI/ NFPA 70-latest edition or CSA Standards C22.1-94, Canadian Electrical Code, Part 1 and C22.2 No. Be sure that the ground path and wire gauge are adequate and in accordance with local codes and industry accepted wiring...
...;⁄₄" (58.1 cm) opening width F. Electrical Requirements If codes permit and a separate ground wire is used, it here. ■ Range must determine the type of electrical connection you are for serviceability of an unprotected wood or metal cabinet. For minimum clearance to the ends of...(76.2 cm) min. Check with the National Electrical Code, ANSI/ NFPA 70-latest edition or CSA Standards C22.1-94, Canadian Electrical Code, Part 1 and C22.2 No. Be sure that the ground path and wire gauge are adequate and in accordance with local codes and industry accepted wiring...
Installation Instructions
Page 5
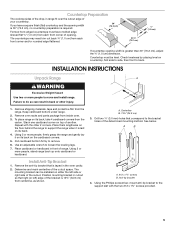
Countertop Preparation The cooktop sides of the drop-in range fit over the cutout edge of another. Failure to move and install range. To place range on its back on the cardboard corners. 5. Using 2 or more people, firmly grasp the range and gently lay it is laid on its back, take 4 ... B Use two or more people, stand range back up onto cardboard or hardboard. Use an adjustable wrench to back. Remove the anti-tip bracket that correspond to the support slat with the other injury. 1. Remove oven racks and parts package from each front corner and/or rounded...
Countertop Preparation The cooktop sides of the drop-in range fit over the cutout edge of another. Failure to move and install range. To place range on its back on the cardboard corners. 5. Using 2 or more people, firmly grasp the range and gently lay it is laid on its back, take 4 ... B Use two or more people, stand range back up onto cardboard or hardboard. Use an adjustable wrench to back. Remove the anti-tip bracket that correspond to the support slat with the other injury. 1. Remove oven racks and parts package from each front corner and/or rounded...
Installation Instructions
Page 8
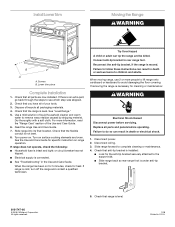
... and adults. Dispose of your tools. 3. Check that the range is not bent. 8. Check that you have all parts are now installed. Turn on for 5 minutes, check for specific instruction on . Whirlpool Corporation. If range does not operate, check the following: ■ Household fuse...the Use and Care Guide. 6. Slide range forward to rear range foot. Connect anti-tip bracket to complete cleaning or maintenance. 4. Check that range is under anti-tip bracket. 8101747-60 © 2008. Check that all of /recycle all parts and panels before servicing. or circuit breaker...
... and adults. Dispose of your tools. 3. Check that the range is not bent. 8. Check that you have all parts are now installed. Turn on for 5 minutes, check for specific instruction on . Whirlpool Corporation. If range does not operate, check the following: ■ Household fuse...the Use and Care Guide. 6. Slide range forward to rear range foot. Connect anti-tip bracket to complete cleaning or maintenance. 4. Check that range is under anti-tip bracket. 8101747-60 © 2008. Check that all of /recycle all parts and panels before servicing. or circuit breaker...


