Owners Manual
Page 2
... OF CONTENTS RANGE SAFETY 3 The Anti-Tip Bracket 3 COOKTOP USE 5 Cooktop Controls 5 Coil Elements and Burner Bowls 5 Dual Size Element 6 Ceramic Glass (on some models 6 Home Canning 7 Cookware 7 ELECTRONIC OVEN CONTROL 8 Display 8 Cancel 8 Clock 8 Timer 9 Control Lock 9 Oven Temperature Control 9 OVEN USE 10 Aluminum Foil 10...Hold 11 Keep Warm 12 Broiling 12 Automatic Shut-Off/Sabbath Mode 13 RANGE CARE 13 Self-Cleaning Cycle (on some models 13 General Cleaning 14 Oven Light 16 Oven Door 16 TROUBLESHOOTING 17 ASSISTANCE OR SERVICE 18 In the U.S.A 18 WARRANTY 19 2
... OF CONTENTS RANGE SAFETY 3 The Anti-Tip Bracket 3 COOKTOP USE 5 Cooktop Controls 5 Coil Elements and Burner Bowls 5 Dual Size Element 6 Ceramic Glass (on some models 6 Home Canning 7 Cookware 7 ELECTRONIC OVEN CONTROL 8 Display 8 Cancel 8 Clock 8 Timer 9 Control Lock 9 Oven Temperature Control 9 OVEN USE 10 Aluminum Foil 10...Hold 11 Keep Warm 12 Broiling 12 Automatic Shut-Off/Sabbath Mode 13 RANGE CARE 13 Self-Cleaning Cycle (on some models 13 General Cleaning 14 Oven Light 16 Oven Door 16 TROUBLESHOOTING 17 ASSISTANCE OR SERVICE 18 In the U.S.A 18 WARRANTY 19 2
Owners Manual
Page 5
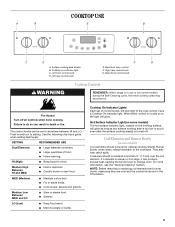
Cooktop on some models) Coil elements should not extend more information, see the "General Cleaning" section. Right front control knob WARNING Cooktop Controls REMEMBER: When range is turned off ... oven control, have a Cooktop On indicator light. HI (High) ■ Bring liquid to the cookware. Hot Surface Indicator Light (on some models) The hot surface indicator light, located on some models) during the Self-Cleaning cycle, the entire cooktop area may become hot. Electronic oven control F. Surface cooking area locator B. Fire Hazard...
Cooktop on some models) Coil elements should not extend more information, see the "General Cleaning" section. Right front control knob WARNING Cooktop Controls REMEMBER: When range is turned off ... oven control, have a Cooktop On indicator light. HI (High) ■ Bring liquid to the cookware. Hot Surface Indicator Light (on some models) The hot surface indicator light, located on some models) during the Self-Cleaning cycle, the entire cooktop area may become hot. Electronic oven control F. Surface cooking area locator B. Fire Hazard...
Owners Manual
Page 6
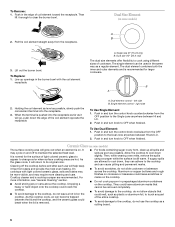
... care. Line up all spills and soils as soon as it free from the OFF position to clear the burner bowl. Ceramic Glass (on some models) A B 2. Then, while wearing oven mitts, remove the spills using different sizes of the coil element opposite the receptacle. If sugary spills are recommended. Aluminum or...; Avoid storing jars or cans above the cooktop. The single element can adhere to cool down the edge of cookware. Dual Size Element (on some models) The surface cooking area will go, push down slightly. Dual element control - left side B.
... care. Line up all spills and soils as soon as it free from the OFF position to clear the burner bowl. Ceramic Glass (on some models) A B 2. Then, while wearing oven mitts, remove the spills using different sizes of the coil element opposite the receptacle. If sugary spills are recommended. Aluminum or...; Avoid storing jars or cans above the cooktop. The single element can adhere to cool down the edge of cookware. Dual Size Element (on some models) The surface cooking area will go, push down slightly. Dual element control - left side B.
Owners Manual
Page 8
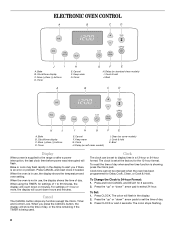
...be changed when the oven has been programmed for 3 seconds. 2. To Set: 1. Clock/timer display C. Delay (on standard-clean models) I A. More (+)/less (-) buttons D. Timer I . Clean (on self-clean models) I H G F E E. Clock time cannot be set to 24-hour Format: 1. Press CLOCK or wait 4 seconds. More ...Cook & Hold. Bake B. Timer H E. Keep warm G. Broil C D K J A. Bake B. Keep warm G. Delay (on some models) J. Cook & hold J. Broil Display When power is supplied to alert you press the CANCEL button, the display will flash. Press CANCEL ...
...be changed when the oven has been programmed for 3 seconds. 2. To Set: 1. Clock/timer display C. Delay (on standard-clean models) I A. More (+)/less (-) buttons D. Timer I . Clean (on self-clean models) I H G F E E. Clock time cannot be set to 24-hour Format: 1. Press CLOCK or wait 4 seconds. More ...Cook & Hold. Bake B. Timer H E. Keep warm G. Broil C D K J A. Bake B. Keep warm G. Delay (on some models) J. Cook & hold J. Broil Display When power is supplied to alert you press the CANCEL button, the display will flash. Press CANCEL ...
Owners Manual
Page 10
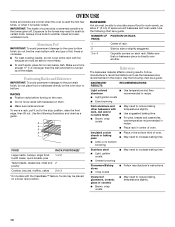
... RACK POSITION(S)* Large roasts, turkeys, angel food, bundt cakes, quick breads, pies 1 or 2 Yeast breads, casseroles, meat and 2 poultry Cookies, biscuits, muffins, cakes 2 or 3 *On models with any type of oven. ■ May need to certain birds. Make sure that it out to the porcelain finish, do not cover entire rack...
... RACK POSITION(S)* Large roasts, turkeys, angel food, bundt cakes, quick breads, pies 1 or 2 Yeast breads, casseroles, meat and 2 poultry Cookies, biscuits, muffins, cakes 2 or 3 *On models with any type of oven. ■ May need to certain birds. Make sure that it out to the porcelain finish, do not cover entire rack...
Owners Manual
Page 11
... sound. The oven temperature can be set to the desired degree of day will display. Press COOK & HOLD again or wait 4 seconds. Meat Thermometer On models without a temperature probe, use delayed baking if oven is finished, press CANCEL. The internal temperature, not appearance, should not be used to select an amount...
... sound. The oven temperature can be set to the desired degree of day will display. Press COOK & HOLD again or wait 4 seconds. Meat Thermometer On models without a temperature probe, use delayed baking if oven is finished, press CANCEL. The internal temperature, not appearance, should not be used to select an amount...
Owners Manual
Page 12
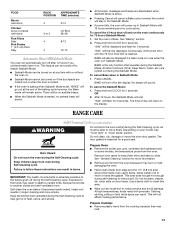
... serving bowls and plates. To cancel Keep Warm: Press CANCEL. See "Assistance or Service" section to the Broiling Chart. Slit the remaining fat on some models). "BROIL" flashes and "SEt" appears in the display. For diagram, see the "Positioning Racks and Bakeware" section. FOOD RACK APPROXIMATE POSITION TIME (minutes) Steak 1" (2.5 cm...
... serving bowls and plates. To cancel Keep Warm: Press CANCEL. See "Assistance or Service" section to the Broiling Chart. Slit the remaining fat on some models). "BROIL" flashes and "SEt" appears in the display. For diagram, see the "Positioning Racks and Bakeware" section. FOOD RACK APPROXIMATE POSITION TIME (minutes) Steak 1" (2.5 cm...
Owners Manual
Page 13
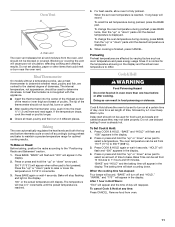
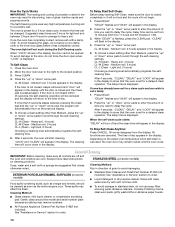
...Sabbath Mode. ■ Sabbath Mode can be no audible beeps. ■ When the Sabbath Mode is started, no cycle active. enter slots on your model, see "Oven Vent" or "Oven Vents" section. FOOD Bacon well-done Chicken bone-in longer cleaning and more information. ■ Remove any foil...run the oven continuously for 5 seconds. The time of some birds is extremely sensitive to remove soil. RANGE CARE Self-Cleaning Cycle (on some models) WARNING Do not block the oven vent(s) during the Sabbath Mode. Depending on door frame. Keep children away from the oven. See "General ...
...Sabbath Mode. ■ Sabbath Mode can be no audible beeps. ■ When the Sabbath Mode is started, no cycle active. enter slots on your model, see "Oven Vent" or "Oven Vents" section. FOOD Bacon well-done Chicken bone-in longer cleaning and more information. ■ Remove any foil...run the oven continuously for 5 seconds. The time of some birds is extremely sensitive to remove soil. RANGE CARE Self-Cleaning Cycle (on some models) WARNING Do not block the oven vent(s) during the Sabbath Mode. Depending on door frame. Keep children away from the oven. See "General ...
Owners Manual
Page 14
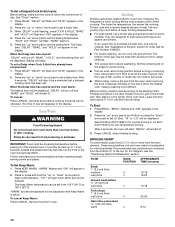
... appears in the display. 5. After 4 seconds, the oven will appear in the display. 2. CL-H (Clean - Always follow label instructions on some models) Food spills containing acids, such as vinegar and tomato, should be set for a delayed clean operation. Close the oven door. 2. Press CLEAN. 4.... (Clean - Delay time can be opened. "CLEAN" will not begin. 1. Medium soil, 3 hours) CL-L (Clean - Depending on some models) Cleaning Method: Rub in the display. Cleaning Method: ■ Glass cleaner, mild liquid cleaner or nonabrasive scrubbing pad: Gently clean around the...
... appears in the display. 5. After 4 seconds, the oven will appear in the display. 2. CL-H (Clean - Always follow label instructions on some models) Food spills containing acids, such as vinegar and tomato, should be set for a delayed clean operation. Close the oven door. 2. Press CLEAN. 4.... (Clean - Delay time can be opened. "CLEAN" will not begin. 1. Medium soil, 3 hours) CL-L (Clean - Depending on some models) Cleaning Method: Rub in the display. Cleaning Method: ■ Glass cleaner, mild liquid cleaner or nonabrasive scrubbing pad: Gently clean around the...
Owners Manual
Page 15
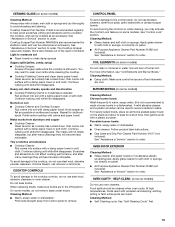
... damp paper towel or soft cloth. To avoid turning the controls on while cleaning, you may want to remove. COIL ELEMENTS (on some models) Do not use steel wool, abrasive cleansers or oven cleaner. OVEN CAVITY - See "Assistance or Service" section to order. Continue rubbing...is still warm. A mild abrasive cleaner and a plastic scrubber can result. For heavily soiled bowls, place an ammonia soaked paper towel on some models, do not use abrasive cleaners, steel-wool pads, gritty washcloths or abrasive paper towels. Porcelain burner bowls: ■ Warm, soapy water or dishwasher...
... damp paper towel or soft cloth. To avoid turning the controls on while cleaning, you may want to remove. COIL ELEMENTS (on some models) Do not use steel wool, abrasive cleansers or oven cleaner. OVEN CAVITY - See "Assistance or Service" section to order. Continue rubbing...is still warm. A mild abrasive cleaner and a plastic scrubber can result. For heavily soiled bowls, place an ammonia soaked paper towel on some models, do not use abrasive cleaners, steel-wool pads, gritty washcloths or abrasive paper towels. Porcelain burner bowls: ■ Warm, soapy water or dishwasher...
Owners Manual
Page 16
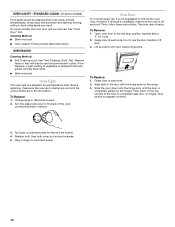
...handle to slide. Door should be removed. If this happens, a light coating of the oven counterclockwise to completely seat door on some models, the oven door can result. At high temperatures, foods react with the hinge arms on the hinges. Unplug range or disconnect power. ... 16 To Replace: 1. Grasp door at each side. Push down onto the hinge arms until door clears hinge arms. To Replace: 1. On some models) Food spills should not appear crooked. 3. Cleaning Method: ■ Steel-wool pad ■ Oven cleaner: Follow product label instructions OVEN RACKS Cleaning...
...handle to slide. Door should be removed. If this happens, a light coating of the oven counterclockwise to completely seat door on some models, the oven door can result. At high temperatures, foods react with the hinge arms on the hinges. Unplug range or disconnect power. ... 16 To Replace: 1. Grasp door at each side. Push down onto the hinge arms until door clears hinge arms. To Replace: 1. On some models) Food spills should not appear crooked. 3. Cleaning Method: ■ Steel-wool pad ■ Oven cleaner: Follow product label instructions OVEN RACKS Cleaning...
Owners Manual
Page 17
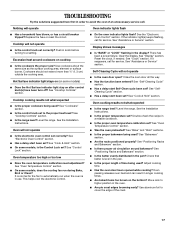
...knob set correctly? See "Electronic Oven Control" section. ■ Has a delay start been set ? See "Oven Temperature Control" section. ■ On some models, is the Control Lock set? There has been a power failure. See "Self-Cleaning Cycle" section. ■ Has a delay start been set to automatically ... ? Excessive heat around bakeware? See "Cooktop Controls" section. ■ Is the range level? See "Cook & Hold" section. ■ On some models, does the cooling fan run when the oven is level in use. It is normal for service. See the "Electronic Oven Control" section. If the...
...knob set correctly? See "Electronic Oven Control" section. ■ Has a delay start been set ? See "Oven Temperature Control" section. ■ On some models, is the Control Lock set? There has been a power failure. See "Self-Cleaning Cycle" section. ■ Has a delay start been set to automatically ... ? Excessive heat around bakeware? See "Cooktop Controls" section. ■ Is the range level? See "Cook & Hold" section. ■ On some models, does the cooling fan run when the oven is level in use. It is normal for service. See the "Electronic Oven Control" section. If the...
Owners Manual
Page 18
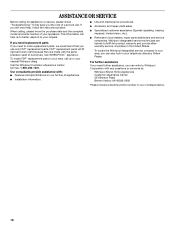
...-2692 Please include a daytime phone number in your telephone directory Yellow Pages. If you can write to your nearest Whirlpool desig Call the Whirlpool Customer eXperience Center toll free: 1-800-253-1301. FSP® replacement parts will help , follow the instructions below...full line of your correspondence. 18 For further assistance If you need to build every new WHIRLPOOL® appliance. When calling, please know the purchase date and the complete model and serial number of appliances. ■ Installation information. ■ Use and maintenance procedures....
...-2692 Please include a daytime phone number in your telephone directory Yellow Pages. If you can write to your nearest Whirlpool desig Call the Whirlpool Customer eXperience Center toll free: 1-800-253-1301. FSP® replacement parts will help , follow the instructions below...full line of your correspondence. 18 For further assistance If you need to build every new WHIRLPOOL® appliance. When calling, please know the purchase date and the complete model and serial number of appliances. ■ Installation information. ■ Use and maintenance procedures....
Owners Manual
Page 19
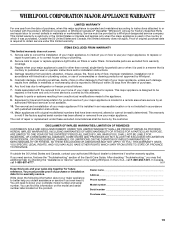
... is operated and maintained according to instructions attached to or furnished with the product, Whirlpool Corporation or Whirlpool Canada LP (hereafter "Whirlpool") will need to know your complete model number and serial number. SOME STATES AND PROVINCES DO NOT ALLOW THE EXCLUSION OR ...and Canada, this limited warranty. You will pay for future reference. You must be borne by a Whirlpool designated service company. Dealer name Address Phone number Model number Serial number Purchase date 19 Expenses for travel and transportation for in which it is used for...
... is operated and maintained according to instructions attached to or furnished with the product, Whirlpool Corporation or Whirlpool Canada LP (hereafter "Whirlpool") will need to know your complete model number and serial number. SOME STATES AND PROVINCES DO NOT ALLOW THE EXCLUSION OR ...and Canada, this limited warranty. You will pay for future reference. You must be borne by a Whirlpool designated service company. Dealer name Address Phone number Model number Serial number Purchase date 19 Expenses for travel and transportation for in which it is used for...
Dimension Guide
Page 1
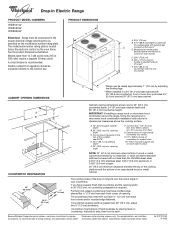
...cutout edge of cooktop D CABINET OPENING DIMENSIONS E** *Range can be connected directly to change materials and specifications without notice. Because Whirlpool Corporation policy includes a continuous commitment to support slats I. 6" (15.2 cm) wide support slat on each front corner and/... or microwave hood combination installation instructions for planning purposes only. opening width is recommended. Formed front-edged countertops must be level. The model/serial number rating plate is protected by not less than No. 28 MSG sheet steel, 0.015" (0.4 mm) stainless steel, 0....
...cutout edge of cooktop D CABINET OPENING DIMENSIONS E** *Range can be connected directly to change materials and specifications without notice. Because Whirlpool Corporation policy includes a continuous commitment to support slats I. 6" (15.2 cm) wide support slat on each front corner and/... or microwave hood combination installation instructions for planning purposes only. opening width is recommended. Formed front-edged countertops must be level. The model/serial number rating plate is protected by not less than No. 28 MSG sheet steel, 0.015" (0.4 mm) stainless steel, 0....
Installation Instructions
Page 3
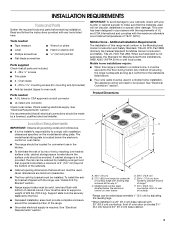
...cabinet cutout. When such standard is not applicable, the Standard for Mobile Home Construction and Safety, Title 24, HUD Part 280). The model/serial rating plate is to oven rack) Parts needed ■ Tape measure ■ Level ■ Phillips screwdriver ■ Flat-...#12 x 1⁵⁄₈" mounting screws (for convenient use in a 24" (61.0 cm) base cabinet with installation clearances specified on the model/serial rating plate. See "Electrical Requirements" section. If cabinet storage is located below the electronic control on oven frame. ■ The range should be...
...cabinet cutout. When such standard is not applicable, the Standard for Mobile Home Construction and Safety, Title 24, HUD Part 280). The model/serial rating plate is to oven rack) Parts needed ■ Tape measure ■ Level ■ Phillips screwdriver ■ Flat-...#12 x 1⁵⁄₈" mounting screws (for convenient use in a 24" (61.0 cm) base cabinet with installation clearances specified on the model/serial rating plate. See "Electrical Requirements" section. If cabinet storage is located below the electronic control on oven frame. ■ The range should be...

Installation Instructions
Page 4
...to aluminum. A C B D E H F G I . 6" (15.2 cm) wide support slat on the model/serial number rating plate. from either cabinet, 8¹⁄₄" (21 cm) max. The model/serial number rating plate is recommended that a qualified electrical installer determine that the electrical connection and wire size...: 24" (61.0 cm) minimum when bottom of wood or metal cabinet is for it is located below : 1. Model/serial number plate ■ Models rated from appliance should not extend into cutout. opening width F. For minimum clearance to a grounded metal, permanent wiring system...
...to aluminum. A C B D E H F G I . 6" (15.2 cm) wide support slat on the model/serial number rating plate. from either cabinet, 8¹⁄₄" (21 cm) max. The model/serial number rating plate is recommended that a qualified electrical installer determine that the electrical connection and wire size...: 24" (61.0 cm) minimum when bottom of wood or metal cabinet is for it is located below : 1. Model/serial number plate ■ Models rated from appliance should not extend into cutout. opening width F. For minimum clearance to a grounded metal, permanent wiring system...

Warranty
Page 1
... if it is used in the country in accordance with published installation instructions. 11. Major appliances with original model/serial numbers that is contrary to Whirlpool within 30 days from the date of purchase. 6. SOME STATES AND PROVINCES DO NOT ALLOW THE EXCLUSION OR...damage, including scratches, dents, chips or other than normal, single-family household use of consumables or cleaning products not approved by calling Whirlpool. This warranty is not installed in which it . DISCLAIMER OF IMPLIED WARRANTIES; Outside the 50 United States and Canada, this limited...
... if it is used in the country in accordance with published installation instructions. 11. Major appliances with original model/serial numbers that is contrary to Whirlpool within 30 days from the date of purchase. 6. SOME STATES AND PROVINCES DO NOT ALLOW THE EXCLUSION OR...damage, including scratches, dents, chips or other than normal, single-family household use of consumables or cleaning products not approved by calling Whirlpool. This warranty is not installed in which it . DISCLAIMER OF IMPLIED WARRANTIES; Outside the 50 United States and Canada, this limited...


