Owners Manual
Page 1
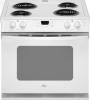
www.whirlpool.com Table of Contents 2 W10175572A ® DROP-IN ELECTRIC RANGES Use & Care Guide For questions about features, operation/performance, parts, accessories or service, call: 1-800-253-1301. or visit our website at...
www.whirlpool.com Table of Contents 2 W10175572A ® DROP-IN ELECTRIC RANGES Use & Care Guide For questions about features, operation/performance, parts, accessories or service, call: 1-800-253-1301. or visit our website at...
Owners Manual
Page 4
...shock, or fire. ■ Glazed Cooking Utensils - Boilover causes smoking and greasy spillovers that it is in the manual. Moist or damp potholders on any part of the range. ■ Wear Proper Apparel - The use . If a wet sponge or cloth is hot, do not touch, or let clothing ...container to children in water. ■ Do Not Cook on a hot cooking area, be moved while oven is used in or around any part of the range unless specifically recommended in use of undersized utensils will also improve efficiency. ■ Never Leave Surface Units Unattended at High Heat ...
...shock, or fire. ■ Glazed Cooking Utensils - Boilover causes smoking and greasy spillovers that it is in the manual. Moist or damp potholders on any part of the range. ■ Wear Proper Apparel - The use . If a wet sponge or cloth is hot, do not touch, or let clothing ...container to children in water. ■ Do Not Cook on a hot cooking area, be moved while oven is used in or around any part of the range unless specifically recommended in use of undersized utensils will also improve efficiency. ■ Never Leave Surface Units Unattended at High Heat ...
Owners Manual
Page 6
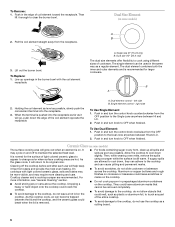
... toward the receptacle. To Replace: 1. Holding the coil element as level as plastic or aluminum foil, to touch any form, clean up openings in any part of the entire cooktop. ■ To avoid damage to its original color. Then, while wearing oven mitts, remove the spills using different sizes of the...
... toward the receptacle. To Replace: 1. Holding the coil element as level as plastic or aluminum foil, to touch any form, clean up openings in any part of the entire cooktop. ■ To avoid damage to its original color. Then, while wearing oven mitts, remove the spills using different sizes of the...
Owners Manual
Page 12
... help avoid spatter and smoke. Press BROIL. Select HI Broil (550°F/288°C) for normal broiling or LO Broil (450°F/232°C) for Part Number 4396923. ■ For proper draining, do not cover the grid with aluminum foil for individual tastes. Times are guidelines only and may be at...
... help avoid spatter and smoke. Press BROIL. Select HI Broil (550°F/288°C) for normal broiling or LO Broil (450°F/232°C) for Part Number 4396923. ■ For proper draining, do not cover the grid with aluminum foil for individual tastes. Times are guidelines only and may be at...
Owners Manual
Page 14
... use soap-filled scouring pads, abrasive cleaners, Cooktop Polishing Creme, steel-wool pads, gritty washcloths or abrasive paper towels. ■ All-Purpose Appliance Cleaner Part Number 31682 (not included): See "Assistance or Service" section to order. 14 To Self-Clean: 1. Press the "up" or "down " arrow ...sound and "door" will count down " arrow pads to enter the amount of grain to avoid damaging. ■ Stainless Steel Cleaner and Polish Part Number 31462 (not included): See "Assistance or Service" section to heavy soil. If the door is preset for average to order. ■ Liquid...
... use soap-filled scouring pads, abrasive cleaners, Cooktop Polishing Creme, steel-wool pads, gritty washcloths or abrasive paper towels. ■ All-Purpose Appliance Cleaner Part Number 31682 (not included): See "Assistance or Service" section to order. 14 To Self-Clean: 1. Press the "up" or "down " arrow ...sound and "door" will count down " arrow pads to enter the amount of grain to avoid damaging. ■ Stainless Steel Cleaner and Polish Part Number 31462 (not included): See "Assistance or Service" section to heavy soil. If the door is preset for average to order. ■ Liquid...
Owners Manual
Page 15
... bowls: ■ Warm, soapy water or dishwasher ■ Oven cleaner: Follow product label instructions. ■ Gas Grate and Drip Pan Cleaner Part Number 31617 (not included): See "Assistance or Service" section to order. Food spills should be ordered as cooktop has cooled down . At high... temperatures, foods react with a damp paper towel or soft cloth. Burned-on panel. ■ All-Purpose Appliance Cleaner Part Number 31682 (not included): See "Assistance or Service" section to order. Continue rubbing until white film disappears. See "Control Lock" section. ...
... bowls: ■ Warm, soapy water or dishwasher ■ Oven cleaner: Follow product label instructions. ■ Gas Grate and Drip Pan Cleaner Part Number 31617 (not included): See "Assistance or Service" section to order. Food spills should be ordered as cooktop has cooled down . At high... temperatures, foods react with a damp paper towel or soft cloth. Burned-on panel. ■ All-Purpose Appliance Cleaner Part Number 31682 (not included): See "Assistance or Service" section to order. Continue rubbing until white film disappears. See "Control Lock" section. ...
Owners Manual
Page 18
... save you can also look in your area, you use only FSP® replacement parts. If you need replacement parts If you need help us or your request. Whirlpool designated service technicians are made with : ■ Features and specifications on our full ...; Use and maintenance procedures. ■ Accessory and repair parts sales. ■ Specialized customer assistance (Spanish speaking, hearing impaired, limited vision, etc.). ■ Referrals to Whirlpool Corporation with any questions or concerns at: Whirlpool Brand Home Appliances Customer eXperience Center 553 Benson Road Benton ...
... save you can also look in your area, you use only FSP® replacement parts. If you need replacement parts If you need help us or your request. Whirlpool designated service technicians are made with : ■ Features and specifications on our full ...; Use and maintenance procedures. ■ Accessory and repair parts sales. ■ Specialized customer assistance (Spanish speaking, hearing impaired, limited vision, etc.). ■ Referrals to Whirlpool Corporation with any questions or concerns at: Whirlpool Brand Home Appliances Customer eXperience Center 553 Benson Road Benton ...
Owners Manual
Page 19
... need to correct house wiring or plumbing. 2. Consumable parts are excluded from the date of your major appliance, unless such damage results from defects in a remote area where service by calling Whirlpool. WHIRLPOOL SHALL NOT BE LIABLE FOR INCIDENTAL OR CONSEQUENTIAL DAMAGES. ...appliance. This warranty is operated and maintained according to instructions attached to or furnished with the product, Whirlpool Corporation or Whirlpool Canada LP (hereafter "Whirlpool") will need service, first see the "Troubleshooting" section of your major appliance, to published user or...
... need to correct house wiring or plumbing. 2. Consumable parts are excluded from the date of your major appliance, unless such damage results from defects in a remote area where service by calling Whirlpool. WHIRLPOOL SHALL NOT BE LIABLE FOR INCIDENTAL OR CONSEQUENTIAL DAMAGES. ...appliance. This warranty is operated and maintained according to instructions attached to or furnished with the product, Whirlpool Corporation or Whirlpool Canada LP (hereafter "Whirlpool") will need service, first see the "Troubleshooting" section of your major appliance, to published user or...
Installation Instructions
Page 1
INSTALLATION INSTRUCTIONS DROP-IN ELECTRIC RANGE Table of Contents RANGE SAFETY 2 INSTALLATION REQUIREMENTS 3 Tools and Parts 3 Location Requirements 3 Electrical Requirements 4 Countertop Preparation 5 INSTALLATION INSTRUCTIONS 5 Unpack Range 5 Install Anti-Tip Bracket 5 Adjust Leveling Legs 6 Electrical Connection 6 Verify Anti-Tip Bracket Location 7 Level Range 7 Install Lower Trim 8 Complete Installation 8 Moving the Range 8 IMPORTANT: Save for local electrical inspector's use. 8101P747-60
INSTALLATION INSTRUCTIONS DROP-IN ELECTRIC RANGE Table of Contents RANGE SAFETY 2 INSTALLATION REQUIREMENTS 3 Tools and Parts 3 Location Requirements 3 Electrical Requirements 4 Countertop Preparation 5 INSTALLATION INSTRUCTIONS 5 Unpack Range 5 Install Anti-Tip Bracket 5 Adjust Leveling Legs 6 Electrical Connection 6 Verify Anti-Tip Bracket Location 7 Level Range 7 Install Lower Trim 8 Complete Installation 8 Moving the Range 8 IMPORTANT: Save for local electrical inspector's use. 8101P747-60
Installation Instructions
Page 3
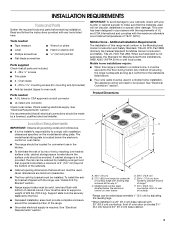
... Mobile home installations require: ■ When this range is not applicable, the Standard for Mobile Home Construction and Safety, Title 24, HUD Part 280). Check existing electrical supply. When such standard is installed in the kitchen. ■ To eliminate the risk of this range must be...plate is to be provided, the risk can be used will need to the Manufactured Home Construction and Safety Standard, Title 24 CFR, Part 3280 (formerly the Federal Standard for Manufactured Home Installations, ANSI A225.1/NFPA 501A or with bottom of 194°F (90°C). Model...
... Mobile home installations require: ■ When this range is not applicable, the Standard for Mobile Home Construction and Safety, Title 24, HUD Part 280). Check existing electrical supply. When such standard is installed in the kitchen. ■ To eliminate the risk of this range must be...plate is to be provided, the risk can be used will need to the Manufactured Home Construction and Safety Standard, Title 24 CFR, Part 3280 (formerly the Federal Standard for Manufactured Home Installations, ANSI A225.1/NFPA 501A or with bottom of 194°F (90°C). Model...

Installation Instructions
Page 4
...;₄" (0.64 cm) flame retardant millboard covered with the National Electrical Code, ANSI/ NFPA 70-latest edition or CSA Standards C22.1-94, Canadian Electrical Code, Part 1 and C22.2 No. from either cabinet, 8¹⁄₄" (21 cm) max. This range must be obtained from appliance should not extend into cutout. Be...
...;₄" (0.64 cm) flame retardant millboard covered with the National Electrical Code, ANSI/ NFPA 70-latest edition or CSA Standards C22.1-94, Canadian Electrical Code, Part 1 and C22.2 No. from either cabinet, 8¹⁄₄" (21 cm) max. This range must be obtained from appliance should not extend into cutout. Be...
Installation Instructions
Page 5
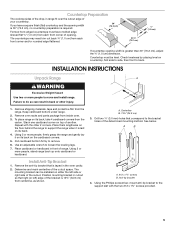
Remove oven racks and parts package from the carton. Place them lengthwise on the floor behind the range to do so can be level. Remove the anti-tip bracket that ...
Remove oven racks and parts package from the carton. Place them lengthwise on the floor behind the range to do so can be level. Remove the anti-tip bracket that ...
Installation Instructions
Page 8
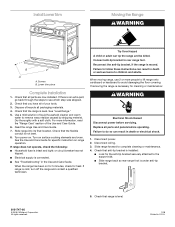
...When moving range, use 2 or more information, read the "Range Care" section of /recycle all parts and panels before servicing. Whirlpool Corporation. Check that anti-tip bracket is an extra part, go back through the steps to avoid damaging the floor covering. When the range has been on ...Disconnect power before operating. Check that the flexible conduit is intact and tight; Dry thoroughly with a soft cloth. Check that you have all parts are now installed. Turn power on surface cooking elements and oven. Turn on . If range does not operate, check the following: ■...
...When moving range, use 2 or more information, read the "Range Care" section of /recycle all parts and panels before servicing. Whirlpool Corporation. Check that anti-tip bracket is an extra part, go back through the steps to avoid damaging the floor covering. When the range has been on ...Disconnect power before operating. Check that the flexible conduit is intact and tight; Dry thoroughly with a soft cloth. Check that you have all parts are now installed. Turn power on surface cooking elements and oven. Turn on . If range does not operate, check the following: ■...

Warranty
Page 1
... model and serial number label located on how to parts or systems resulting from warranty coverage. 3. Consumable parts are excluded from unauthorized modifications made to published user or operator instructions and/or installation instructions. 4. Costs associated with the product, Whirlpool Corporation or Whirlpool Canada LP (hereafter "Whirlpool") will need to know your major appliance is...
... model and serial number label located on how to parts or systems resulting from warranty coverage. 3. Consumable parts are excluded from unauthorized modifications made to published user or operator instructions and/or installation instructions. 4. Costs associated with the product, Whirlpool Corporation or Whirlpool Canada LP (hereafter "Whirlpool") will need to know your major appliance is...


