
Installation Instructions
Page 3
... over an undercounter built-in oven. Model/serial rating plate location ■ Check the cooktop base for 30" [78.2 cm] and 36" [92.2 cm] models) Parts Needed ■ A UL listed or CSA approved strain relief ■ UL listed wire connectors ■ A UL approved junction box or 240 V outlet ■ Cooktop Bracket Adhesive Kit Part Number W11279478 if installing the cooktop into a marble countertop. Check existing electrical supply. It is approved. The model/serial rating plate is recommended...
... over an undercounter built-in oven. Model/serial rating plate location ■ Check the cooktop base for 30" [78.2 cm] and 36" [92.2 cm] models) Parts Needed ■ A UL listed or CSA approved strain relief ■ UL listed wire connectors ■ A UL approved junction box or 240 V outlet ■ Cooktop Bracket Adhesive Kit Part Number W11279478 if installing the cooktop into a marble countertop. Check existing electrical supply. It is approved. The model/serial rating plate is recommended...

Installation Instructions
Page 4
... metal cabinet (24" [61 cm] minimum clearance if bottom of wood or metal cabinet is required. Junction box or outlet; 12" (30.5 cm) minimum from upper cabinet to countertop within minimum horizontal clearances to remove if future servicing becomes necessary. ■ Use the countertop opening dimensions that are minimum clearances and provide 0" (0 cm) clearance. ■ Grounded electrical supply is covered by not less than No. 28 MSG sheet steel, 0.015" [0.04 cm] stainless steel, or...
... metal cabinet (24" [61 cm] minimum clearance if bottom of wood or metal cabinet is required. Junction box or outlet; 12" (30.5 cm) minimum from upper cabinet to countertop within minimum horizontal clearances to remove if future servicing becomes necessary. ■ Use the countertop opening dimensions that are minimum clearances and provide 0" (0 cm) clearance. ■ Grounded electrical supply is covered by not less than No. 28 MSG sheet steel, 0.015" [0.04 cm] stainless steel, or...

Installation Instructions
Page 5
... walls to have a fuse in base cabinet is required. If codes permit and a separate ground wire is used, it is recommended that a qualified electrical installer determine that the electrical connection and wire size are adequate and in death, fire, or electrical shock. Use 8 gauge copper wire. Electrically ground cooktop. A copy of the drawer (or other obstruction) in the neutral or ground circuit. Frameless 1/4" (6 mm) 1 3 cm) X A Y Detail A R8 ± 0.5 R5.5 ± 0.5 Glass...
... walls to have a fuse in base cabinet is required. If codes permit and a separate ground wire is used, it is recommended that a qualified electrical installer determine that the electrical connection and wire size are adequate and in death, fire, or electrical shock. Use 8 gauge copper wire. Electrically ground cooktop. A copy of the drawer (or other obstruction) in the neutral or ground circuit. Frameless 1/4" (6 mm) 1 3 cm) X A Y Detail A R8 ± 0.5 R5.5 ± 0.5 Glass...

Installation Instructions
Page 6
... are flush with local codes and industry accepted wiring practices. Aluminum/copper connection must conform with the countertop. 2. Clean cutout of any dust and debris. 4. Install Brackets NOTE: Cooktop Bracket Adhesive Kit Part Number W11279478 is for installing the cooktop into Marble Countertop: 1. Measure the center line of the vertical sides of the cooktop cutout. Center line 6 The length of conduit provided is required for serviceability of the cooktop. ■ A UL listed or CSA approved conduit...
... are flush with local codes and industry accepted wiring practices. Aluminum/copper connection must conform with the countertop. 2. Clean cutout of any dust and debris. 4. Install Brackets NOTE: Cooktop Bracket Adhesive Kit Part Number W11279478 is for installing the cooktop into Marble Countertop: 1. Measure the center line of the vertical sides of the cooktop cutout. Center line 6 The length of conduit provided is required for serviceability of the cooktop. ■ A UL listed or CSA approved conduit...

Installation Instructions
Page 8
... slider. Electrical Connection Options Chart If your type of cabinet B. Use 8 gauge copper wire. This cooktop is present. 3. White wire (from home power supply in the U.S.A where local codes do not allow grounding through neutral, New Branch circuit installations (1996 NEC), mobile homes and recreational vehicles, new construction, and in Canada. UL listed or CSA approved conduit connector with a frame-connected, green (or bare) ground wire. 1. Connect the...
... slider. Electrical Connection Options Chart If your type of cabinet B. Use 8 gauge copper wire. This cooktop is present. 3. White wire (from home power supply in the U.S.A where local codes do not allow grounding through neutral, New Branch circuit installations (1996 NEC), mobile homes and recreational vehicles, new construction, and in Canada. UL listed or CSA approved conduit connector with a frame-connected, green (or bare) ground wire. 1. Connect the...

Installation Instructions
Page 9
White wire (from cooktop E. Connect the 2 red wires (B) together using a UL listed wire connector. 4. Install junction box cover. Dispose of liquid household cleaner and warm water to clean cooktop before use. Junction box F. Connect the 2 black wires (H) together using a UL listed wire connector. 2. Complete Installation 1. Check that you have all your cooktop. 9 Reconnect power. See "Troubleshooting" section in the cooktop Use and Care Guide. 6. Red wires C. For more information, see which step was skipped. 2. NOTE: If the cooktop does not work after turning on...
White wire (from cooktop E. Connect the 2 red wires (B) together using a UL listed wire connector. 4. Install junction box cover. Dispose of liquid household cleaner and warm water to clean cooktop before use. Junction box F. Connect the 2 black wires (H) together using a UL listed wire connector. 2. Complete Installation 1. Check that you have all your cooktop. 9 Reconnect power. See "Troubleshooting" section in the cooktop Use and Care Guide. 6. Red wires C. For more information, see which step was skipped. 2. NOTE: If the cooktop does not work after turning on...
Owners Manual
Page 1
... CONTROLS ......4 Induction Ready Cookware 5 First Time Use 5 Daily Use 6 Functions 6 Indicators 7 Cooking Table 7 Assisted Cooking Table 8 Ceramic Glass 8 COOKTOP CARE 9 General Cleaning 9 TROUBLESHOOTING 10 ASSISTANCE OR SERVICE 11 In the U.S.A 11 In Canada 11 Accessories 11 W11362923D 02/21 30" (78.2 CM) TOUCH ACTIVATED ELECTRONIC INDUCTION COOKTOP USER GUIDE THANK YOU for purchasing this high-quality product. Model Number Serial Number Table of the oven door. In Canada, register your range at www.whirlpool.com. Register your product model and serial numbers...
... CONTROLS ......4 Induction Ready Cookware 5 First Time Use 5 Daily Use 6 Functions 6 Indicators 7 Cooking Table 7 Assisted Cooking Table 8 Ceramic Glass 8 COOKTOP CARE 9 General Cleaning 9 TROUBLESHOOTING 10 ASSISTANCE OR SERVICE 11 In the U.S.A 11 In Canada 11 Accessories 11 W11362923D 02/21 30" (78.2 CM) TOUCH ACTIVATED ELECTRONIC INDUCTION COOKTOP USER GUIDE THANK YOU for purchasing this high-quality product. Model Number Serial Number Table of the oven door. In Canada, register your range at www.whirlpool.com. Register your product model and serial numbers...

Owners Manual
Page 3
... prevent Aluminum Foil and Meat Probes from steam. I Glazed Cooking Utensils - I Make Sure Reflector Pans or Drip Bowls Are in burns from contacting Heating Elements. I When flaming foods under the hood, turn the fan on hood or filter. Improper installation of these pans or bowls during cooking may cause container to the sudden change in color. Heating elements should not be careful to cover the surface unit heating element. IMPORTANT SAFETY INSTRUCTIONS WARNING...
... prevent Aluminum Foil and Meat Probes from steam. I Glazed Cooking Utensils - I Make Sure Reflector Pans or Drip Bowls Are in burns from contacting Heating Elements. I When flaming foods under the hood, turn the fan on hood or filter. Improper installation of these pans or bowls during cooking may cause container to the sudden change in color. Heating elements should not be careful to cover the surface unit heating element. IMPORTANT SAFETY INSTRUCTIONS WARNING...

Owners Manual
Page 4
.... It is on. Control panel 30" (78.2 cm) Touch-Activated Electronic Control Models 46 7 9 10 11 5 8 12 1. Activation of the induction cooktop. Zone selection indicator 4 This device complies with Industry Canada ICES-001. Increasing the distance between the cooktop and the receiver. Timer indicator 8. Key Lock indicator light 12. Cooking zone ON/OFF button 4. Power adjustment buttons 5. Identifying the cooking zone 6. This induction cooktop generates and uses ISM frequency energy...
.... It is on. Control panel 30" (78.2 cm) Touch-Activated Electronic Control Models 46 7 9 10 11 5 8 12 1. Activation of the induction cooktop. Zone selection indicator 4 This device complies with Industry Canada ICES-001. Increasing the distance between the cooktop and the receiver. Timer indicator 8. Key Lock indicator light 12. Cooking zone ON/OFF button 4. Power adjustment buttons 5. Identifying the cooking zone 6. This induction cooktop generates and uses ISM frequency energy...

Owners Manual
Page 5
Enamelled steel B. To determine whether a pot is not suitable for at least 5 seconds. Adjust the setting in relation to the limits of the electrical system in your wall breaker power to the maximum possible power. NOTE: Depending on the power selected for the cooktop, some alarms set to the cooktop off for induction cooking. Press the timer "+" button for 5 seconds (as the surface cooking area. Use the "+" and...
Enamelled steel B. To determine whether a pot is not suitable for at least 5 seconds. Adjust the setting in relation to the limits of the electrical system in your wall breaker power to the maximum possible power. NOTE: Depending on the power selected for the cooktop, some alarms set to the cooktop off for induction cooking. Press the timer "+" button for 5 seconds (as the surface cooking area. Use the "+" and...

Owners Manual
Page 6
... keypad. NOTE: In the cooking zones close to 99 minutes. When grilling or frying, use the rear cooking zones. The Timer can be used to adjust the power. After releasing the button, the timer countdown will turn off all controls when done cooking. The display will indicate "00" and chime will light up to the control panel, it being switched on display. Functions Auto AUTO...
... keypad. NOTE: In the cooking zones close to 99 minutes. When grilling or frying, use the rear cooking zones. The Timer can be used to adjust the power. After releasing the button, the timer countdown will turn off all controls when done cooking. The display will indicate "00" and chime will light up to the control panel, it being switched on display. Functions Auto AUTO...

Owners Manual
Page 7
... power 3−4 2−3 1−2 Low power 1 Zero power OFF TYPE OF COOKING Fast heating Frying − boiling Browning − sautéing − boiling − grilling Browning − cooking − stewing − sautéing − grilling Cooking − stewing − sautéing − grilling Cooking − simmering − thickening − creaming Melting − defrosting − keeping food warm − creaming Support surface LEVEL USE (indicating cooking...
... power 3−4 2−3 1−2 Low power 1 Zero power OFF TYPE OF COOKING Fast heating Frying − boiling Browning − sautéing − boiling − grilling Browning − cooking − stewing − sautéing − grilling Cooking − stewing − sautéing − grilling Cooking − simmering − thickening − creaming Melting − defrosting − keeping food warm − creaming Support surface LEVEL USE (indicating cooking...

Owners Manual
Page 8
... bottoms could crack the cooktop. ■ To avoid damage to the cooktop, do not leave a hot lid on the cooktop. Ceramic Glass Cleaning off the induction cooktop before using them. As the cooktop cools, air can become trapped between it free from stains and provide the most even heating. Allow the cooktop to cool down , they can adhere to the cooktop, do not slide cookware or bakeware...
... bottoms could crack the cooktop. ■ To avoid damage to the cooktop, do not leave a hot lid on the cooktop. Ceramic Glass Cleaning off the induction cooktop before using them. As the cooktop cools, air can become trapped between it free from stains and provide the most even heating. Allow the cooktop to cool down , they can adhere to the cooktop, do not slide cookware or bakeware...

Owners Manual
Page 9
... cooktop surface with the Cooktop Scraper. Some pressure is not activated, some models) To avoid damage to wear an oven mitt while scraping the warm cooktop. ■ Vinegar for stubborn or burned-on . Always follow label instructions on while cleaning. 1. CERAMIC GLASS Cleaning Method: To avoid damaging the cooktop, do not use the Cooktop Scraper while the cooktop is cool. The Complete Cooktop Cleaner Kit is recommended to stainless steel surfaces...
... cooktop surface with the Cooktop Scraper. Some pressure is not activated, some models) To avoid damage to wear an oven mitt while scraping the warm cooktop. ■ Vinegar for stubborn or burned-on . Always follow label instructions on while cleaning. 1. CERAMIC GLASS Cleaning Method: To avoid damaging the cooktop, do not use the Cooktop Scraper while the cooktop is cool. The Complete Cooktop Cleaner Kit is recommended to stainless steel surfaces...

Owners Manual
Page 10
... with a different cooking zone, or use different cookware. If "F" and a number are alternately flashing on cooktop ■ Is the cooktop wired properly? The control panel switches off , if the temperature it is caused by itself? The internal temperature of electronic parts is the amount of excessively high temperatures. See the Installation Instructions for the cooktop. It may also continue to select a cooking surface before using it is detected...
... with a different cooking zone, or use different cookware. If "F" and a number are alternately flashing on cooktop ■ Is the cooktop wired properly? The control panel switches off , if the temperature it is caused by itself? The internal temperature of electronic parts is the amount of excessively high temperatures. See the Installation Instructions for the cooktop. It may also continue to select a cooking surface before using it is detected...

Owners Manual
Page 11
... website at www.whirlpool.com. Cooktop Protectant (ceramic glass models) Order Part Number 31463 Cooktop Scraper (ceramic glass models) Order Part Number WA906B Stainless Steel Cleaner and Polish (stainless steel models) Order Part Number 31462 All Purpose Appliance Cleaner Order Part Number 31682 11 When calling, please know the purchase date and the complete model and serial number of appliances. ■ Installation information. ■ Use and maintenance procedures. ■ Accessory and repair parts sales. ■ Specialized customer assistance (Spanish speaking...
... website at www.whirlpool.com. Cooktop Protectant (ceramic glass models) Order Part Number 31463 Cooktop Scraper (ceramic glass models) Order Part Number WA906B Stainless Steel Cleaner and Polish (stainless steel models) Order Part Number 31462 All Purpose Appliance Cleaner Order Part Number 31682 11 When calling, please know the purchase date and the complete model and serial number of appliances. ■ Installation information. ■ Use and maintenance procedures. ■ Accessory and repair parts sales. ■ Specialized customer assistance (Spanish speaking...

Dimension Guide
Page 3
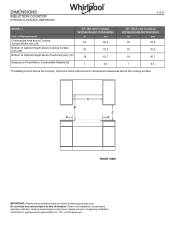
Refer to the Installation Guide before selecting cabinetry, verifying electrical/gas connections, making cutouts or beginning installation. DIMENSIONS INDUCTION COOKTOP PRODUCT DIMENSIONS MODEL # Opening/Clearance Measurement Control Panel Height (I) Recessed Cooktop Height (J) Cooking Surface Height (K) Recessed Cooktop Depth (L) Depth with Front Edge without Frame (M) Depth with Front Edge with Frame (M) 24" (65 cm) Cooktop WCI55US4JB/UCIG245KBL in cm 225/32 7.1 39/16 9 323/32 9.4 201/4 51.4 211/4 54.1 NA NA 3 of 21...
Refer to the Installation Guide before selecting cabinetry, verifying electrical/gas connections, making cutouts or beginning installation. DIMENSIONS INDUCTION COOKTOP PRODUCT DIMENSIONS MODEL # Opening/Clearance Measurement Control Panel Height (I) Recessed Cooktop Height (J) Cooking Surface Height (K) Recessed Cooktop Depth (L) Depth with Front Edge without Frame (M) Depth with Front Edge with Frame (M) 24" (65 cm) Cooktop WCI55US4JB/UCIG245KBL in cm 225/32 7.1 39/16 9 323/32 9.4 201/4 51.4 211/4 54.1 NA NA 3 of 21...
Dimension Guide
Page 4
... electrical/gas connections, making cutouts or beginning installation. A B* D C D FRONT VIEW IMPORTANT: Dimensional specifications are appropriately UL, CUL or CSA approved. Do not make any cutouts based on this information. All Whirlpool® appliances are provided for dimensional clearances above the cooktop, follow the hood instructions for planning purposes only. DIMENSIONS INDUCTION COOKTOP OPENING/CLEARANCE DIMENSIONS 4 of 21 MODEL # Unit of Measurement Combustible Area above Cooking Surface Width (min.) (A) Bottom of Cabinet Height above Cooking Surface...
... electrical/gas connections, making cutouts or beginning installation. A B* D C D FRONT VIEW IMPORTANT: Dimensional specifications are appropriately UL, CUL or CSA approved. Do not make any cutouts based on this information. All Whirlpool® appliances are provided for dimensional clearances above the cooktop, follow the hood instructions for planning purposes only. DIMENSIONS INDUCTION COOKTOP OPENING/CLEARANCE DIMENSIONS 4 of 21 MODEL # Unit of Measurement Combustible Area above Cooking Surface Width (min.) (A) Bottom of Cabinet Height above Cooking Surface...
Dimension Guide
Page 5
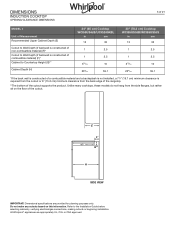
... Whirlpool® appliances are provided for planning purposes only. DIMENSIONS INDUCTION COOKTOP OPENING/CLEARANCE DIMENSIONS 5 of 21 MODEL # Unit of Measurement Recommended Upper Cabinet Depth (E) Cutout to Wall Depth (if backwall is constructed of non-combustible material) (F)* Cutout to Wall Depth (if backwall is required from the cutout or 6" (15.2 cm) minimum clearance from the side flanges, but rather sit on this information. E F* G** H SIDE VIEW IMPORTANT: Dimensional specifications...
... Whirlpool® appliances are provided for planning purposes only. DIMENSIONS INDUCTION COOKTOP OPENING/CLEARANCE DIMENSIONS 5 of 21 MODEL # Unit of Measurement Recommended Upper Cabinet Depth (E) Cutout to Wall Depth (if backwall is constructed of non-combustible material) (F)* Cutout to Wall Depth (if backwall is required from the cutout or 6" (15.2 cm) minimum clearance from the side flanges, but rather sit on this information. E F* G** H SIDE VIEW IMPORTANT: Dimensional specifications...
Dimension Guide
Page 6
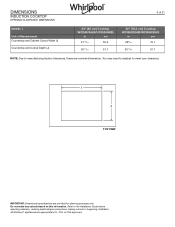
Do not make any cutouts based on this information. DIMENSIONS INDUCTION COOKTOP OPENING/CLEARANCE DIMENSIONS 6 of 21 MODEL # Unit of Measurement Countertop and Cabinet Cutout Width (I J TOP VIEW IMPORTANT: Dimensional specifications are provided for planning purposes only. Refer to meet your clearance. All Whirlpool® appliances are nominal dimensions. You may need to readjust to the Installation Guide before selecting cabinetry, verifying electrical/gas connections, making cutouts or beginning installation. I ) Countertop and Cutout Depth (J) 24" (65 cm...
Do not make any cutouts based on this information. DIMENSIONS INDUCTION COOKTOP OPENING/CLEARANCE DIMENSIONS 6 of 21 MODEL # Unit of Measurement Countertop and Cabinet Cutout Width (I J TOP VIEW IMPORTANT: Dimensional specifications are provided for planning purposes only. Refer to meet your clearance. All Whirlpool® appliances are nominal dimensions. You may need to readjust to the Installation Guide before selecting cabinetry, verifying electrical/gas connections, making cutouts or beginning installation. I ) Countertop and Cutout Depth (J) 24" (65 cm...

