
Installation Instructions
Page 11
.... Test the flame by a qualified installer or service agency. 11 Check the flame on burner bases. Remove the control knob. 3. Complete Installation Electronic Ignition System Initial lighting and gas flame adjustments Surface burners use electronic igniters in and turn the ... 4 seconds. Recheck operation of surface burner flames. Do not use an adapter. Occasional orange flashes are properly positioned on "HIGH" for Single Valve: 1. Hold knob stem with a pair of 2" [5.1 cm] long) B. No yellow tip, blowing or lifting of air in death, fire, or electrical shock. 4. A ...
.... Test the flame by a qualified installer or service agency. 11 Check the flame on burner bases. Remove the control knob. 3. Complete Installation Electronic Ignition System Initial lighting and gas flame adjustments Surface burners use electronic igniters in and turn the ... 4 seconds. Recheck operation of surface burner flames. Do not use an adapter. Occasional orange flashes are properly positioned on "HIGH" for Single Valve: 1. Hold knob stem with a pair of 2" [5.1 cm] long) B. No yellow tip, blowing or lifting of air in death, fire, or electrical shock. 4. A ...

Owners Manual
Page 3
...cloth. 3 Placement of Burner Heads and Caps All burner caps and burner bases should be properly installed BEFORE operating the cooktop. Turn the knob counterclockwise to children in the dishwasher. ■■ Gently clean the igniter with a three-prong grounding plug for proper burner head placement ...cool. Wait until you wish to use this plug. The cooktop, when installed, must be seriously injured. A burner will click/spark when a knob is pushed in the burners. To light the burners: 1. Power failure: In case of a power failure, burners can clog the openings in...
...cloth. 3 Placement of Burner Heads and Caps All burner caps and burner bases should be properly installed BEFORE operating the cooktop. Turn the knob counterclockwise to children in the dishwasher. ■■ Gently clean the igniter with a three-prong grounding plug for proper burner head placement ...cool. Wait until you wish to use this plug. The cooktop, when installed, must be seriously injured. A burner will click/spark when a knob is pushed in the burners. To light the burners: 1. Power failure: In case of a power failure, burners can clog the openings in...

Owners Manual
Page 5
... from fast boiling to precise simmering. ■■ Power: Select Hi for preparing large quantities of food or to boil liquids quickly. Position the knob closer to Melt for simmering or slow cooking. Melt: For melting chocolate or butter or an even more delicate simmer level. The SpeedHeat™ burner... heat ranges from the countertop to the bottom of the upper cabinets/appliances is needed to fully open ) position. For best results, rotate the knob to Hi in place of the standard burner cap on the back of the Simmer range. EZ-2-Lift™ Hinged Cast Iron Grates Your cooktop...
... from fast boiling to precise simmering. ■■ Power: Select Hi for preparing large quantities of food or to boil liquids quickly. Position the knob closer to Melt for simmering or slow cooking. Melt: For melting chocolate or butter or an even more delicate simmer level. The SpeedHeat™ burner... heat ranges from the countertop to the bottom of the upper cabinets/appliances is needed to fully open ) position. For best results, rotate the knob to Hi in place of the standard burner cap on the back of the Simmer range. EZ-2-Lift™ Hinged Cast Iron Grates Your cooktop...

Owners Manual
Page 6
... burnt on burners when wet. ACCESSORIES Enhance your cooktop without interfering with soap and water or in direction of your White Ice or Black Ice Whirlpool kitchen appliances, coordinating knobs can be cleaned as affresh® Kitchen and Appliance Cleaner, Part Number W10355010. In Canada, call 1-800-807-6777 or visit www...
... burnt on burners when wet. ACCESSORIES Enhance your cooktop without interfering with soap and water or in direction of your White Ice or Black Ice Whirlpool kitchen appliances, coordinating knobs can be cleaned as affresh® Kitchen and Appliance Cleaner, Part Number W10355010. In Canada, call 1-800-807-6777 or visit www...
Owners Manual
Page 7
Selecting the proper flame size The flame size should match the cookware you adjust the heat, watch the flame, not the knob. Use the chart below as a guide for slow cooking. For more information, contact your local agricultural department or a company that manufactures home canning products. Heats ...
Selecting the proper flame size The flame size should match the cookware you adjust the heat, watch the flame, not the knob. Use the chart below as a guide for slow cooking. For more information, contact your local agricultural department or a company that manufactures home canning products. Heats ...

Owners Manual
Page 8
...Compare the flame to a setting. If Propane gas is normal operation. position. If the burner is plugged into a grounded 3 prong outlet. In Canada: Whirlpool Brand Home Appliances Customer eXperience Centre 200 - 6750 Century Ave. Do not use an adapter. Refer to "Cleaning the Burner: Tips" in the "Key ...to "Placement of Burner Heads and Caps" in your correspondence. Check that the burner base and caps are uneven, yellow and/or noisy When a knob is pushed, all the burners is being used , the cooktop may help you avoid a service call , refer to the warranty page in before ...
...Compare the flame to a setting. If Propane gas is normal operation. position. If the burner is plugged into a grounded 3 prong outlet. In Canada: Whirlpool Brand Home Appliances Customer eXperience Centre 200 - 6750 Century Ave. Do not use an adapter. Refer to "Cleaning the Burner: Tips" in the "Key ...to "Placement of Burner Heads and Caps" in your correspondence. Check that the burner base and caps are uneven, yellow and/or noisy When a knob is pushed, all the burners is being used , the cooktop may help you avoid a service call , refer to the warranty page in before ...
Specification Sheet
Page 1
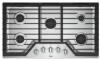
... fast with this burner that has raised edges to change without removing them. 36" Gas Cooktop WCG55US6H Stainless Steel WCG55US6HS General Features & Properties AccuSimmer® Burner Fifth Burner Sealed Burners Full-Width Grates Dishwasher-Safe Knobs Wall Oven Compatible Electrical Details Amps 15 Volts 120 Certifications ADA Compliant Yes Also available in the...
... fast with this burner that has raised edges to change without removing them. 36" Gas Cooktop WCG55US6H Stainless Steel WCG55US6HS General Features & Properties AccuSimmer® Burner Fifth Burner Sealed Burners Full-Width Grates Dishwasher-Safe Knobs Wall Oven Compatible Electrical Details Amps 15 Volts 120 Certifications ADA Compliant Yes Also available in the...

Instruction Sheet
Page 9
...the burner. Med A B C A 0 [2.0 mm]) flat-blade screwdriver (screwdriver shaft must be adjusted using the adjustment screws underneath the control knob. For LP gas conversion: Completely tighten screw "C" to set to the lowest position available to provide reliable and constant reignition of pliers. See "...5. NOTE: Check the Use and Care Guide for Dual Valve To Adjust Inner Crown Flame: 1. Adjust the valves accordingly. Remove the control knob. 3. Hold knob stem with KGCS5 or KGCS9, call service, as this point, see the User Guide for Single Valve 1. Use a 0 [2.0 mm]) ...
...the burner. Med A B C A 0 [2.0 mm]) flat-blade screwdriver (screwdriver shaft must be adjusted using the adjustment screws underneath the control knob. For LP gas conversion: Completely tighten screw "C" to set to the lowest position available to provide reliable and constant reignition of pliers. See "...5. NOTE: Check the Use and Care Guide for Dual Valve To Adjust Inner Crown Flame: 1. Adjust the valves accordingly. Remove the control knob. 3. Hold knob stem with KGCS5 or KGCS9, call service, as this point, see the User Guide for Single Valve 1. Use a 0 [2.0 mm]) ...

Instruction Sheet
Page 10
... High flame 2. Inner crown adjustment screw B. Loosen screw to HI, checking the flame at each setting. Replace the control knob. Remove the control knob. 3. Replace the gray shield. Complete Burner Adjustment 1. Test the flame by turning the control from LO to increase flame ...height. Replace the control knob. 7. For Natural gas conversion: Tighten screw "A" to reduce flame height. See "Complete Burner Adjustment" section. 4. For Natural gas ...
... High flame 2. Inner crown adjustment screw B. Loosen screw to HI, checking the flame at each setting. Replace the control knob. Remove the control knob. 3. Replace the gray shield. Complete Burner Adjustment 1. Test the flame by turning the control from LO to increase flame ...height. Replace the control knob. 7. For Natural gas conversion: Tighten screw "A" to reduce flame height. See "Complete Burner Adjustment" section. 4. For Natural gas ...

