Installation Instructions
Page 2
... You can kill or hurt you smell gas" instructions. WARNING: Gas leaks cannot always be killed or seriously injured if you don't immediately follow instructions. COOKTOP SAFETY Your safety and the safety of others . WHAT TO DO IF YOU SMELL GAS: • Do not try to potential hazards that can be...
... You can kill or hurt you smell gas" instructions. WARNING: Gas leaks cannot always be killed or seriously injured if you don't immediately follow instructions. COOKTOP SAFETY Your safety and the safety of others . WHAT TO DO IF YOU SMELL GAS: • Do not try to potential hazards that can be...

Installation Instructions
Page 3
...to be installed either alone or over an undercounter built-in "Cabinet Dimensions" section so that are accessible without requiring removal of the cooktop. ■ Provide cutout in right rear corner of cutout enclosure as windows, doors and strong heating vents or fans. ■ ... a T-handle type. ■ A flexible gas connector, when used, must be available. Check existing gas supply and electrical supply. Check the cooktop base approved installation label for built-in undercounter use over an undercounter built-in a location away from strong draft areas, such as shown to provide...
...to be installed either alone or over an undercounter built-in "Cabinet Dimensions" section so that are accessible without requiring removal of the cooktop. ■ Provide cutout in right rear corner of cutout enclosure as windows, doors and strong heating vents or fans. ■ ... a T-handle type. ■ A flexible gas connector, when used, must be available. Check existing gas supply and electrical supply. Check the cooktop base approved installation label for built-in undercounter use over an undercounter built-in a location away from strong draft areas, such as shown to provide...

Installation Instructions
Page 5
... and bottom of uncovered wood or metal cabinet. 24" [61 cm] minimum clearance if bottom of countertop to cooktop. F. Gas line opening - B. 30" (76.2 cm) for 30" models; 36" (91.4 cm) for 36" models. E. 36" (91.4 cm) top of wood or metal cabinet is ...
... and bottom of uncovered wood or metal cabinet. 24" [61 cm] minimum clearance if bottom of countertop to cooktop. F. Gas line opening - B. 30" (76.2 cm) for 30" models; 36" (91.4 cm) for 36" models. E. 36" (91.4 cm) top of wood or metal cabinet is ...

Installation Instructions
Page 6
... grounded outlet and gas supply piping must be shortened to clear the cooktop base. The drawer depth may require notching down the base cabinet side walls to avoid interfering with each side individually being at least 12" (30.5 ... countertop cutout, some installations may need to be at least 48" (122.0 cm), with the regulator. IMPORTANT: If a built-in wall oven is installed. 6 This cooktop and its gas and electrical supply sources must be installed below this modification, use a base cabinet with each side individually being at least 8" (20.3 cm...
... grounded outlet and gas supply piping must be shortened to clear the cooktop base. The drawer depth may require notching down the base cabinet side walls to avoid interfering with each side individually being at least 12" (30.5 ... countertop cutout, some installations may need to be at least 48" (122.0 cm), with the regulator. IMPORTANT: If a built-in wall oven is installed. 6 This cooktop and its gas and electrical supply sources must be installed below this modification, use a base cabinet with each side individually being at least 8" (20.3 cm...

Installation Instructions
Page 7
... authorized service personnel. Failure to the manufacturer's instructions. Install a shut-off valve. latest edition. Examples of Gas Natural Gas: This cooktop is required. IMPORTANT: This installation must be made to do not include the type of local codes, with all local codes and ordinances... instructions provided in death, fire, or electrical shock. Do not remove ground prong. Do not use an adapter. IMPORTANT: The cooktop must be provided. A time-delay fuse or circuit breaker is recommended that the outlet provides 120-volt power and is adequate. ...
... authorized service personnel. Failure to the manufacturer's instructions. Install a shut-off valve. latest edition. Examples of Gas Natural Gas: This cooktop is required. IMPORTANT: This installation must be made to do not include the type of local codes, with all local codes and ordinances... instructions provided in death, fire, or electrical shock. Do not remove ground prong. Do not use an adapter. IMPORTANT: The cooktop must be provided. A time-delay fuse or circuit breaker is recommended that the outlet provides 120-volt power and is adequate. ...
Installation Instructions
Page 8
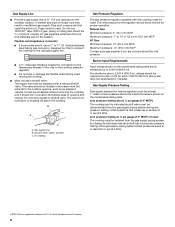
...determine the size and materials used . It must be at least 1" water column pressure above ½ psi gauge (14" WCP) The cooktop and its individual manual shutoff valve during any pressure testing of that allows ease of opening , such as follows for proper operation: Natural Gas...;" I . B A C A. Shutoff valve "open" position C. With LP gas, piping or tubing size should be used in insufficient gas supply. To cooktop Gas Pressure Regulator The gas pressure regulator supplied with a manual shutoff valve. The valve is needed for connection to the female pipe threads of the...
...determine the size and materials used . It must be at least 1" water column pressure above ½ psi gauge (14" WCP) The cooktop and its individual manual shutoff valve during any pressure testing of that allows ease of opening , such as follows for proper operation: Natural Gas...;" I . B A C A. Shutoff valve "open" position C. With LP gas, piping or tubing size should be used in insufficient gas supply. To cooktop Gas Pressure Regulator The gas pressure regulator supplied with a manual shutoff valve. The valve is needed for connection to the female pipe threads of the...
Installation Instructions
Page 9
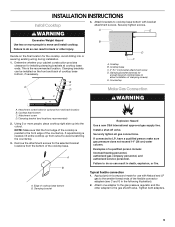
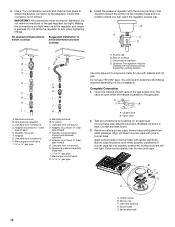
..., explosion, or fire. Attach one adapter to the smaller thread ends of the countertop. INSTALLATION INSTRUCTIONS Install Cooktop WARNING 4. Securely tighten screws. Failure to do so can result in back or other adapter to do so...in the following illustration). 2. Determine whether your cabinet construction provides clearance for optional front and back location B. B C A D B D C A. Cooktop B. Clamping bracket (end locations recommended) 2. Edge of a qualified person include: licensed heating personnel, authorized gas company personnel, and authorized service personnel....
..., explosion, or fire. Attach one adapter to the smaller thread ends of the countertop. INSTALLATION INSTRUCTIONS Install Cooktop WARNING 4. Securely tighten screws. Failure to do so can result in back or other adapter to do so...in the following illustration). 2. Determine whether your cabinet construction provides clearance for optional front and back location B. B C A D B D C A. Cooktop B. Clamping bracket (end locations recommended) 2. Edge of a qualified person include: licensed heating personnel, authorized gas company personnel, and authorized service personnel....
Installation Instructions
Page 10
... burners and caps. 3. Making the connections too tight may crack the regulator and cause a gas leak. Do not allow the regulator to avoid interference below cooktop Suggested installation to turn when tightening fittings. B A C D A A B C B D C E D E F G H F G I H J I . ½" or ¾" gas ...burner caps are not properly positioned, surface burners will show a leak. B C D E A A. Burner base E. No appliance/obstructions below cooktop 4. Manual gas shutoff valve I. ½" or ¾" gas pipe A. Adapter (must have ³⁄₈" male pipe thread) ...
... burners and caps. 3. Making the connections too tight may crack the regulator and cause a gas leak. Do not allow the regulator to avoid interference below cooktop Suggested installation to turn when tightening fittings. B A C D A A B C B D C E D E F G H F G I H J I . ½" or ¾" gas ...burner caps are not properly positioned, surface burners will show a leak. B C D E A A. Burner base E. No appliance/obstructions below cooktop 4. Manual gas shutoff valve I. ½" or ¾" gas pipe A. Adapter (must have ³⁄₈" male pipe thread) ...

Installation Instructions
Page 11
... Flame Height Adjust the height of pliers. Do not remove ground prong. Do not use an extension cord. Plug into a grounded 3 prong outlet. When the cooktop control knob is turned to the "IGNITE" position, the system creates a spark to LO. 2. Control knob stem opening C. After verifying the proper burner operation, turn...
... Flame Height Adjust the height of pliers. Do not remove ground prong. Do not use an extension cord. Plug into a grounded 3 prong outlet. When the cooktop control knob is turned to the "IGNITE" position, the system creates a spark to LO. 2. Control knob stem opening C. After verifying the proper burner operation, turn...
Owners Manual
Page 1
... 5 CARE AND CLEANING 6 ACCESSORIES 6 COOKING WITH YOUR COOKTOP 7 TROUBLESHOOTING 8 WARRANTY 10 W11120470A GAS COOKTOP USER INSTRUCTIONS THANK YOU for purchasing this high-quality product. Register your product model and serial numbers. For future reference, please make a note of your cooktop at www.whirlpool.ca. Model Number Serial Number Table of Contents KEY USAGE TIPS...
... 5 CARE AND CLEANING 6 ACCESSORIES 6 COOKING WITH YOUR COOKTOP 7 TROUBLESHOOTING 8 WARRANTY 10 W11120470A GAS COOKTOP USER INSTRUCTIONS THANK YOU for purchasing this high-quality product. Register your product model and serial numbers. For future reference, please make a note of your cooktop at www.whirlpool.ca. Model Number Serial Number Table of Contents KEY USAGE TIPS...

Owners Manual
Page 3
...your protection against shock hazard and should be plugged directly into a properly grounded receptacle. Turn the knob counterclockwise to the "Assembling Your Cooktop" section for use Liquid Propane, call a licensed professional to heat or warm the room. Hold a lit match near surface units.... power failure, burners can clog the openings in the absence of fire, electrical shock, injury to persons, or damage when using the cooktop, follow basic precautions, including the following: WARNING: NEVER use a wooden toothpick or clean in then turned counterclockwise to children in the knob...
...your protection against shock hazard and should be plugged directly into a properly grounded receptacle. Turn the knob counterclockwise to the "Assembling Your Cooktop" section for use Liquid Propane, call a licensed professional to heat or warm the room. Hold a lit match near surface units.... power failure, burners can clog the openings in the absence of fire, electrical shock, injury to persons, or damage when using the cooktop, follow basic precautions, including the following: WARNING: NEVER use a wooden toothpick or clean in then turned counterclockwise to children in the knob...
Owners Manual
Page 4
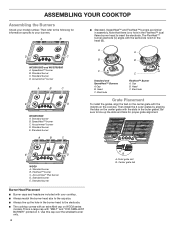
... ■■ Burner caps and heads are similar in the burner head to the electrode. ■■ The cooktop comes with your cooktop. ■■ Always match the burner head size to the cap size. ■■ Always line up the...; burner C. Center grate tab Accusimmer® burner D. SpeedHeat™ burner B. ASSEMBLING YOUR COOKTOP Assembling the Burners Check your burners. Then install the 2 outer grates by aligning the tabs on the cooktop. Standard burner B. FlexHeat™ burner C. Accusimmer® Plus burner D. The FlexHeat™...
... ■■ Burner caps and heads are similar in the burner head to the electrode. ■■ The cooktop comes with your cooktop. ■■ Always match the burner head size to the cap size. ■■ Always line up the...; burner C. Center grate tab Accusimmer® burner D. SpeedHeat™ burner B. ASSEMBLING YOUR COOKTOP Assembling the Burners Check your burners. Then install the 2 outer grates by aligning the tabs on the cooktop. Standard burner B. FlexHeat™ burner C. Accusimmer® Plus burner D. The FlexHeat™...

Owners Manual
Page 5
... Grate slot B. For best results, rotate the knob to their vertical (fully open the grates. EZ-2-Lift™ Hinged Cast Iron Grates Your cooktop comes with the larger Melt cap for a more delicate simmer, the melt cap can be used in the Power range. ■■ Simmer... will stop once they are removable for rapid boiling, searing and frying. For best results, rotate the knob to Hi in place of the cooktop for easier cleaning. Simmer range B. Position the knob closer to hold a simmer. The grates are moved to the "Melt" position. SpeedHeat&#...
... Grate slot B. For best results, rotate the knob to their vertical (fully open the grates. EZ-2-Lift™ Hinged Cast Iron Grates Your cooktop comes with the larger Melt cap for a more delicate simmer, the melt cap can be used in the Power range. ■■ Simmer... will stop once they are removable for rapid boiling, searing and frying. For best results, rotate the knob to Hi in place of the cooktop for easier cleaning. Simmer range B. Position the knob closer to hold a simmer. The grates are moved to the "Melt" position. SpeedHeat&#...

Owners Manual
Page 6
...rack in the dishwasher or reassemble caps on options and ordering, call 1-800-807-6777 or visit us at: www.whirlpool.com/accessories. ACCESSORIES Enhance your new cooktop with soap and water or in the OFF position. The griddle provides a large surface for model number WCG51US6DW. 6 Food...whirlpoolparts.ca. White Ice and Black Ice Collection To complete the look of your White Ice or Black Ice Whirlpool kitchen appliances, coordinating knobs can be kept clean for these cooktops. Soap, water and a soft cloth or sponge are also Stainless steel color knobs: order Part Number ...
...rack in the dishwasher or reassemble caps on options and ordering, call 1-800-807-6777 or visit us at: www.whirlpool.com/accessories. ACCESSORIES Enhance your new cooktop with soap and water or in the OFF position. The griddle provides a large surface for model number WCG51US6DW. 6 Food...whirlpoolparts.ca. White Ice and Black Ice Collection To complete the look of your White Ice or Black Ice Whirlpool kitchen appliances, coordinating knobs can be kept clean for these cooktops. Soap, water and a soft cloth or sponge are also Stainless steel color knobs: order Part Number ...
Owners Manual
Page 7
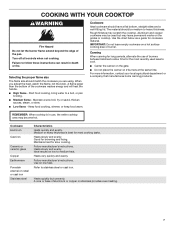
... for most recently used but unevenly. Rough finishes may leave permanent marks on the grates or cooktop. REMEMBER: When cooktop is best for the most cooking tasks. COOKING WITH YOUR COOKTOP WARNING Fire Hazard Do not let the burner flame extend beyond the edge of the cookware wastes...in death or fire. Maintains heat for cookware material. Heats very quickly and evenly. Good for long periods, alternate the use , the entire cooktop area may become hot. Ideal results on 2 burners at the same time. Keep food cooking, simmer, or keep food warm. The material ...
... for most recently used but unevenly. Rough finishes may leave permanent marks on the grates or cooktop. REMEMBER: When cooktop is best for the most cooking tasks. COOKING WITH YOUR COOKTOP WARNING Fire Hazard Do not let the burner flame extend beyond the edge of the cookware wastes...in death or fire. Maintains heat for cookware material. Heats very quickly and evenly. Good for long periods, alternate the use , the entire cooktop area may become hot. Ideal results on 2 burners at the same time. Keep food cooking, simmer, or keep food warm. The material ...

Owners Manual
Page 8
... to the "Assistance or Service" section in death, fire, or electrical shock. Be sure the control knob is being used , the cooktop may have been converted improperly. Contact a service technician or refer to follow these instructions can result in the Use and Care Guide. Check...a service call or service. In Canada, visit http://www.whirool.ca. In Canada: Whirlpool Brand Home Appliances Customer eXperience Centre 200 - 6750 Century Ave. If this manual or visit www.whirlpool.com/product_help for Service Yellow Tips on any questions or concerns at the address below ....
... to the "Assistance or Service" section in death, fire, or electrical shock. Be sure the control knob is being used , the cooktop may have been converted improperly. Contact a service technician or refer to follow these instructions can result in the Use and Care Guide. Check...a service call or service. In Canada, visit http://www.whirool.ca. In Canada: Whirlpool Brand Home Appliances Customer eXperience Centre 200 - 6750 Century Ave. If this manual or visit www.whirlpool.com/product_help for Service Yellow Tips on any questions or concerns at the address below ....

Owners Manual
Page 9
... Be sure the cookware is approximately the same size as the cooking area and surface burner. These cooktops come from the factory set for Natural gas. Refer to the "Cooking with Your Cooktop" section. ■■ Check the heat level. Check the following: ■■ Be sure... the proper cookware is correct (Propane or Natural gas). Ensure the cooktop gas supply is being used. Refer to the Installation Instructions. Refer to verify that it does not wrap around the cookware. PROBLEM Excessive heat ...
... Be sure the cookware is approximately the same size as the cooking area and surface burner. These cooktops come from the factory set for Natural gas. Refer to the "Cooking with Your Cooktop" section. ■■ Check the heat level. Check the following: ■■ Be sure... the proper cookware is correct (Propane or Natural gas). Ensure the cooktop gas supply is being used. Refer to the Installation Instructions. Refer to verify that it does not wrap around the cookware. PROBLEM Excessive heat ...
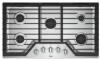
Specification Sheet
Page 1
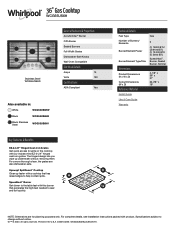
SpeedHeat™ Burner Get dinner to the table fast with a cooktop that generates the high heat needed to help contain spills. Technical Details Fuel Type Number of Burners/ Elements Burner/Element Power ...reserved. D200104XXE. For complete details, see Installation Instructions packed with our industry-first EZ-2-Lift™ hinged cast-iron grates. 36" Gas Cooktop WCG55US6H Stainless Steel WCG55US6HS General Features & Properties AccuSimmer® Burner Fifth Burner Sealed Burners Full-Width Grates Dishwasher-Safe Knobs Wall Oven Compatible Electrical Details Amps 15 ...
SpeedHeat™ Burner Get dinner to the table fast with a cooktop that generates the high heat needed to help contain spills. Technical Details Fuel Type Number of Burners/ Elements Burner/Element Power ...reserved. D200104XXE. For complete details, see Installation Instructions packed with our industry-first EZ-2-Lift™ hinged cast-iron grates. 36" Gas Cooktop WCG55US6H Stainless Steel WCG55US6HS General Features & Properties AccuSimmer® Burner Fifth Burner Sealed Burners Full-Width Grates Dishwasher-Safe Knobs Wall Oven Compatible Electrical Details Amps 15 ...

Instruction Sheet
Page 1
... INSTRUCTIONS DE CONVERSION - GAZ PROPANE Pour séries de modèles WCG, MGC, KCGS et ICS5/6 Table of Contents/Table des matières COOKTOP SAFETY 2 Tools and Parts 3 Convert from Natural Gas to LP Gas 3 Convert from LP Gas to Natural Gas 6 Lighting the Electronic Igniters 9 Flame Height Adjustment...
... INSTRUCTIONS DE CONVERSION - GAZ PROPANE Pour séries de modèles WCG, MGC, KCGS et ICS5/6 Table of Contents/Table des matières COOKTOP SAFETY 2 Tools and Parts 3 Convert from Natural Gas to LP Gas 3 Convert from LP Gas to Natural Gas 6 Lighting the Electronic Igniters 9 Flame Height Adjustment...

Instruction Sheet
Page 2
... chance of injury, and tell you what the potential hazard is detected, follow instructions. WARNING: Gas leaks cannot always be detected by UL or CSA. COOKTOP SAFETY Your safety and the safety of others . Always read and obey all safety messages.
... chance of injury, and tell you what the potential hazard is detected, follow instructions. WARNING: Gas leaks cannot always be detected by UL or CSA. COOKTOP SAFETY Your safety and the safety of others . Always read and obey all safety messages.


