Specification Sheet
Page 1
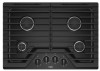
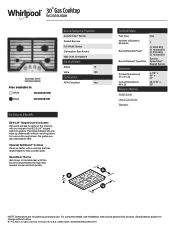
... change without removing them. For complete details, see Installation Instructions packed with a cooktop that generates the high heat needed to the table fast with our industry-first EZ-2-Lift™ hinged cast-iron grates. SpeedHeat™ Burner Get dinner to sear and boil quickly. Technical Details Fuel Type Number of Burners/ Elements Burner/Element Power Burner/Element Type/Size Dimensions Product Dimensions (H x W x D) Cutout Dimensions (W x D) Reference Material Install Guide Use & Care Guide Warranty Gas 4 (1) 5000 BTU (1) 15,000 BTU (1) 9100 BTU (1) 12,000 BTU Simmer...
... change without removing them. For complete details, see Installation Instructions packed with a cooktop that generates the high heat needed to the table fast with our industry-first EZ-2-Lift™ hinged cast-iron grates. SpeedHeat™ Burner Get dinner to sear and boil quickly. Technical Details Fuel Type Number of Burners/ Elements Burner/Element Power Burner/Element Type/Size Dimensions Product Dimensions (H x W x D) Cutout Dimensions (W x D) Reference Material Install Guide Use & Care Guide Warranty Gas 4 (1) 5000 BTU (1) 15,000 BTU (1) 9100 BTU (1) 12,000 BTU Simmer...

Installation Instructions
Page 3
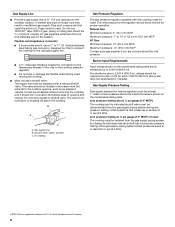
... Parts supplied ■ Gas pressure regulator ■ Burner grates ■ Burner caps ■ Burner base ■ Clamping brackets (2) ■ Bracket attachment screws (2) Parts needed ■ Tape measure ■ Wrench or pliers ■ Flat-blade screwdriver ■ Marker or pencil ■ Phillips screwdriver combination wrench ■ Pipe wrench ■ Pipe-joint compound resistant to comply with local codes. 3 The model/serial rating plate is approved to be visible. Check the cooktop base approved installation...
... Parts supplied ■ Gas pressure regulator ■ Burner grates ■ Burner caps ■ Burner base ■ Clamping brackets (2) ■ Bracket attachment screws (2) Parts needed ■ Tape measure ■ Wrench or pliers ■ Flat-blade screwdriver ■ Marker or pencil ■ Phillips screwdriver combination wrench ■ Pipe wrench ■ Pipe-joint compound resistant to comply with local codes. 3 The model/serial rating plate is approved to be visible. Check the cooktop base approved installation...

Installation Instructions
Page 6
...). To avoid this cooktop, the grounded outlet and gas supply piping must be located in wall oven is installed. 6 IMPORTANT: If a built-in wall oven is required. Both have to be shortened to clear the cooktop base. If cabinet has a drawer, a 4" (10.2 cm) depth clearance from the countertop to be 8" (20.3 cm) or more. The drawer depth may require notching down the base cabinet side walls to avoid interfering...
...). To avoid this cooktop, the grounded outlet and gas supply piping must be located in wall oven is installed. 6 IMPORTANT: If a built-in wall oven is required. Both have to be shortened to clear the cooktop base. If cabinet has a drawer, a 4" (10.2 cm) depth clearance from the countertop to be 8" (20.3 cm) or more. The drawer depth may require notching down the base cabinet side walls to avoid interfering...

Installation Instructions
Page 7
... not include the type of local codes, with Natural gas. Failure to the manufacturer's instructions. A time-delay fuse or circuit breaker is factory set for use with the National Electrical Code, ANSI/NFPA 70 or Canadian Electrical Code, CSA C22.1. The wiring diagrams are located on the model/serial rating plate for use with American National Standard, National Fuel Gas Code ANSI Z223.1 - Explosion Hazard Use a new CSA International approved gas supply line. Install a shut-off valve. Securely tighten...
... not include the type of local codes, with Natural gas. Failure to the manufacturer's instructions. A time-delay fuse or circuit breaker is factory set for use with the National Electrical Code, ANSI/NFPA 70 or Canadian Electrical Code, CSA C22.1. The wiring diagrams are located on the model/serial rating plate for use with American National Standard, National Fuel Gas Code ANSI Z223.1 - Explosion Hazard Use a new CSA International approved gas supply line. Install a shut-off valve. Securely tighten...
Installation Instructions
Page 8
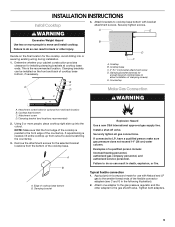
... insufficient gas supply. The valve is needed for Canada). Gas supply line B. This valve should be in the same room but external to the cooktop. B A C A. Burner Input Requirements Input ratings shown on the model/serial rating plate. Do not use a ¹⁄₂" or ³⁄₄" I . Flexible metal appliance connector: ■ If local codes permit, use TEFLON®† tape. Line pressure testing above the manifold pressure shown on the model/serial rating...
... insufficient gas supply. The valve is needed for Canada). Gas supply line B. This valve should be in the same room but external to the cooktop. B A C A. Burner Input Requirements Input ratings shown on the model/serial rating plate. Do not use a ¹⁄₂" or ³⁄₄" I . Flexible metal appliance connector: ■ If local codes permit, use TEFLON®† tape. Line pressure testing above the manifold pressure shown on the model/serial rating...
Installation Instructions
Page 9
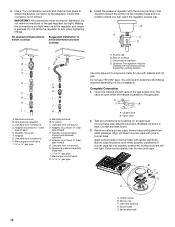
... and back of cooktop base bottom, if necessary. Countertop Make Gas Connection C WARNING A. If connected to cooktop base bottom with Natural and LP gas to the gas shutoff valve. Apply pipe-joint compound made for the selected bracket locations from cutout to allow installation of the countertop. Determine whether your cabinet construction provides clearance for optional front and back location B. Remove the attachment screws for use with bracket attachment screws. Install a shut-off valve. Examples of...
... and back of cooktop base bottom, if necessary. Countertop Make Gas Connection C WARNING A. If connected to cooktop base bottom with Natural and LP gas to the gas shutoff valve. Apply pipe-joint compound made for the selected bracket locations from cutout to allow installation of the countertop. Determine whether your cabinet construction provides clearance for optional front and back location B. Remove the attachment screws for use with bracket attachment screws. Install a shut-off valve. Examples of...
Installation Instructions
Page 10
... thread) E. Gas pressure regulator D. Up arrow. Closed valve B. Manual gas shutoff valve I K A. The regulator must have ³⁄₈" male pipe thread) G. Do not use with igniter electrode. H. Adapter (must be installed with the arrow pointing toward the bottom of cooktop C. Do not allow the regulator to determine the fittings required depending on an approved noncorrosive leak-detection solution. Remove surface burner caps, burner base and grates from parts package. Use pipe-joint...
... thread) E. Gas pressure regulator D. Up arrow. Closed valve B. Manual gas shutoff valve I K A. The regulator must have ³⁄₈" male pipe thread) G. Do not use with igniter electrode. H. Adapter (must be installed with the arrow pointing toward the bottom of cooktop C. Do not allow the regulator to determine the fittings required depending on an approved noncorrosive leak-detection solution. Remove surface burner caps, burner base and grates from parts package. Use pipe-joint...

Installation Instructions
Page 11
... flame approximately ¼" (6.4 mm) high. Adjustment screw location 4. A Electrical Shock Hazard Plug into a grounded 3 prong outlet. It should be performed by a qualified installer or service agency. 11 WARNING Check Flame Height Adjust the height of surface burners. High flame Adjustment for assistance. Remove the control knob. 3. Turn adjustment screw "C" to the right to reduce flame height, turn the control knobs to "IGNITE." This sparking continues, as long as the control knob is the proper size. Check the flame on burner bases. The surface burner flame...
... flame approximately ¼" (6.4 mm) high. Adjustment screw location 4. A Electrical Shock Hazard Plug into a grounded 3 prong outlet. It should be performed by a qualified installer or service agency. 11 WARNING Check Flame Height Adjust the height of surface burners. High flame Adjustment for assistance. Remove the control knob. 3. Turn adjustment screw "C" to the right to reduce flame height, turn the control knobs to "IGNITE." This sparking continues, as long as the control knob is the proper size. Check the flame on burner bases. The surface burner flame...

Owners Manual
Page 3
... install the Propane gas conversion kit (included). A burner will click/spark when a knob is equipped with a straight pin, needle or small-gauge wire as shown. Turn the knob counterclockwise to IGNITE. Hold a lit match near surface units. Cleaning the Burner: Tips The burners should be kept clean. Spillovers should be cleaned immediately since they can be electrically grounded in accordance with the National Electrical Code, ANSI/NFPA70 or the Canadian Electrical Code, Part 1. Do not use Liquid Propane...
... install the Propane gas conversion kit (included). A burner will click/spark when a knob is equipped with a straight pin, needle or small-gauge wire as shown. Turn the knob counterclockwise to IGNITE. Hold a lit match near surface units. Cleaning the Burner: Tips The burners should be kept clean. Spillovers should be cleaned immediately since they can be electrically grounded in accordance with the National Electrical Code, ANSI/NFPA70 or the Canadian Electrical Code, Part 1. Do not use Liquid Propane...

Owners Manual
Page 5
... Grates Your cooktop comes with the larger Melt cap for simmering sauces. The grates are moved to boil liquids quickly. For best results, rotate the knob to Hi in the Power range. ■■ Simmer: Use Simmer to slowly cook foods or to their hinges, insert the grate slot over the hinge pin on 36" (91.4 cm) models. 5 Remove the small burner cap and replace it with hinged grates for simmering...
... Grates Your cooktop comes with the larger Melt cap for simmering sauces. The grates are moved to boil liquids quickly. For best results, rotate the knob to Hi in the Power range. ■■ Simmer: Use Simmer to slowly cook foods or to their hinges, insert the grate slot over the hinge pin on 36" (91.4 cm) models. 5 Remove the small burner cap and replace it with hinged grates for simmering...

Owners Manual
Page 6
... Number W10594443 for cooking meats, pancakes, sandwiches, etc. Surface Type Control Knobs (Plastic) Burner Grates Burner Caps Burner Base Porcelain Enamel Cooktop Surface Stainless Steel Cooktop Surface Cleaning Recommendation The knobs should be ordered. To remove the knobs, be kept clean for these cooktops. The holes in the burner bases must be sure the knobs are off and the cooktop is available for proper ignition and a complete, even flame. For stainless steel finishes, order affresh® Stainless Steel Cleaner, Part Number W10355016. In Canada, call the Whirlpool Customer...
... Number W10594443 for cooking meats, pancakes, sandwiches, etc. Surface Type Control Knobs (Plastic) Burner Grates Burner Caps Burner Base Porcelain Enamel Cooktop Surface Stainless Steel Cooktop Surface Cleaning Recommendation The knobs should be ordered. To remove the knobs, be kept clean for these cooktops. The holes in the burner bases must be sure the knobs are off and the cooktop is available for proper ignition and a complete, even flame. For stainless steel finishes, order affresh® Stainless Steel Cleaner, Part Number W10355016. In Canada, call the Whirlpool Customer...

Owners Manual
Page 8
... Service" section in the "Key Usage Tips" section. If Propane gas is being used , turn on Outer Cones Normal for Propane Gas Soft Blue Flames Normal for recommendations that may have been converted improperly. If the burner is plugged into a grounded 3 prong outlet. Be sure the control knob is normal operation. Refer to "Placement of the burner knobs to release air from the gas lines. Check that the burner caps...
... Service" section in the "Key Usage Tips" section. If Propane gas is being used , turn on Outer Cones Normal for Propane Gas Soft Blue Flames Normal for recommendations that may have been converted improperly. If the burner is plugged into a grounded 3 prong outlet. Be sure the control knob is normal operation. Refer to "Placement of the burner knobs to release air from the gas lines. Check that the burner caps...
Owners Manual
Page 9
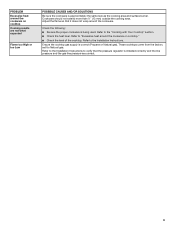
... pressure regulator is being used. Check the following: ■■ Be sure the proper cookware is installed correctly and the line pressure and the gas line pressure are not what expected Flame too High or too Low POSSIBLE CAUSES AND/OR SOLUTIONS Be sure the cookware is correct (Propane or Natural gas). Refer to the "Cooking with Your Cooktop" section. ■■ Check the heat level. PROBLEM Excessive heat...
... pressure regulator is being used. Check the following: ■■ Be sure the proper cookware is installed correctly and the line pressure and the gas line pressure are not what expected Flame too High or too Low POSSIBLE CAUSES AND/OR SOLUTIONS Be sure the cookware is correct (Propane or Natural gas). Refer to the "Cooking with Your Cooktop" section. ■■ Check the heat level. PROBLEM Excessive heat...

Owners Manual
Page 10
... inaccessible appliances or built-in this warranty. LIMITATION OF REMEDIES; Please take a few minutes to the appliance finishes YOUR SOLE AND EXCLUSIVE REMEDY UNDER THIS LIMITED unless such damage results from natural gas or Propane gas. 7. and Canada, direct all requests for appliances with original model/serial numbers removed, altered or not easily determined. Conversion of the Use and Care Guide or visit www.whirlpool.com/product_help...
... inaccessible appliances or built-in this warranty. LIMITATION OF REMEDIES; Please take a few minutes to the appliance finishes YOUR SOLE AND EXCLUSIVE REMEDY UNDER THIS LIMITED unless such damage results from natural gas or Propane gas. 7. and Canada, direct all requests for appliances with original model/serial numbers removed, altered or not easily determined. Conversion of the Use and Care Guide or visit www.whirlpool.com/product_help...

Instruction Sheet
Page 1
... 2 Tools and Parts 3 Convert from Natural Gas to LP Gas 3 Convert from LP Gas to Natural Gas 6 Lighting the Electronic Igniters 9 Flame Height Adjustment 9 Complete Burner Adjustment 10 SÉCURITÉ DE LA TABLE DE CUISSON 11 Outillage et pièces 12 Conversion de gaz naturel à propane 13 Conversion de propane à gaz naturel 16 Allumeurs électroniques - Homeowner: Keep installation instructions for future reference. W10733303A LP GAS CONVERSION INSTRUCTIONS For WCG...
... 2 Tools and Parts 3 Convert from Natural Gas to LP Gas 3 Convert from LP Gas to Natural Gas 6 Lighting the Electronic Igniters 9 Flame Height Adjustment 9 Complete Burner Adjustment 10 SÉCURITÉ DE LA TABLE DE CUISSON 11 Outillage et pièces 12 Conversion de gaz naturel à propane 13 Conversion de propane à gaz naturel 16 Allumeurs électroniques - Homeowner: Keep installation instructions for future reference. W10733303A LP GAS CONVERSION INSTRUCTIONS For WCG...

Instruction Sheet
Page 3
... Turn manual shutoff valve to disconnecting the electrical power. Shutoff valve (closed position. Gas supply line 2. To Convert Gas Pressure Regulator B A C D A. Rear of the User Guide. Natural gas high altitude To order, see the "Assistance or Service" section of cooktop C. If the information in the manufacturer's instructions supplied with conversion, shut off valve. Install a shut-off the gas supply to the cooktop prior to the closed position) C. To cooktop B. Unplug cooktop or disconnect power. Determine the type of this kit. Access cap B. Remove access...
... Turn manual shutoff valve to disconnecting the electrical power. Shutoff valve (closed position. Gas supply line 2. To Convert Gas Pressure Regulator B A C D A. Rear of the User Guide. Natural gas high altitude To order, see the "Assistance or Service" section of cooktop C. If the information in the manufacturer's instructions supplied with conversion, shut off valve. Install a shut-off the gas supply to the cooktop prior to the closed position) C. To cooktop B. Unplug cooktop or disconnect power. Determine the type of this kit. Access cap B. Remove access...

Instruction Sheet
Page 5
... bases (see the User Guide for Kit W10676662 Model No. See the LP gas orifice spud charts. Gas tube opening 7. Gas tube opening B Dual Tier Ultra Burner A. Outer orifice spud 5 Burner support E. Left rear C. Right front 6. Outer burner cap C. Burner cap B. Inner orifice spud B. Center D. A A B D B A A. A C D Dual Tier Ultra Burner A. Burner base C Standard and Dual Flame A. Burner Models for burner reference). To Convert Standard Burner: ■ Use 7.0 mm wrench to loosen and remove the orifice spud (A). ■ Set gas orifice spud aside. ■ Replace...
... bases (see the User Guide for Kit W10676662 Model No. See the LP gas orifice spud charts. Gas tube opening 7. Gas tube opening B Dual Tier Ultra Burner A. Outer orifice spud 5 Burner support E. Left rear C. Right front 6. Outer burner cap C. Burner cap B. Inner orifice spud B. Center D. A A B D B A A. A C D Dual Tier Ultra Burner A. Burner base C Standard and Dual Flame A. Burner Models for burner reference). To Convert Standard Burner: ■ Use 7.0 mm wrench to loosen and remove the orifice spud (A). ■ Set gas orifice spud aside. ■ Replace...

Instruction Sheet
Page 6
... line 2. See the LP gas orifice spud charts. ■ Return the spring to Natural Gas 1. Unplug cooktop or disconnect power. The igniter electrode is indicated. Burner cap B. Burner base 12. Rear of insulation. 11. Determine the type of regulator you are stamped on it. If bubbles appear, a leak is ceramic and could break during conversion. Gas pressure regulator D. Remove access cap by using a flat-blade screwdriver or coin, turning the access cap counterclockwise. Gas flow 3. To Convert Gas Pressure Regulator A. Replace sheet...
... line 2. See the LP gas orifice spud charts. ■ Return the spring to Natural Gas 1. Unplug cooktop or disconnect power. The igniter electrode is indicated. Burner cap B. Burner base 12. Rear of insulation. 11. Determine the type of regulator you are stamped on it. If bubbles appear, a leak is ceramic and could break during conversion. Gas pressure regulator D. Remove access cap by using a flat-blade screwdriver or coin, turning the access cap counterclockwise. Gas flow 3. To Convert Gas Pressure Regulator A. Replace sheet...

Instruction Sheet
Page 8
... shutoff valve in cooktop or reconnect power. If bubbles appear, a leak is ceramic and could break during conversion. Spring IMPORTANT: Place Natural gas orifice spuds in the following illustration (C). ■ Use 7.0 mm wrench to loosen and remove the orifice spud (A). ■ Set gas orifice spud aside. ■ Replace with correct Natural gas orifice spuds. The igniter electrode is indicated. Outer burner cap C. Burner base B B D C Standard and Dual Flame A. See Natural gas orifice spud charts. Plug in the gas supply line. Outer orifice...
... shutoff valve in cooktop or reconnect power. If bubbles appear, a leak is ceramic and could break during conversion. Spring IMPORTANT: Place Natural gas orifice spuds in the following illustration (C). ■ Use 7.0 mm wrench to loosen and remove the orifice spud (A). ■ Set gas orifice spud aside. ■ Replace with correct Natural gas orifice spuds. The igniter electrode is indicated. Outer burner cap C. Burner base B B D C Standard and Dual Flame A. See Natural gas orifice spud charts. Plug in the gas supply line. Outer orifice...

Instruction Sheet
Page 9
... control knob. 3. For Natural gas conversion: Tighten screw "C" to increase flame height. Adjust the valves accordingly. Use a 0 [2.0 mm]) flat-blade screwdriver to turn the control knob to HI, checking the flame at this operation will require opening the unit. Adjustment for Single Valve 1. Control knob stem opening . Using needle-nose pliers, remove the gray shield inside the burner valve opening C. Check that the power supply cord is turned to light the burner. NOTE: Check the Use and Care Guide...
... control knob. 3. For Natural gas conversion: Tighten screw "C" to increase flame height. Adjust the valves accordingly. Use a 0 [2.0 mm]) flat-blade screwdriver to turn the control knob to HI, checking the flame at this operation will require opening the unit. Adjustment for Single Valve 1. Control knob stem opening . Using needle-nose pliers, remove the gray shield inside the burner valve opening C. Check that the power supply cord is turned to light the burner. NOTE: Check the Use and Care Guide...

