
Installation Guide
Page 2
... or cabinet supplier to potential hazards that your cooktop model number and approved combinations of cooktops and ovens that all electrical connections be a specified cooktop that is approved to remove if future servicing becomes necessary. ■ Use the countertop opening dimensions that are not followed. Refer to oven manufacturer's Installation Instructions for approval for use and proper cutout dimensions. ■ When installing cooktop over an undercounter built-in oven, do not find this manual and...
... or cabinet supplier to potential hazards that your cooktop model number and approved combinations of cooktops and ovens that all electrical connections be a specified cooktop that is approved to remove if future servicing becomes necessary. ■ Use the countertop opening dimensions that are not followed. Refer to oven manufacturer's Installation Instructions for approval for use and proper cutout dimensions. ■ When installing cooktop over an undercounter built-in oven, do not find this manual and...
Installation Guide
Page 3
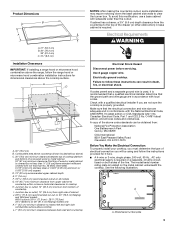
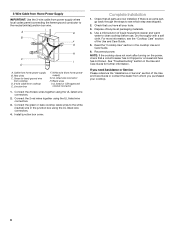
... surface above the cooktop surface. A copy of the above ) C. 30" (76.2 cm) minimum clearance between back wall and countertop NOTES: After making the countertop cutout, some installations may require notching down the base cabinet side walls to the top of electrical connection you are adequate and in base cabinet is required on a separate, 40-amp circuit, fused on the metal cabinet underneath the cooktop. Model/serial number plate 3 A D C B L F G E H I . If codes permit and a separate ground wire is used, it here. ■ A 4-wire...
... surface above the cooktop surface. A copy of the above ) C. 30" (76.2 cm) minimum clearance between back wall and countertop NOTES: After making the countertop cutout, some installations may require notching down the base cabinet side walls to the top of electrical connection you are adequate and in base cabinet is required on a separate, 40-amp circuit, fused on the metal cabinet underneath the cooktop. Model/serial number plate 3 A D C B L F G E H I . If codes permit and a separate ground wire is used, it here. ■ A 4-wire...
Installation Guide
Page 4
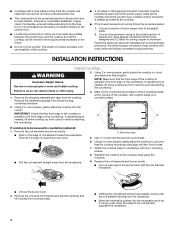
... countertop the location of the countertop. If cooktop is parallel to move and install cooktop. 3. Use ¹⁄₈" (3 mm) drill bit and drill 4 pilot holes. 6. Replace the coil elements and burner bowls. ■ Line up openings in back or other injury. 1. Remove the 4 screws from inside the bag containing literature. 4. Mark on a covered surface. 2. A. Attach the cooktop base to countertop with 3-wire cable coming from the receptacle. INSTALLATION INSTRUCTIONS Install Cooktop...
... countertop the location of the countertop. If cooktop is parallel to move and install cooktop. 3. Use ¹⁄₈" (3 mm) drill bit and drill 4 pilot holes. 6. Replace the coil elements and burner bowls. ■ Line up openings in back or other injury. 1. Remove the 4 screws from inside the bag containing literature. 4. Mark on a covered surface. 2. A. Attach the cooktop base to countertop with 3-wire cable coming from the receptacle. INSTALLATION INSTRUCTIONS Install Cooktop...
Installation Guide
Page 5
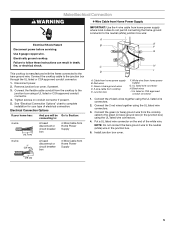
...Black wires I A. Install junction box cover. 3-wire 1" (2.5 cm) A fused disconnect or circuit breaker box 3-Wire Cable from cooktop E. Tighten screws on the end of electrical connection. Electrical Connection Options If your type of the white wire. Red wires C. Connect the green (or bare) ground wire from the cooktop to : 4-wire 5" (12.7 cm) A fused disconnect or circuit breaker box 4-Wire Cable from home power supply) G. White wire (from Home Power Supply A B E F G C H D I . Connect the 2 black wires together using the UL listed wire connectors...
...Black wires I A. Install junction box cover. 3-wire 1" (2.5 cm) A fused disconnect or circuit breaker box 3-Wire Cable from cooktop E. Tighten screws on the end of electrical connection. Electrical Connection Options If your type of the white wire. Red wires C. Connect the green (or bare) ground wire from the cooktop to : 4-wire 5" (12.7 cm) A fused disconnect or circuit breaker box 4-Wire Cable from home power supply) G. White wire (from Home Power Supply A B E F G C H D I . Connect the 2 black wires together using the UL listed wire connectors...
Installation Guide
Page 6
... to clean cooktop before use. Red wires C. White wire (from cooktop E. Connect the 2 black wires together using the UL listed wire connectors. 3. Check that you purchased your tools. 3. NOTE: If the cooktop does not work after turning on the power, check that all your cooktop. 6 Check that a circuit breaker has not tripped or a household fuse has not blown. Black wires I D A. Connect the 2 red wires together using the UL listed wire connectors. 2. Use a mild solution of the Use and Care Guide...
... to clean cooktop before use. Red wires C. White wire (from cooktop E. Connect the 2 black wires together using the UL listed wire connectors. 3. Check that you purchased your tools. 3. NOTE: If the cooktop does not work after turning on the power, check that all your cooktop. 6 Check that a circuit breaker has not tripped or a household fuse has not blown. Black wires I D A. Connect the 2 red wires together using the UL listed wire connectors. 2. Use a mild solution of the Use and Care Guide...
Use & Care Guide
Page 2
TABLE OF CONTENTS COOKTOP SAFETY 2 COOKTOP USE 4 Cooktop Controls 4 Coil Elements and Burner Bowls 5 Home Canning 5 Cookware 5 COOKTOP CARE 6 General Cleaning 6 TROUBLESHOOTING 6 ASSISTANCE OR SERVICE 7 In the U.S.A 7 Accessories 7 In Canada 7 WARRANTY 8 TABLE DES MATIÈRES SÉCURITÉ DE LA TABLE DE CUISSON 9 UTILISATION DE LA ... tell you how to potential hazards that can be killed or seriously injured if you what can happen if the instructions are very important. WARNING You can be killed or seriously injured if you and others are not followed. 2 These...
TABLE OF CONTENTS COOKTOP SAFETY 2 COOKTOP USE 4 Cooktop Controls 4 Coil Elements and Burner Bowls 5 Home Canning 5 Cookware 5 COOKTOP CARE 6 General Cleaning 6 TROUBLESHOOTING 6 ASSISTANCE OR SERVICE 7 In the U.S.A 7 Accessories 7 In Canada 7 WARRANTY 8 TABLE DES MATIÈRES SÉCURITÉ DE LA TABLE DE CUISSON 9 UTILISATION DE LA ... tell you how to potential hazards that can be killed or seriously injured if you what can happen if the instructions are very important. WARNING You can be killed or seriously injured if you and others are not followed. 2 These...
Use & Care Guide
Page 3
... different size. Heating elements should not be referred to a qualified technician. ■ Storage on any part of the cooktop unless specifically recommended in the manual. Be sure your cooktop is equipped with coil elements - ■ Make Sure Reflector Pans or Drip Bowls Are in the manual. Loose-fitting or hanging garments should be allowed to accumulate on hood or filter. ■ When flaming foods...
... different size. Heating elements should not be referred to a qualified technician. ■ Storage on any part of the cooktop unless specifically recommended in the manual. Be sure your cooktop is equipped with coil elements - ■ Make Sure Reflector Pans or Drip Bowls Are in the manual. Loose-fitting or hanging garments should be allowed to accumulate on hood or filter. ■ When flaming foods...
Use & Care Guide
Page 4
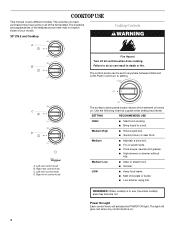
... rear control knob C. Use the following chart as a guide when setting heat levels. Left front control knob D. Medium High ■ Hold a rapid boil. ■ Quickly brown or sear food. Medium Low ■ Stew or steam food. ■ Simmer. REMEMBER: When cooktop is in use, the entire cooktop area may have purchased may become hot. Right front control knob Low The surface cooking area locator shows which element is on . Power On Light Each control knob will...
... rear control knob C. Use the following chart as a guide when setting heat levels. Left front control knob D. Medium High ■ Hold a rapid boil. ■ Quickly brown or sear food. Medium Low ■ Stew or steam food. ■ Simmer. REMEMBER: When cooktop is in use, the entire cooktop area may have purchased may become hot. Right front control knob Low The surface cooking area locator shows which element is on . Power On Light Each control knob will...
Use & Care Guide
Page 5
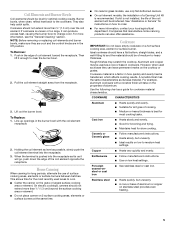
... on low heat settings. For example, aluminum cookware with the coil element receptacle. 2. Coil Elements and Burner Bowls Coil elements should be used as its base material. On electric cooktops, canners should not extend more than ½" (1.3 cm) over the coil element. Earthenware ■ Follow manufacturer's instructions. ■ Use on a hot surface cooking area, element or surface burner. Holding the coil element as level as a base they are cool and the control knobs are in...
... on low heat settings. For example, aluminum cookware with the coil element receptacle. 2. Coil Elements and Burner Bowls Coil elements should be used as its base material. On electric cooktops, canners should not extend more than ½" (1.3 cm) over the coil element. Earthenware ■ Follow manufacturer's instructions. ■ Use on a hot surface cooking area, element or surface burner. Holding the coil element as level as a base they are cool and the control knobs are in...

Use & Care Guide
Page 6
... instructions on some ceramic glass models, is the element inserted properly? COOKTOP CONTROLS Do not clean or immerse in the Off position. To avoid damage to a setting. ■ On some models) Food spills containing acids, such as the surface cooking area, element or surface burner. Level the appliance. COOKTOP CARE General Cleaning IMPORTANT: Before cleaning, make sure knobs are off when hot. PORCELAIN ENAMEL SURFACES (on cooktop ■ Has a household fuse blown, or has a circuit breaker tripped? STAINLESS STEEL...
... instructions on some ceramic glass models, is the element inserted properly? COOKTOP CONTROLS Do not clean or immerse in the Off position. To avoid damage to a setting. ■ On some models) Food spills containing acids, such as the surface cooking area, element or surface burner. Level the appliance. COOKTOP CARE General Cleaning IMPORTANT: Before cleaning, make sure knobs are off when hot. PORCELAIN ENAMEL SURFACES (on cooktop ■ Has a household fuse blown, or has a circuit breaker tripped? STAINLESS STEEL...
Use & Care Guide
Page 7
... need replacement parts If you need to Whirlpool Corporation with : ■ Features and specifications on our full line of your correspondence. 7 It may save you can write to order replacement parts, we recommend that you still need further assistance, you can write to local dealers, repair parts distributors, and service companies. Accessories Canning Unit Kit (coil element models) Order Part Number 242905 All-Purpose Appliance Cleaner Order Part Number 31682 Stainless Steel...
... need replacement parts If you need to Whirlpool Corporation with : ■ Features and specifications on our full line of your correspondence. 7 It may save you can write to order replacement parts, we recommend that you still need further assistance, you can write to local dealers, repair parts distributors, and service companies. Accessories Canning Unit Kit (coil element models) Order Part Number 242905 All-Purpose Appliance Cleaner Order Part Number 31682 Stainless Steel...
Use & Care Guide
Page 8
... installation instructions. 11. ITEMS EXCLUDED FROM WARRANTY This limited warranty does not cover: 1. Consumable parts are excluded from unauthorized modifications made to determine if another warranty applies. This warranty is covered by a Whirlpool designated service company. Outside the 50 United States and Canada, this information on the model and serial number label located on how to use or when it is installed in an inaccessible location or is required to Whirlpool...
... installation instructions. 11. ITEMS EXCLUDED FROM WARRANTY This limited warranty does not cover: 1. Consumable parts are excluded from unauthorized modifications made to determine if another warranty applies. This warranty is covered by a Whirlpool designated service company. Outside the 50 United States and Canada, this information on the model and serial number label located on how to use or when it is installed in an inaccessible location or is required to Whirlpool...

Warranty Information
Page 1
... installation instructions. 4. Repairs when your major appliance is located in a remote area where service by Whirlpool. 5. Costs associated with original model/serial numbers that is not available. 10. Expenses for travel and transportation for future reference. Major appliances with the removal from warranty coverage. 3. The cost of consumables or cleaning products not approved by an authorized Whirlpool servicer is contrary to repair or replace appliance light bulbs, air filters...
... installation instructions. 4. Repairs when your major appliance is located in a remote area where service by Whirlpool. 5. Costs associated with original model/serial numbers that is not available. 10. Expenses for travel and transportation for future reference. Major appliances with the removal from warranty coverage. 3. The cost of consumables or cleaning products not approved by an authorized Whirlpool servicer is contrary to repair or replace appliance light bulbs, air filters...

