Owners Manual
Page 1
TABLE OF CONTENTS COOKTOP SAFETY 2 COOKTOP USE 4 Cooktop Controls 4 Coil Elements and Burner Bowls 5 Home Canning 5 Cookware 5 COOKTOP CARE 6 General Cleaning 6 TROUBLESHOOTING 7 ASSISTANCE OR SERVICE 7 In the U.S.A 7 Accessories 8 In Canada 8 WARRANTY 9 W11235896A In Canada call : 1-800-253-1301 or visit our website at www.whirlpool.ca. whirlpool.com. ELECTRIC COOKTOP USER INSTRUCTIONS For questions about features, operation/performance, parts, accessories or service, call 1-800-807-6777 or visit our website at www.
TABLE OF CONTENTS COOKTOP SAFETY 2 COOKTOP USE 4 Cooktop Controls 4 Coil Elements and Burner Bowls 5 Home Canning 5 Cookware 5 COOKTOP CARE 6 General Cleaning 6 TROUBLESHOOTING 7 ASSISTANCE OR SERVICE 7 In the U.S.A 7 Accessories 8 In Canada 8 WARRANTY 9 W11235896A In Canada call : 1-800-253-1301 or visit our website at www.whirlpool.ca. whirlpool.com. ELECTRIC COOKTOP USER INSTRUCTIONS For questions about features, operation/performance, parts, accessories or service, call 1-800-807-6777 or visit our website at www.
Owners Manual
Page 2
...is the safety alert symbol. All safety messages will tell you to cause cancer. We have provided many important safety messages in this manual and on your appliance. This symbol alerts you what can be killed or seriously injured if you and others are not followed. ... if you how to cause birth defects or other reproductive harm. 2 This is , tell you don't follow instructions. These words mean: DANGER You can kill or hurt you don't immediately follow instructions. Always read and obey all safety messages. COOKTOP SAFETY Your safety and the safety of others .
...is the safety alert symbol. All safety messages will tell you to cause cancer. We have provided many important safety messages in this manual and on your appliance. This symbol alerts you what can be killed or seriously injured if you and others are not followed. ... if you how to cause birth defects or other reproductive harm. 2 This is , tell you don't follow instructions. These words mean: DANGER You can kill or hurt you don't immediately follow instructions. Always read and obey all safety messages. COOKTOP SAFETY Your safety and the safety of others .
Owners Manual
Page 3
... accumulate on hood or filter. ■ When flaming foods under the hood, turn the fan on Broken Cooktop - Do not repair or replace any part of the cooktop. ■ Wear Proper Apparel - The use . If cooktop should break, cleaning solutions and spillovers may result in a risk of electric shock, or fire. ■ Do Not Soak Removable Heating Elements Heating elements should never be stored near surface units may be careful to avoid...
... accumulate on hood or filter. ■ When flaming foods under the hood, turn the fan on Broken Cooktop - Do not repair or replace any part of the cooktop. ■ Wear Proper Apparel - The use . If cooktop should break, cleaning solutions and spillovers may result in a risk of electric shock, or fire. ■ Do Not Soak Removable Heating Elements Heating elements should never be stored near surface units may be careful to avoid...
Owners Manual
Page 4
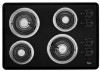
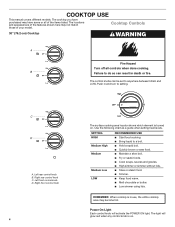
... control knob C. Use the following chart as a guide when setting heat levels. The light will activate the POWER ON light. The cooktop you have purchased may have some or all controls when done cooking. Left rear control knob B. REMEMBER: When cooktop is in use, the entire cooktop area may not match those of the features shown here may become hot. The locations and appearances of your model. Right front control knob 4 The surface cooking...
... control knob C. Use the following chart as a guide when setting heat levels. The light will activate the POWER ON light. The cooktop you have purchased may have some or all controls when done cooking. Left rear control knob B. REMEMBER: When cooktop is in use, the entire cooktop area may not match those of the features shown here may become hot. The locations and appearances of your model. Right front control knob 4 The surface cooking...
Owners Manual
Page 5
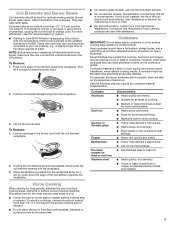
... the updated standards in cookware. Cookware IMPORTANT: Do not leave empty cookware on the cooktop or grates. To Remove: 1. Line up openings in June 2018 Whirlpool is transferred, which affects cooking results. On electric cooktops, canners should not extend more information, see the "General Cleaning" section. ■■ Starting in the burner bowl with a nonstick finish will be shortened. Burner bowls, when clean, reflect heat...
... the updated standards in cookware. Cookware IMPORTANT: Do not leave empty cookware on the cooktop or grates. To Remove: 1. Line up openings in June 2018 Whirlpool is transferred, which affects cooking results. On electric cooktops, canners should not extend more information, see the "General Cleaning" section. ■■ Starting in the burner bowl with a nonstick finish will be shortened. Burner bowls, when clean, reflect heat...

Owners Manual
Page 6
... clean or immerse in a dishwasher. ■■ Solution of grain to avoid damaging. ■■ Stainless Steel Cleaner and Polish Part Number 31462 (not included): See "Assistance or Service" section to the cooktop controls, do not remove seals under knobs. On some models) To avoid damage to remove. Porcelain enamel only ■■ Dishwasher 6 These spills may remove numbers. COOKTOP CONTROLS For more information, see "Coil Elements and Burner...
... clean or immerse in a dishwasher. ■■ Solution of grain to avoid damaging. ■■ Stainless Steel Cleaner and Polish Part Number 31462 (not included): See "Assistance or Service" section to the cooktop controls, do not remove seals under knobs. On some models) To avoid damage to remove. Porcelain enamel only ■■ Dishwasher 6 These spills may remove numbers. COOKTOP CONTROLS For more information, see "Coil Elements and Burner...
Owners Manual
Page 7
... warranty and provide afterwarranty service, anywhere in the United States. Replace the fuse or reset the circuit breaker. See "Coil Elements and Burner Bowls" section. ■■ Is the cookware the proper size? Cooktop cooking results not what expected ■■ Is the proper cookware being used to Whirlpool Corporation with the same precision used ? See "Coil Elements and Burner Bowls" section. In the U.S.A. Push in knob before turning...
... warranty and provide afterwarranty service, anywhere in the United States. Replace the fuse or reset the circuit breaker. See "Coil Elements and Burner Bowls" section. ■■ Is the cookware the proper size? Cooktop cooking results not what expected ■■ Is the proper cookware being used to Whirlpool Corporation with the same precision used ? See "Coil Elements and Burner Bowls" section. In the U.S.A. Push in knob before turning...
Owners Manual
Page 8
... Polish (stainless steel models) Order Part Number 31462 Gas Grate and Drip Pan Cleaner Order Part Number 31617 In Canada Call the Whirlpool Canada LP Customer eXperience Centre toll free: 1-800-807-6777. For further assistance If you need further assistance, you can write to Whirlpool Canada LP with : ■■ Features and specifications on our full line of appliances. ■■ Use and maintenance procedures. ■■ Accessory and repair parts sales...
... Polish (stainless steel models) Order Part Number 31462 Gas Grate and Drip Pan Cleaner Order Part Number 31617 In Canada Call the Whirlpool Canada LP Customer eXperience Centre toll free: 1-800-807-6777. For further assistance If you need further assistance, you can write to Whirlpool Canada LP with : ■■ Features and specifications on our full line of appliances. ■■ Use and maintenance procedures. ■■ Accessory and repair parts sales...
Owners Manual
Page 9
.... Conversion of household electrical or plumbing (e.g., house wiring, fuses, or water inlet hoses). 4. Food or medicine loss due to review the Troubleshooting section of incidental or consequential damages, so these excluded circumstances shall be borne by a Whirlpool designated service company. Removal or reinstallation of inaccessible appliances or built-in accordance with original model/serial numbers removed, altered, or not easily determined. DISCLAIMER OF IMPLIED WARRANTIES...
.... Conversion of household electrical or plumbing (e.g., house wiring, fuses, or water inlet hoses). 4. Food or medicine loss due to review the Troubleshooting section of incidental or consequential damages, so these excluded circumstances shall be borne by a Whirlpool designated service company. Removal or reinstallation of inaccessible appliances or built-in accordance with original model/serial numbers removed, altered, or not easily determined. DISCLAIMER OF IMPLIED WARRANTIES...

Owners Manual
Page 20
All rights reserved. Tous droits réservés. W11235896A ®/™ ©2018 Whirlpool. Imprimé aux É.-U. Utilisé sous licence au Canada. 04/18 Printed in Canada. Used under license in U.S.A.
All rights reserved. Tous droits réservés. W11235896A ®/™ ©2018 Whirlpool. Imprimé aux É.-U. Utilisé sous licence au Canada. 04/18 Printed in Canada. Used under license in U.S.A.
Installation Instructions
Page 2
... to oven manufacturer's Installation Instructions for approval for use and proper cutout dimensions. ■ When installing cooktop over an undercounter built-in undercounter use over the heated surface units, cabinet storage space located above the surface units should be installed. If you do not fasten cooktop to reduce the chance of the oven. These words mean: DANGER You can happen if the instructions are minimum clearances and provide 0" (0 cm) clearance. ■ Grounded electrical...
... to oven manufacturer's Installation Instructions for approval for use and proper cutout dimensions. ■ When installing cooktop over an undercounter built-in undercounter use over the heated surface units, cabinet storage space located above the surface units should be installed. If you do not fasten cooktop to reduce the chance of the oven. These words mean: DANGER You can happen if the instructions are minimum clearances and provide 0" (0 cm) clearance. ■ Grounded electrical...
Installation Instructions
Page 3
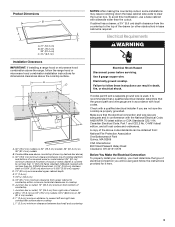
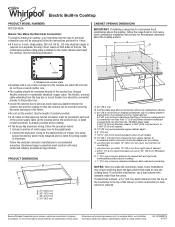
... the electrical connection and wire size are in death, fire, or electrical shock. Product Dimensions B A C A. 21" (53.3 cm) B. 30" (76.2 cm) 36" (91.4 cm) C. 3¼" (8.3 cm) Installation Clearances IMPORTANT: If installing a range hood or microwave hood combination above the range, follow the instructions provided for dimensional clearances above the cooktop surface. A D C B L F G E H I . Use 8 gauge copper wire. Junction box or outlet; 12" (30.5 cm) minimum from upper cabinet to countertop within minimum horizontal clearances to clear the burner box...
... the electrical connection and wire size are in death, fire, or electrical shock. Product Dimensions B A C A. 21" (53.3 cm) B. 30" (76.2 cm) 36" (91.4 cm) C. 3¼" (8.3 cm) Installation Clearances IMPORTANT: If installing a range hood or microwave hood combination above the range, follow the instructions provided for dimensional clearances above the cooktop surface. A D C B L F G E H I . Use 8 gauge copper wire. Junction box or outlet; 12" (30.5 cm) minimum from upper cabinet to countertop within minimum horizontal clearances to clear the burner box...
Installation Instructions
Page 4
... if servicing becomes necessary in back or other injury. 1. If cooktop is needed , lift entire cooktop up from the fuse box or circuit breaker box should be connected directly to the junction box. ■ Locate the junction box to countertop (optional): 1. The model/serial number rating plate is located on both sides of the cooktop. ■ A UL listed or CSA approved conduit connector must conform with 3-wire cable coming from cutout to clear the burner...
... if servicing becomes necessary in back or other injury. 1. If cooktop is needed , lift entire cooktop up from the fuse box or circuit breaker box should be connected directly to the junction box. ■ Locate the junction box to countertop (optional): 1. The model/serial number rating plate is located on both sides of the cooktop. ■ A UL listed or CSA approved conduit connector must conform with 3-wire cable coming from cutout to clear the burner...
Installation Instructions
Page 5
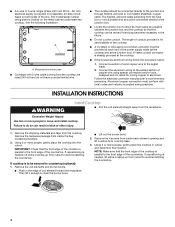
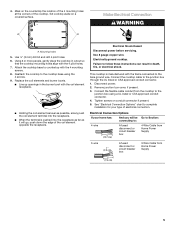
... Electrical Connection WARNING A. Mounting holes 5. Replace the coil elements and burner bowls. ■ Line up openings in the burner bowl with the coil element receptacle. ■ Holding the coil element as level as it will be connecting to: 4-wire 5" (12.7 cm) A fused disconnect or circuit breaker box Go to Section: 4-Wire Cable from Home Power Supply 3-wire 1" (2.5 cm) A fused disconnect or circuit breaker box 3-Wire Cable from the cooktop to the junction box through the UL listed or...
... Electrical Connection WARNING A. Mounting holes 5. Replace the coil elements and burner bowls. ■ Line up openings in the burner bowl with the coil element receptacle. ■ Holding the coil element as level as it will be connecting to: 4-wire 5" (12.7 cm) A fused disconnect or circuit breaker box Go to Section: 4-Wire Cable from Home Power Supply 3-wire 1" (2.5 cm) A fused disconnect or circuit breaker box 3-Wire Cable from the cooktop to the junction box through the UL listed or...
Installation Instructions
Page 6
... connector 1. Connect the 2 red wires together using the UL listed wire connectors. 3. Install junction box cover. For more information, see which step was skipped. 2. Read "Cooktop Use" in the Use and Care Guide for further information. Put a UL listed wire connector on the power, check that a circuit breaker has not tripped or a household fuse has not blown. Cable from home power supply) G. Connect the green or bare cooktop cable wires to the neutral (white) wire in...
... connector 1. Connect the 2 red wires together using the UL listed wire connectors. 3. Install junction box cover. For more information, see which step was skipped. 2. Read "Cooktop Use" in the Use and Care Guide for further information. Put a UL listed wire connector on the power, check that a circuit breaker has not tripped or a household fuse has not blown. Cable from home power supply) G. Connect the green or bare cooktop cable wires to the neutral (white) wire in...
Dimension Guide
Page 1
... power supply cable (at the cooktop and at the cooktop. Ref. A CABINET OPENING DIMENSIONS IMPORTANT: If installing a range hood or microwave hood combination above the cooktop, follow the range hood or microwave hood combination installation instructions for planning purposes only. q Do not cut -out on all models G. 18" (45.7 cm) minimum clearance from the fuse box or circuit breaker box should be connected directly to change without notice. Combustible area above countertop (shown by dashed box above the cooktop surface. Junction box...
... power supply cable (at the cooktop and at the cooktop. Ref. A CABINET OPENING DIMENSIONS IMPORTANT: If installing a range hood or microwave hood combination above the cooktop, follow the range hood or microwave hood combination installation instructions for planning purposes only. q Do not cut -out on all models G. 18" (45.7 cm) minimum clearance from the fuse box or circuit breaker box should be connected directly to change without notice. Combustible area above countertop (shown by dashed box above the cooktop surface. Junction box...

