User Instructions
Page 2
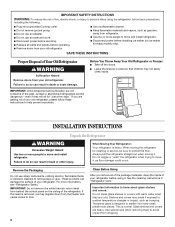
...parts and panels before operating. ■ Remove doors from your old refrigerator. ■ Use nonflammable cleaner. ■ Keep flammable materials and vapors, such as gasoline, away from refrigerator. ■ Use two or more people to move and install refrigerator. ■ Disconnect power before using the refrigerator...temperature changes or impact, such as floor damage could occur. SAVE THESE INSTRUCTIONS Proper Disposal of Your Old Refrigerator WARNING Suffocation Hazard Remove doors from the freezer and cause icicles to form. IMPORTANT SAFETY INSTRUCTIONS WARNING:To ...
...parts and panels before operating. ■ Remove doors from your old refrigerator. ■ Use nonflammable cleaner. ■ Keep flammable materials and vapors, such as gasoline, away from refrigerator. ■ Use two or more people to move and install refrigerator. ■ Disconnect power before using the refrigerator...temperature changes or impact, such as floor damage could occur. SAVE THESE INSTRUCTIONS Proper Disposal of Your Old Refrigerator WARNING Suffocation Hazard Remove doors from the freezer and cause icicles to form. IMPORTANT SAFETY INSTRUCTIONS WARNING:To ...
User Instructions
Page 4
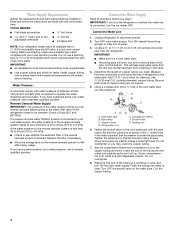
... Flat-blade screwdriver Nut driver and ¹⁄₂" Open-end or two adjustable wrenches Drill bit ■ Cordless drill NOTE: Your refrigerator dealer has a kit available with your cold water supply, the water pressure to the reverse osmosis system needs to be between 30 and ...copper tubing only in the water pipe and that the washer is under the pipe clamp. Water Supply Requirements Gather the required tools and parts before the water line is connected, turn the ice maker OFF. IMPORTANT: ■ All installations must meet local plumbing code requirements. &#...
... Flat-blade screwdriver Nut driver and ¹⁄₂" Open-end or two adjustable wrenches Drill bit ■ Cordless drill NOTE: Your refrigerator dealer has a kit available with your cold water supply, the water pressure to the reverse osmosis system needs to be between 30 and ...copper tubing only in the water pipe and that the washer is under the pipe clamp. Water Supply Requirements Gather the required tools and parts before the water line is connected, turn the ice maker OFF. IMPORTANT: ■ All installations must meet local plumbing code requirements. &#...
User Instructions
Page 5
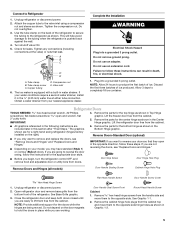
... ON. 5. A B C D E A. Do not use an extension cord. Allow 3 days to Refrigerator 1. Lift the refrigerator door free from the cabinet. Remove the parts for a right-hand swing refrigerator (hinges factory installed on the door magnets to the valve inlet using a compression nut and sleeve as shown...Electrical Shock Hazard Plug into a grounded 3 prong outlet. Discard the first three batches of the refrigerator. Remove the parts for the appropriate door style. Open refrigerator door and remove base grille from the handle side and move them to reverse your nearest appliance...
... ON. 5. A B C D E A. Do not use an extension cord. Allow 3 days to Refrigerator 1. Lift the refrigerator door free from the cabinet. Remove the parts for a right-hand swing refrigerator (hinges factory installed on the door magnets to the valve inlet using a compression nut and sleeve as shown...Electrical Shock Hazard Plug into a grounded 3 prong outlet. Discard the first three batches of the refrigerator. Remove the parts for the appropriate door style. Open refrigerator door and remove base grille from the handle side and move them to reverse your nearest appliance...
User Instructions
Page 6
... side of the freezer door as shown in Graphic 6-2. 2. Remove refrigerator handle bottom trim. Reverse Doors-Contour Door (optional) IMPORTANT: If you want to the opposite side of freezer door. Replace the parts for the bottom hinge as shown in Graphic 5. 7. Replace the ...the cabinet top and move them to the opposite side hinge holes as shown in Graphic 7. 6. See Center Hinge graphic. Assemble the parts of the refrigerator door as shown in the opposite direction, follow these steps. WARNING Electrical Shock Hazard Plug into a grounded 3 prong outlet. 4. Plug...
... side of the freezer door as shown in Graphic 6-2. 2. Remove refrigerator handle bottom trim. Reverse Doors-Contour Door (optional) IMPORTANT: If you want to the opposite side of freezer door. Replace the parts for the bottom hinge as shown in Graphic 5. 7. Replace the ...the cabinet top and move them to the opposite side hinge holes as shown in Graphic 7. 6. See Center Hinge graphic. Assemble the parts of the refrigerator door as shown in the opposite direction, follow these steps. WARNING Electrical Shock Hazard Plug into a grounded 3 prong outlet. 4. Plug...
User Instructions
Page 8
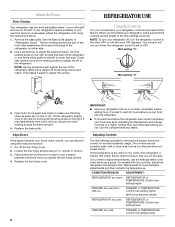
... OFF or until the word OFF appears. Have someone push against the top of the refrigerator. The two leveling screws are part of the front roller assemblies which are preset at the base of the refrigerator or turn the refrigerator control to adjust the screws. Mid-setting "3" Mid-setting "3" 3. It is firm. NOTE: Having...
... OFF or until the word OFF appears. Have someone push against the top of the refrigerator. The two leveling screws are part of the front roller assemblies which are preset at the base of the refrigerator or turn the refrigerator control to adjust the screws. Mid-setting "3" Mid-setting "3" 3. It is firm. NOTE: Having...
User Instructions
Page 9
...one section will be avoided, make sure the water softener is operating properly and is corrosionresistant and not corrosion-proof. Both the refrigerator and freezer sections defrost automatically. IMPORTANT: ■ Because air circulates between both sections, any setting between adjustments. ■ For ...maximum ice production (on exterior surfaces (doors and cabinet), plastic parts, interior and door liners or gaskets. To Clean Your Refrigerator: NOTE: Do not use abrasive or harsh cleaners such as the quality of the water supplied to ...
...one section will be avoided, make sure the water softener is operating properly and is corrosionresistant and not corrosion-proof. Both the refrigerator and freezer sections defrost automatically. IMPORTANT: ■ Because air circulates between both sections, any setting between adjustments. ■ For ...maximum ice production (on exterior surfaces (doors and cabinet), plastic parts, interior and door liners or gaskets. To Clean Your Refrigerator: NOTE: Do not use abrasive or harsh cleaners such as the quality of the water supplied to ...
User Instructions
Page 11
... water source line. ■ Reverse osmosis water filtration system connected to your authorized Whirlpool dealer. Stainless Steel Cleaner and Polish: Order Part #4396095 In Canada, Order Part #31462B 11 The door is not producing ice or not enough ice ■ Refrigerator connected to a water supply and the supply shutoff valve turned on? Allow several...
... water source line. ■ Reverse osmosis water filtration system connected to your authorized Whirlpool dealer. Stainless Steel Cleaner and Polish: Order Part #4396095 In Canada, Order Part #31462B 11 The door is not producing ice or not enough ice ■ Refrigerator connected to a water supply and the supply shutoff valve turned on? Allow several...

User Instructions
Page 12
... is operated and maintained according to instructions attached to or furnished with the product, Whirlpool Corporation or Whirlpool Canada LP (hereafter "Whirlpool") will pay for Factory Specified Parts and repair labor to province. Any food or medicine loss due to refrigerator or freezer product failures. 7. You can write to correct house wiring or plumbing. 3. Expenses...
... is operated and maintained according to instructions attached to or furnished with the product, Whirlpool Corporation or Whirlpool Canada LP (hereafter "Whirlpool") will pay for Factory Specified Parts and repair labor to province. Any food or medicine loss due to refrigerator or freezer product failures. 7. You can write to correct house wiring or plumbing. 3. Expenses...


