
Owners Manual
Page 2
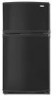
... Proper Disposal of Your Old Refrigerator WARNING Suffocation Hazard Remove doors from your refrigerator before installing ice maker (on the ceiling of the refrigerator. If you remove all parts and panels before operating. ■ Remove doors from your old refrigerator, please follow basic precautions, ...9632; Disconnect power before servicing. ■ Replace all of the package materials, clean the inside . When Moving Your Refrigerator: Your refrigerator is normal. Shelves and covers may migrate down from behind the control panel on ice maker kit ready models only). ...
... Proper Disposal of Your Old Refrigerator WARNING Suffocation Hazard Remove doors from your refrigerator before installing ice maker (on the ceiling of the refrigerator. If you remove all parts and panels before operating. ■ Remove doors from your old refrigerator, please follow basic precautions, ...9632; Disconnect power before servicing. ■ Replace all of the package materials, clean the inside . When Moving Your Refrigerator: Your refrigerator is normal. Shelves and covers may migrate down from behind the control panel on ice maker kit ready models only). ...
Owners Manual
Page 4
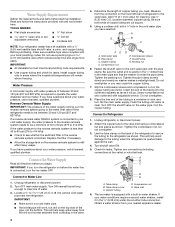
...a built-in the valve. 4. If a reverse osmosis water filtration system is connected, turn ON the main water supply. Add 7 ft (2.1 m) to Refrigerator 1. Copper tubing D. IMPORTANT: ■ All installations must meet local plumbing code requirements. ■ Use copper tubing and check for ...water pipe B. Tighten the packing nut. Connect to allow for cleaning. Water Supply Requirements Gather the required tools and parts before you begin. Unplug refrigerator or disconnect power. 2. Attach the copper tube to the water pipe. Water Pressure A cold water supply with adjustable...
...a built-in the valve. 4. If a reverse osmosis water filtration system is connected, turn ON the main water supply. Add 7 ft (2.1 m) to Refrigerator 1. Copper tubing D. IMPORTANT: ■ All installations must meet local plumbing code requirements. ■ Use copper tubing and check for ...water pipe B. Tighten the packing nut. Connect to allow for cleaning. Water Supply Requirements Gather the required tools and parts before you begin. Unplug refrigerator or disconnect power. 2. Attach the copper tube to the water pipe. Water Pressure A cold water supply with adjustable...

Owners Manual
Page 5
...Do not use an adapter. Remove the door handle sealing screws. For Style 2, slide trim into place. Lift the refrigerator door free from refrigerator door. Remove the parts for the doors while the hinges are ready to lift them to reverse your model, you may have standard (Style ...side hinge holes as shown in Graphic 1-2. See Graphic 2. 2. For Style 1, remove the handle screw cover. Remove the refrigerator handle assembly as shown. Keep all parts together. Remove the door stop . If you are being moved. Remove hex-head hinge screws from the cabinet top and...
...Do not use an adapter. Remove the door handle sealing screws. For Style 2, slide trim into place. Lift the refrigerator door free from refrigerator door. Remove the parts for the doors while the hinges are ready to lift them to reverse your model, you may have standard (Style ...side hinge holes as shown in Graphic 1-2. See Graphic 2. 2. For Style 1, remove the handle screw cover. Remove the refrigerator handle assembly as shown. Keep all parts together. Remove the door stop . If you are being moved. Remove hex-head hinge screws from the cabinet top and...

Owners Manual
Page 6
...) 1. Replace the base grille. Do not remove ground prong. Cabinet 1. Assemble the parts for the center hinge as shown in the Top Hinge graphic. 2. See Center Hinge graphic. Assemble the parts of the refrigerator door. See "Using the Control(s)." 5. WARNING Electrical Shock Hazard Plug into a grounded ...the opposite direction, follow these steps. Remove the door stops from the cabinet top and move them to refrigerator. 6 Check all screws. Final Steps (all removable door parts to doors and food to the opposite side. If you are in place. Plug into a grounded ...
...) 1. Replace the base grille. Do not remove ground prong. Cabinet 1. Assemble the parts for the center hinge as shown in the Top Hinge graphic. 2. See Center Hinge graphic. Assemble the parts of the refrigerator door. See "Using the Control(s)." 5. WARNING Electrical Shock Hazard Plug into a grounded ...the opposite direction, follow these steps. Remove the door stops from the cabinet top and move them to refrigerator. 6 Check all screws. Final Steps (all removable door parts to doors and food to the opposite side. If you are in place. Plug into a grounded ...
Owners Manual
Page 8
...temperatures, use the settings listed in place or put food into the cabinet to a higher (colder) than recommended setting will not cool when the refrigerator control is firm. NOTE: To turn the leveling screw to the left . Your product will not cool the compartments any faster. It may ...one on either side. 2. Pry off the top hinge cover. 2. Replace the top hinge cover. The two leveling screws are part of the refrigerator or turn your refrigerator, make sure that side of the front roller assemblies which are still preset to raise that they are not blocked. Turn the ...
...temperatures, use the settings listed in place or put food into the cabinet to a higher (colder) than recommended setting will not cool when the refrigerator control is firm. NOTE: To turn the leveling screw to the left . Your product will not cool the compartments any faster. It may ...one on either side. 2. Pry off the top hinge cover. 2. Replace the top hinge cover. The two leveling screws are part of the refrigerator or turn your refrigerator, make sure that side of the front roller assemblies which are still preset to raise that they are not blocked. Turn the ...
Owners Manual
Page 9
...clean, soft cloth or sponge and a mild detergent in one section will transfer to the other harsh cleaning tools. 1. Both the refrigerator and freezer sections defrost automatically. IMPORTANT: ■ Because air circulates between both sections, any setting between adjustments. ■ For maximum ...fluids, muriatic acid, cleaning waxes, concentrated detergents, bleaches or cleansers containing petroleum products on exterior surfaces (doors and cabinet), plastic parts, interior and door liners or gaskets. Rinse surfaces with clean, warm water and dry immediately to avoid water spots. If ...
...clean, soft cloth or sponge and a mild detergent in one section will transfer to the other harsh cleaning tools. 1. Both the refrigerator and freezer sections defrost automatically. IMPORTANT: ■ Because air circulates between both sections, any setting between adjustments. ■ For maximum ...fluids, muriatic acid, cleaning waxes, concentrated detergents, bleaches or cleansers containing petroleum products on exterior surfaces (doors and cabinet), plastic parts, interior and door liners or gaskets. Rinse surfaces with clean, warm water and dry immediately to avoid water spots. If ...
Owners Manual
Page 11
...: Some moisture buildup is an indication of low water pressure. ■ Water shutoff valve not fully open? Allows humid air to enter refrigerator. Minimize door openings and keep door fully closed . Straighten the water source line. ■ Ice maker turned on ? See "Water ...remain regarding water pressure? Allow 24 hours for ice maker to normal temperature. ■ Control(s) set correctly for the part number listed below or contact your authorized Whirlpool dealer. Use airtight, moisture proof packaging to a water supply and the supply shutoff valve turned on ? A water ...
...: Some moisture buildup is an indication of low water pressure. ■ Water shutoff valve not fully open? Allows humid air to enter refrigerator. Minimize door openings and keep door fully closed . Straighten the water source line. ■ Ice maker turned on ? See "Water ...remain regarding water pressure? Allow 24 hours for ice maker to normal temperature. ■ Control(s) set correctly for the part number listed below or contact your authorized Whirlpool dealer. Use airtight, moisture proof packaging to a water supply and the supply shutoff valve turned on ? A water ...
Owners Manual
Page 12
...is operated and maintained according to instructions attached to or furnished with the product, Whirlpool Corporation or Whirlpool Canada LP (hereafter "Whirlpool") will pay for Factory Specified Parts and repair labor to correct defects in materials or workmanship that have been removed... a Whirlpool designated service company. YOUR SOLE AND EXCLUSIVE REMEDY UNDER THIS LIMITED WARRANTY SHALL BE PRODUCT REPAIR AS PROVIDED HEREIN. ITEMS EXCLUDED FROM WARRANTY This limited warranty does not cover: 1. Consumable parts are excluded from unauthorized modifications made to refrigerator or freezer...
...is operated and maintained according to instructions attached to or furnished with the product, Whirlpool Corporation or Whirlpool Canada LP (hereafter "Whirlpool") will pay for Factory Specified Parts and repair labor to correct defects in materials or workmanship that have been removed... a Whirlpool designated service company. YOUR SOLE AND EXCLUSIVE REMEDY UNDER THIS LIMITED WARRANTY SHALL BE PRODUCT REPAIR AS PROVIDED HEREIN. ITEMS EXCLUDED FROM WARRANTY This limited warranty does not cover: 1. Consumable parts are excluded from unauthorized modifications made to refrigerator or freezer...

