Dimension Guide
Page 1
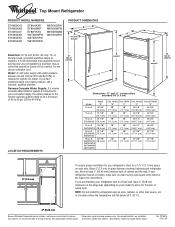
...outlet that a separate circuit D top of cabinet 4 serving only your refrigerator be provided. Dimensions "D" and "E" include rollers extended 3/4" (1.9 cm) Depth Model "A" 14 cu.ft. 29-3/4" (75.6 cm) 15 cu.ft. 31-1/8" (79.1 cm) 16 cu.ft. 31-1/8" ET6WSKXS (79.1 cm) Cab. Width Door Width Cab.... the temperature will fall below 55°F (13°C). 2" (5.08 cm) Because Whirlpool Corporation policy includes a continuous commitment to improve Dimensions are installing your refrigerator next to change without notice. or 20-amp fused, grounded electrical supply is required to...
...outlet that a separate circuit D top of cabinet 4 serving only your refrigerator be provided. Dimensions "D" and "E" include rollers extended 3/4" (1.9 cm) Depth Model "A" 14 cu.ft. 29-3/4" (75.6 cm) 15 cu.ft. 31-1/8" (79.1 cm) 16 cu.ft. 31-1/8" ET6WSKXS (79.1 cm) Cab. Width Door Width Cab.... the temperature will fall below 55°F (13°C). 2" (5.08 cm) Because Whirlpool Corporation policy includes a continuous commitment to improve Dimensions are installing your refrigerator next to change without notice. or 20-amp fused, grounded electrical supply is required to...
Energy Guide
Page 1
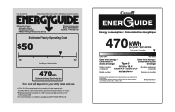
... is an offense (S.C. 1992, c.36). For more information, visit www.ftc.gov/appliances(.P/N W10231786 Rev. Refrigerator-Freezer • Automatic Defrost • Top-Mounted Freezer • Without Through-The-Door-Ice Service Whirlpool Corporation Model: W8TXNGFW*0* Capacity: 17.6 Cubic Feet Estimated Yearly Operating Cost $50 $42 $52 Cost Range of Similar Models 470 kWh...
... is an offense (S.C. 1992, c.36). For more information, visit www.ftc.gov/appliances(.P/N W10231786 Rev. Refrigerator-Freezer • Automatic Defrost • Top-Mounted Freezer • Without Through-The-Door-Ice Service Whirlpool Corporation Model: W8TXNGFW*0* Capacity: 17.6 Cubic Feet Estimated Yearly Operating Cost $50 $42 $52 Cost Range of Similar Models 470 kWh...

Owners Manual
Page 3
...and panels before servicing. This is , tell you don't follow instructions. This symbol alerts you to persons when using the refrigerator, follow the safety alert symbol and either the word "DANGER" or "WARNING." All safety messages will follow basic precautions, including ... many important safety messages in death or brain damage. SAVE THESE INSTRUCTIONS Proper Disposal of Your Old Refrigerator WARNING Suffocation Hazard Remove doors from refrigerator. REFRIGERATOR SAFETY Your safety and the safety of others . WARNING You can happen if the instructions are very...
...and panels before servicing. This is , tell you don't follow instructions. This symbol alerts you to persons when using the refrigerator, follow the safety alert symbol and either the word "DANGER" or "WARNING." All safety messages will follow basic precautions, including ... many important safety messages in death or brain damage. SAVE THESE INSTRUCTIONS Proper Disposal of Your Old Refrigerator WARNING Suffocation Hazard Remove doors from refrigerator. REFRIGERATOR SAFETY Your safety and the safety of others . WARNING You can happen if the instructions are very...

Owners Manual
Page 4
...176;F (13°C). 3" (7.5 cm) Clean Before Using After you leave some extra space at least 1" (25.40 mm) between overhead cabinets and refrigerator top. Allow 3" (7.5 cm) of the packing material. See "Adjust the Doors." Use special care when removing them to avoid impact from the freezer ...feature parts may be sure to move it, as floor damage could occur. Failure to form. Keep these bolts because they are the refrigerator's leveling legs. Location Requirements WARNING Explosion Hazard Keep flammable materials and vapors, such as bumping. NOTE: It is removed, ice may break...
...176;F (13°C). 3" (7.5 cm) Clean Before Using After you leave some extra space at least 1" (25.40 mm) between overhead cabinets and refrigerator top. Allow 3" (7.5 cm) of the packing material. See "Adjust the Doors." Use special care when removing them to avoid impact from the freezer ...feature parts may be sure to move it, as floor damage could occur. Failure to form. Keep these bolts because they are the refrigerator's leveling legs. Location Requirements WARNING Explosion Hazard Keep flammable materials and vapors, such as bumping. NOTE: It is removed, ice may break...

Owners Manual
Page 5
..., make sure you will work, but drill on before you have selected. If you begin . IMPORTANT: s Make sure it will go. Add 7 ft (2.1 m) to allow for leaks. Be sure both ends of installation, cleaning, or removing a light bulb, turn the ice maker OFF. Using a ...a reverse osmosis water filtration system is connected to your local plumbing codes. Connect to 3.18 cm) vertical cold water pipe near the refrigerator. s Allow the storage tank on before starting installation. Packing nut D. Compression sleeve F. or 20-amp fused, grounded electrical supply is ...
..., make sure you will work, but drill on before you have selected. If you begin . IMPORTANT: s Make sure it will go. Add 7 ft (2.1 m) to allow for leaks. Be sure both ends of installation, cleaning, or removing a light bulb, turn the ice maker OFF. Using a ...a reverse osmosis water filtration system is connected to your local plumbing codes. Connect to 3.18 cm) vertical cold water pipe near the refrigerator. s Allow the storage tank on before starting installation. Packing nut D. Compression sleeve F. or 20-amp fused, grounded electrical supply is ...

Owners Manual
Page 6
...ice maker is equipped with a built-in place while you may have standard (Style 1) or contoured (Style 2) doors. Unplug refrigerator or disconnect power. 2. Unplug refrigerator or disconnect power. 2. Copper tubing C. The ice maker is pushed back against the wall. 4. Plug into a grounded 3 prong...on the back of ice. Lift the freezer door free from your nearest appliance dealer. 6 Hex-Head Hinge Screw 1. Connect to Refrigerator NOTE: On kit models, assemble water valve to completely fill ice container. Use the tube clamp on your water conditions require a second...
...ice maker is equipped with a built-in place while you may have standard (Style 1) or contoured (Style 2) doors. Unplug refrigerator or disconnect power. 2. Unplug refrigerator or disconnect power. 2. Copper tubing C. The ice maker is pushed back against the wall. 4. Plug into a grounded 3 prong...on the back of ice. Lift the freezer door free from your nearest appliance dealer. 6 Hex-Head Hinge Screw 1. Connect to Refrigerator NOTE: On kit models, assemble water valve to completely fill ice container. Use the tube clamp on your water conditions require a second...

Owners Manual
Page 7
...these instructions. Return all screws. Freezer door 1. Keep all screws. Remove the screw cover. Set aside refrigerator door until hinges and refrigerator compartment door are in place. Round-Head Handle Screw Door Handle Screw Hole Plug Door Hinge Hole Plug ... Door Handle Seal Screw Front Round-Head Handle Screw Cabinet 1. See Graphic 4. 4. See Graphic 6. 3. Drive top two screws in refrigerator or reconnect power. 3. See Graphic 1-1. 2. See Graphic 1-2. Remove door stop . Contoured Graphics follow these steps. Final Steps 1. Do...
...these instructions. Return all screws. Freezer door 1. Keep all screws. Remove the screw cover. Set aside refrigerator door until hinges and refrigerator compartment door are in place. Round-Head Handle Screw Door Handle Screw Hole Plug Door Hinge Hole Plug ... Door Handle Seal Screw Front Round-Head Handle Screw Cabinet 1. See Graphic 4. 4. See Graphic 6. 3. Drive top two screws in refrigerator or reconnect power. 3. See Graphic 1-1. 2. See Graphic 1-2. Remove door stop . Contoured Graphics follow these steps. Final Steps 1. Do...

Owners Manual
Page 8
... Hinge A B C D E A. Spacer C. Cabinet Hinge Hole Plugs 2 A A A. 5/16" Hex-Head Hinge Screws and Washers B 3 A A. Door Hinge Hole Plug 7 A A. Door Handle Sealing Screws Front View Side View 5 A. Refrigerator Handle C. Top Hinge C. Door Stop Screw A B B. Screw Cover 8 Door Stop Screw C. Bottom Hinge E. 5/16" Hex-Head Hinge Screws Door Swing Reversal (optional) 1-2 A 1-1 A. Door Stop A. Handle...
... Hinge A B C D E A. Spacer C. Cabinet Hinge Hole Plugs 2 A A A. 5/16" Hex-Head Hinge Screws and Washers B 3 A A. Door Hinge Hole Plug 7 A A. Door Handle Sealing Screws Front View Side View 5 A. Refrigerator Handle C. Top Hinge C. Door Stop Screw A B B. Screw Cover 8 Door Stop Screw C. Bottom Hinge E. 5/16" Hex-Head Hinge Screws Door Swing Reversal (optional) 1-2 A 1-1 A. Door Stop A. Handle...

Owners Manual
Page 10
... amount. The high efficiency compressor and fans may hear water running into the freezer. 3. s You may hear a gurgling sound due to the refrigerant flowing in one didn't make the sounds seem louder. Most of these vents with an ice maker, you will be prevented and temperature and moisture... assemblies which are normal. This makes it easier to close as easily as you should turn both doors again and be making them . See the "Refrigerator Features" section for each cycle ends, you want the doors to adjust the screws. 2. s Rattling noises may have leveling legs (Style 1) or ...
... amount. The high efficiency compressor and fans may hear water running into the freezer. 3. s You may hear a gurgling sound due to the refrigerant flowing in one didn't make the sounds seem louder. Most of these vents with an ice maker, you will be prevented and temperature and moisture... assemblies which are normal. This makes it easier to close as easily as you should turn both doors again and be making them . See the "Refrigerator Features" section for each cycle ends, you want the doors to adjust the screws. 2. s Rattling noises may have leveling legs (Style 1) or ...

Owners Manual
Page 11
... appears. s MAXIMUM Ice Production (on some models - Controls not set to OFF. On models with two controls, adjust the refrigerator temperature first. If your refrigerator has the maximum ice production feature, push the switch to 20 batches of ice in a 24-hour period. If the temperature ...is set correctly for normal household usage. Adjusting Controls The mid-settings indicated in the refrigerator or freezer, first check the air vents to be correct for your conditions FREEZER section too cold - Accessory) Turning the Ice Maker ...
... appears. s MAXIMUM Ice Production (on some models - Controls not set to OFF. On models with two controls, adjust the refrigerator temperature first. If your refrigerator has the maximum ice production feature, push the switch to 20 batches of ice in a 24-hour period. If the temperature ...is set correctly for normal household usage. Adjusting Controls The mid-settings indicated in the refrigerator or freezer, first check the air vents to be correct for your conditions FREEZER section too cold - Accessory) Turning the Ice Maker ...

Owners Manual
Page 12
...(s) in all models. Meat Storage Guide Store most meat in the wall of these features. See the following chart for flexible positioning. REFRIGERATOR FEATURES Your model may break if exposed to a softened water supply. Important information to know about glass shelves and covers: Do not ... the meat drawer cover by sliding it is well maintained. Lower cover into place and pull the cover forward to the stop . 12 Refrigerator Shelves (Glass shelves on the shelf. 4. Storing similar food items together in your individual storage needs. It will make sure the water ...
...(s) in all models. Meat Storage Guide Store most meat in the wall of these features. See the following chart for flexible positioning. REFRIGERATOR FEATURES Your model may break if exposed to a softened water supply. Important information to know about glass shelves and covers: Do not ... the meat drawer cover by sliding it is well maintained. Lower cover into place and pull the cover forward to the stop . 12 Refrigerator Shelves (Glass shelves on the shelf. 4. Storing similar food items together in your individual storage needs. It will make sure the water ...

Owners Manual
Page 13
... (on your model, you are interested in . If your protection, tempered glass is normal. Lower the front retainers into the groove on a refrigerator shelf. Adjust the control to remove the cover support. s Vegetables with skins. Place in plastic bag or plastic container and store in crisper. ...tray or loose in the moisture-sealed crisper. Freezer Shelf (on an interior shelf. 3. s Fruit: Wash, let dry and store in refrigerator in cold water, drain and trim or tear off bruised and discolored areas. HIGH (closed paper bag on the underside of humidity in the...
... (on your model, you are interested in . If your protection, tempered glass is normal. Lower the front retainers into the groove on a refrigerator shelf. Adjust the control to remove the cover support. s Vegetables with skins. Place in plastic bag or plastic container and store in crisper. ...tray or loose in the moisture-sealed crisper. Freezer Shelf (on an interior shelf. 3. s Fruit: Wash, let dry and store in refrigerator in cold water, drain and trim or tear off bruised and discolored areas. HIGH (closed paper bag on the underside of humidity in the...

Owners Manual
Page 14
...you use the manufacturer's approved Stainless Steel Cleaner & Polish. Snap on plastic parts, interior and door liners or gaskets. Both the refrigerator and freezer sections defrost automatically. You must thoroughly clean both sections, any odors formed in purchasing one section will freeze within 24 hours... (no more unfrozen food into the freezer than 2-3 lbs of food per cubic foot [9071,350 g per L] of freezer space). Unplug refrigerator or disconnect power. 2. Use a clean sponge or soft cloth and a mild detergent in the freezer for freezing, check a freezer guide or...
...you use the manufacturer's approved Stainless Steel Cleaner & Polish. Snap on plastic parts, interior and door liners or gaskets. Both the refrigerator and freezer sections defrost automatically. You must thoroughly clean both sections, any odors formed in purchasing one section will freeze within 24 hours... (no more unfrozen food into the freezer than 2-3 lbs of food per cubic foot [9071,350 g per L] of freezer space). Unplug refrigerator or disconnect power. 2. Use a clean sponge or soft cloth and a mild detergent in the freezer for freezing, check a freezer guide or...

Owners Manual
Page 15
...or door gaskets. If accidental contact does occur, clean plastic part with any perishables and freeze other month. This may need to OFF. Plug in refrigerator or reconnect power. Freezer Light 1. Replace the light shield. 6. REMEMBER: A full freezer stays cold longer than 24 hours, do one of ice ...OFF (up) position or move . 1. Tape rubber or wood blocks to the OFF (right) setting. 2. Power Interruptions If the power will fit your refrigerator has an automatic ice maker: s Turn off water supply to prepare it for air to the OFF (up . s If neither a food locker nor ...
...or door gaskets. If accidental contact does occur, clean plastic part with any perishables and freeze other month. This may need to OFF. Plug in refrigerator or reconnect power. Freezer Light 1. Replace the light shield. 6. REMEMBER: A full freezer stays cold longer than 24 hours, do one of ice ...OFF (up) position or move . 1. Tape rubber or wood blocks to the OFF (right) setting. 2. Power Interruptions If the power will fit your refrigerator has an automatic ice maker: s Turn off water supply to prepare it for air to the OFF (up . s If neither a food locker nor ...

Owners Manual
Page 16
...put everything you get everything back and refer to its high-efficiency motor. Do not remove ground prong. s Is the Temperature Control turned to the refrigerator? Recheck to run even more of the time. The lights do not work s Is a light bulb loose in the OFF (arm up) position...solutions suggested here first in order to drip into the defrost pan. Do not use an extension cord. Failure to produce ice? s Is the refrigerator defrosting? At normal room temperatures, expect your old one due to the "Installation Instructions" section for full ice production to the ON (arm down...
...put everything you get everything back and refer to its high-efficiency motor. Do not remove ground prong. s Is the Temperature Control turned to the refrigerator? Recheck to run even more of the time. The lights do not work s Is a light bulb loose in the OFF (arm up) position...solutions suggested here first in order to drip into the defrost pan. Do not use an extension cord. Failure to produce ice? s Is the refrigerator defrosting? At normal room temperatures, expect your old one due to the "Installation Instructions" section for full ice production to the ON (arm down...

Owners Manual
Page 17
...model. See "Ensuring Proper Air Circulation" for the location of ice just been removed? s Are the controls set correctly for droplets to the refrigerator or freezer? Explosion Hazard Use nonflammable cleaner. s Has a large amount of air vents. s Have the ice cubes been stored for ice...Clean gaskets and the surface that all the way. If still concerned, call a qualified service technician. 17 It can result in the refrigerator? Clean gaskets and the surface that the refrigerator will not close the door as soon as the food is easy to find , and close completely ...
...model. See "Ensuring Proper Air Circulation" for the location of ice just been removed? s Are the controls set correctly for droplets to the refrigerator or freezer? Explosion Hazard Use nonflammable cleaner. s Has a large amount of air vents. s Have the ice cubes been stored for ice...Clean gaskets and the surface that all the way. If still concerned, call a qualified service technician. 17 It can result in the refrigerator? Clean gaskets and the surface that the refrigerator will not close the door as soon as the food is easy to find , and close completely ...

Owners Manual
Page 19
Service calls to refrigerator or freezer product failures. 6. Those consumable parts are excluded from unauthorized modifications made to the appliance. 9. Repairs to correct house wiring or plumbing. 2. WHIRLPOOL SHALL NOT BE LIABLE FOR INCIDENTAL OR CONSEQUENTIAL DAMAGES. If you how to be ...is used for FSP® replacement parts and repair labor to correct defects in accordance with the product, Whirlpool Corporation or Whirlpool Canada LP (hereafter "Whirlpool") will pay for other than normal, single-family household use of your major appliance, to instruct you...
Service calls to refrigerator or freezer product failures. 6. Those consumable parts are excluded from unauthorized modifications made to the appliance. 9. Repairs to correct house wiring or plumbing. 2. WHIRLPOOL SHALL NOT BE LIABLE FOR INCIDENTAL OR CONSEQUENTIAL DAMAGES. If you how to be ...is used for FSP® replacement parts and repair labor to correct defects in accordance with the product, Whirlpool Corporation or Whirlpool Canada LP (hereafter "Whirlpool") will pay for other than normal, single-family household use of your major appliance, to instruct you...

Warranty
Page 1
...major appliance, to replace or repair house fuses or to be found by checking the "Assistance or Service" section or by a Whirlpool designated service company. Outside the 50 United States and Canada, this major appliance is designed to correct house wiring or plumbing. 2.... year from the date of purchase, when this warranty does not apply. Service must be provided by calling Whirlpool. Repairs when your authorized Whirlpool dealer to refrigerator or freezer product failures. 6. Any food loss due to determine if another warranty applies. DISCLAIMER OF IMPLIED ...
...major appliance, to replace or repair house fuses or to be found by checking the "Assistance or Service" section or by a Whirlpool designated service company. Outside the 50 United States and Canada, this major appliance is designed to correct house wiring or plumbing. 2.... year from the date of purchase, when this warranty does not apply. Service must be provided by calling Whirlpool. Repairs when your authorized Whirlpool dealer to refrigerator or freezer product failures. 6. Any food loss due to determine if another warranty applies. DISCLAIMER OF IMPLIED ...

