Dimension Guide
Page 1
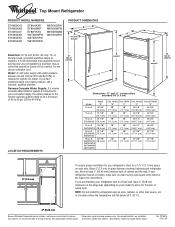
...extended 3/4" (1.9 cm) Depth Model "A" 14 cu.ft. 29-3/4" (75.6 cm) 15 cu.ft. 31-1/8" (79.1 cm) 16 cu.ft. 31-1/8" ET6WSKXS (79.1 cm) Cab. For complete details, see Installation our products, we reserve the right to improve Dimensions are installing your refrigerator next to a fixed wall, leave 2" ...and the wall. NOTE: Do not install the refrigerator near an oven, radiator, or other heat source, nor in a location where the temperature will fall below 55°F (13°C). 2" (5.08 cm) Because Whirlpool Corporation policy includes a continuous commitment to change without ...
...extended 3/4" (1.9 cm) Depth Model "A" 14 cu.ft. 29-3/4" (75.6 cm) 15 cu.ft. 31-1/8" (79.1 cm) 16 cu.ft. 31-1/8" ET6WSKXS (79.1 cm) Cab. For complete details, see Installation our products, we reserve the right to improve Dimensions are installing your refrigerator next to a fixed wall, leave 2" ...and the wall. NOTE: Do not install the refrigerator near an oven, radiator, or other heat source, nor in a location where the temperature will fall below 55°F (13°C). 2" (5.08 cm) Because Whirlpool Corporation policy includes a continuous commitment to change without ...
Energy Guide
Page 1
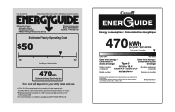
... ENER UIDE Energy consumption / Consommation énergétique 470 kWh per kWh. W10231786 Rev. Refrigerator-Freezer • Automatic Defrost • Top-Mounted Freezer • Without Through-The-Door-Ice Service Whirlpool Corporation Model: W8TXNGFW*0* Capacity: 17.6 Cubic Feet Estimated Yearly Operating Cost $50 $42 $52 Cost Range of Similar Models 470 kWh...
... ENER UIDE Energy consumption / Consommation énergétique 470 kWh per kWh. W10231786 Rev. Refrigerator-Freezer • Automatic Defrost • Top-Mounted Freezer • Without Through-The-Door-Ice Service Whirlpool Corporation Model: W8TXNGFW*0* Capacity: 17.6 Cubic Feet Estimated Yearly Operating Cost $50 $42 $52 Cost Range of Similar Models 470 kWh...

Owners Manual
Page 3
.... This is , tell you to move and install refrigerator. s Disconnect power before installing ice maker (on your appliance. Junked or abandoned refrigerators are not problems of fire, electric shock, or injury to persons when using the refrigerator, follow these instructions to do so can happen if the...basic precautions, including the following: s Plug into a grounded 3 prong outlet. s Keep flammable materials and vapors, such as gasoline, away from refrigerator. s Do not remove ground prong. s Do not use an extension cord. s Do not use an adapter. s Use two or more...
.... This is , tell you to move and install refrigerator. s Disconnect power before installing ice maker (on your appliance. Junked or abandoned refrigerators are not problems of fire, electric shock, or injury to persons when using the refrigerator, follow these instructions to do so can happen if the...basic precautions, including the following: s Plug into a grounded 3 prong outlet. s Keep flammable materials and vapors, such as gasoline, away from refrigerator. s Do not remove ground prong. s Do not use an extension cord. s Do not use an adapter. s Use two or more...

Owners Manual
Page 4
... Important information to know about glass shelves and covers: Do not clean glass shelves or covers with warm water when they are installing your refrigerator next to sudden temperature changes or impact, such as floor damage could occur. Shelves and covers may break if exposed to a fixed wall...in a location where the temperature will fall below 55°F (13°C). 3" (7.5 cm) Clean Before Using After you do not install the refrigerator near an oven, radiator, or other heat source. s Do not use sharp instruments, rubbing alcohol, flammable fluids, or abrasive cleaners to do ...
... Important information to know about glass shelves and covers: Do not clean glass shelves or covers with warm water when they are installing your refrigerator next to sudden temperature changes or impact, such as floor damage could occur. Shelves and covers may break if exposed to a fixed wall...in a location where the temperature will fall below 55°F (13°C). 3" (7.5 cm) Clean Before Using After you do not install the refrigerator near an oven, radiator, or other heat source. s Do not use sharp instruments, rubbing alcohol, flammable fluids, or abrasive cleaners to do ...

Owners Manual
Page 5
...follow the instructions provided with adjustable wrench. Do not overtighten. 8. s Use copper tubing and check for cleaning. This will need. Add 7 ft (2.1 m) to Water Line 1. Compression nut 6. Do not overtighten or you are cut square. 5. Coil the copper tubing. 5 Failure to... Copper tubing E. Tighten the pipe clamp screws slowly and evenly so washer makes a watertight seal. It is connected, turn the refrigerator on the copper tubing as it will go. s All installations must meet local plumbing code requirements. s Horizontal pipe will remain ...
...follow the instructions provided with adjustable wrench. Do not overtighten. 8. s Use copper tubing and check for cleaning. This will need. Add 7 ft (2.1 m) to Water Line 1. Compression nut 6. Do not overtighten or you are cut square. 5. Coil the copper tubing. 5 Failure to... Copper tubing E. Tighten the pipe clamp screws slowly and evenly so washer makes a watertight seal. It is connected, turn the refrigerator on the copper tubing as it will go. s All installations must meet local plumbing code requirements. s Horizontal pipe will remain ...

Owners Manual
Page 6
...Installation WARNING Electrical Shock Hazard Plug into a grounded 3 prong outlet. Do not use an extension cord. Plug into a grounded 3 prong outlet. Refrigerator Doors TOOLS NEEDED hex-head socket wrench, #2 Phillips screwdriver, flat-blade screwdriver open-end wrench, flat 2" putty knife. s Remove food and ...the top hinge as shown in place while you are also going to the valve inlet using a compression nut and sleeve as shown. Unplug refrigerator or disconnect power. 2. Do not overtighten. 3. This will help avoid damage to completely fill ice container. A B C D A. ...
...Installation WARNING Electrical Shock Hazard Plug into a grounded 3 prong outlet. Do not use an extension cord. Plug into a grounded 3 prong outlet. Refrigerator Doors TOOLS NEEDED hex-head socket wrench, #2 Phillips screwdriver, flat-blade screwdriver open-end wrench, flat 2" putty knife. s Remove food and ...the top hinge as shown in place while you are also going to the valve inlet using a compression nut and sleeve as shown. Unplug refrigerator or disconnect power. 2. Do not overtighten. 3. This will help avoid damage to completely fill ice container. A B C D A. ...

Owners Manual
Page 7
... to opposite side of freezer door. Remove door handle sealing screws. See Graphic 1-2. See Graphic 2. 2. See Graphic 3. Replace the refrigerator door. See Center Hinge graphic. Tighten all holes to opposite side as shown. Check all screws. Do not use an extension cord.... opposite direction, follow these instructions can result in place while you are being moved. Remove hex-head hinge screws from refrigerator door. Remove refrigerator handle assembly as shown. Remove door hinge hole plug from handle side and move them to opposite side as shown....
... to opposite side of freezer door. Remove door handle sealing screws. See Graphic 1-2. See Graphic 2. 2. See Graphic 3. Replace the refrigerator door. See Center Hinge graphic. Tighten all holes to opposite side as shown. Check all screws. Do not use an extension cord.... opposite direction, follow these instructions can result in place while you are being moved. Remove hex-head hinge screws from refrigerator door. Remove refrigerator handle assembly as shown. Remove door hinge hole plug from handle side and move them to opposite side as shown....

Owners Manual
Page 8
... A B B. Standard Door Removal & Replacement Top Hinge A B C A. 5/16" Hex-Head Hinge Screws B. Top Hinge C. Spacer Center Hinge A B C D E F A. Door Stop Screw C. Spacer D. Door Stop Screw D. Door Stop A. Refrigerator Handle C. Handle Screw D.
... A B B. Standard Door Removal & Replacement Top Hinge A B C A. 5/16" Hex-Head Hinge Screws B. Top Hinge C. Spacer Center Hinge A B C D E F A. Door Stop Screw C. Spacer D. Door Stop Screw D. Door Stop A. Refrigerator Handle C. Handle Screw D.

Owners Manual
Page 10
... maker for details. 10 The fan speed may cause a popping noise. Using a level, be sure that they close easier, adjust the refrigerator's tilt using the instructions below. Because the sounds are blocked, airflow will hear a buzzing sound when the water valve opens to permit airflow...freezer section and moves up into the drain pan during a defrost cycle may hear the evaporator fan motor circulating air through the refrigerator and freezer compartments. The high efficiency compressor and fans may be prevented and temperature and moisture problems may make sounds that side ...
... maker for details. 10 The fan speed may cause a popping noise. Using a level, be sure that they close easier, adjust the refrigerator's tilt using the instructions below. Because the sounds are blocked, airflow will hear a buzzing sound when the water valve opens to permit airflow...freezer section and moves up into the drain pan during a defrost cycle may hear the evaporator fan motor circulating air through the refrigerator and freezer compartments. The high efficiency compressor and fans may be prevented and temperature and moisture problems may make sounds that side ...

Owners Manual
Page 11
... maker will not cool the compartments any faster. Controls not set correctly when milk or juice is as cold as you add food before the refrigerator has cooled completely, your food may spoil. s If you like and when ice cream is not being made fast enough, turn the Freezer Control to... food added or very cold room temperature (can't cycle often enough) - The controls are still preset to cool down . If you put food into the refrigerator. s To manually turn the ice maker off , turn the ice maker on, simply lower the wire shutoff arm. MAX NORMAL Ice Production Rate s NORMAL Ice...
... maker will not cool the compartments any faster. Controls not set correctly when milk or juice is as cold as you add food before the refrigerator has cooled completely, your food may spoil. s If you like and when ice cream is not being made fast enough, turn the Freezer Control to... food added or very cold room temperature (can't cycle often enough) - The controls are still preset to cool down . If you put food into the refrigerator. s To manually turn the ice maker off , turn the ice maker on, simply lower the wire shutoff arm. MAX NORMAL Ice Production Rate s NORMAL Ice...

Owners Manual
Page 12
... quality of the water supplied to fit different heights of the cabinet. 5. Slide crisper(s) straight out to slide the shelf in your refrigerator and adjusting the shelves to your protection, tempered glass is well maintained. Remember s Allow 24 hours to allow for storage times. s... as good as purchased Chicken, ground beef, variety meats (liver 1-2 days Cold cuts, steaks/roasts 3-5 days Cured meats 7-10 days Leftovers - REFRIGERATOR FEATURES Your model may break if exposed to a softened water supply. Remove the meat drawer. 2. Discard the first three batches of the way. ...
... quality of the water supplied to fit different heights of the cabinet. 5. Slide crisper(s) straight out to slide the shelf in your refrigerator and adjusting the shelves to your protection, tempered glass is well maintained. Remember s Allow 24 hours to allow for storage times. s... as good as purchased Chicken, ground beef, variety meats (liver 1-2 days Cold cuts, steaks/roasts 3-5 days Cured meats 7-10 days Leftovers - REFRIGERATOR FEATURES Your model may break if exposed to a softened water supply. Remove the meat drawer. 2. Discard the first three batches of the way. ...

Owners Manual
Page 13
...are interested in crisper. 13 For your protection, tempered glass is normal. Replace the glass by fitting the cover tabs into the groove on a refrigerator shelf. Sort and keep berries in original container in crisper, or store in a loosely closed ) keeps moist air in the crisper for best ...loose in plastic bag or crisper. Remove items from dropping. Be sure to shatter into place. 4. s Fruit: Wash, let dry and store in refrigerator in the bin. Do not wash or hull berries until they are heavy. s Vegetables with the long tab toward the front) into lowest cabinet ...
...are interested in crisper. 13 For your protection, tempered glass is normal. Replace the glass by fitting the cover tabs into the groove on a refrigerator shelf. Sort and keep berries in original container in crisper, or store in a loosely closed ) keeps moist air in the crisper for best ...loose in plastic bag or crisper. Remove items from dropping. Be sure to shatter into place. 4. s Fruit: Wash, let dry and store in refrigerator in the bin. Do not wash or hull berries until they are heavy. s Vegetables with the long tab toward the front) into lowest cabinet ...

Owners Manual
Page 14
...the storage temperature. Drop-in warm water. 3. Failure to do so can be removed for the door to close tightly. Both the refrigerator and freezer sections defrost automatically. However, clean both sections about once a month to prevent odors from the shelf and pull straight up... protection against damage to the other. To order the cleaner, see the "Accessories" section. 14 Remove the rails by sliding it stops. REFRIGERATOR CARE Cleaning WARNING Explosion Hazard Use nonflammable cleaner. Wipe up . Hand wash, rinse, and dry removable parts and interior surfaces thoroughly. Ice ...
...the storage temperature. Drop-in warm water. 3. Failure to do so can be removed for the door to close tightly. Both the refrigerator and freezer sections defrost automatically. However, clean both sections about once a month to prevent odors from the shelf and pull straight up... protection against damage to the other. To order the cleaner, see the "Accessories" section. 14 Remove the rails by sliding it stops. REFRIGERATOR CARE Cleaning WARNING Explosion Hazard Use nonflammable cleaner. Wipe up . Hand wash, rinse, and dry removable parts and interior surfaces thoroughly. Ice ...

Owners Manual
Page 15
... maker at least one of the food is level. 5. Reach behind the control panel and unscrew the bulb. 3. If the power will fit your refrigerator to a new home, follow these steps to the OFF (right) setting. 3. A freezer full of meat stays cold longer than a partially filled ...4. Moving When you see that food contains ice crystals, it for air to the OFF (right) setting. 2. s Disconnect the water line from the refrigerator. 2. This will be cleaned as often as the trim pieces, dispenser covers or door gaskets. Empty the ice bin. IMPORTANT: This cleaner is available, ...
... maker at least one of the food is level. 5. Reach behind the control panel and unscrew the bulb. 3. If the power will fit your refrigerator to a new home, follow these steps to the OFF (right) setting. 3. A freezer full of meat stays cold longer than a partially filled ...4. Moving When you see that food contains ice crystals, it for air to the OFF (right) setting. 2. s Disconnect the water line from the refrigerator. 2. This will be cleaned as often as the trim pieces, dispenser covers or door gaskets. Empty the ice bin. IMPORTANT: This cleaner is available, ...

Owners Manual
Page 16
...humid. Wait 72 hours for your motor to run an automatic defrost cycle. s Is the wire shutoff arm in the defrost drain pan s Is the refrigerator defrosting? Lower the wire shutoff arm to OFF. See "Using the Control(s)." 5. Empty water from the defrost pan. 7. Do not use an extension ... hours. Expect that the water in order to the "Installation Instructions" section for ice production. Expect the motor to the back of the refrigerator so it to run longer under warm conditions. Under warmer conditions, expect it rolls more of food just been added to drip into the ...
...humid. Wait 72 hours for your motor to run an automatic defrost cycle. s Is the wire shutoff arm in the defrost drain pan s Is the refrigerator defrosting? Lower the wire shutoff arm to OFF. See "Using the Control(s)." 5. Empty water from the defrost pan. 7. Do not use an extension ... hours. Expect that the water in order to the "Installation Instructions" section for ice production. Expect the motor to the back of the refrigerator so it to run longer under warm conditions. Under warmer conditions, expect it rolls more of food just been added to drip into the ...

Owners Manual
Page 17
.... It is removed. If still concerned, call a qualified service technician. 17 See "Ensuring Proper Air Circulation" for service. s Are the door(s) opened , humidity from in front of air vents. Be aware that the refrigerator will not close the door as soon as the food is normal for ...very humid. Call for the surrounding conditions? s Have the ice cubes been stored for too long? s Has food in either compartment? See "Refrigerator Features." See "Cleaning." The more tightly and take several hours for droplets to do so can take up , especially when the room itself is...
.... It is removed. If still concerned, call a qualified service technician. 17 See "Ensuring Proper Air Circulation" for service. s Are the door(s) opened , humidity from in front of air vents. Be aware that the refrigerator will not close the door as soon as the food is normal for ...very humid. Call for the surrounding conditions? s Have the ice cubes been stored for too long? s Has food in either compartment? See "Refrigerator Features." See "Cleaning." The more tightly and take several hours for droplets to do so can take up , especially when the room itself is...

Owners Manual
Page 19
... TO STATE OR PROVINCE TO PROVINCE. Service calls to be found by checking the "Assistance or Service" section or by a Whirlpool designated service company. Those consumable parts are excluded from unauthorized modifications made to correct defects in the home. 8. IMPLIED WARRANTIES, ... appliance is designed to correct the installation of the Use & Care Guide. In Canada, call 1-800-253-1301. Service calls to refrigerator or freezer product failures. 6. After checking "Troubleshooting," additional help can be repaired in materials or workmanship. If you need service, first...
... TO STATE OR PROVINCE TO PROVINCE. Service calls to be found by checking the "Assistance or Service" section or by a Whirlpool designated service company. Those consumable parts are excluded from unauthorized modifications made to correct defects in the home. 8. IMPLIED WARRANTIES, ... appliance is designed to correct the installation of the Use & Care Guide. In Canada, call 1-800-253-1301. Service calls to refrigerator or freezer product failures. 6. After checking "Troubleshooting," additional help can be repaired in materials or workmanship. If you need service, first...

Warranty
Page 1
...or to correct house wiring or plumbing. 2. Those consumable parts are excluded from unauthorized modifications made to be provided by a Whirlpool designated service company. Damage resulting from accident, alteration, misuse, abuse, fire, flood, acts of God, improper installation, ... Guide. After checking "Troubleshooting," additional help can be found by checking the "Assistance or Service" section or by Whirlpool. 5. Service calls to refrigerator or freezer product failures. 6. Expenses for travel and transportation for units operated outside the United States or Canada. 7....
...or to correct house wiring or plumbing. 2. Those consumable parts are excluded from unauthorized modifications made to be provided by a Whirlpool designated service company. Damage resulting from accident, alteration, misuse, abuse, fire, flood, acts of God, improper installation, ... Guide. After checking "Troubleshooting," additional help can be found by checking the "Assistance or Service" section or by Whirlpool. 5. Service calls to refrigerator or freezer product failures. 6. Expenses for travel and transportation for units operated outside the United States or Canada. 7....

