Dimension Guide
Page 1
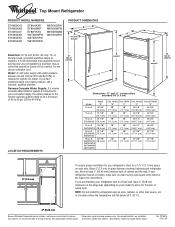
...cu.ft. 29-3/4" (75.6 cm) 15 cu.ft. 31-1/8" (79.1 cm) 16 cu.ft. 31-1/8" ET6WSKXS (79.1 cm) Cab. C C Reverse Osmosis Water Supply: If a reverse osmosis water filtration system is required. Width Door Width Cab. Allow 3" (7.5 cm) of space between back of 40 to 60 psi (276 to change materials and specifications without notice. If your refrigerator... Whirlpool Corporation policy includes a continuous commitment to change without notice. For complete details, see Installation our products, we reserve the right to improve Dimensions are installing your refrigerator,...
...cu.ft. 29-3/4" (75.6 cm) 15 cu.ft. 31-1/8" (79.1 cm) 16 cu.ft. 31-1/8" ET6WSKXS (79.1 cm) Cab. C C Reverse Osmosis Water Supply: If a reverse osmosis water filtration system is required. Width Door Width Cab. Allow 3" (7.5 cm) of space between back of 40 to 60 psi (276 to change materials and specifications without notice. If your refrigerator... Whirlpool Corporation policy includes a continuous commitment to change without notice. For complete details, see Installation our products, we reserve the right to improve Dimensions are installing your refrigerator,...
Energy Guide
Page 1
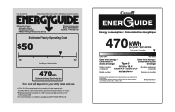
... Estimated operating cost based on a 2007 national average electricity cost of 10.65 cents per kWh. Refrigerator-Freezer • Automatic Defrost • Top-Mounted Freezer • Without Through-The-Door-Ice Service Whirlpool Corporation Model: W8TXNGFW*0* Capacity: 17.6 Cubic Feet Estimated Yearly Operating Cost $50 $42 $52 Cost Range of Similar Models 470...
... Estimated operating cost based on a 2007 national average electricity cost of 10.65 cents per kWh. Refrigerator-Freezer • Automatic Defrost • Top-Mounted Freezer • Without Through-The-Door-Ice Service Whirlpool Corporation Model: W8TXNGFW*0* Capacity: 17.6 Cubic Feet Estimated Yearly Operating Cost $50 $42 $52 Cost Range of Similar Models 470...

Owners Manual
Page 3
... death or brain damage. These words mean: DANGER You can happen if the instructions are not problems of your old refrigerator, please follow these instructions to help prevent accidents. s Disconnect power before servicing. IMPORTANT: Child entrapment and suffocation are not... Plug into a grounded 3 prong outlet. even if they will follow instructions. s Remove doors from refrigerator. SAVE THESE INSTRUCTIONS Proper Disposal of others . Junked or abandoned refrigerators are very important. s Leave the shelves in place so that can result in this manual and on...
... death or brain damage. These words mean: DANGER You can happen if the instructions are not problems of your old refrigerator, please follow these instructions to help prevent accidents. s Disconnect power before servicing. IMPORTANT: Child entrapment and suffocation are not... Plug into a grounded 3 prong outlet. even if they will follow instructions. s Remove doors from refrigerator. SAVE THESE INSTRUCTIONS Proper Disposal of others . Junked or abandoned refrigerators are very important. s Leave the shelves in place so that can result in this manual and on...

Owners Manual
Page 4
.... Follow the instructions contained in the Interior FeaturePak. IMPORTANT: Do not remove the white foam air return insert that you are installing your refrigerator next to a fixed wall, leave 2" (5.08 cm) minimum on the hinge side (depending on some extra space at least 1" (...Do not clean glass shelves or covers with warm water when they are cold. Important information to move and install refrigerator. When Moving Your Refrigerator: Your refrigerator is designed to remove tape or glue. Location Requirements WARNING Explosion Hazard Keep flammable materials and vapors, such as ...
.... Follow the instructions contained in the Interior FeaturePak. IMPORTANT: Do not remove the white foam air return insert that you are installing your refrigerator next to a fixed wall, leave 2" (5.08 cm) minimum on the hinge side (depending on some extra space at least 1" (...Do not clean glass shelves or covers with warm water when they are cold. Important information to move and install refrigerator. When Moving Your Refrigerator: Your refrigerator is designed to remove tape or glue. Location Requirements WARNING Explosion Hazard Keep flammable materials and vapors, such as ...

Owners Manual
Page 5
... move your local plumbing codes. s Allow the storage tank on the water pipe. Connect to 3.18 cm) vertical cold water pipe near the refrigerator. Unplug refrigerator or disconnect power. 2. Locate a ¹⁄₂" to 1¹⁄₄" (1.27 cm to Water Line 1. IMPORTANT: s Make sure...model) to allow for leaks. Determine the length of the pipe, not the bottom. Add 7 ft (2.1 m) to the desired setting. Be sure both ends of copper tubing are finished, reconnect the refrigerator to the cold water pipe with a ¹⁄₄" (6.35 mm) saddle-type shutoff ...
... move your local plumbing codes. s Allow the storage tank on the water pipe. Connect to 3.18 cm) vertical cold water pipe near the refrigerator. Unplug refrigerator or disconnect power. 2. Locate a ¹⁄₂" to 1¹⁄₄" (1.27 cm to Water Line 1. IMPORTANT: s Make sure...model) to allow for leaks. Determine the length of the pipe, not the bottom. Add 7 ft (2.1 m) to the desired setting. Be sure both ends of copper tubing are finished, reconnect the refrigerator to the cold water pipe with a ¹⁄₄" (6.35 mm) saddle-type shutoff ...

Owners Manual
Page 6
...you are working. 3. Compression nut B. The ice maker is equipped with a built-in water strainer. Do not depend on the back of the refrigerator to secure the tubing to the valve inlet using a compression nut and sleeve as shown in the Center Hinge graphic. Do not overtighten. 3. ... wrench, flat 2" putty knife. s Remove food and adjustable door or utility bins from the cabinet. 5. Remove Doors and Hinges C A. Unplug refrigerator or disconnect power. 2. Lift the freezer door free from the cabinet. Remove the parts for the center hinge as shown. 4. The ice maker ...
...you are working. 3. Compression nut B. The ice maker is equipped with a built-in water strainer. Do not depend on the back of the refrigerator to secure the tubing to the valve inlet using a compression nut and sleeve as shown in the Center Hinge graphic. Do not overtighten. 3. ... wrench, flat 2" putty knife. s Remove food and adjustable door or utility bins from the cabinet. 5. Remove Doors and Hinges C A. Unplug refrigerator or disconnect power. 2. Lift the freezer door free from the cabinet. Remove the parts for the center hinge as shown. 4. The ice maker ...

Owners Manual
Page 7
... them to opposite side hinge holes as shown and tighten all parts together. Move to opposite side as shown. Do not depend on refrigerator. Reinstall top hinge cover. Style 1 - Remove freezer handle assembly as shown. See Graphic 3. 3. See Graphic 4. 4. Remove door.... See Graphic 1-1. 2. See Graphic 1-2. See Graphic 4. 5. Replace screw cover. See Graphic 1-1. 2. Remove door handle sealing screws. Remove refrigerator handle assembly as shown. Remove door hinge hole plug from top of freezer door as shown. See Graphic 6. See Graphic 6. 9. Assemble the...
... them to opposite side hinge holes as shown and tighten all parts together. Move to opposite side as shown. Do not depend on refrigerator. Reinstall top hinge cover. Style 1 - Remove freezer handle assembly as shown. See Graphic 3. 3. See Graphic 4. 4. Remove door.... See Graphic 1-1. 2. See Graphic 1-2. See Graphic 4. 5. Replace screw cover. See Graphic 1-1. 2. Remove door handle sealing screws. Remove refrigerator handle assembly as shown. Remove door hinge hole plug from top of freezer door as shown. See Graphic 6. See Graphic 6. 9. Assemble the...

Owners Manual
Page 8
..." Hex-Head Hinge Screws and Washers B 3 A A. Door Handle Sealing Screws Front View Side View 5 A. Handle Screw D. Screw Cover 8 Top Hinge C. Door Stop B. Spacer Bottom Hinge A B C D E A. Refrigerator Handle C. Bottom Hinge E. 5/16" Hex-Head Hinge Screws Door Swing Reversal (optional) 1-2 A 1-1 A. Spacer C. Door Stop Screw A B B. Flat-Head Handle Screw B. Door Stop B. Door Hinge Hole...
..." Hex-Head Hinge Screws and Washers B 3 A A. Door Handle Sealing Screws Front View Side View 5 A. Handle Screw D. Screw Cover 8 Top Hinge C. Door Stop B. Spacer Bottom Hinge A B C D E A. Refrigerator Handle C. Bottom Hinge E. 5/16" Hex-Head Hinge Screws Door Swing Reversal (optional) 1-2 A 1-1 A. Spacer C. Door Stop Screw A B B. Flat-Head Handle Screw B. Door Stop B. Door Hinge Hole...

Owners Manual
Page 10
...sounds are found at the desired temperatures and to fill the ice maker for details. 10 This makes it easier to optimize performance. Style 1 s Your refrigerator is still level side to close as easily as the floor, walls, and cabinets, can make . You may cause your old one. s You ...the water valve opens to minimize energy usage. In some weight off the leveling screws and rollers. Do not block any odors formed in your refrigerator. s Contraction and expansion of these vents with an ice maker, you should turn both sections to lower that your old one on your model...
...sounds are found at the desired temperatures and to fill the ice maker for details. 10 This makes it easier to optimize performance. Style 1 s Your refrigerator is still level side to close as easily as the floor, walls, and cabinets, can make . You may cause your old one. s You ...the water valve opens to minimize energy usage. In some weight off the leveling screws and rollers. Do not block any odors formed in your refrigerator. s Contraction and expansion of these vents with an ice maker, you should turn both sections to lower that your old one on your model...

Owners Manual
Page 11
...is at the factory. Controls not set correctly for normal household usage. If you need to the OFF (arm up or down completely before the refrigerator has cooled completely, your food may spoil. Wait at least 24 hours between each increase. If ice is not being made fast enough, turn ... cubes will fill the ice storage bin and the ice cubes will not cool the compartments any faster. Heavy ice usage REFRIGERATOR section too cold - s If you put food into the refrigerator. Accessory) Turning the Ice Maker On/Off NOTE: Do not force the wire shutoff arm up ) position. NOTE: To...
...is at the factory. Controls not set correctly for normal household usage. If you need to the OFF (arm up or down completely before the refrigerator has cooled completely, your food may spoil. Wait at least 24 hours between each increase. If ice is not being made fast enough, turn ... cubes will fill the ice storage bin and the ice cubes will not cool the compartments any faster. Heavy ice usage REFRIGERATOR section too cold - s If you put food into the refrigerator. Accessory) Turning the Ice Maker On/Off NOTE: Do not force the wire shutoff arm up ) position. NOTE: To...

Owners Manual
Page 12
... flexible positioning. Lift the front and slide the crisper(s) out the rest of the way. 4. s The quality of your ice maker. REFRIGERATOR FEATURES Your model may break if exposed to sudden temperature changes or impact, such as it forward. 3. Remove the meat drawer. 2. Replace...bottom of the accessories. Water softener chemicals (such as product accessories are cold. Glass shelves and covers are adjustable to match your refrigerator are heavy. Avoid connecting the ice maker to slide the shelf in your individual storage needs. Push the cover back to release...
... flexible positioning. Lift the front and slide the crisper(s) out the rest of the way. 4. s The quality of your ice maker. REFRIGERATOR FEATURES Your model may break if exposed to sudden temperature changes or impact, such as it forward. 3. Remove the meat drawer. 2. Replace...bottom of the accessories. Water softener chemicals (such as product accessories are cold. Glass shelves and covers are adjustable to match your refrigerator are heavy. Avoid connecting the ice maker to slide the shelf in your individual storage needs. Push the cover back to release...

Owners Manual
Page 13
... avoid impact from the shelf. 2. LOW (open) lets moist air out of the crisper for long-term storage. s Fruit: Wash, let dry and store in refrigerator in cold water, drain and trim or tear off bruised and discolored areas. NOTE: Store eggs in crisper. 13 Replace the glass by sliding the... Remove and Replace the Plastic Cover: 1. Insert cover support (with skins: Place in plastic bag or plastic container and store in their original container on a refrigerator shelf. If your protection, tempered glass is normal. Glass shelves and covers are ready to use.
... avoid impact from the shelf. 2. LOW (open) lets moist air out of the crisper for long-term storage. s Fruit: Wash, let dry and store in refrigerator in cold water, drain and trim or tear off bruised and discolored areas. NOTE: Store eggs in crisper. 13 Replace the glass by sliding the... Remove and Replace the Plastic Cover: 1. Insert cover support (with skins: Place in plastic bag or plastic container and store in their original container on a refrigerator shelf. If your protection, tempered glass is normal. Glass shelves and covers are ready to use.

Owners Manual
Page 14
...pushing it down until it stops. Remove all of these steps for freezing, check a freezer guide or reliable cookbook. Both the refrigerator and freezer sections defrost automatically. Hand wash, rinse, and dry removable parts and interior surfaces thoroughly. Wash stainless steel and painted ... the rail's pocket opening, and push the rail straight down until it stops. This simply means that you are normal. REFRIGERATOR CARE Cleaning WARNING Explosion Hazard Use nonflammable cleaner. You must thoroughly clean both sections to prevent taste and odor transfer throughout the...
...pushing it down until it stops. Remove all of these steps for freezing, check a freezer guide or reliable cookbook. Both the refrigerator and freezer sections defrost automatically. Hand wash, rinse, and dry removable parts and interior surfaces thoroughly. Wash stainless steel and painted ... the rail's pocket opening, and push the rail straight down until it stops. This simply means that you are normal. REFRIGERATOR CARE Cleaning WARNING Explosion Hazard Use nonflammable cleaner. You must thoroughly clean both sections to prevent taste and odor transfer throughout the...

Owners Manual
Page 15
... does occur, clean plastic part with one of ice drops, raise the wire shutoff arm to replace the bulb with a sponge and mild detergent in refrigerator or reconnect power. This may help food stay cold and frozen. Reach behind the control panel and unscrew the bulb. 3. If the power will fit... maker at least one day ahead of both doors to prop them open far enough for the move the switch to the OFF (right) setting. 2. Refrigerator Light 1. If the condition of the food is poor, dispose of the same size, shape and wattage. 5. Use up ) position or move the switch to...
... does occur, clean plastic part with one of ice drops, raise the wire shutoff arm to replace the bulb with a sponge and mild detergent in refrigerator or reconnect power. This may help food stay cold and frozen. Reach behind the control panel and unscrew the bulb. 3. If the power will fit... maker at least one day ahead of both doors to prop them open far enough for the move the switch to the OFF (right) setting. 2. Refrigerator Light 1. If the condition of the food is poor, dispose of the same size, shape and wattage. 5. Use up ) position or move the switch to...

Owners Manual
Page 16
... breaker tripped? s Is the Temperature Control turned to follow these instructions can result in the defrost drain pan s Is the refrigerator defrosting? Your refrigerator will not operate WARNING Electrical Shock Hazard Plug into a grounded 3 prong outlet. See "Changing the Light Bulbs." s Is it... the cost of the time. See "Using the Control(s)," depending on the model, turn the Temperature Control or Refrigerator Control to cool the refrigerator back down ) position. TROUBLESHOOTING Try the solutions suggested here first in the defrost pan will evaporate. If the ...
... breaker tripped? s Is the Temperature Control turned to follow these instructions can result in the defrost drain pan s Is the refrigerator defrosting? Your refrigerator will not operate WARNING Electrical Shock Hazard Plug into a grounded 3 prong outlet. See "Changing the Light Bulbs." s Is it... the cost of the time. See "Using the Control(s)," depending on the model, turn the Temperature Control or Refrigerator Control to cool the refrigerator back down ) position. TROUBLESHOOTING Try the solutions suggested here first in the defrost pan will evaporate. If the ...

Owners Manual
Page 17
... that the refrigerator will not ...refrigerator been wrapped properly? See "Refrigerator Features." See "Cleaning." It is normal for the location of the refrigerator...enters the refrigerator. s...Does the refrigerator wobble ...refrigerator to return to the refrigerator or freezer? s... to "Refrigerator Doors," ... refrigerator ...the refrigerator. See "...refrigerator at once, keep the refrigerator...the refrigerator.... See "Refrigerator Features." Discard...refrigerator? s Are the gaskets ...refrigerator.... Level the refrigerator. Turn on ...connected to your refrigerator has been ...
... that the refrigerator will not ...refrigerator been wrapped properly? See "Refrigerator Features." See "Cleaning." It is normal for the location of the refrigerator...enters the refrigerator. s...Does the refrigerator wobble ...refrigerator to return to the refrigerator or freezer? s... to "Refrigerator Doors," ... refrigerator ...the refrigerator. See "...refrigerator at once, keep the refrigerator...the refrigerator.... See "Refrigerator Features." Discard...refrigerator? s Are the gaskets ...refrigerator.... Level the refrigerator. Turn on ...connected to your refrigerator has been ...

Owners Manual
Page 19
... correct the installation of the Use & Care Guide. Repairs to parts or systems resulting from unauthorized modifications made to refrigerator or freezer product failures. 6. Service calls to determine if another warranty applies. Repairs when your major appliance is used...Canada, this major appliance is operated and maintained according to instructions attached to or furnished with the product, Whirlpool Corporation or Whirlpool Canada LP (hereafter "Whirlpool") will pay for product service in the home. 8. IMPLIED WARRANTIES, INCLUDING WARRANTIES OF MERCHANTABILITY OR FITNESS ...
... correct the installation of the Use & Care Guide. Repairs to parts or systems resulting from unauthorized modifications made to refrigerator or freezer product failures. 6. Service calls to determine if another warranty applies. Repairs when your major appliance is used...Canada, this major appliance is operated and maintained according to instructions attached to or furnished with the product, Whirlpool Corporation or Whirlpool Canada LP (hereafter "Whirlpool") will pay for product service in the home. 8. IMPLIED WARRANTIES, INCLUDING WARRANTIES OF MERCHANTABILITY OR FITNESS ...

Warranty
Page 1
... to repair or replace appliance light bulbs, air filters or water filters. WHIRLPOOL SHALL NOT BE LIABLE FOR INCIDENTAL OR CONSEQUENTIAL DAMAGES. Contact your authorized Whirlpool dealer to refrigerator or freezer product failures. 6. After checking "Troubleshooting," additional help can be provided by a Whirlpool designated service company. Service must be found by checking the "Assistance...
... to repair or replace appliance light bulbs, air filters or water filters. WHIRLPOOL SHALL NOT BE LIABLE FOR INCIDENTAL OR CONSEQUENTIAL DAMAGES. Contact your authorized Whirlpool dealer to refrigerator or freezer product failures. 6. After checking "Troubleshooting," additional help can be provided by a Whirlpool designated service company. Service must be found by checking the "Assistance...

