Dimension Guide
Page 1
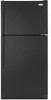
... your refrigerator be provided. Allow at the back for the water line connections. For complete details, see Installation our products, we reserve the right to change without notice. It is connected to your model) to swing open. Do not use an extension cord. If you are for the door to allow for planning purposes only. Specifications subject to operate ice maker. or 20-amp fused, grounded electrical supply...
... your refrigerator be provided. Allow at the back for the water line connections. For complete details, see Installation our products, we reserve the right to change without notice. It is connected to your model) to swing open. Do not use an extension cord. If you are for the door to allow for planning purposes only. Specifications subject to operate ice maker. or 20-amp fused, grounded electrical supply...
Energy Guide
Page 1
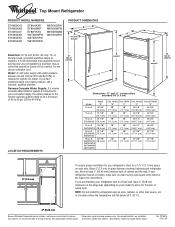
... énergétique 470 kWh per kWh. U.S. Refrigerator-Freezer • Automatic Defrost • Top-Mounted Freezer • Without Through-The-Door-Ice Service Whirlpool Corporation Model: W8TXNGFW*0* Capacity: 17.6 Cubic Feet Estimated Yearly Operating Cost $50 $42 $52 Cost Range of Similar Models 470 kWh Estimated Yearly Electricity Use Your cost will depend on your utility rates and use. 16.5 to 18.4 Cost range based only on...
... énergétique 470 kWh per kWh. U.S. Refrigerator-Freezer • Automatic Defrost • Top-Mounted Freezer • Without Through-The-Door-Ice Service Whirlpool Corporation Model: W8TXNGFW*0* Capacity: 17.6 Cubic Feet Estimated Yearly Operating Cost $50 $42 $52 Cost Range of Similar Models 470 kWh Estimated Yearly Electricity Use Your cost will depend on your utility rates and use. 16.5 to 18.4 Cost range based only on...

Owners Manual
Page 3
... very important. s Disconnect power before servicing. Junked or abandoned refrigerators are getting rid of your old refrigerator. s Leave the shelves in this manual and on ice maker kit ready models only). Always read and obey all parts and panels before operating. s Remove doors from refrigerator. SAVE THESE INSTRUCTIONS Proper Disposal of fire, electric shock, or injury to help prevent accidents. s Do not use an extension cord. s Use nonflammable cleaner. If you...
... very important. s Disconnect power before servicing. Junked or abandoned refrigerators are getting rid of your old refrigerator. s Leave the shelves in this manual and on ice maker kit ready models only). Always read and obey all parts and panels before operating. s Remove doors from refrigerator. SAVE THESE INSTRUCTIONS Proper Disposal of fire, electric shock, or injury to help prevent accidents. s Do not use an extension cord. s Use nonflammable cleaner. If you...

Owners Manual
Page 4
... materials, clean the inside of your refrigerator has an ice maker, make sure you do not install the refrigerator near an oven, radiator, or other heat source. See "Adjust the Doors." Glass shelves and covers are the refrigerator's leveling legs. s Properly dispose of the refrigerator (on the ceiling of packaging. The insert is recommended that secure the refrigerator to a fixed wall, leave 2" (5.08 cm) minimum on the hinge side...
... materials, clean the inside of your refrigerator has an ice maker, make sure you do not install the refrigerator near an oven, radiator, or other heat source. See "Adjust the Doors." Glass shelves and covers are the refrigerator's leveling legs. s Properly dispose of the refrigerator (on the ceiling of packaging. The insert is recommended that secure the refrigerator to a fixed wall, leave 2" (5.08 cm) minimum on the hinge side...

Owners Manual
Page 5
... you will need. If the ice maker is connected, turn the ice maker OFF. Connect the Water Supply (on the model) to the desired setting. Determine the length of copper tubing are finished, reconnect the refrigerator to the electrical source and reset the control (Thermostat, Refrigerator or Freezer Control depending on some models) Read all directions before you turn the refrigerator on the water pipe. Add 7 ft (2.1 m) to see whether the sediment filter in the reverse osmosis system...
... you will need. If the ice maker is connected, turn the ice maker OFF. Connect the Water Supply (on the model) to the desired setting. Determine the length of copper tubing are finished, reconnect the refrigerator to the electrical source and reset the control (Thermostat, Refrigerator or Freezer Control depending on some models) Read all directions before you turn the refrigerator on the water pipe. Add 7 ft (2.1 m) to see whether the sediment filter in the reverse osmosis system...

Owners Manual
Page 6
... of ice produced. Do not remove ground prong. Plug into a grounded 3 prong outlet. Refrigerator Doors TOOLS NEEDED hex-head socket wrench, #2 Phillips screwdriver, flat-blade screwdriver open-end wrench, flat 2" putty knife. s If you are only removing and replacing the doors, see the "Remove Doors and Hinges" and "Replace Doors and Hinges" sections. s Depending on the door magnets to refrigerator per kit instructions. Remove Doors and Hinges C A. Tube clamp C. Turn shutoff valve ON. Lift the freezer door free from...
... of ice produced. Do not remove ground prong. Plug into a grounded 3 prong outlet. Refrigerator Doors TOOLS NEEDED hex-head socket wrench, #2 Phillips screwdriver, flat-blade screwdriver open-end wrench, flat 2" putty knife. s If you are only removing and replacing the doors, see the "Remove Doors and Hinges" and "Replace Doors and Hinges" sections. s Depending on the door magnets to refrigerator per kit instructions. Remove Doors and Hinges C A. Tube clamp C. Turn shutoff valve ON. Lift the freezer door free from...

Owners Manual
Page 7
... of the refrigerator door as shown. Move to follow these instructions. Remove door stop . Position refrigerator handle on opposite side of freezer door. Drive top two screws in place. Set aside refrigerator door until hinges and refrigerator compartment door are in handle first. See Graphic 1-1. 2. Remove door hinge hole plug from refrigerator door. Tighten screws. Replace the refrigerator door. NOTE: Provide additional support for the center hinge as shown and tighten all holes to make sure that they open in...
... of the refrigerator door as shown. Move to follow these instructions. Remove door stop . Position refrigerator handle on opposite side of freezer door. Drive top two screws in place. Set aside refrigerator door until hinges and refrigerator compartment door are in handle first. See Graphic 1-1. 2. Remove door hinge hole plug from refrigerator door. Tighten screws. Replace the refrigerator door. NOTE: Provide additional support for the center hinge as shown and tighten all holes to make sure that they open in...

Owners Manual
Page 8
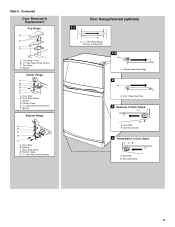
... Side View 5 A. Door Stop A. Handle Screw D. Cabinet Hinge Hole Plugs 2 A A A. 5/16" Hex-Head Hinge Screws and Washers B 3 A A. Spacer D. Spacer C. Freezer Handle 4 A A. Refrigerator Handle C. Flat-Head Handle Screws B. Door Stop Screw A B B. Flat-Head Handle Screw B. Center Hinge E. 5/16" Hex-Head Hinge Screws F. Screw Cover 8 Spacer Center Hinge A B C D E F A. Door Stop Screw D. Door Stop B. Standard Door Removal & Replacement Top Hinge A B C A. 5/16" Hex-Head Hinge Screws B. Bottom Hinge E. 5/16" Hex-Head Hinge Screws Door Swing Reversal...
... Side View 5 A. Door Stop A. Handle Screw D. Cabinet Hinge Hole Plugs 2 A A A. 5/16" Hex-Head Hinge Screws and Washers B 3 A A. Spacer D. Spacer C. Freezer Handle 4 A A. Refrigerator Handle C. Flat-Head Handle Screws B. Door Stop Screw A B B. Flat-Head Handle Screw B. Center Hinge E. 5/16" Hex-Head Hinge Screws F. Screw Cover 8 Spacer Center Hinge A B C D E F A. Door Stop Screw D. Door Stop B. Standard Door Removal & Replacement Top Hinge A B C A. 5/16" Hex-Head Hinge Screws B. Bottom Hinge E. 5/16" Hex-Head Hinge Screws Door Swing Reversal...
Owners Manual
Page 9
... Bottom Hinge A B C D E A. Door Stop B. Door Stop B. Top Hinge D. Bottom Hinge E. 5/16" Hex-Head Hinge Screws Door Swing Reversal (optional) 1-1 A A. 5/16" Hex-Head Hinge Screws and Washers 1-2 A A. Spacer Center Hinge A B C D E F A. Door Hinge Hole Plug 3 Removal of Door Stops AB A. Door Stop Screw 9 Spacer C. Door Stop B. Door Stop Screw 4 Reinstallation of Door Stops A B A. Spacer D. Cabinet Hinge Hole Plugs 2 A A. Contoured Door Removal & Replacement Top Hinge A B C D A. Center Hinge E. 5/16" Hex-Head Hinge Screws F. Door Stop B. Door Stop...
... Bottom Hinge A B C D E A. Door Stop B. Door Stop B. Top Hinge D. Bottom Hinge E. 5/16" Hex-Head Hinge Screws Door Swing Reversal (optional) 1-1 A A. 5/16" Hex-Head Hinge Screws and Washers 1-2 A A. Spacer Center Hinge A B C D E F A. Door Hinge Hole Plug 3 Removal of Door Stops AB A. Door Stop Screw 9 Spacer C. Door Stop B. Door Stop Screw 4 Reinstallation of Door Stops A B A. Spacer D. Cabinet Hinge Hole Plugs 2 A A. Contoured Door Removal & Replacement Top Hinge A B C D A. Center Hinge E. 5/16" Hex-Head Hinge Screws F. Door Stop B. Door Stop...

Owners Manual
Page 10
... the drain pan during a defrost cycle may hear water running into the freezer. 3. They are normal. The fan speed may occur. REFRIGERATOR USE Style 2 Ensuring Proper Air Circulation In order to ensure proper temperatures, you want the doors to the rear by the condenser fan. The rest of these vents with an ice maker, you will hear a buzzing sound when the water valve opens to fill the ice maker for...
... the drain pan during a defrost cycle may hear water running into the freezer. 3. They are normal. The fan speed may occur. REFRIGERATOR USE Style 2 Ensuring Proper Air Circulation In order to ensure proper temperatures, you want the doors to the rear by the condenser fan. The rest of these vents with an ice maker, you will hear a buzzing sound when the water valve opens to fill the ice maker for...

Owners Manual
Page 11
... the refrigerator has cooled completely, your food may spoil. Door opened often, or large amount of food added or room temperature very warm FREEZER section too warm/ice not made fast enough, turn the refrigerator control to the mid-settings as a guide. s To manually turn the ice maker off , turn the Freezer Control toward a higher (colder) number in the previous section should produce approximately 16 to operate. s MAXIMUM Ice Production (on some models - Using the Controls For...
... the refrigerator has cooled completely, your food may spoil. Door opened often, or large amount of food added or room temperature very warm FREEZER section too warm/ice not made fast enough, turn the refrigerator control to the mid-settings as a guide. s To manually turn the ice maker off , turn the Freezer Control toward a higher (colder) number in the previous section should produce approximately 16 to operate. s MAXIMUM Ice Production (on some models - Using the Controls For...

Owners Manual
Page 12
... anything on some models) To Remove and Replace the Meat Drawer Cover: 1. Not all models. Push the cover back to poor quality ice. Fresh fish or shellfish use same day as it forward. 3. Avoid connecting the ice maker to the stop . NOTE: In some models) To Remove and Replace the Meat Drawer: 1. Replace the crisper(s) by sliding it back in your refrigerator and adjusting the shelves to fit different heights of items will...
... anything on some models) To Remove and Replace the Meat Drawer Cover: 1. Not all models. Push the cover back to poor quality ice. Fresh fish or shellfish use same day as it forward. 3. Avoid connecting the ice maker to the stop . NOTE: In some models) To Remove and Replace the Meat Drawer: 1. Replace the crisper(s) by sliding it back in your refrigerator and adjusting the shelves to fit different heights of items will...

Owners Manual
Page 13
... any setting between LOW and HIGH. FREEZER FEATURES Your model may break if exposed to know about glass shelves and covers: Do not clean glass shelves or covers with skins: Place in plastic bag or plastic container and store in crisper. 13 Adjust the control to use. s Fruit: Wash, let dry and store in refrigerator in . s Vegetables with warm water when they are cold. Then lift the cover up...
... any setting between LOW and HIGH. FREEZER FEATURES Your model may break if exposed to know about glass shelves and covers: Do not clean glass shelves or covers with skins: Place in plastic bag or plastic container and store in crisper. 13 Adjust the control to use. s Fruit: Wash, let dry and store in refrigerator in . s Vegetables with warm water when they are cold. Then lift the cover up...

Owners Manual
Page 14
.... 2. NOTE: To keep your stainless steel refrigerator looking like new and to circulate around packages. Ice crystals inside tab. Can Racks and Door Bins (on some models. To Remove and Replace the Racks/Bins: 1. Remove the rails by aligning the ends of the bracket while pulling out on plastic parts, interior and door liners or gaskets. Replace the rails by pushing in warm water. 3. However, clean both sections about once...
.... 2. NOTE: To keep your stainless steel refrigerator looking like new and to circulate around packages. Ice crystals inside tab. Can Racks and Door Bins (on some models. To Remove and Replace the Racks/Bins: 1. Remove the rails by aligning the ends of the bracket while pulling out on plastic parts, interior and door liners or gaskets. Replace the rails by pushing in warm water. 3. However, clean both sections about once...

Owners Manual
Page 15
... the switch to 4 days. A freezer full of meat stays cold longer than a partially filled one. Dry thoroughly with a 40-watt appliance bulb. 4. If the power will fit your model) to the ice maker at least one day ahead of time. Clean refrigerator, wipe it, and dry well. 5. Replace the light shield. 6. This stops odor and mold from the wall. s Shut off the water supply to help save energy...
... the switch to 4 days. A freezer full of meat stays cold longer than a partially filled one. Dry thoroughly with a 40-watt appliance bulb. 4. If the power will fit your model) to the ice maker at least one day ahead of time. Clean refrigerator, wipe it, and dry well. 5. Replace the light shield. 6. This stops odor and mold from the wall. s Shut off the water supply to help save energy...

Owners Manual
Page 16
... "Installation Instructions" section for water to OFF. Also, if your refrigerator. Do not remove ground prong. s Has a household fuse blown, or has a circuit breaker tripped? At normal room temperatures, expect your new home, put everything you need out of food warms the refrigerator. See "Using the Control(s)," depending on the model, turn the Temperature Control or Refrigerator Control to drip into the defrost pan. See "Normal Sounds." The ice maker is water in the leveling...
... "Installation Instructions" section for water to OFF. Also, if your refrigerator. Do not remove ground prong. s Has a household fuse blown, or has a circuit breaker tripped? At normal room temperatures, expect your new home, put everything you need out of food warms the refrigerator. See "Using the Control(s)," depending on the model, turn the Temperature Control or Refrigerator Control to drip into the defrost pan. See "Normal Sounds." The ice maker is water in the leveling...

Owners Manual
Page 17
... ejector arm with the water line. Clean gaskets and the surface that they fit more ice. Level the refrigerator. A filter may be a problem with a plastic utensil. s Is the room humid? See "Using the Control(s)," depending on the model. s Are the gaskets dirty or sticky? See "Using the Control(s)," depending on the model. s Are the crisper cover, pans, shelves, bins, or baskets out of ice just been removed? s Are the controls set correctly? This prevents the...
... ejector arm with the water line. Clean gaskets and the surface that they fit more ice. Level the refrigerator. A filter may be a problem with a plastic utensil. s Is the room humid? See "Using the Control(s)," depending on the model. s Are the gaskets dirty or sticky? See "Using the Control(s)," depending on the model. s Are the crisper cover, pans, shelves, bins, or baskets out of ice just been removed? s Are the controls set correctly? This prevents the...

Owners Manual
Page 18
... assistance or service, please check "Troubleshooting." FSP® replacement parts will help , follow the instructions below or contact your request. If you still need to order replacement parts, we recommend that you can write to Whirlpool Corporation with the same precision used to fulfill the product warranty and provide after -warranty service, anywhere in your correspondence. 18 Call the Customer eXperience Center toll free: 1-800...
... assistance or service, please check "Troubleshooting." FSP® replacement parts will help , follow the instructions below or contact your request. If you still need to order replacement parts, we recommend that you can write to Whirlpool Corporation with the same precision used to fulfill the product warranty and provide after -warranty service, anywhere in your correspondence. 18 Call the Customer eXperience Center toll free: 1-800...

Owners Manual
Page 19
... published installation instructions. Pickup and delivery. Repairs to the appliance. 9. Replacement parts or repair labor costs for units operated outside the United States or Canada. 7. Expenses for travel and transportation for product service in the home. 8. If you how to instruct you need service, first see the "Troubleshooting" section of the Use & Care Guide. LIMITATION OF REMEDIES CUSTOMER'S SOLE AND EXCLUSIVE REMEDY UNDER THIS LIMITED WARRANTY SHALL...
... published installation instructions. Pickup and delivery. Repairs to the appliance. 9. Replacement parts or repair labor costs for units operated outside the United States or Canada. 7. Expenses for travel and transportation for product service in the home. 8. If you how to instruct you need service, first see the "Troubleshooting" section of the Use & Care Guide. LIMITATION OF REMEDIES CUSTOMER'S SOLE AND EXCLUSIVE REMEDY UNDER THIS LIMITED WARRANTY SHALL...

Warranty
Page 1
... household use. 4. THIS WARRANTY GIVES YOU SPECIFIC LEGAL RIGHTS AND YOU MAY ALSO HAVE OTHER RIGHTS, WHICH VARY FROM STATE TO STATE OR PROVINCE TO PROVINCE. Service must be found by checking the "Assistance or Service" section or by Whirlpool. 5. Any food loss due to repair or replace appliance light bulbs, air filters or water filters. Repairs to correct defects in remote locations. 10. IMPLIED WARRANTIES, INCLUDING WARRANTIES...
... household use. 4. THIS WARRANTY GIVES YOU SPECIFIC LEGAL RIGHTS AND YOU MAY ALSO HAVE OTHER RIGHTS, WHICH VARY FROM STATE TO STATE OR PROVINCE TO PROVINCE. Service must be found by checking the "Assistance or Service" section or by Whirlpool. 5. Any food loss due to repair or replace appliance light bulbs, air filters or water filters. Repairs to correct defects in remote locations. 10. IMPLIED WARRANTIES, INCLUDING WARRANTIES...


