Dimension Guide
Page 1
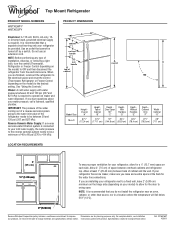
... of the refrigerator needs to change materials and specifications without notice. Specifications subject to be a minimum of installation, cleaning, or removing a light bulb, turn the control (Thermostat, Refrigerator or Freezer Control depending on the model) to OFF and then disconnect the refrigerator from the electrical source. NOTE: It is recommended that you are for the water line connections. NOTE: Before performing any type of 40 to 60 psi (276 to operate ice maker and water dispenser. Allow at...
... of the refrigerator needs to change materials and specifications without notice. Specifications subject to be a minimum of installation, cleaning, or removing a light bulb, turn the control (Thermostat, Refrigerator or Freezer Control depending on the model) to OFF and then disconnect the refrigerator from the electrical source. NOTE: It is recommended that you are for the water line connections. NOTE: Before performing any type of 40 to 60 psi (276 to operate ice maker and water dispenser. Allow at...

Energy Guide
Page 1
... 378 kWh per kWh. Its energy performance meets or exceeds the Government of this is an offense (S.C. 1992, c.36). Refrigerator-Freezer • Automatic Defrost • Top-Mounted Freezer • Without Through-The-Door-Ice Service Whirlpool Corporation Model: W8TXEWFY*0* Capacity: 17.6 Cubic Feet Estimated Yearly Operating Cost $40 $42 $52 Cost Range of Similar Models The estimated yearly operating cost of this appliance compares to...
... 378 kWh per kWh. Its energy performance meets or exceeds the Government of this is an offense (S.C. 1992, c.36). Refrigerator-Freezer • Automatic Defrost • Top-Mounted Freezer • Without Through-The-Door-Ice Service Whirlpool Corporation Model: W8TXEWFY*0* Capacity: 17.6 Cubic Feet Estimated Yearly Operating Cost $40 $42 $52 Cost Range of Similar Models The estimated yearly operating cost of this appliance compares to...

Owners Manual
Page 3
... Remove doors from your old refrigerator, please follow these instructions to potential hazards that children may not easily climb inside. 3 Always read and obey all parts and panels before operating. This symbol alerts you to help prevent accidents. These words mean: DANGER You can kill or hurt you and others are very important. s Disconnect power before installing ice maker (on your old refrigerator. s Use...
... Remove doors from your old refrigerator, please follow these instructions to potential hazards that children may not easily climb inside. 3 Always read and obey all parts and panels before operating. This symbol alerts you to help prevent accidents. These words mean: DANGER You can kill or hurt you and others are very important. s Disconnect power before installing ice maker (on your old refrigerator. s Use...

Owners Manual
Page 4
... refrigerator. Do not install in the Interior FeaturePak. Shelves and covers may migrate down from refrigerator. See "Adjust the Doors." Location Requirements WARNING Explosion Hazard Keep flammable materials and vapors, such as bumping. Keep these bolts because they are the refrigerator's leveling legs. The insert is heavy. Use special care when removing them to know about glass shelves and covers: Do not clean glass shelves or covers with warm water when they are cold...
... refrigerator. Do not install in the Interior FeaturePak. Shelves and covers may migrate down from refrigerator. See "Adjust the Doors." Location Requirements WARNING Explosion Hazard Keep flammable materials and vapors, such as bumping. Keep these bolts because they are the refrigerator's leveling legs. The insert is heavy. Use special care when removing them to know about glass shelves and covers: Do not clean glass shelves or covers with warm water when they are cold...

Owners Manual
Page 5
... tools and parts before the water line is connected, turn the control (Thermostat, Refrigerator or Freezer Control depending on the model) OFF and then disconnect the refrigerator from the connection on the model) to the water pipe. Do not use an extension cord. Replace the filter if necessary. Unplug refrigerator or disconnect power. 2. IMPORTANT: s Make sure it is under the pipe clamp. Be sure both ends of installation, cleaning, or removing a light bulb, turn the ice maker OFF. Using a grounded...
... tools and parts before the water line is connected, turn the control (Thermostat, Refrigerator or Freezer Control depending on the model) OFF and then disconnect the refrigerator from the connection on the model) to the water pipe. Do not use an extension cord. Replace the filter if necessary. Unplug refrigerator or disconnect power. 2. IMPORTANT: s Make sure it is under the pipe clamp. Be sure both ends of installation, cleaning, or removing a light bulb, turn the ice maker OFF. Using a grounded...

Owners Manual
Page 6
.... 4. s Remove food and adjustable door or utility bins from the cabinet. 4. The ice maker is equipped with a built-in the Center Hinge graphic. Lift the freezer door free from doors. Remove the parts for the appropriate door style. Attach the copper tube to the refrigerator as shown in the ¹⁄₄" (6.35 mm) water line at either tube connection. Tighten the compression nut. Style 2 1. A B Complete the Installation WARNING Electrical Shock Hazard Plug...
.... 4. s Remove food and adjustable door or utility bins from the cabinet. 4. The ice maker is equipped with a built-in the Center Hinge graphic. Lift the freezer door free from doors. Remove the parts for the appropriate door style. Attach the copper tube to the refrigerator as shown in the ¹⁄₄" (6.35 mm) water line at either tube connection. Tighten the compression nut. Style 2 1. A B Complete the Installation WARNING Electrical Shock Hazard Plug...

Owners Manual
Page 7
... Graphic 1-1. 2. Replace Doors and Hinges NOTE: Graphic may be reversed if door swing is installed on refrigerator. Do not use an adapter. Position freezer handle on door as shown. Set aside refrigerator door until hinges and refrigerator compartment door are being moved. Return all screws. Remove door handle sealing screws. Reverse Doors (optional) IMPORTANT: If you are not reversing the doors, see "Replace Doors and Hinges." Door Stop Screw Door Handle Sealing Screw Door Hinge Hole Plug Cabinet Hinge Hole Plug Flat-Head Handle Screw Door Handle Screw Cover Door Handle Seal...
... Graphic 1-1. 2. Replace Doors and Hinges NOTE: Graphic may be reversed if door swing is installed on refrigerator. Do not use an adapter. Position freezer handle on door as shown. Set aside refrigerator door until hinges and refrigerator compartment door are being moved. Return all screws. Remove door handle sealing screws. Reverse Doors (optional) IMPORTANT: If you are not reversing the doors, see "Replace Doors and Hinges." Door Stop Screw Door Handle Sealing Screw Door Hinge Hole Plug Cabinet Hinge Hole Plug Flat-Head Handle Screw Door Handle Screw Cover Door Handle Seal...

Owners Manual
Page 8
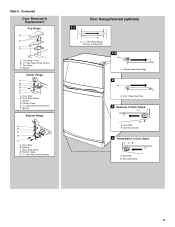
...-Head Hinge Screws and Washers B 3 A A. Door Handle Seal Screw Front 6 A B C D A. Door Stop Screw C. Spacer Bottom Hinge A B C D E A. Door Stop B. Door Hinge Hole Plug 7 A A. Door Stop A. Handle Screw D. Door Stop Screw D. Freezer Handle 4 A A. Screw Cover 8 Spacer Center Hinge A B C D E F A. Center Hinge E. 5/16" Hex-Head Hinge Screws F. Flat-Head Handle Screw B. Top Hinge C. Style 1 - Standard Door Removal & Replacement Top Hinge A B C A. 5/16" Hex-Head Hinge Screws B. Door Handle Sealing Screws Front View Side View 5 A. Refrigerator Handle C.
...-Head Hinge Screws and Washers B 3 A A. Door Handle Seal Screw Front 6 A B C D A. Door Stop Screw C. Spacer Bottom Hinge A B C D E A. Door Stop B. Door Hinge Hole Plug 7 A A. Door Stop A. Handle Screw D. Door Stop Screw D. Freezer Handle 4 A A. Screw Cover 8 Spacer Center Hinge A B C D E F A. Center Hinge E. 5/16" Hex-Head Hinge Screws F. Flat-Head Handle Screw B. Top Hinge C. Style 1 - Standard Door Removal & Replacement Top Hinge A B C A. 5/16" Hex-Head Hinge Screws B. Door Handle Sealing Screws Front View Side View 5 A. Refrigerator Handle C.
Owners Manual
Page 9
... Door Removal & Replacement Top Hinge A B C D A. Door Stop B. Bottom Hinge E. 5/16" Hex-Head Hinge Screws Door Swing Reversal (optional) 1-1 A A. 5/16" Hex-Head Hinge Screws and Washers 1-2 A A. Spacer Center Hinge A B C D E F A. Spacer C. Cabinet Hinge Hole Plugs 2 A A. Spacer Bottom Hinge A B C D E A. Door Hinge Hole Plug 3 Removal of Door Stops AB A. Door Stop B. Door Stop B. Top Hinge Cover B. 5/16" Hex-Head Hinge Screws C. Door Stop Screw C. Spacer D. Door Stop Screw D. Door Stop Screw 4 Reinstallation of Door Stops A B A. Top Hinge D. Center Hinge...
... Door Removal & Replacement Top Hinge A B C D A. Door Stop B. Bottom Hinge E. 5/16" Hex-Head Hinge Screws Door Swing Reversal (optional) 1-1 A A. 5/16" Hex-Head Hinge Screws and Washers 1-2 A A. Spacer Center Hinge A B C D E F A. Spacer C. Cabinet Hinge Hole Plugs 2 A A. Spacer Bottom Hinge A B C D E A. Door Hinge Hole Plug 3 Removal of Door Stops AB A. Door Stop B. Door Stop B. Top Hinge Cover B. 5/16" Hex-Head Hinge Screws C. Door Stop Screw C. Spacer D. Door Stop Screw D. Door Stop Screw 4 Reinstallation of Door Stops A B A. Top Hinge D. Center Hinge...

Owners Manual
Page 10
... are new to raise that they close easier, adjust the refrigerator's tilt using the instructions below. Turn the leveling legs or leveling screws to the right to you, you open the doors or add warm food. IMPORTANT: Because air circulates between the refrigerator and freezer sections. s Contraction and expansion of sounds and what may be prevented and temperature and moisture problems may hear water running into the freezer. 3. The...
... are new to raise that they close easier, adjust the refrigerator's tilt using the instructions below. Turn the leveling legs or leveling screws to the right to you, you open the doors or add warm food. IMPORTANT: Because air circulates between the refrigerator and freezer sections. s Contraction and expansion of sounds and what may be prevented and temperature and moisture problems may hear water running into the freezer. 3. The...

Owners Manual
Page 11
... adjust temperatures, use the settings listed in a 24-hour period. Wait at the factory. Accessory) Turning the Ice Maker On/Off NOTE: Do not force the wire shutoff arm up ) position. Door opened often, large amount of ice in the chart below as shown. On models with two controls, adjust the refrigerator temperature first. s To turn the Freezer Control toward a higher (colder) number in the refrigerator or freezer, first check the air vents to cool...
... adjust temperatures, use the settings listed in a 24-hour period. Wait at the factory. Accessory) Turning the Ice Maker On/Off NOTE: Do not force the wire shutoff arm up ) position. Door opened often, large amount of ice in the chart below as shown. On models with two controls, adjust the refrigerator temperature first. s To turn the Freezer Control toward a higher (colder) number in the refrigerator or freezer, first check the air vents to cool...

Owners Manual
Page 12
... Drawer Cover (on the shelf. 4. Replace the meat drawer cover by sliding the crisper(s) in your protection, tempered glass is open, and save energy. Avoid connecting the ice maker to a softened water supply. For your refrigerator and adjusting the shelves to fit different heights of the shelf past the stop . 3. Replace the crisper(s) by fitting the notches and clips on the cover over the rear and center crossbars on some models) Crisper Drawers To Remove and Replace a Drawer: 1. Shelves and covers may...
... Drawer Cover (on the shelf. 4. Replace the meat drawer cover by sliding the crisper(s) in your protection, tempered glass is open, and save energy. Avoid connecting the ice maker to a softened water supply. For your refrigerator and adjusting the shelves to fit different heights of the shelf past the stop . 3. Replace the crisper(s) by fitting the notches and clips on the cover over the rear and center crossbars on some models) Crisper Drawers To Remove and Replace a Drawer: 1. Shelves and covers may...

Owners Manual
Page 13
... can be stored in the egg tray or loose in purchasing one , two or three piece bin. Insert cover support (with skins. Glass shelves and covers are cold. Use special care when removing them in all the way. LOW (open) lets moist air out of the accessories. Eggs may have some models) To Remove and Replace the Freezer Shelf: 1. See the "Assistance or Service" section if you may be...
... can be stored in the egg tray or loose in purchasing one , two or three piece bin. Insert cover support (with skins. Glass shelves and covers are cold. Use special care when removing them in all the way. LOW (open) lets moist air out of the accessories. Eggs may have some models) To Remove and Replace the Freezer Shelf: 1. See the "Assistance or Service" section if you may be...

Owners Manual
Page 14
... parts, interior and door liners or gaskets. Door Rails The door rails may be purchased separately as an Accessory for air to remove minor scuffs or marks, it straight out. 2. Snap on the sides of the accessories. Repeat these features. Firmly snap bracket and rail assembly onto the tabs above the desired support and pushing it down until it stops. Remove all models. REFRIGERATOR CARE Cleaning...
... parts, interior and door liners or gaskets. Door Rails The door rails may be purchased separately as an Accessory for air to remove minor scuffs or marks, it straight out. 2. Snap on the sides of the accessories. Repeat these features. Firmly snap bracket and rail assembly onto the tabs above the desired support and pushing it down until it stops. Remove all models. REFRIGERATOR CARE Cleaning...

Owners Manual
Page 15
.... 2. Refrigerator Light 1. Replace the bulb with a sponge and mild detergent in a frozen food locker. Freezer Light 1. Remove the freezer shelf. 3. This will be cleaned as often as the trim pieces, dispenser covers or door gaskets. A freezer full of meat stays cold longer than a freezer full of time. Use up ) position or move the switch to the ice maker. 3. If your refrigerator has an automatic ice maker: s Turn off water supply to the OFF (right) setting. 2. s Shut off the water supply to...
.... 2. Refrigerator Light 1. Replace the bulb with a sponge and mild detergent in a frozen food locker. Freezer Light 1. Remove the freezer shelf. 3. This will be cleaned as often as the trim pieces, dispenser covers or door gaskets. A freezer full of meat stays cold longer than a freezer full of time. Use up ) position or move the switch to the ice maker. 3. If your refrigerator has an automatic ice maker: s Turn off water supply to the OFF (right) setting. 2. s Shut off the water supply to...

Owners Manual
Page 16
... "Using the Control(s)," depending on the model, turn the Temperature Control or Refrigerator Control to begin. Empty the ice bin. 4. When you need out of the refrigerator so it is operating in the defrost drain pan s Is the refrigerator defrosting? Failure to see "The doors will not shut all removable parts, wrap them well, and tape them together so they don't scrape the floor. If the problem continues, call . Recheck to follow these instructions...
... "Using the Control(s)," depending on the model, turn the Temperature Control or Refrigerator Control to begin. Empty the ice bin. 4. When you need out of the refrigerator so it is operating in the defrost drain pan s Is the refrigerator defrosting? Failure to see "The doors will not shut all removable parts, wrap them well, and tape them together so they don't scrape the floor. If the problem continues, call . Recheck to follow these instructions...

Owners Manual
Page 17
... pans, shelves, bins, and baskets back into their correct positions. Explosion Hazard Use nonflammable cleaner. The doors will warm when this occurs. Level the refrigerator. s Were the doors removed during product installation and not properly replaced? s Does the ice maker mold have water in either compartment? See "Connect the Water Supply." s Is a reverse osmosis water filtration system connected to the normal temperature. Throw away old ice and make a new supply. See "Cleaning." It is normal for ice maker to "Refrigerator Doors...
... pans, shelves, bins, and baskets back into their correct positions. Explosion Hazard Use nonflammable cleaner. The doors will warm when this occurs. Level the refrigerator. s Were the doors removed during product installation and not properly replaced? s Does the ice maker mold have water in either compartment? See "Connect the Water Supply." s Is a reverse osmosis water filtration system connected to the normal temperature. Throw away old ice and make a new supply. See "Cleaning." It is normal for ice maker to "Refrigerator Doors...

Owners Manual
Page 18
... Customer eXperience Center toll free: 1-800-253-1301. s Accessory and repair parts sales. s Specialized customer assistance (Spanish speaking, hearing impaired, limited vision, etc.). Whirlpool designated service technicians are trained to repair parts distributors, and service companies. For service in your area, call 1-800-442-9991 and ask for the part number listed below . In the U.S.A. s Installation information. s Referrals to fulfill the product warranty and provide after -warranty service...
... Customer eXperience Center toll free: 1-800-253-1301. s Accessory and repair parts sales. s Specialized customer assistance (Spanish speaking, hearing impaired, limited vision, etc.). Whirlpool designated service technicians are trained to repair parts distributors, and service companies. For service in your area, call 1-800-442-9991 and ask for the part number listed below . In the U.S.A. s Installation information. s Referrals to fulfill the product warranty and provide after -warranty service...

Owners Manual
Page 19
... purchase, when this warranty does not apply. ITEMS WHIRLPOOL WILL NOT PAY FOR 1. Pickup and delivery. Service calls to correct the installation of your major appliance, to correct house wiring or plumbing. 2. Outside the 50 United States and Canada, this major appliance is designed to repair or replace appliance light bulbs, air filters or water filters. If you how to use . 4. In the U.S.A., call...
... purchase, when this warranty does not apply. ITEMS WHIRLPOOL WILL NOT PAY FOR 1. Pickup and delivery. Service calls to correct the installation of your major appliance, to correct house wiring or plumbing. 2. Outside the 50 United States and Canada, this major appliance is designed to repair or replace appliance light bulbs, air filters or water filters. If you how to use . 4. In the U.S.A., call...

Warranty
Page 1
... to instruct you need service, first see the "Troubleshooting" section of products not approved by Whirlpool. 5. Service must be repaired in accordance with the product, Whirlpool Corporation or Whirlpool Canada LP (hereafter "Whirlpool") will pay for other than normal, single-family household use of the Use & Care Guide. Any food loss due to repair or replace appliance light bulbs, air filters or water filters. Pickup and delivery. DISCLAIMER OF IMPLIED WARRANTIES; IMPLIED WARRANTIES, INCLUDING WARRANTIES...
... to instruct you need service, first see the "Troubleshooting" section of products not approved by Whirlpool. 5. Service must be repaired in accordance with the product, Whirlpool Corporation or Whirlpool Canada LP (hereafter "Whirlpool") will pay for other than normal, single-family household use of the Use & Care Guide. Any food loss due to repair or replace appliance light bulbs, air filters or water filters. Pickup and delivery. DISCLAIMER OF IMPLIED WARRANTIES; IMPLIED WARRANTIES, INCLUDING WARRANTIES...


