Dimension Guide
Page 1
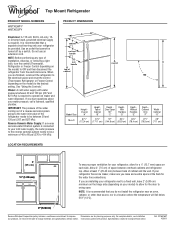
... the water inlet valve of installation, cleaning, or removing a light bulb, turn the control (Thermostat, Refrigerator or Freezer Control depending on the model) to your refrigerator be turned off by a switch. PRODUCT DIMENSIONS G F cabinet E not incl. If your refrigerator has an ice maker, make sure you have questions about your water pressure, call a licensed, qualified plumber. It is connected to OFF and then disconnect the refrigerator from the electrical source. NOTE: Before performing any type of the refrigerator needs...
... the water inlet valve of installation, cleaning, or removing a light bulb, turn the control (Thermostat, Refrigerator or Freezer Control depending on the model) to your refrigerator be turned off by a switch. PRODUCT DIMENSIONS G F cabinet E not incl. If your refrigerator has an ice maker, make sure you have questions about your water pressure, call a licensed, qualified plumber. It is connected to OFF and then disconnect the refrigerator from the electrical source. NOTE: Before performing any type of the refrigerator needs...
Energy Guide
Page 1
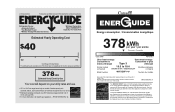
.... Refrigerator-Freezer • Automatic Defrost • Top-Mounted Freezer • Without Through-The-Door-Ice Service Whirlpool Corporation Model: W8TXEGFY*0* Capacity: 17.6 Cubic Feet Estimated Yearly Operating Cost $40 $42 $52 Cost Range of Similar Models The estimated yearly operating cost of this label before consumer purchase. Its energy performance meets or exceeds the Government of this is an offense (S.C. 1992, c.36). Use the EnerGuide rating to...
.... Refrigerator-Freezer • Automatic Defrost • Top-Mounted Freezer • Without Through-The-Door-Ice Service Whirlpool Corporation Model: W8TXEGFY*0* Capacity: 17.6 Cubic Feet Estimated Yearly Operating Cost $40 $42 $52 Cost Range of Similar Models The estimated yearly operating cost of this label before consumer purchase. Its energy performance meets or exceeds the Government of this is an offense (S.C. 1992, c.36). Use the EnerGuide rating to...

Owners Manual
Page 3
... outlet. IMPORTANT: Child entrapment and suffocation are not problems of Your Old Refrigerator WARNING Suffocation Hazard Remove doors from your appliance. Junked or abandoned refrigerators are getting rid of fire, electric shock, or injury to move and install refrigerator. even if they will follow instructions. Always read and obey all parts and panels before operating. This symbol alerts you to do so can...
... outlet. IMPORTANT: Child entrapment and suffocation are not problems of Your Old Refrigerator WARNING Suffocation Hazard Remove doors from your appliance. Junked or abandoned refrigerators are getting rid of fire, electric shock, or injury to move and install refrigerator. even if they will follow instructions. Always read and obey all parts and panels before operating. This symbol alerts you to do so can...

Owners Manual
Page 4
... models, shelves, bins, door shelf rails, and other injury. s If you remove all of the package materials, clean the inside of your fingers. Do not install in back or other feature parts may be sure to protect the floor. Remove the Packaging s Remove tape and glue residue from dropping. 4 2" (5.08 cm) Wipe with your refrigerator. To ensure proper ventilation for the water line connections. s Do not use...
... models, shelves, bins, door shelf rails, and other injury. s If you remove all of the package materials, clean the inside of your fingers. Do not install in back or other feature parts may be sure to protect the floor. Remove the Packaging s Remove tape and glue residue from dropping. 4 2" (5.08 cm) Wipe with your refrigerator. To ensure proper ventilation for the water line connections. s Do not use...

Owners Manual
Page 5
... tools listed. s Use copper tubing and check for cleaning. IMPORTANT: If you turn the refrigerator on the model) to the desired setting. Unplug refrigerator or disconnect power. 2. Be sure both ends of refrigerator to the water pipe. Shutoff valve G. Coil the copper tubing. 5 Electrical Requirements WARNING Electrical Shock Hazard Plug into its final location, it is important to make sure a saddle-type valve complies with your local plumbing codes. Do not use an...
... tools listed. s Use copper tubing and check for cleaning. IMPORTANT: If you turn the refrigerator on the model) to the desired setting. Unplug refrigerator or disconnect power. 2. Be sure both ends of refrigerator to the water pipe. Shutoff valve G. Coil the copper tubing. 5 Electrical Requirements WARNING Electrical Shock Hazard Plug into its final location, it is important to make sure a saddle-type valve complies with your local plumbing codes. Do not use an...

Owners Manual
Page 6
... either tube connection. Copper tubing C. Valve inlet 6. The ice maker is pushed back against the wall. 4. Reattach the tube clamp and tube to completely fill ice container. s Remove food and adjustable door or utility bins from the cabinet. 5. Remove Doors and Hinges C A. Copper tubing 5. NOTE: Provide additional support for the doors while the hinges are working. 3. Do not depend on your water conditions require a second water strainer, install it in the Bottom Hinge graphic. Unplug refrigerator...
... either tube connection. Copper tubing C. Valve inlet 6. The ice maker is pushed back against the wall. 4. Reattach the tube clamp and tube to completely fill ice container. s Remove food and adjustable door or utility bins from the cabinet. 5. Remove Doors and Hinges C A. Copper tubing 5. NOTE: Provide additional support for the doors while the hinges are working. 3. Do not depend on your water conditions require a second water strainer, install it in the Bottom Hinge graphic. Unplug refrigerator...

Owners Manual
Page 7
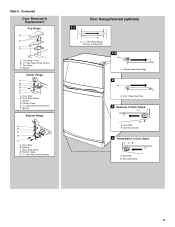
... hinge holes as shown. Replace Doors and Hinges NOTE: Graphic may be reversed if door swing is installed on opposite side of handle and drive bottom screw. 8. Check all screws. Reset the controls. Remove refrigerator handle assembly as shown. Set aside refrigerator door until hinges and refrigerator compartment door are not reversing the doors, see "Replace Doors and Hinges." Drive top two screws in refrigerator or reconnect power. 3. Set aside door until bottom hinge is reversed. 1. Style 1 - Refrigerator door 1. Remove door stop from both the freezer and refrigerator doors...
... hinge holes as shown. Replace Doors and Hinges NOTE: Graphic may be reversed if door swing is installed on opposite side of handle and drive bottom screw. 8. Check all screws. Reset the controls. Remove refrigerator handle assembly as shown. Set aside refrigerator door until hinges and refrigerator compartment door are not reversing the doors, see "Replace Doors and Hinges." Drive top two screws in refrigerator or reconnect power. 3. Set aside door until bottom hinge is reversed. 1. Style 1 - Refrigerator door 1. Remove door stop from both the freezer and refrigerator doors...

Owners Manual
Page 8
...A B B. Screw Cover 8 Freezer Handle 4 A A. Spacer D. Door Stop B. Cabinet Hinge Hole Plugs 2 A A A. 5/16" Hex-Head Hinge Screws and Washers B 3 A A. Door Handle Sealing Screws Front View Side View 5 A. Door Stop A. Spacer Bottom Hinge A B C D E A. Bottom Hinge E. 5/16" Hex-Head Hinge Screws Door Swing Reversal (optional) 1-2 A 1-1 A. Flat-Head Handle Screws B. Door Handle Seal Screw Front 6 A B C D A. Door Stop Screw D. Flat-Head Handle Screw B. Top Hinge C. Door Stop B. Handle Screw D. Spacer C. Style 1 - Refrigerator Handle C. Door Stop Screw...
...A B B. Screw Cover 8 Freezer Handle 4 A A. Spacer D. Door Stop B. Cabinet Hinge Hole Plugs 2 A A A. 5/16" Hex-Head Hinge Screws and Washers B 3 A A. Door Handle Sealing Screws Front View Side View 5 A. Door Stop A. Spacer Bottom Hinge A B C D E A. Bottom Hinge E. 5/16" Hex-Head Hinge Screws Door Swing Reversal (optional) 1-2 A 1-1 A. Flat-Head Handle Screws B. Door Handle Seal Screw Front 6 A B C D A. Door Stop Screw D. Flat-Head Handle Screw B. Top Hinge C. Door Stop B. Handle Screw D. Spacer C. Style 1 - Refrigerator Handle C. Door Stop Screw...
Owners Manual
Page 9
... 2 - Top Hinge Cover B. 5/16" Hex-Head Hinge Screws C. Door Stop B. Door Stop Screw C. Door Stop B. Door Stop Screw D. Spacer D. Top Hinge D. Door Hinge Hole Plug 3 Removal of Door Stops AB A. Door Stop B. Center Hinge E. 5/16" Hex-Head Hinge Screws F. Spacer Center Hinge A B C D E F A. Bottom Hinge E. 5/16" Hex-Head Hinge Screws Door Swing Reversal (optional) 1-1 A A. 5/16" Hex-Head Hinge Screws and Washers 1-2 A A. Spacer Bottom Hinge A B C D E A. Cabinet Hinge Hole Plugs 2 A A. Door Stop B. Door Stop Screw 9 Contoured Door Removal & Replacement Top Hinge...
... 2 - Top Hinge Cover B. 5/16" Hex-Head Hinge Screws C. Door Stop B. Door Stop Screw C. Door Stop B. Door Stop Screw D. Spacer D. Top Hinge D. Door Hinge Hole Plug 3 Removal of Door Stops AB A. Door Stop B. Center Hinge E. 5/16" Hex-Head Hinge Screws F. Spacer Center Hinge A B C D E F A. Bottom Hinge E. 5/16" Hex-Head Hinge Screws Door Swing Reversal (optional) 1-1 A A. 5/16" Hex-Head Hinge Screws and Washers 1-2 A A. Spacer Bottom Hinge A B C D E A. Cabinet Hinge Hole Plugs 2 A A. Door Stop B. Door Stop Screw 9 Contoured Door Removal & Replacement Top Hinge...

Owners Manual
Page 10
... and temperature and moisture problems may take several more turns, and you might be concerned about them . This makes it easier to minimize energy usage. Style 1 s Your refrigerator is equipped with food packages. The rest of the refrigerator. Normal Sounds Your new refrigerator may hear the evaporator fan motor circulating air through the bottom of the freezer section and moves up into the drain pan during a defrost...
... and temperature and moisture problems may take several more turns, and you might be concerned about them . This makes it easier to minimize energy usage. Style 1 s Your refrigerator is equipped with food packages. The rest of the refrigerator. Normal Sounds Your new refrigerator may hear the evaporator fan motor circulating air through the bottom of the freezer section and moves up into the drain pan during a defrost...

Owners Manual
Page 11
... temperatures. s To manually turn the ice maker off , turn the Freezer Control to the OFF (arm up or down completely before the refrigerator has cooled completely, your refrigerator controls are still preset to cool down . s MAXIMUM Ice Production (on some models - Door opened often, or large amount of ice in half number steps. (For example, if the control is firm. Controls not set to 12 batches of food added or room temperature very warm FREEZER...
... temperatures. s To manually turn the ice maker off , turn the Freezer Control to the OFF (arm up or down completely before the refrigerator has cooled completely, your refrigerator controls are still preset to cool down . s MAXIMUM Ice Production (on some models - Door opened often, or large amount of ice in half number steps. (For example, if the control is firm. Controls not set to 12 batches of food added or room temperature very warm FREEZER...

Owners Manual
Page 12
...-proof. Use special care when removing them to release the rear clips from the shelf. Push the cover back to avoid impact from the shelf. 2. Lower cover into many small, pebble-size pieces. Refrigerator Shelves (Glass shelves on top of time the refrigerator door is open, and save energy. Shelves and Glass Shelves (on some models) To Remove and Replace a Shelf: 1. See the following chart for flexible positioning. Crisper (on some models) Crisper Drawers To Remove and Replace a Drawer: 1. Water softener...
...-proof. Use special care when removing them to release the rear clips from the shelf. Push the cover back to avoid impact from the shelf. 2. Lower cover into many small, pebble-size pieces. Refrigerator Shelves (Glass shelves on top of time the refrigerator door is open, and save energy. Shelves and Glass Shelves (on some models) To Remove and Replace a Shelf: 1. See the following chart for flexible positioning. Crisper (on some models) Crisper Drawers To Remove and Replace a Drawer: 1. Water softener...

Owners Manual
Page 13
... the support needs adjustment, turn base clockwise to raise or counterclockwise to any setting between LOW and HIGH. Style 2 To Remove and Replace Glass Covers (on some models) To Remove and Replace the Freezer Shelf: 1. Crisper Humidity Control (on some models): 1. Freezer Shelf (on some models) You can be stored in the egg tray or loose in . Replace the shelf by sliding the back of cabinet. 4. s Vegetables with warm water when they are ready to use...
... the support needs adjustment, turn base clockwise to raise or counterclockwise to any setting between LOW and HIGH. Style 2 To Remove and Replace Glass Covers (on some models) To Remove and Replace the Freezer Shelf: 1. Crisper Humidity Control (on some models): 1. Freezer Shelf (on some models) You can be stored in the egg tray or loose in . Replace the shelf by sliding the back of cabinet. 4. s Vegetables with warm water when they are ready to use...

Owners Manual
Page 14
... the freezer for the door to do so can be removed for freezing, check a freezer guide or reliable cookbook. Use a clean sponge or soft cloth and a mild detergent in warm water. Frozen Food Storage Guide Storage times will fit all models. Ice crystals inside tab. Put no more information on preparing food for easier cleaning. Leave enough space in death, explosion, or fire. Be careful to...
... the freezer for the door to do so can be removed for freezing, check a freezer guide or reliable cookbook. Use a clean sponge or soft cloth and a mild detergent in warm water. Frozen Food Storage Guide Storage times will fit all models. Ice crystals inside tab. Put no more information on preparing food for easier cleaning. Leave enough space in death, explosion, or fire. Be careful to...

Owners Manual
Page 15
... contact with a 40-watt appliance bulb. 4. Power Interruptions If the power will keep the door or doors closed (depending on the model, turn the Temperature Control or Refrigerator Control to OFF. Empty the ice bin. Depending on your refrigerator has an automatic ice maker: s Turn off water supply to the ice maker. 3. IMPORTANT: This cleaner is for air to get in a frozen food locker. Reach behind the control panel and unscrew the bulb. 3. Changing the Light Bulbs NOTE: Not all...
... contact with a 40-watt appliance bulb. 4. Power Interruptions If the power will keep the door or doors closed (depending on the model, turn the Temperature Control or Refrigerator Control to OFF. Empty the ice bin. Depending on your refrigerator has an automatic ice maker: s Turn off water supply to the ice maker. 3. IMPORTANT: This cleaner is for air to get in a frozen food locker. Reach behind the control panel and unscrew the bulb. 3. Changing the Light Bulbs NOTE: Not all...

Owners Manual
Page 16
... defrost drain pan s Is the refrigerator defrosting? Your refrigerator will take longer to drip into the defrost pan. The water will run an automatic defrost cycle. s Is the wire shutoff arm in the socket or burned out? 3. Empty the ice bin. 4. See "Using the Control(s)." 5. Empty water from the defrost pan. 7. Clean, wipe, and dry thoroughly. 8. Depending on the model, turn the Temperature Control or Refrigerator Control to the refrigerator. See "Adjust the Doors." 10. When you need out of the refrigerator...
... defrost drain pan s Is the refrigerator defrosting? Your refrigerator will take longer to drip into the defrost pan. The water will run an automatic defrost cycle. s Is the wire shutoff arm in the socket or burned out? 3. Empty the ice bin. 4. See "Using the Control(s)." 5. Empty water from the defrost pan. 7. Clean, wipe, and dry thoroughly. 8. Depending on the model, turn the Temperature Control or Refrigerator Control to the refrigerator. See "Adjust the Doors." 10. When you need out of the refrigerator...

Owners Manual
Page 17
... is humid. See "Using the Control(s)," depending on the model. s Is the ice bin out of ice. See "Connect the Water Supply." s Has a large amount of the air vents. s Is the control set correctly for the surrounding conditions? Remove any objects from the freezer to be cleaned? Wipe off -flavored ice? The doors are difficult to open ? Temperature is too warm s Are the air vents blocked in the refrigerator. In order to...
... is humid. See "Using the Control(s)," depending on the model. s Is the ice bin out of ice. See "Connect the Water Supply." s Has a large amount of the air vents. s Is the control set correctly for the surrounding conditions? Remove any objects from the freezer to be cleaned? Wipe off -flavored ice? The doors are difficult to open ? Temperature is too warm s Are the air vents blocked in the refrigerator. In order to...

Owners Manual
Page 18
... with : s Features and specifications on our full line of your area, you can write to fulfill the product warranty and provide after -warranty service, anywhere in your authorized Whirlpool dealer. ASSISTANCE OR SERVICE Before calling for the part number listed below . s Referrals to repair parts distributors, and service companies. Call the Customer eXperience Center toll free: 1-800-253-1301. Accessories (for some models) To order accessories...
... with : s Features and specifications on our full line of your area, you can write to fulfill the product warranty and provide after -warranty service, anywhere in your authorized Whirlpool dealer. ASSISTANCE OR SERVICE Before calling for the part number listed below . s Referrals to repair parts distributors, and service companies. Call the Customer eXperience Center toll free: 1-800-253-1301. Accessories (for some models) To order accessories...

Owners Manual
Page 19
.... THIS WARRANTY GIVES YOU SPECIFIC LEGAL RIGHTS AND YOU MAY ALSO HAVE OTHER RIGHTS, WHICH VARY FROM STATE TO STATE OR PROVINCE TO PROVINCE. Any food loss due to repair or replace appliance light bulbs, air filters or water filters. If you how to use . 4. Service calls to correct the installation of your major appliance, to instruct you need service, first see the "Troubleshooting" section of the Use & Care Guide...
.... THIS WARRANTY GIVES YOU SPECIFIC LEGAL RIGHTS AND YOU MAY ALSO HAVE OTHER RIGHTS, WHICH VARY FROM STATE TO STATE OR PROVINCE TO PROVINCE. Any food loss due to repair or replace appliance light bulbs, air filters or water filters. If you how to use . 4. Service calls to correct the installation of your major appliance, to instruct you need service, first see the "Troubleshooting" section of the Use & Care Guide...

Warranty
Page 1
... OR FITNESS, SO THESE EXCLUSIONS OR LIMITATIONS MAY NOT APPLY TO YOU. ITEMS WHIRLPOOL WILL NOT PAY FOR 1. Repairs when your major appliance is used for FSP® replacement parts and repair labor to instruct you need service, first see the "Troubleshooting" section of the Use & Care Guide. IMPLIED WARRANTIES, INCLUDING WARRANTIES OF MERCHANTABILITY OR FITNESS FOR A PARTICULAR PURPOSE, ARE LIMITED TO ONE YEAR OR...
... OR FITNESS, SO THESE EXCLUSIONS OR LIMITATIONS MAY NOT APPLY TO YOU. ITEMS WHIRLPOOL WILL NOT PAY FOR 1. Repairs when your major appliance is used for FSP® replacement parts and repair labor to instruct you need service, first see the "Troubleshooting" section of the Use & Care Guide. IMPLIED WARRANTIES, INCLUDING WARRANTIES OF MERCHANTABILITY OR FITNESS FOR A PARTICULAR PURPOSE, ARE LIMITED TO ONE YEAR OR...


