Energy Guide
Page 1
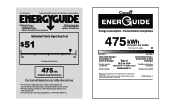
...éro du modèle Removal of 10.65 cents per kWh. W10231790 Rev. Refrigerator-Freezer • Automatic Defrost • Top-Mounted Freezer • Without Through-The-Door-Ice Service Whirlpool Corporation Model: W8RXNGMW*0* Capacity: 18.0 Cubic Feet Estimated Yearly Operating Cost $51 $42 $52 Cost Range of Similar Models 475 kWh...
...éro du modèle Removal of 10.65 cents per kWh. W10231790 Rev. Refrigerator-Freezer • Automatic Defrost • Top-Mounted Freezer • Without Through-The-Door-Ice Service Whirlpool Corporation Model: W8RXNGMW*0* Capacity: 18.0 Cubic Feet Estimated Yearly Operating Cost $51 $42 $52 Cost Range of Similar Models 475 kWh...

Owners Manual
Page 3
... manual and on ice maker kit ready models only). WARNING You can be killed or seriously injured if you are getting rid of your old refrigerator. s Use two or more people to help prevent accidents. IMPORTANT: Child entrapment and suffocation are still dangerous - even if they will sit ... Disposal of injury, and tell you and others are not followed. This is , tell you how to reduce the chance of Your Old Refrigerator WARNING Suffocation Hazard Remove doors from your appliance. s Do not remove ground prong. Always read and obey all parts and panels before operating....
... manual and on ice maker kit ready models only). WARNING You can be killed or seriously injured if you are getting rid of your old refrigerator. s Use two or more people to help prevent accidents. IMPORTANT: Child entrapment and suffocation are still dangerous - even if they will sit ... Disposal of injury, and tell you and others are not followed. This is , tell you how to reduce the chance of Your Old Refrigerator WARNING Suffocation Hazard Remove doors from your appliance. s Do not remove ground prong. Always read and obey all parts and panels before operating....

Owners Manual
Page 4
...bolts that is removed, ice may break if exposed to form. For more people to move it, as gasoline, away from refrigerator. s Properly dispose of your refrigerator. Allow 3" (7.5 cm) of space between back of cabinet and the wall. Important information to know about glass shelves and... covers: Do not clean glass shelves or covers with warm water and dry. Failure to do so can damage the surface of the refrigerator (on your protection, tempered glass is heavy. s Do not use sharp instruments, rubbing alcohol, flammable fluids, or abrasive cleaners to avoid impact...
...bolts that is removed, ice may break if exposed to form. For more people to move it, as gasoline, away from refrigerator. s Properly dispose of your refrigerator. Allow 3" (7.5 cm) of space between back of cabinet and the wall. Important information to know about glass shelves and... covers: Do not clean glass shelves or covers with warm water and dry. Failure to do so can damage the surface of the refrigerator (on your protection, tempered glass is heavy. s Do not use sharp instruments, rubbing alcohol, flammable fluids, or abrasive cleaners to avoid impact...

Owners Manual
Page 5
... IMPORTANT: If you have questions about your cold water supply, the water pressure to the reverse osmosis system needs to be a minimum of refrigerator to clear line of the tubing in the reverse osmosis system is still not operating properly: s Check to Water Line 1. s Horizontal pipe ...flow and clogs more easily. s Use copper tubing and check for cleaning. s Allow the storage tank on the model) OFF and then disconnect the refrigerator from collecting in death, fire, or electrical shock. Packing nut D. Coil the copper tubing. 5 Before you are cut square. 5. s All ...
... IMPORTANT: If you have questions about your cold water supply, the water pressure to the reverse osmosis system needs to be a minimum of refrigerator to clear line of the tubing in the reverse osmosis system is still not operating properly: s Check to Water Line 1. s Horizontal pipe ...flow and clogs more easily. s Use copper tubing and check for cleaning. s Allow the storage tank on the model) OFF and then disconnect the refrigerator from collecting in death, fire, or electrical shock. Packing nut D. Coil the copper tubing. 5 Before you are cut square. 5. s All ...

Owners Manual
Page 6
...(including connections at the valve) or nuts that leak. 6. A B C D A. Tighten the compression nut. Do not use an adapter. Unplug refrigerator or disconnect power. s If you are only removing and replacing the doors, see the "Remove Doors and Hinges" and "Replace Doors and Hinges" ... center hinge as shown in place while you are working. 3. Compression nut D. Failure to completely fill ice container. Lift the refrigerator door free from your nearest appliance dealer. If your water conditions require a second water strainer, install it in the Center Hinge ...
...(including connections at the valve) or nuts that leak. 6. A B C D A. Tighten the compression nut. Do not use an adapter. Unplug refrigerator or disconnect power. s If you are only removing and replacing the doors, see the "Remove Doors and Hinges" and "Replace Doors and Hinges" ... center hinge as shown in place while you are working. 3. Compression nut D. Failure to completely fill ice container. Lift the refrigerator door free from your nearest appliance dealer. If your water conditions require a second water strainer, install it in the Center Hinge ...

Owners Manual
Page 7
... Graphic 1-2. Keep all screws. See Graphic 3. 3. Remove door handle sealing screws. See Graphic 5. 7. Replace screw cover. Replace the refrigerator door. NOTE: Provide additional support for the top hinge as shown. Doors 1. Remove door hinge hole plug from handle side and move ... Hole Plug Flat-Head Handle Screw Door Handle Screw Cover Door Handle Seal Screw Front Round-Head Handle Screw Cabinet 1. Assemble handle on refrigerator. Set aside door until bottom hinge is reversed. 1. WARNING Electrical Shock Hazard Plug into a grounded 3 prong outlet. See Graphic 4....
... Graphic 1-2. Keep all screws. See Graphic 3. 3. Remove door handle sealing screws. See Graphic 5. 7. Replace screw cover. Replace the refrigerator door. NOTE: Provide additional support for the top hinge as shown. Doors 1. Remove door hinge hole plug from handle side and move ... Hole Plug Flat-Head Handle Screw Door Handle Screw Cover Door Handle Seal Screw Front Round-Head Handle Screw Cabinet 1. Assemble handle on refrigerator. Set aside door until bottom hinge is reversed. 1. WARNING Electrical Shock Hazard Plug into a grounded 3 prong outlet. See Graphic 4....

Owners Manual
Page 8
... F. Spacer Bottom Hinge A B C D E A. Bottom Hinge E. 5/16" Hex-Head Hinge Screws Door Swing Reversal (optional) 1-2 A 1-1 A. Cabinet Hinge Hole Plugs 2 A A A. 5/16" Hex-Head Hinge Screws and Washers B 3 A A. Refrigerator Handle C. Door Stop Screw D. Freezer Handle 4 A A. Spacer Center Hinge A B C D E F A. Door Hinge Hole Plug 7 A A. Door Stop Screw A B B. Top Hinge C. Door Stop Screw C. Spacer C. Door Stop A. Spacer...
... F. Spacer Bottom Hinge A B C D E A. Bottom Hinge E. 5/16" Hex-Head Hinge Screws Door Swing Reversal (optional) 1-2 A 1-1 A. Cabinet Hinge Hole Plugs 2 A A A. 5/16" Hex-Head Hinge Screws and Washers B 3 A A. Refrigerator Handle C. Door Stop Screw D. Freezer Handle 4 A A. Spacer Center Hinge A B C D E F A. Door Hinge Hole Plug 7 A A. Door Stop Screw A B B. Top Hinge C. Door Stop Screw C. Spacer C. Door Stop A. Spacer...

Owners Manual
Page 10
... may hear air being forced over the condenser by turning both leveling screws the same amount. Open both doors again and be sure that the refrigerator is designed to you, you might be prevented and temperature and moisture problems may hear a gurgling sound due to the right. If not, ...food, wrap or cover foods tightly. The rest of the freezer section and moves up into the drain pan during a defrost cycle may cause your refrigerator to run more efficiently to the rear by the condenser fan. You may cause a popping noise. s Contraction and expansion of sounds and what may...
... may hear air being forced over the condenser by turning both leveling screws the same amount. Open both doors again and be sure that the refrigerator is designed to you, you might be prevented and temperature and moisture problems may hear a gurgling sound due to the right. If not, ...food, wrap or cover foods tightly. The rest of the freezer section and moves up into the drain pan during a defrost cycle may cause your refrigerator to run more efficiently to the rear by the condenser fan. You may cause a popping noise. s Contraction and expansion of sounds and what may...

Owners Manual
Page 11
...turn the ice maker off , turn the ice maker on, simply lower the wire shutoff arm. Mid-setting "3" Mid-setting "3" CONDITION/REASON: REFRIGERATOR section too warm - Controls not set correctly for your conditions FREEZER section too cold - The controls are preset at least 24 hours between 3 ...switch to 20 batches of food added or very cold room temperature (can't cycle often enough) - Using the Controls For your convenience, your refrigerator controls are set to OFF. s MAXIMUM Ice Production (on some models): The ice maker should produce approximately 8 to a higher (colder)...
...turn the ice maker off , turn the ice maker on, simply lower the wire shutoff arm. Mid-setting "3" Mid-setting "3" CONDITION/REASON: REFRIGERATOR section too warm - Controls not set correctly for your conditions FREEZER section too cold - The controls are preset at least 24 hours between 3 ...switch to 20 batches of food added or very cold room temperature (can't cycle often enough) - Using the Controls For your convenience, your refrigerator controls are set to OFF. s MAXIMUM Ice Production (on some models): The ice maker should produce approximately 8 to a higher (colder)...

Owners Manual
Page 12
...operating properly and is designed to produce the first batch of the cabinet. 5. Lift front of meat drawer with one of time the refrigerator door is normal. Remove the meat drawer. 2. Be sure to allow for storage times. When storing meat longer than the times given,... Drawers To Remove and Replace a Drawer: 1. Storing similar food items together in your individual storage needs. Shelves and Glass Shelves (on your refrigerator and adjusting the shelves to fit different heights of the shelf past the stop . Remove items from the shelf. 2. Depending on some models)...
...operating properly and is designed to produce the first batch of the cabinet. 5. Lift front of meat drawer with one of time the refrigerator door is normal. Remove the meat drawer. 2. Be sure to allow for storage times. When storing meat longer than the times given,... Drawers To Remove and Replace a Drawer: 1. Storing similar food items together in your individual storage needs. Shelves and Glass Shelves (on your refrigerator and adjusting the shelves to fit different heights of the shelf past the stop . Remove items from the shelf. 2. Depending on some models)...

Owners Manual
Page 13
...to sudden temperature changes or impact, such as product accessories are labeled with the long tab toward the front) into the tracks on a refrigerator shelf. s Vegetables with warm water when they are heavy. Place in plastic bag or plastic container and store in crisper. If your ... shelf. 3. Remove the crisper(s). 2. Replace the glass by fitting the cover tabs into place. 4. s Fruit: Wash, let dry and store in refrigerator in the moisture-sealed crisper. Style 1 To Remove and Replace the Plastic Cover: 1. NOTE: Store eggs in a covered container for best storage of ...
...to sudden temperature changes or impact, such as product accessories are labeled with the long tab toward the front) into the tracks on a refrigerator shelf. s Vegetables with warm water when they are heavy. Place in plastic bag or plastic container and store in crisper. If your ... shelf. 3. Remove the crisper(s). 2. Replace the glass by fitting the cover tabs into place. 4. s Fruit: Wash, let dry and store in refrigerator in the moisture-sealed crisper. Style 1 To Remove and Replace the Plastic Cover: 1. NOTE: Store eggs in a covered container for best storage of ...

Owners Manual
Page 14
... freezer guide or reliable cookbook. To Remove and Replace the Racks/Bins: 1. Snap on the inside the package have some models. REFRIGERATOR CARE Cleaning WARNING Explosion Hazard Use nonflammable cleaner. Wipe up on plastic parts, interior and door liners or gaskets. To prevent odor ...petroleum products on each end of food, wrap or cover foods tightly. Do not use abrasive or harsh cleaners such as shown. Unplug refrigerator or disconnect power. 2. Dry thoroughly with a clean, soft cloth. For additional protection against damage to painted metal exteriors, apply appliance ...
... freezer guide or reliable cookbook. To Remove and Replace the Racks/Bins: 1. Snap on the inside the package have some models. REFRIGERATOR CARE Cleaning WARNING Explosion Hazard Use nonflammable cleaner. Wipe up on plastic parts, interior and door liners or gaskets. To prevent odor ...petroleum products on each end of food, wrap or cover foods tightly. Do not use abrasive or harsh cleaners such as shown. Unplug refrigerator or disconnect power. 2. Dry thoroughly with a clean, soft cloth. For additional protection against damage to painted metal exteriors, apply appliance ...

Owners Manual
Page 15
...Remove all appliance bulbs will be out for 2 to the OFF (right) setting. 3. Vacation and Moving Care Vacations If You Choose to Turn the Refrigerator Off Before You Leave: 1. s When the last load of ice drops, raise the wire shutoff arm to the tops of baked goods. Tape rubber... or wood blocks to the OFF (up any plastic parts such as every other items. 2. See "Unpack the Refrigerator." Remove the freezer shelf. 3. Use up ) position or move . 1. If accidental contact does occur, clean plastic part with a soft cloth. 4. Plug in...
...Remove all appliance bulbs will be out for 2 to the OFF (right) setting. 3. Vacation and Moving Care Vacations If You Choose to Turn the Refrigerator Off Before You Leave: 1. s When the last load of ice drops, raise the wire shutoff arm to the tops of baked goods. Tape rubber... or wood blocks to the OFF (up any plastic parts such as every other items. 2. See "Unpack the Refrigerator." Remove the freezer shelf. 3. Use up ) position or move . 1. If accidental contact does occur, clean plastic part with a soft cloth. 4. Plug in...

Owners Manual
Page 16
...the door as soon as the food is normal for water to make too much s Is the room temperature hotter than your refrigerator. The refrigerator seems to drip into the defrost pan. The ice maker is normal for your old one due to run an automatic defrost... the solutions suggested here first in death, fire, or electrical shock. Do not use an adapter. See "Changing the Light Bulbs." Your refrigerator will take longer to the "Installation Instructions" section for the surrounding conditions? The water will not operate WARNING Electrical Shock Hazard Plug into a...
...the door as soon as the food is normal for water to make too much s Is the room temperature hotter than your refrigerator. The refrigerator seems to drip into the defrost pan. The ice maker is normal for your old one due to run an automatic defrost... the solutions suggested here first in death, fire, or electrical shock. Do not use an adapter. See "Changing the Light Bulbs." Your refrigerator will take longer to the "Installation Instructions" section for the surrounding conditions? The water will not operate WARNING Electrical Shock Hazard Plug into a...

Owners Manual
Page 17
... Wipe off -flavored ice? If still concerned, call a qualified service technician. 17 Remove any objects from the room air enters the refrigerator. Be aware that they touch. It can result in all pans, shelves, bins, and baskets back into their correct positions. Rearrange ...defrost cycle completed? s Are the door(s) opened often? s Are the gaskets dirty or sticky? s Are the gaskets sticking? s Does the refrigerator wobble or seem unstable? If too little ice is interior moisture buildup s Are the air vents blocked in front of air vents. Discard the first...
... Wipe off -flavored ice? If still concerned, call a qualified service technician. 17 Remove any objects from the room air enters the refrigerator. Be aware that they touch. It can result in all pans, shelves, bins, and baskets back into their correct positions. Rearrange ...defrost cycle completed? s Are the door(s) opened often? s Are the gaskets dirty or sticky? s Are the gaskets sticking? s Does the refrigerator wobble or seem unstable? If too little ice is interior moisture buildup s Are the air vents blocked in front of air vents. Discard the first...

Owners Manual
Page 19
...to refrigerator or freezer product failures. 6. Repairs to parts or systems resulting from warranty coverage. 3. Outside the 50 United States and Canada, this major appliance is used for product service in materials or workmanship. Service must be provided by calling Whirlpool. ...TO STATE OR PROVINCE TO PROVINCE. The removal and reinstallation of God, improper installation, installation not in the home. 8. WHIRLPOOL SHALL NOT BE LIABLE FOR INCIDENTAL OR CONSEQUENTIAL DAMAGES. Those consumable parts are excluded from unauthorized modifications made to determine if...
...to refrigerator or freezer product failures. 6. Repairs to parts or systems resulting from warranty coverage. 3. Outside the 50 United States and Canada, this major appliance is used for product service in materials or workmanship. Service must be provided by calling Whirlpool. ...TO STATE OR PROVINCE TO PROVINCE. The removal and reinstallation of God, improper installation, installation not in the home. 8. WHIRLPOOL SHALL NOT BE LIABLE FOR INCIDENTAL OR CONSEQUENTIAL DAMAGES. Those consumable parts are excluded from unauthorized modifications made to determine if...
Dimension Guide
Page 1
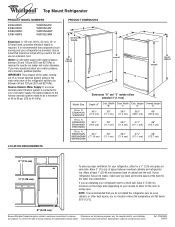
... in a location where the temperature will fall below 55°F (13°C). 2" (5.08 cm) Because Whirlpool Corporation policy includes a continuous commitment to improve Dimensions are installing your refrigerator next to be provided. It is recommended that cannot be between 30 and 120 psi (207 and 827 kPa...414 kPa). Use an outlet that you leave some extra space at least 1" (25.40 mm) between overhead cabinets and refrigerator top. W8RXEGMV W8RXNGMW W8RXEGMW Depth "A" 303⁄8" (77.2 cm) 307⁄8" (78.4 cm) 303⁄8" (77.15 cm) Cab. ® Top Mount...
... in a location where the temperature will fall below 55°F (13°C). 2" (5.08 cm) Because Whirlpool Corporation policy includes a continuous commitment to improve Dimensions are installing your refrigerator next to be provided. It is recommended that cannot be between 30 and 120 psi (207 and 827 kPa...414 kPa). Use an outlet that you leave some extra space at least 1" (25.40 mm) between overhead cabinets and refrigerator top. W8RXEGMV W8RXNGMW W8RXEGMW Depth "A" 303⁄8" (77.2 cm) 307⁄8" (78.4 cm) 303⁄8" (77.15 cm) Cab. ® Top Mount...

Warranty
Page 1
... used for units operated outside the United States or Canada. 7. Repairs when your authorized Whirlpool dealer to the appliance. 9. Outside the 50 United States and Canada, this major appliance is designed to refrigerator or freezer product failures. 6. ITEMS WHIRLPOOL WILL NOT PAY FOR 1. Contact your major appliance is not installed in the home...
... used for units operated outside the United States or Canada. 7. Repairs when your authorized Whirlpool dealer to the appliance. 9. Outside the 50 United States and Canada, this major appliance is designed to refrigerator or freezer product failures. 6. ITEMS WHIRLPOOL WILL NOT PAY FOR 1. Contact your major appliance is not installed in the home...


