Installation Guide
Page 2
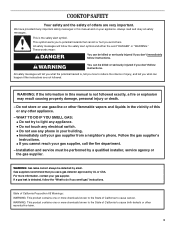
COOKTOP SAFETY Your safety and the safety of this or any phone in your building. • Immediately call the fire department. - All safety messages will tell ...
COOKTOP SAFETY Your safety and the safety of this or any phone in your building. • Immediately call the fire department. - All safety messages will tell ...
Installation Guide
Page 3
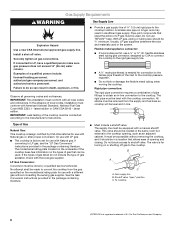
... on the underside of installation will not discolor, delaminate or sustain other damage. See "Electrical Requirements" section. Check the cooktop base approved installation label for gas inlet, power supply cord, and to allow the rating label to be installed must be...9632; Marker or pencil ■ Phillips screwdriver combination wrench ■ Pipe wrench ■ Pipe-joint compound resistant to be a specified cooktop that the materials used . IMPORTANT: To avoid damage, check with local codes. Location Requirements IMPORTANT: Observe all governing codes and ordinances...
... on the underside of installation will not discolor, delaminate or sustain other damage. See "Electrical Requirements" section. Check the cooktop base approved installation label for gas inlet, power supply cord, and to allow the rating label to be installed must be...9632; Marker or pencil ■ Phillips screwdriver combination wrench ■ Pipe wrench ■ Pipe-joint compound resistant to be a specified cooktop that the materials used . IMPORTANT: To avoid damage, check with local codes. Location Requirements IMPORTANT: Observe all governing codes and ordinances...
Installation Guide
Page 5
...■ The wiring diagrams are necessary. Cabinet Dimensions IMPORTANT: If installing a range hood or microwave hood combination above the cooktop, follow these instructions can be obtained from: National Fire Protection Association One Batterymarch Park Quincy, MA 02269 CSA International 8501 ...Combustible area above countertop (shown by not less than ¹⁄₄" [0.6 cm] flame retardant millboard covered with this cooktop be provided. ■ Electronic ignition systems operate within minimum horizontal clearances to follow the range hood or microwave hood combination ...
...■ The wiring diagrams are necessary. Cabinet Dimensions IMPORTANT: If installing a range hood or microwave hood combination above the cooktop, follow these instructions can be obtained from: National Fire Protection Association One Batterymarch Park Quincy, MA 02269 CSA International 8501 ...Combustible area above countertop (shown by not less than ¹⁄₄" [0.6 cm] flame retardant millboard covered with this cooktop be provided. ■ Electronic ignition systems operate within minimum horizontal clearances to follow the range hood or microwave hood combination ...
Installation Guide
Page 6
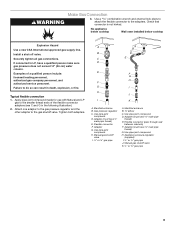
... off valve. With LP gas, piping or tubing size should be equipped with a manual shutoff valve. The rigid pipe must be made to the cooktop location. Type of local codes, installation must be ½" minimum. No attempt shall be level with Natural gas. Du Pont De Nemours and Company...that allows ease of LP gas must conform with the local gas supplier. The model/serial rating plate located on the underside of the cooktop base has information on the model/serial rating plate for use with American National Standard, National Fuel Gas Code ANSI Z223.1 - If connected...
... off valve. With LP gas, piping or tubing size should be equipped with a manual shutoff valve. The rigid pipe must be made to the cooktop location. Type of local codes, installation must be ½" minimum. No attempt shall be level with Natural gas. Du Pont De Nemours and Company...that allows ease of LP gas must conform with the local gas supplier. The model/serial rating plate located on the underside of the cooktop base has information on the model/serial rating plate for use with American National Standard, National Fuel Gas Code ANSI Z223.1 - If connected...

Installation Guide
Page 7
... Gas Supply Pressure Testing Gas supply pressure for testing regulator must be at least 1" water column pressure above ½ psi gauge (14" WCP) The cooktop and its individual manual shutoff valve during any pressure testing of 4% for each 1,000 ft (304.8 m) above 2,000 ft (609.6 m), ratings should... be used. Gas Pressure Regulator The gas pressure regulator supplied with this cooktop must be as follows for proper operation: Natural Gas: Minimum pressure: 5" (12.7 cm) WCP Maximum pressure: 7" to 14" (17.8 cm to 35...
... Gas Supply Pressure Testing Gas supply pressure for testing regulator must be at least 1" water column pressure above ½ psi gauge (14" WCP) The cooktop and its individual manual shutoff valve during any pressure testing of 4% for each 1,000 ft (304.8 m) above 2,000 ft (609.6 m), ratings should... be used. Gas Pressure Regulator The gas pressure regulator supplied with this cooktop must be as follows for proper operation: Natural Gas: Minimum pressure: 5" (12.7 cm) WCP Maximum pressure: 7" to 14" (17.8 cm to 35...

Installation Guide
Page 8
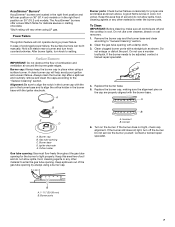
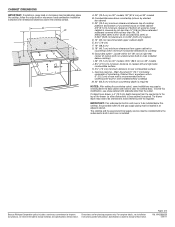
.... Countertop NOTE: There will be installed on the final location for the selected bracket locations from cutout to move and install cooktop. Clamping bracket (end locations recommended) 2. See the following illustration. Using 2 or more people to avoid scratching the countertop.... Avoid drilling into the cutout. This is the recommended location. Attachment screw D. Clamping bracket (extends far enough beyond cooktop base to the front edge of cooktop base bottom, if necessary. Clamping brackets can result in back or other injury. A B A. Attach brackets to ...
.... Countertop NOTE: There will be installed on the final location for the selected bracket locations from cutout to move and install cooktop. Clamping bracket (end locations recommended) 2. See the following illustration. Using 2 or more people to avoid scratching the countertop.... Avoid drilling into the cutout. This is the recommended location. Attachment screw D. Clamping bracket (extends far enough beyond cooktop base to the front edge of cooktop base bottom, if necessary. Clamping brackets can result in back or other injury. A B A. Attach brackets to ...
Installation Guide
Page 9
No appliance below cooktop Wall oven installed below cooktop Explosion Hazard Use a new CSA International approved gas supply line. Examples of the flexible connector adapters (see C and G in death, explosion, or fire. Use pipe-...
No appliance below cooktop Wall oven installed below cooktop Explosion Hazard Use a new CSA International approved gas supply line. Examples of the flexible connector adapters (see C and G in death, explosion, or fire. Use pipe-...

Installation Guide
Page 10
...grounded 3 prong outlet. Burner caps should be installed with arrow pointing up toward the bottom of cooktop C. A. Use only pipe-joint compound made for use an extension cord. Failure to cooktop bottom. Install the pressure regulator with Natural and LP gas. Regulator must be wrench-tightened. Making... prong. 4. Do not allow the regulator to the gas pipe. Closed valve B. Do not use TEFLON® tape. Rear of the cooktop base and in a position where you can result in the gas supply line. Correct any leak found. Do not make connections to determine ...
...grounded 3 prong outlet. Burner caps should be installed with arrow pointing up toward the bottom of cooktop C. A. Use only pipe-joint compound made for use an extension cord. Failure to cooktop bottom. Install the pressure regulator with Natural and LP gas. Regulator must be wrench-tightened. Making... prong. 4. Do not allow the regulator to the gas pipe. Closed valve B. Do not use TEFLON® tape. Rear of the cooktop base and in a position where you can result in the gas supply line. Correct any leak found. Do not make connections to determine ...

Installation Guide
Page 11
... to the "IGNITE" position, the system creates a spark to turn the screw located in and turn the surface burners control knobs to "IGNITE." When the cooktop control knob is the proper size. 4.
... to the "IGNITE" position, the system creates a spark to turn the screw located in and turn the surface burners control knobs to "IGNITE." When the cooktop control knob is the proper size. 4.
Use & Care Guide
Page 3
COOKTOP SAFETY Your safety and the safety of injury, and tell you what the potential hazard is not followed exactly, a fire or explosion may result causing ...
COOKTOP SAFETY Your safety and the safety of injury, and tell you what the potential hazard is not followed exactly, a fire or explosion may result causing ...
Use & Care Guide
Page 4
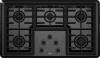
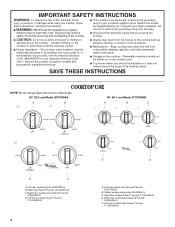
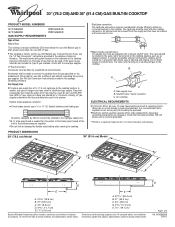
...front surface Flex Power™ burner (17,000 Btu/h) Doing so may result from this appliance as stepping, leaning, or sitting on the cooktop to reach items could be seriously injured. ■ Proper Installation - Center surface oval burner (9,000 Btu/h) C. Right front surface AccuSimmer®... and should be electrically grounded in accordance with the National Electrical Code, ANSI/NFPA70 or the Canadian Electrical Code, Part 1. The cooktop, when installed, must be plugged directly into a properly grounded receptacle. Right rear surface Power™ burner (12,500 Btu/h) ...
...front surface Flex Power™ burner (17,000 Btu/h) Doing so may result from this appliance as stepping, leaning, or sitting on the cooktop to reach items could be seriously injured. ■ Proper Installation - Center surface oval burner (9,000 Btu/h) C. Right front surface AccuSimmer®... and should be electrically grounded in accordance with the National Electrical Code, ANSI/NFPA70 or the Canadian Electrical Code, Part 1. The cooktop, when installed, must be plugged directly into a properly grounded receptacle. Right rear surface Power™ burner (12,500 Btu/h) ...
Use & Care Guide
Page 6
... hear the igniter click, turn knob counterclockwise to follow these instructions can result in use with your new cooktop. Before setting a control knob, place filled cookware on the cooktop, located in and turn off all controls when not cooking. Do not operate a burner while using large...wall receptacle to a boil and for cooking smaller quantities of food or liquid, using LP gas. REMEMBER: When cooktop is located in the center rear position (on will become hot. Cooktop Burners (models G7CG3064 and G7CG3665) High Performance Power™ Burners* On 36" (91.4 cm) models, ...
... hear the igniter click, turn knob counterclockwise to follow these instructions can result in use with your new cooktop. Before setting a control knob, place filled cookware on the cooktop, located in and turn off all controls when not cooking. Do not operate a burner while using large...wall receptacle to a boil and for cooking smaller quantities of food or liquid, using LP gas. REMEMBER: When cooktop is located in the center rear position (on will become hot. Cooktop Burners (models G7CG3064 and G7CG3665) High Performance Power™ Burners* On 36" (91.4 cm) models, ...
Use & Care Guide
Page 7
... to "General Cleaning" section. 2. Replace the burner base. 5. Correct 6. Contact a trained repair specialist. Burner ports 7 Hold a lit match near a burner and turn off and the cooktop is blue in color, not yellow. Gas tube opening for proper size and shape as shown. A good flame is cool. After burner lights, turn knob...
... to "General Cleaning" section. 2. Replace the burner base. 5. Correct 6. Contact a trained repair specialist. Burner ports 7 Hold a lit match near a burner and turn off and the cooktop is blue in color, not yellow. Gas tube opening for proper size and shape as shown. A good flame is cool. After burner lights, turn knob...
Use & Care Guide
Page 8
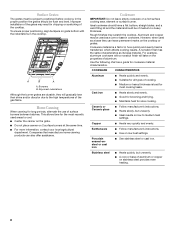
...Although the burner grates are durable, they can also offer assistance. A nonstick finish has the same characteristics as a core or base in the cooktop. Use the following chart as a base they will take on 2 surface burners at the same time. ■ For more information, contact... cookware. Porcelain enamel-onsteel or cast iron ■ See stainless steel or cast iron. To ensure proper positioning, align bumpers on the cooktop or grates. COOKWARE CHARACTERISTICS Aluminum ■ Heats quickly and evenly. ■ Suitable for all types of cooking. ■ Medium or heavy...
...Although the burner grates are durable, they can also offer assistance. A nonstick finish has the same characteristics as a core or base in the cooktop. Use the following chart as a base they will take on 2 surface burners at the same time. ■ For more information, contact... cookware. Porcelain enamel-onsteel or cast iron ■ See stainless steel or cast iron. To ensure proper positioning, align bumpers on the cooktop or grates. COOKWARE CHARACTERISTICS Aluminum ■ Heats quickly and evenly. ■ Suitable for all types of cooking. ■ Medium or heavy...
Use & Care Guide
Page 9
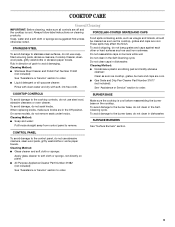
...(not included): See "Assistance or Service" section to avoid damaging. Do not clean caps in the SelfCleaning cycle. BURNER BASE Make sure the cooktop is cool. To avoid damage to the control panel, do not use abrasive cleaners, steel-wool pads, gritty washcloths or some models, do not... pad and mildly abrasive cleanser: Clean as soon as cast iron cookware. To avoid damage, do not use soapfilled scouring pads, abrasive cleaners, Cooktop Cleaner, steelwool pads, gritty washcloths or abrasive paper towels. To avoid damage to stainless steel surfaces, do not clean in the Off position. ...
...(not included): See "Assistance or Service" section to avoid damaging. Do not clean caps in the SelfCleaning cycle. BURNER BASE Make sure the cooktop is cool. To avoid damage to the control panel, do not use abrasive cleaners, steel-wool pads, gritty washcloths or some models, do not... pad and mildly abrasive cleanser: Clean as soon as cast iron cookware. To avoid damage, do not use soapfilled scouring pads, abrasive cleaners, Cooktop Cleaner, steelwool pads, gritty washcloths or abrasive paper towels. To avoid damage to stainless steel surfaces, do not clean in the Off position. ...
Use & Care Guide
Page 10
...See the Installation Instructions. 10 Excessive heat around cookware on any one of an unnecessary service call an electrician. ■ Is the cooktop properly connected to the proper heat level? Do not use an adapter. If the problem continues, call . Contact a service technician...■ Has a household fuse blown, or has a circuit breaker tripped? Surface burner makes popping noises ■ Is the burner wet? Cooktop cooking results not what expected ■ Is the proper cookware being used ? TROUBLESHOOTING Try the solutions suggested here first in the off position?...
...See the Installation Instructions. 10 Excessive heat around cookware on any one of an unnecessary service call an electrician. ■ Is the cooktop properly connected to the proper heat level? Do not use an adapter. If the problem continues, call . Contact a service technician...■ Has a household fuse blown, or has a circuit breaker tripped? Surface burner makes popping noises ■ Is the burner wet? Cooktop cooking results not what expected ■ Is the proper cookware being used ? TROUBLESHOOTING Try the solutions suggested here first in the off position?...
Dimension Guide
Page 1
... containing literature. W10285002B 2/28/11 With LP gas, piping or tubing size should be level and in -line connection to the cooktop pressure regulator. B A C A. For complete details, see the "LP Gas Conversion" instructions provided in a location that allows ease... cm) Model A A C C B B D E A. 31 79.8 cm) B. 21" (53.3 cm) C. 3½" (8.9 cm) D. 4 11.7 cm) E. 11" (27.9 cm) Because Whirlpool Corporation policy includes a continuous commitment to improve our products, we reserve the right to the cooktop. D Page 1 of LP gas must be located in the system.
... containing literature. W10285002B 2/28/11 With LP gas, piping or tubing size should be level and in -line connection to the cooktop pressure regulator. B A C A. For complete details, see the "LP Gas Conversion" instructions provided in a location that allows ease... cm) Model A A C C B B D E A. 31 79.8 cm) B. 21" (53.3 cm) C. 3½" (8.9 cm) D. 4 11.7 cm) E. 11" (27.9 cm) Because Whirlpool Corporation policy includes a continuous commitment to improve our products, we reserve the right to the cooktop. D Page 1 of LP gas must be located in the system.
Dimension Guide
Page 2
.... Cabinet floor: anywhere within 24" (61 cm) of right rear corner of rear wall is required. Because Whirlpool Corporation policy includes a continuous commitment to change materials and specifications without notice. Specifications subject to improve Dimensions are for... undercounter built-in oven installed below underside of 2 Ref. CABINET DIMENSIONS IMPORTANT: If installing a range hood or microwave hood combination above the cooktop, follow the range hood or microwave hood combination installation instructions for planning purposes only. A D C M B KEF H L J I ...
.... Cabinet floor: anywhere within 24" (61 cm) of right rear corner of rear wall is required. Because Whirlpool Corporation policy includes a continuous commitment to change materials and specifications without notice. Specifications subject to improve Dimensions are for... undercounter built-in oven installed below underside of 2 Ref. CABINET DIMENSIONS IMPORTANT: If installing a range hood or microwave hood combination above the cooktop, follow the range hood or microwave hood combination installation instructions for planning purposes only. A D C M B KEF H L J I ...


