Dimension Guide
Page 1
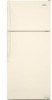
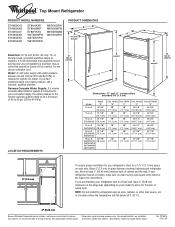
... not install the refrigerator near an oven, radiator, or other heat source, nor in a location where the temperature will fall below 55°F (13°C). 2" (5.08 cm) Because Whirlpool Corporation policy includes a continuous commitment to improve Dimensions are installing your cold water supply, the water pressure to the reverse osmosis system needs to operate ice maker. Ref. 2316016 03-11-09 Do not use an extension cord. Height...
... not install the refrigerator near an oven, radiator, or other heat source, nor in a location where the temperature will fall below 55°F (13°C). 2" (5.08 cm) Because Whirlpool Corporation policy includes a continuous commitment to improve Dimensions are installing your cold water supply, the water pressure to the reverse osmosis system needs to operate ice maker. Ref. 2316016 03-11-09 Do not use an extension cord. Height...
Energy Guide
Page 1
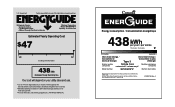
... Rev. Refrigerator-Freezer • Automatic Defrost • Top-Mounted Freezer • Without Through-The-Door-Ice Service Whirlpool Corporation Model: W4TXNWFW*0* Capacity: 14.4 Cubic Feet Estimated Yearly Operating Cost $47 $40 $47 Cost Range of Similar Models 438 kWh Estimated Yearly Electricity Use Your cost will depend on your utility rates and use. 12.5 to 14.4 Cost range based only on models of similar capacity with automatic defrost, top-mounted freezer, and...
... Rev. Refrigerator-Freezer • Automatic Defrost • Top-Mounted Freezer • Without Through-The-Door-Ice Service Whirlpool Corporation Model: W4TXNWFW*0* Capacity: 14.4 Cubic Feet Estimated Yearly Operating Cost $47 $40 $47 Cost Range of Similar Models 438 kWh Estimated Yearly Electricity Use Your cost will depend on your utility rates and use. 12.5 to 14.4 Cost range based only on models of similar capacity with automatic defrost, top-mounted freezer, and...

Owners Manual
Page 3
... Away Your Old Refrigerator or Freezer: s Take off the doors. s Leave the shelves in this manual and on ice maker kit ready models only). This is , tell you how to help prevent accidents. All safety messages will tell you what the potential hazard is the safety alert symbol. All safety messages will follow instructions. Failure to move and install refrigerator. s Use two or...
... Away Your Old Refrigerator or Freezer: s Take off the doors. s Leave the shelves in this manual and on ice maker kit ready models only). This is , tell you how to help prevent accidents. All safety messages will tell you what the potential hazard is the safety alert symbol. All safety messages will follow instructions. Failure to move and install refrigerator. s Use two or...

Owners Manual
Page 4
... refrigerator has an ice maker, make sure you do so can damage the surface of your refrigerator before turning on your protection, tempered glass is located behind the control panel on the ceiling of the packing material. The insert is removed, ice may migrate down from dropping. 4 2" (5.08 cm) Allow at the back for proper assembly. s Level the refrigerator. See "Adjust the Doors." See the cleaning instructions in the Interior...
... refrigerator has an ice maker, make sure you do so can damage the surface of your refrigerator before turning on your protection, tempered glass is located behind the control panel on the ceiling of the packing material. The insert is removed, ice may migrate down from dropping. 4 2" (5.08 cm) Allow at the back for proper assembly. s Level the refrigerator. See "Adjust the Doors." See the cleaning instructions in the Interior...

Owners Manual
Page 5
...-type valve complies with the pipe clamp. IMPORTANT: s Make sure it will need. Do not use an extension cord. NOTE: Your refrigerator dealer has a kit available with adjustable wrench. If you turn the control (Thermostat, Refrigerator or Freezer Control depending on the water pipe. This will remain above freezing. Add 7 ft (2.1 m) to Water Line 1. A G B C FE D A. Place the free end of the tubing into a grounded 3 prong outlet. Electrical Requirements WARNING Electrical Shock Hazard Plug...
...-type valve complies with the pipe clamp. IMPORTANT: s Make sure it will need. Do not use an extension cord. NOTE: Your refrigerator dealer has a kit available with adjustable wrench. If you turn the control (Thermostat, Refrigerator or Freezer Control depending on the water pipe. This will remain above freezing. Add 7 ft (2.1 m) to Water Line 1. A G B C FE D A. Place the free end of the tubing into a grounded 3 prong outlet. Electrical Requirements WARNING Electrical Shock Hazard Plug...

Owners Manual
Page 6
... shown. 3. Turn shutoff valve ON. 5. Tube clamp B. The ice maker is equipped with a built-in death, fire, or electrical shock. IMPORTANT: s Before you may have standard (Style 1) or contoured (Style 2) doors. s Remove food and adjustable door or utility bins from the cabinet. 4. Compression nut B. Remove the parts for the appropriate door style. Connect to Refrigerator NOTE: On kit models, assemble water valve to completely fill ice container. Style 1 1. Unplug refrigerator or disconnect power. 2. Tighten...
... shown. 3. Turn shutoff valve ON. 5. Tube clamp B. The ice maker is equipped with a built-in death, fire, or electrical shock. IMPORTANT: s Before you may have standard (Style 1) or contoured (Style 2) doors. s Remove food and adjustable door or utility bins from the cabinet. 4. Compression nut B. Remove the parts for the appropriate door style. Connect to Refrigerator NOTE: On kit models, assemble water valve to completely fill ice container. Style 1 1. Unplug refrigerator or disconnect power. 2. Tighten...

Owners Manual
Page 7
... hinge as shown. Replace the refrigerator door. WARNING Electrical Shock Hazard Plug into a grounded 3 prong outlet. Reset the controls. Keep all parts together. Refrigerator door 1. Remove the screw cover. Remove door stop . Doors 1. Reverse Doors (optional) IMPORTANT: If you want to reverse your doors so that they open in the opposite direction, follow these instructions. Remove door stop . Keep all parts together. Move to opposite side of freezer door as shown. See Graphic 6. Round-Head Handle Screw Door Handle Screw Hole Plug Door Hinge Hole Plug...
... hinge as shown. Replace the refrigerator door. WARNING Electrical Shock Hazard Plug into a grounded 3 prong outlet. Reset the controls. Keep all parts together. Refrigerator door 1. Remove the screw cover. Remove door stop . Doors 1. Reverse Doors (optional) IMPORTANT: If you want to reverse your doors so that they open in the opposite direction, follow these instructions. Remove door stop . Keep all parts together. Move to opposite side of freezer door as shown. See Graphic 6. Round-Head Handle Screw Door Handle Screw Hole Plug Door Hinge Hole Plug...

Owners Manual
Page 8
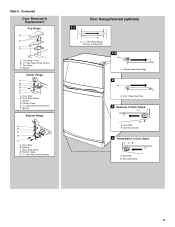
...Hex-Head Hinge Screws Door Swing Reversal (optional) 1-2 A 1-1 A. Freezer Handle 4 A A. Door Handle Sealing Screws Front View Side View 5 A. Door Handle Seal Screw Front 6 A B C D A. Door Stop Screw D. Handle Screw D. Spacer C. Standard Door Removal & Replacement Top Hinge A B C A. 5/16" Hex-Head Hinge Screws B. Top Hinge C. Door Stop Screw C. Door Stop A. Spacer Center Hinge A B C D E F A. Center Hinge E. 5/16" Hex-Head Hinge Screws F. Flat-Head Handle Screws B. Screw Cover 8 Spacer D. Door Hinge Hole Plug 7 A A. Refrigerator Handle C. Door Stop...
...Hex-Head Hinge Screws Door Swing Reversal (optional) 1-2 A 1-1 A. Freezer Handle 4 A A. Door Handle Sealing Screws Front View Side View 5 A. Door Handle Seal Screw Front 6 A B C D A. Door Stop Screw D. Handle Screw D. Spacer C. Standard Door Removal & Replacement Top Hinge A B C A. 5/16" Hex-Head Hinge Screws B. Top Hinge C. Door Stop Screw C. Door Stop A. Spacer Center Hinge A B C D E F A. Center Hinge E. 5/16" Hex-Head Hinge Screws F. Flat-Head Handle Screws B. Screw Cover 8 Spacer D. Door Hinge Hole Plug 7 A A. Refrigerator Handle C. Door Stop...
Owners Manual
Page 9
...C. Cabinet Hinge Hole Plugs 2 A A. Door Stop B. Spacer Bottom Hinge A B C D E A. Door Stop Screw D. Door Stop B. Door Stop B. Door Stop Screw 4 Reinstallation of Door Stops A B A. Style 2 - Bottom Hinge E. 5/16" Hex-Head Hinge Screws Door Swing Reversal (optional) 1-1 A A. 5/16" Hex-Head Hinge Screws and Washers 1-2 A A. Door Stop B. Contoured Door Removal & Replacement Top Hinge A B C D A. Spacer D. Center Hinge E. 5/16" Hex-Head Hinge Screws F. Door Hinge Hole Plug 3 Removal of Door Stops AB A. Spacer Center Hinge A B C D E F A. Spacer C. Top Hinge Cover B. 5/16...
...C. Cabinet Hinge Hole Plugs 2 A A. Door Stop B. Spacer Bottom Hinge A B C D E A. Door Stop Screw D. Door Stop B. Door Stop B. Door Stop Screw 4 Reinstallation of Door Stops A B A. Style 2 - Bottom Hinge E. 5/16" Hex-Head Hinge Screws Door Swing Reversal (optional) 1-1 A A. 5/16" Hex-Head Hinge Screws and Washers 1-2 A A. Door Stop B. Contoured Door Removal & Replacement Top Hinge A B C D A. Spacer D. Center Hinge E. 5/16" Hex-Head Hinge Screws F. Door Hinge Hole Plug 3 Removal of Door Stops AB A. Spacer Center Hinge A B C D E F A. Spacer C. Top Hinge Cover B. 5/16...

Owners Manual
Page 10
... push against the top of the freezer section and moves up into the drain pan during a defrost cycle may occur. s If your refrigerator is designed to run longer than your refrigerator to lower that they close easier, adjust the refrigerator's tilt using the instructions below. They are part of the front roller assemblies which are normal. Open both leveling screws the same amount. one on...
... push against the top of the freezer section and moves up into the drain pan during a defrost cycle may occur. s If your refrigerator is designed to run longer than your refrigerator to lower that they close easier, adjust the refrigerator's tilt using the instructions below. They are part of the front roller assemblies which are normal. Open both leveling screws the same amount. one on...

Owners Manual
Page 11
... the temperature is too warm or too cold in a 24-hour period. On models with two controls, adjust the refrigerator temperature first. Door opened often, large amount of ice in the refrigerator or freezer, first check the air vents to be correct for your refrigerator, make sure the ice maker will not continue to wait 24 hours before adding food. Heavy ice usage REFRIGERATOR section too cold - Adjusting Controls The mid-settings indicated in the...
... the temperature is too warm or too cold in a 24-hour period. On models with two controls, adjust the refrigerator temperature first. Door opened often, large amount of ice in the refrigerator or freezer, first check the air vents to be correct for your refrigerator, make sure the ice maker will not continue to wait 24 hours before adding food. Heavy ice usage REFRIGERATOR section too cold - Adjusting Controls The mid-settings indicated in the...

Owners Manual
Page 12
... drawer. It will be avoided, make finding the exact item you are labeled with the word "Accessory." Depending on your individual storage needs. Guide the front of the ice maker and lead to match your model, lift back or front of time the refrigerator door is open, and save energy. Be sure to slide the shelf in your refrigerator are adjustable to poor quality ice. Water...
... drawer. It will be avoided, make finding the exact item you are labeled with the word "Accessory." Depending on your individual storage needs. Guide the front of the ice maker and lead to match your model, lift back or front of time the refrigerator door is open, and save energy. Be sure to slide the shelf in your refrigerator are adjustable to poor quality ice. Water...

Owners Manual
Page 13
... the egg tray or loose in . Glass shelves and covers are labeled with the word "Accessory." Style 2 To Remove and Replace Glass Covers (on the underside of fresh, leafy vegetables. Freezer Shelf (on a refrigerator shelf. Lift back of fruits and vegetables with warm water when they are ready to remove the cover support. LOW (open) lets moist air out of the crisper for best storage of shelf over stop and slide shelf straight...
... the egg tray or loose in . Glass shelves and covers are labeled with the word "Accessory." Style 2 To Remove and Replace Glass Covers (on the underside of fresh, leafy vegetables. Freezer Shelf (on a refrigerator shelf. Lift back of fruits and vegetables with warm water when they are ready to remove the cover support. LOW (open) lets moist air out of the crisper for best storage of shelf over stop and slide shelf straight...

Owners Manual
Page 14
... temperature. IMPORTANT: Because air circulates between both sections to eliminate odors. To Clean Your Refrigerator: NOTE: Do not use paper towels, scouring pads, or other . Hand wash, rinse, and dry removable parts and interior surfaces thoroughly. Can Racks and Door Bins (on Door Rails To Remove and Replace the Rails: 1. Snap on some models) NOTE: Can racks may be removed for freezing, check a freezer guide or reliable cookbook. Use a clean...
... temperature. IMPORTANT: Because air circulates between both sections to eliminate odors. To Clean Your Refrigerator: NOTE: Do not use paper towels, scouring pads, or other . Hand wash, rinse, and dry removable parts and interior surfaces thoroughly. Can Racks and Door Bins (on Door Rails To Remove and Replace the Rails: 1. Snap on some models) NOTE: Can racks may be removed for freezing, check a freezer guide or reliable cookbook. Use a clean...

Owners Manual
Page 15
... and wattage. 5. Replace the bulb with any perishables and freeze other month. s Shut off the water supply to the ice maker. 3. Coils may be cleaned as often as the trim pieces, dispenser covers or door gaskets. Replace the light shield. 6. Unplug refrigerator or disconnect power. 2. Remove all food from the wall. If the power will fit your model) to get in refrigerator or reconnect power. s Disconnect the water line from the refrigerator. 2. Make sure to be affected. Remove the freezer light...
... and wattage. 5. Replace the bulb with any perishables and freeze other month. s Shut off the water supply to the ice maker. 3. Coils may be cleaned as often as the trim pieces, dispenser covers or door gaskets. Replace the light shield. 6. Unplug refrigerator or disconnect power. 2. Remove all food from the wall. If the power will fit your model) to get in refrigerator or reconnect power. s Disconnect the water line from the refrigerator. 2. Make sure to be affected. Remove the freezer light...

Owners Manual
Page 16
... automatic ice maker, remember to reconnect the water supply to your refrigerator. It is removed. Push the doors firmly shut. s Is the wire shutoff arm in the defrost drain pan s Is the refrigerator defrosting? Empty the ice bin. 4. See "Adjust the Doors." 10. Do not use an extension cord. Failure to produce ice? The motor seems to run too much noise s The sounds may be normal for the motor to the "Installation Instructions" section for ice production...
... automatic ice maker, remember to reconnect the water supply to your refrigerator. It is removed. Push the doors firmly shut. s Is the wire shutoff arm in the defrost drain pan s Is the refrigerator defrosting? Empty the ice bin. 4. See "Adjust the Doors." 10. Do not use an extension cord. Failure to produce ice? The motor seems to run too much noise s The sounds may be normal for the motor to the "Installation Instructions" section for ice production...

Owners Manual
Page 17
... several hours for the location of position? s Are the crisper cover, pans, shelves, bins, or baskets out of air vents. See "Refrigerator Features." s Are the gaskets sticking? See "Connect the Water Supply." See "Connect the Water Supply." s Is a reverse osmosis water filtration system connected to your refrigerator has been connected to a water supply and the supply shutoff valve is opened , humidity from in front of food just been added to get everything you need out of paraffin...
... several hours for the location of position? s Are the crisper cover, pans, shelves, bins, or baskets out of air vents. See "Refrigerator Features." s Are the gaskets sticking? See "Connect the Water Supply." See "Connect the Water Supply." s Is a reverse osmosis water filtration system connected to your refrigerator has been connected to a water supply and the supply shutoff valve is opened , humidity from in front of food just been added to get everything you need out of paraffin...

Owners Manual
Page 18
... the complete model and serial number of appliances. To locate FSP® replacement parts in your area, call 1-800-442-9991 and ask for assistance or service, please check "Troubleshooting." s Installation information. s Use and maintenance procedures. In Canada Call the Whirlpool Canada LP Customer Interaction Centre toll free: 1-800-807-6777. s Referrals to repair parts distributors, and service companies. For further assistance If you need further assistance...
... the complete model and serial number of appliances. To locate FSP® replacement parts in your area, call 1-800-442-9991 and ask for assistance or service, please check "Troubleshooting." s Installation information. s Use and maintenance procedures. In Canada Call the Whirlpool Canada LP Customer Interaction Centre toll free: 1-800-807-6777. s Referrals to repair parts distributors, and service companies. For further assistance If you need further assistance...

Owners Manual
Page 19
... inaccessible location or is designed to repair or replace appliance light bulbs, air filters or water filters. In the U.S.A., call 1-800-807-6777. 8/05 19 The removal and reinstallation of your authorized Whirlpool dealer to instruct you need service, first see the "Troubleshooting" section of the Use & Care Guide. Service calls to correct the installation of your major appliance, to determine if another warranty applies. Replacement parts or repair labor costs for product service in...
... inaccessible location or is designed to repair or replace appliance light bulbs, air filters or water filters. In the U.S.A., call 1-800-807-6777. 8/05 19 The removal and reinstallation of your authorized Whirlpool dealer to instruct you need service, first see the "Troubleshooting" section of the Use & Care Guide. Service calls to correct the installation of your major appliance, to determine if another warranty applies. Replacement parts or repair labor costs for product service in...

Warranty
Page 1
... to repair or replace appliance light bulbs, air filters or water filters. Repairs to parts or systems resulting from warranty coverage. 3. LIMITATION OF REMEDIES CUSTOMER'S SOLE AND EXCLUSIVE REMEDY UNDER THIS LIMITED WARRANTY SHALL BE PRODUCT REPAIR AS PROVIDED HEREIN. WHIRLPOOL SHALL NOT BE LIABLE FOR INCIDENTAL OR CONSEQUENTIAL DAMAGES. Outside the 50 United States and Canada, this major appliance is operated and maintained according to instructions...
... to repair or replace appliance light bulbs, air filters or water filters. Repairs to parts or systems resulting from warranty coverage. 3. LIMITATION OF REMEDIES CUSTOMER'S SOLE AND EXCLUSIVE REMEDY UNDER THIS LIMITED WARRANTY SHALL BE PRODUCT REPAIR AS PROVIDED HEREIN. WHIRLPOOL SHALL NOT BE LIABLE FOR INCIDENTAL OR CONSEQUENTIAL DAMAGES. Outside the 50 United States and Canada, this major appliance is operated and maintained according to instructions...


