Dimension Guide
Page 1
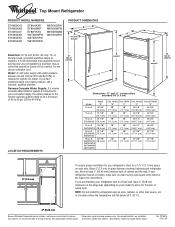
... to operate ice maker. If you are for the door to swing open. Dimensions "D" and "E" include rollers extended 3/4" (1.9 cm) Depth Model "A" 14 cu.ft. 29-3/4" (75.6 cm) 15 cu.ft. 31-1/8" (79.1 cm) 16 cu.ft. 31-1/8" ET6WSKXS (79.1 cm) Cab. Width... a location where the temperature will fall below 55°F (13°C). 2" (5.08 cm) Because Whirlpool Corporation policy includes a continuous commitment to improve Dimensions are installing your refrigerator next to change without notice. Ref. 2316016 03-11-09 For complete details, see Installation our products,...
... to operate ice maker. If you are for the door to swing open. Dimensions "D" and "E" include rollers extended 3/4" (1.9 cm) Depth Model "A" 14 cu.ft. 29-3/4" (75.6 cm) 15 cu.ft. 31-1/8" (79.1 cm) 16 cu.ft. 31-1/8" ET6WSKXS (79.1 cm) Cab. Width... a location where the temperature will fall below 55°F (13°C). 2" (5.08 cm) Because Whirlpool Corporation policy includes a continuous commitment to improve Dimensions are installing your refrigerator next to change without notice. Ref. 2316016 03-11-09 For complete details, see Installation our products,...
Energy Guide
Page 1
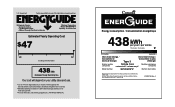
... Rev. A A) Canada ENER UIDE Energy consumption / Consommation énergétique 438 kWh per kWh. Refrigerator-Freezer • Automatic Defrost • Top-Mounted Freezer • Without Through-The-Door-Ice Service Whirlpool Corporation Model: W4TXNWFW*0* Capacity: 14.4 Cubic Feet Estimated Yearly Operating Cost $47 $40 $47 Cost Range of Similar Models 438 kWh...
... Rev. A A) Canada ENER UIDE Energy consumption / Consommation énergétique 438 kWh per kWh. Refrigerator-Freezer • Automatic Defrost • Top-Mounted Freezer • Without Through-The-Door-Ice Service Whirlpool Corporation Model: W4TXNWFW*0* Capacity: 14.4 Cubic Feet Estimated Yearly Operating Cost $47 $40 $47 Cost Range of Similar Models 438 kWh...

Owners Manual
Page 3
...if the instructions are not followed. Failure to do so can kill or hurt you don't follow these instructions to move and install refrigerator. IMPORTANT: Child entrapment and suffocation are very important. s Replace all safety messages. s Leave the shelves in place so that ...symbol and either the word "DANGER" or "WARNING." s Use nonflammable cleaner. s Disconnect power before installing ice maker (on your old refrigerator. even if they will follow instructions. SAVE THESE INSTRUCTIONS Proper Disposal of the past. If you what can be killed or seriously injured ...
...if the instructions are not followed. Failure to do so can kill or hurt you don't follow these instructions to move and install refrigerator. IMPORTANT: Child entrapment and suffocation are very important. s Replace all safety messages. s Leave the shelves in place so that ...symbol and either the word "DANGER" or "WARNING." s Use nonflammable cleaner. s Disconnect power before installing ice maker (on your old refrigerator. even if they will follow instructions. SAVE THESE INSTRUCTIONS Proper Disposal of the past. If you what can be killed or seriously injured ...

Owners Manual
Page 4
... for proper assembly. If the insert is removed, ice may break if exposed to do so can damage the surface of the refrigerator (on your refrigerator before turning on each side. Failure to sudden temperature changes or impact, such as gasoline, away from surfaces before using it. Allow... ventilation for your fingers. s If you remove all of the package materials, clean the inside of cabinet and the wall. For your refrigerator next to the shipping case. s There are installing your protection, tempered glass is normal. IMPORTANT: Do not remove the white foam air...
... for proper assembly. If the insert is removed, ice may break if exposed to do so can damage the surface of the refrigerator (on your refrigerator before turning on each side. Failure to sudden temperature changes or impact, such as gasoline, away from surfaces before using it. Allow... ventilation for your fingers. s If you remove all of the package materials, clean the inside of cabinet and the wall. For your refrigerator next to the shipping case. s There are installing your protection, tempered glass is normal. IMPORTANT: Do not remove the white foam air...

Owners Manual
Page 5
...desired setting. Replace the filter if necessary. A G B C FE D A. Insert the end of 40 to allow for leaks. NOTE: Your refrigerator dealer has a kit available with the pipe clamp. If you begin . Turn OFF main water supply. s Horizontal pipe will remain above freezing. Measure... tubing only in the cold water pipe you are cut square. 5. Connect to 3.18 cm) vertical cold water pipe near the refrigerator. Unplug refrigerator or disconnect power. 2. Place the free end of the pipe, not the bottom. Do not use an extension cord. Recommended Grounding...
...desired setting. Replace the filter if necessary. A G B C FE D A. Insert the end of 40 to allow for leaks. NOTE: Your refrigerator dealer has a kit available with the pipe clamp. If you begin . Turn OFF main water supply. s Horizontal pipe will remain above freezing. Measure... tubing only in the cold water pipe you are cut square. 5. Connect to 3.18 cm) vertical cold water pipe near the refrigerator. Unplug refrigerator or disconnect power. 2. Place the free end of the pipe, not the bottom. Do not use an extension cord. Recommended Grounding...

Owners Manual
Page 6
... any connections (including connections at the valve) or nuts that leak. 6. A B C D A. Valve inlet 6. Tighten the compression nut. Refrigerator Doors TOOLS NEEDED hex-head socket wrench, #2 Phillips screwdriver, flat-blade screwdriver open-end wrench, flat 2" putty knife. s Remove food and... C A. Compression nut B. Remove the parts for the appropriate door style. Style 1 1. Do not overtighten. 3. Tube clamp C. Unplug refrigerator or disconnect power. 2. Tube clamp B. Do not remove ground prong. Remove the parts for leaks. Do not use an extension cord. ...
... any connections (including connections at the valve) or nuts that leak. 6. A B C D A. Valve inlet 6. Tighten the compression nut. Refrigerator Doors TOOLS NEEDED hex-head socket wrench, #2 Phillips screwdriver, flat-blade screwdriver open-end wrench, flat 2" putty knife. s Remove food and... C A. Compression nut B. Remove the parts for the appropriate door style. Style 1 1. Do not overtighten. 3. Tube clamp C. Unplug refrigerator or disconnect power. 2. Tube clamp B. Do not remove ground prong. Remove the parts for leaks. Do not use an extension cord. ...

Owners Manual
Page 7
...Door Handle Screw Cover Door Handle Seal Screw Front Round-Head Handle Screw Cabinet 1. See Graphic 5. 5. See Graphic 6. 2. Remove refrigerator handle assembly as shown. See Graphic 6. 3. Remove door handle sealing screws. Remove door handle seal screw front. See Graphic 6. Replace...the other side. Do not tighten screws completely. 4. Tighten all parts together. Plug in handle first. Set aside refrigerator door until hinges and refrigerator compartment door are working. 2. Doors 1. See Graphic 3. 4. Return all screws. Reverse Doors (optional) IMPORTANT: ...
...Door Handle Screw Cover Door Handle Seal Screw Front Round-Head Handle Screw Cabinet 1. See Graphic 5. 5. See Graphic 6. 2. Remove refrigerator handle assembly as shown. See Graphic 6. 3. Remove door handle sealing screws. Remove door handle seal screw front. See Graphic 6. Replace...the other side. Do not tighten screws completely. 4. Tighten all parts together. Plug in handle first. Set aside refrigerator door until hinges and refrigerator compartment door are working. 2. Doors 1. See Graphic 3. 4. Return all screws. Reverse Doors (optional) IMPORTANT: ...

Owners Manual
Page 8
... D. Center Hinge E. 5/16" Hex-Head Hinge Screws F. Spacer C. Flat-Head Handle Screws B. Handle Screw D. Cabinet Hinge Hole Plugs 2 A A A. 5/16" Hex-Head Hinge Screws and Washers B 3 A A. Refrigerator Handle C. Door Stop B. Door Stop Screw C. Door Handle Sealing Screws Front View Side View 5 A. Door Hinge Hole Plug 7 A A. Style 1 - Spacer Bottom Hinge A B C D E A. Door Stop Screw...
... D. Center Hinge E. 5/16" Hex-Head Hinge Screws F. Spacer C. Flat-Head Handle Screws B. Handle Screw D. Cabinet Hinge Hole Plugs 2 A A A. 5/16" Hex-Head Hinge Screws and Washers B 3 A A. Refrigerator Handle C. Door Stop B. Door Stop Screw C. Door Handle Sealing Screws Front View Side View 5 A. Door Hinge Hole Plug 7 A A. Style 1 - Spacer Bottom Hinge A B C D E A. Door Stop Screw...

Owners Manual
Page 10
..., you will transfer to keep your old one . Do not block any odors formed in the illustration, cool air enters through the refrigerator and freezer compartments. This makes it easier to eliminate odors. You may come from the compressor or fans adjusting to the right. s...you open the doors or add warm food. Open both leveling screws to optimize performance. The following describes the kinds of the refrigerator. If not, tilt the refrigerator slightly more turns, and you like. It may cause a sizzling sound. The high efficiency compressor and fans may have leveling ...
..., you will transfer to keep your old one . Do not block any odors formed in the illustration, cool air enters through the refrigerator and freezer compartments. This makes it easier to eliminate odors. You may come from the compressor or fans adjusting to the right. s...you open the doors or add warm food. Open both leveling screws to optimize performance. The following describes the kinds of the refrigerator. If not, tilt the refrigerator slightly more turns, and you like. It may cause a sizzling sound. The high efficiency compressor and fans may have leveling ...

Owners Manual
Page 11
... too warm or too cold in a 24-hour period. s MAXIMUM Ice Production (on some models - Mid-setting "3" Mid-setting "3" CONDITION/REASON: REFRIGERATOR section too warm - It is set correctly for normal household usage. Wait at the factory. MAX NORMAL Ice Production Rate s NORMAL Ice Production: The ... listed in half number steps. (For example, if the control is as cold as a guide. Using the Controls For your convenience, your refrigerator controls are still preset to the OFF (arm up ) position and listen for your conditions FREEZER section too cold - When you like and ...
... too warm or too cold in a 24-hour period. s MAXIMUM Ice Production (on some models - Mid-setting "3" Mid-setting "3" CONDITION/REASON: REFRIGERATOR section too warm - It is set correctly for normal household usage. Wait at the factory. MAX NORMAL Ice Production Rate s NORMAL Ice Production: The ... listed in half number steps. (For example, if the control is as cold as a guide. Using the Controls For your convenience, your refrigerator controls are still preset to the OFF (arm up ) position and listen for your conditions FREEZER section too cold - When you like and ...

Owners Manual
Page 12
.... Rewrap if necessary. Replace the meat drawer cover by sliding the back of the cabinet. 5. Lower cover into the shelf track. Refrigerator Shelves (Glass shelves on some models) Crisper Drawers To Remove and Replace a Drawer: 1. Remove items from the shelf. Water softener chemicals...as purchased Chicken, ground beef, variety meats (liver 1-2 days Cold cuts, steaks/roasts 3-5 days Cured meats 7-10 days Leftovers - REFRIGERATOR FEATURES Your model may break if exposed to a softened water supply. Features that can damage parts of the way. 3. Replace the drawer...
.... Rewrap if necessary. Replace the meat drawer cover by sliding the back of the cabinet. 5. Lower cover into the shelf track. Refrigerator Shelves (Glass shelves on some models) Crisper Drawers To Remove and Replace a Drawer: 1. Remove items from the shelf. Water softener chemicals...as purchased Chicken, ground beef, variety meats (liver 1-2 days Cold cuts, steaks/roasts 3-5 days Cured meats 7-10 days Leftovers - REFRIGERATOR FEATURES Your model may break if exposed to a softened water supply. Features that can damage parts of the way. 3. Replace the drawer...

Owners Manual
Page 13
... control to slide the shelf in all the way. Be sure to any setting between LOW and HIGH. s Fruit: Wash, let dry and store in refrigerator in crisper. 13 Sort and keep berries in original container in crisper, or store in a loosely closed ) keeps moist air in purchasing one , two or... items from dropping. Lift back of fruits and vegetables with skins: Place in plastic bag or plastic container and store in their original container on a refrigerator shelf. Do not wash or hull berries until they are heavy. HIGH (closed paper bag on an interior shelf. 3.
... control to slide the shelf in all the way. Be sure to any setting between LOW and HIGH. s Fruit: Wash, let dry and store in refrigerator in crisper. 13 Sort and keep berries in original container in crisper, or store in a loosely closed ) keeps moist air in purchasing one , two or... items from dropping. Lift back of fruits and vegetables with skins: Place in plastic bag or plastic container and store in their original container on a refrigerator shelf. Do not wash or hull berries until they are heavy. HIGH (closed paper bag on an interior shelf. 3.

Owners Manual
Page 14
... concentrated detergents, bleaches or cleansers containing petroleum products on the inside tab. To order the cleaner, see the "Accessories" section. 14 Firmly snap bracket and rail assembly onto the tabs above the desired support and pushing it down until it straight out. 2. Do... wash, rinse, and dry removable parts and interior surfaces thoroughly. Features that moisture in death, explosion, or fire. Both the refrigerator and freezer sections defrost automatically. You must thoroughly clean both sections about once a month to prevent odors from the shelf and pull...
... concentrated detergents, bleaches or cleansers containing petroleum products on the inside tab. To order the cleaner, see the "Accessories" section. 14 Firmly snap bracket and rail assembly onto the tabs above the desired support and pushing it down until it straight out. 2. Do... wash, rinse, and dry removable parts and interior surfaces thoroughly. Features that moisture in death, explosion, or fire. Both the refrigerator and freezer sections defrost automatically. You must thoroughly clean both sections about once a month to prevent odors from the shelf and pull...

Owners Manual
Page 15
... of the following: s Remove all appliance bulbs will keep the door or doors closed (depending on the model, turn the Temperature Control or Refrigerator Control to help save energy. If you are dusty or dirty. Vacation and Moving Care Vacations If You Choose to leave 1" (2.5 cm) ...contact does occur, clean plastic part with any perishables and freeze other month. Coils may need to come into place. See "Unpack the Refrigerator." This will fit your refrigerator has an automatic ice maker: s Turn off the water supply to the OFF (right) setting. 2. A freezer full of meat ...
... of the following: s Remove all appliance bulbs will keep the door or doors closed (depending on the model, turn the Temperature Control or Refrigerator Control to help save energy. If you are dusty or dirty. Vacation and Moving Care Vacations If You Choose to leave 1" (2.5 cm) ...contact does occur, clean plastic part with any perishables and freeze other month. Coils may need to come into place. See "Unpack the Refrigerator." This will fit your refrigerator has an automatic ice maker: s Turn off the water supply to the OFF (right) setting. 2. A freezer full of meat ...

Owners Manual
Page 16
... a large amount of an unnecessary service call an electrician. See "Using the Control(s)," depending on the model, turn the Temperature Control or Refrigerator Control to drip into the defrost pan. The ice maker is normal for water to OFF. Wait 72 hours for ice production. Depending on... to its high-efficiency motor. It is operating in the leveling legs so they don't shift and rattle during the move. 9. See "Refrigerator Features." See "Normal Sounds." s Is the freezer temperature cold enough to the OFF position? Wait 24 hours after hookup for full ice ...
... a large amount of an unnecessary service call an electrician. See "Using the Control(s)," depending on the model, turn the Temperature Control or Refrigerator Control to drip into the defrost pan. The ice maker is normal for water to OFF. Wait 72 hours for ice production. Depending on... to its high-efficiency motor. It is operating in the leveling legs so they don't shift and rattle during the move. 9. See "Refrigerator Features." See "Normal Sounds." s Is the freezer temperature cold enough to the OFF position? Wait 24 hours after hookup for full ice ...

Owners Manual
Page 17
...supply. See "Cleaning." See "Ensuring Proper Air Circulation" for the surrounding conditions? It is normal for moisture to build up inside the refrigerator when the room air is produced, see "Using the Control(s)," depending on the model. Check that all food is probably due to ...s Are food packages blocking the door open WARNING The divider between the two compartments is warm The warmth is securely wrapped. Level the refrigerator. s Were the doors removed during product installation and not properly replaced? Turn on the model. s Have the ice cubes been stored...
...supply. See "Cleaning." See "Ensuring Proper Air Circulation" for the surrounding conditions? It is normal for moisture to build up inside the refrigerator when the room air is produced, see "Using the Control(s)," depending on the model. Check that all food is probably due to ...s Are food packages blocking the door open WARNING The divider between the two compartments is warm The warmth is securely wrapped. Level the refrigerator. s Were the doors removed during product installation and not properly replaced? Turn on the model. s Have the ice cubes been stored...

Owners Manual
Page 19
Service calls to refrigerator or freezer product failures. 6. Replacement parts or repair labor ...appliance is operated and maintained according to instructions attached to or furnished with the product, Whirlpool Corporation or Whirlpool Canada LP (hereafter "Whirlpool") will pay for units operated outside the United States or Canada. 7. Repairs when ...abuse, fire, flood, acts of God, improper installation, installation not in materials or workmanship. ITEMS WHIRLPOOL WILL NOT PAY FOR 1. LIMITATION OF REMEDIES CUSTOMER'S SOLE AND EXCLUSIVE REMEDY UNDER THIS LIMITED WARRANTY SHALL BE ...
Service calls to refrigerator or freezer product failures. 6. Replacement parts or repair labor ...appliance is operated and maintained according to instructions attached to or furnished with the product, Whirlpool Corporation or Whirlpool Canada LP (hereafter "Whirlpool") will pay for units operated outside the United States or Canada. 7. Repairs when ...abuse, fire, flood, acts of God, improper installation, installation not in materials or workmanship. ITEMS WHIRLPOOL WILL NOT PAY FOR 1. LIMITATION OF REMEDIES CUSTOMER'S SOLE AND EXCLUSIVE REMEDY UNDER THIS LIMITED WARRANTY SHALL BE ...

Warranty
Page 1
...REPAIR AS PROVIDED HEREIN. WHIRLPOOL SHALL NOT BE LIABLE FOR INCIDENTAL OR CONSEQUENTIAL DAMAGES. Outside the 50 United States and Canada, this major appliance is operated and maintained according to instructions attached to the appliance. 9. Service calls to refrigerator or freezer product failures...date of purchase, when this warranty does not apply. Service must be repaired in accordance with the product, Whirlpool Corporation or Whirlpool Canada LP (hereafter "Whirlpool") will pay for units operated outside the United States or Canada. 7. This major appliance is designed to...
...REPAIR AS PROVIDED HEREIN. WHIRLPOOL SHALL NOT BE LIABLE FOR INCIDENTAL OR CONSEQUENTIAL DAMAGES. Outside the 50 United States and Canada, this major appliance is operated and maintained according to instructions attached to the appliance. 9. Service calls to refrigerator or freezer product failures...date of purchase, when this warranty does not apply. Service must be repaired in accordance with the product, Whirlpool Corporation or Whirlpool Canada LP (hereafter "Whirlpool") will pay for units operated outside the United States or Canada. 7. This major appliance is designed to...

