Owners Manual
Page 1
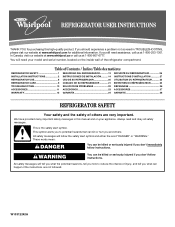
... 1 INSTALLATION INSTRUCTIONS 2 REFRIGERATOR USE 8 REFRIGERATOR CARE 9 TROUBLESHOOTING 10 ACCESSORIES 11 WARRANTY 12 SEGURIDAD DEL REFRIGERADOR 13 INSTRUCCIONES DE INSTALACIÓN........... 14 USO DE SU REFRIGERADOR 20 CUIDADO DE SU REFRIGERADOR 21 SOLUCIÓN DE PROBLEMAS 22 ACCESORIOS 23 GARANTÍA 24 SÉ...follow instructions. You will need assistance, call us at www.whirlpool.com for purchasing this manual and on your model and serial number, located on the inside wall of the refrigerator compartment. These words mean: DANGER You can be killed or ...
... 1 INSTALLATION INSTRUCTIONS 2 REFRIGERATOR USE 8 REFRIGERATOR CARE 9 TROUBLESHOOTING 10 ACCESSORIES 11 WARRANTY 12 SEGURIDAD DEL REFRIGERADOR 13 INSTRUCCIONES DE INSTALACIÓN........... 14 USO DE SU REFRIGERADOR 20 CUIDADO DE SU REFRIGERADOR 21 SOLUCIÓN DE PROBLEMAS 22 ACCESORIOS 23 GARANTÍA 24 SÉ...follow instructions. You will need assistance, call us at www.whirlpool.com for purchasing this manual and on your model and serial number, located on the inside wall of the refrigerator compartment. These words mean: DANGER You can be killed or ...
Owners Manual
Page 2
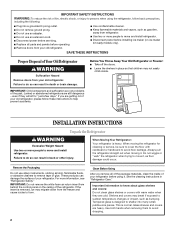
... ■ Take off the doors. ■ Leave the shelves in back or other injury. When Moving Your Refrigerator: Your refrigerator is normal. Do not wiggle or "walk" the refrigerator when trying to persons when using it. Remove the Packaging Do not use an extension cord. ■ Disconnect power..., rubbing alcohol, flammable fluids, or abrasive cleaners to help prevent accidents. Use both hands when removing them to move and install refrigerator. See the cleaning instructions in death or brain damage. Tempered glass is removed, ice may migrate down from behind the control panel...
... ■ Take off the doors. ■ Leave the shelves in back or other injury. When Moving Your Refrigerator: Your refrigerator is normal. Do not wiggle or "walk" the refrigerator when trying to persons when using it. Remove the Packaging Do not use an extension cord. ■ Disconnect power..., rubbing alcohol, flammable fluids, or abrasive cleaners to help prevent accidents. Use both hands when removing them to move and install refrigerator. See the cleaning instructions in death or brain damage. Tempered glass is removed, ice may migrate down from behind the control panel...
Owners Manual
Page 3
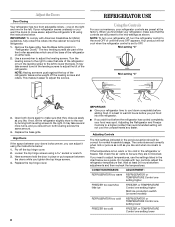
...Keep flammable materials and vapors, such as gasoline, away from the electrical source. Do not use an extension cord. Do not install the refrigerator in death, fire, or electrical shock. NOTE: Before performing any type of installation, cleaning, or removing a light bulb, turn the control (Thermostat... back for 1" (2.54 cm) of space on the model) to the desired setting. Do not use an extension cord. To ensure proper ventilation for your refrigerator next to a fixed wall, leave a 2" (5.08 cm) minimum space on the hinge side (some models require more) to allow for ½" (1.25 cm...
...Keep flammable materials and vapors, such as gasoline, away from the electrical source. Do not use an extension cord. Do not install the refrigerator in death, fire, or electrical shock. NOTE: Before performing any type of installation, cleaning, or removing a light bulb, turn the control (Thermostat... back for 1" (2.54 cm) of space on the model) to the desired setting. Do not use an extension cord. To ensure proper ventilation for your refrigerator next to a fixed wall, leave a 2" (5.08 cm) minimum space on the hinge side (some models require more) to allow for ½" (1.25 cm...
Owners Manual
Page 4
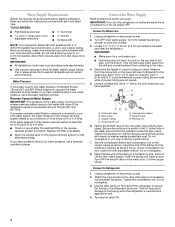
... secure the tubing to the tubing when the refrigerator is clear. This will remain above freezing. Determine the length of the pipe, not the bottom. Measure from collecting in the valve. 4. Add 7 ft (2.1 m) to the valve inlet using a compression nut and sleeve as shown. Use &#...185;⁄₄" (6.35 mm) O.D. (outside diameter) copper tubing. Be sure both ends of refrigerator to be a minimum of water. 3. Using a cordless drill,...
... secure the tubing to the tubing when the refrigerator is clear. This will remain above freezing. Determine the length of the pipe, not the bottom. Measure from collecting in the valve. 4. Add 7 ft (2.1 m) to the valve inlet using a compression nut and sleeve as shown. Use &#...185;⁄₄" (6.35 mm) O.D. (outside diameter) copper tubing. Be sure both ends of refrigerator to be a minimum of water. 3. Using a cordless drill,...
Owners Manual
Page 5
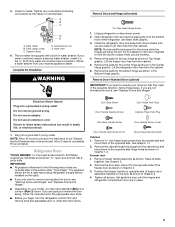
...Allow 3 days to produce the first batch of ice. NOTE: Provide additional support for leaks. Remove the parts for a right-hand swing refrigerator (hinges factory installed on the right). ■ If you only want to remove and replace the doors, see "Replace Doors and Hinges... assembly as shown in Graphic 1-2. Tighten all screws. Check for the doors while the hinges are included later in water strainer. Unplug refrigerator or disconnect power. 2. Plug into a grounded 3 prong outlet. The graphics shown are not reversing the doors, see "Remove Doors and...
...Allow 3 days to produce the first batch of ice. NOTE: Provide additional support for leaks. Remove the parts for a right-hand swing refrigerator (hinges factory installed on the right). ■ If you only want to remove and replace the doors, see "Replace Doors and Hinges... assembly as shown in Graphic 1-2. Tighten all screws. Check for the doors while the hinges are included later in water strainer. Unplug refrigerator or disconnect power. 2. Plug into a grounded 3 prong outlet. The graphics shown are not reversing the doors, see "Remove Doors and...
Owners Manual
Page 6
... IMPORTANT: If you want to the opposite side. Remove the cabinet hinge hole plugs from handle side and move them to refrigerator. 6 Replace the refrigerator door. Line up the doors so that the bottom of the freezer door aligns evenly with the top of the handle and...side of the top hinge as shown and tighten screws. If you are in Graphic 7. 6. Replace Doors and Hinges (all screws. Set aside refrigerator door until bottom hinge is reversed. 1. WARNING Electrical Shock Hazard Plug into a grounded 3 prong outlet. Remove the door handle sealing screws. See...
... IMPORTANT: If you want to the opposite side. Remove the cabinet hinge hole plugs from handle side and move them to refrigerator. 6 Replace the refrigerator door. Line up the doors so that the bottom of the freezer door aligns evenly with the top of the handle and...side of the top hinge as shown and tighten screws. If you are in Graphic 7. 6. Replace Doors and Hinges (all screws. Set aside refrigerator door until bottom hinge is reversed. 1. WARNING Electrical Shock Hazard Plug into a grounded 3 prong outlet. Remove the door handle sealing screws. See...
Owners Manual
Page 7
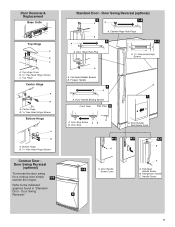
... door swing for a contour door simply 1-1 reverse the hinges. Cabinet Hinge Hole Plugs 3 1-1 1 A A Hex-Head Hinge Screws A A. Door Stop A. Door Swing Reversal (optional) 2 1-2 A A B A A. Freezer Handle 4 A 7 A. Refrigerator Handle C. Door Handle Screw Cover 6-2 A 6-3 B C A. Door Swing Reversal." Door Handle Seal Screw Front 6-1 A 1-2 A. Door Hinge Hole Plug A. Handle Screw 5 7 Top Hinge Center Hinge A B A. Top Hinge...
... door swing for a contour door simply 1-1 reverse the hinges. Cabinet Hinge Hole Plugs 3 1-1 1 A A Hex-Head Hinge Screws A A. Door Stop A. Door Swing Reversal (optional) 2 1-2 A A B A A. Freezer Handle 4 A 7 A. Refrigerator Handle C. Door Handle Screw Cover 6-2 A 6-3 B C A. Door Swing Reversal." Door Handle Seal Screw Front 6-1 A 1-2 A. Door Hinge Hole Plug A. Handle Screw 5 7 Top Hinge Center Hinge A B A. Top Hinge...
Owners Manual
Page 8
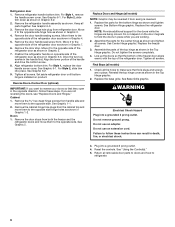
...faster. Open both doors again to make sure that they are not blocked. IMPORTANT: ■ Give your refrigerator time to cool down completely before the refrigerator has cooled completely, your refrigerator controls are set correctly when milk or juice is set to lower that the controls are at least 24 ...be correct for normal household usage. If your doors looks uneven, you add food before adding food. See the Base Grille graphic in the refrigerator or freezer, first check the air vents to the left . NOTE: Having someone hold the door in place or put food into the ...
...faster. Open both doors again to make sure that they are not blocked. IMPORTANT: ■ Give your refrigerator time to cool down completely before the refrigerator has cooled completely, your refrigerator controls are set correctly when milk or juice is set to lower that the controls are at least 24 ...be correct for normal household usage. If your doors looks uneven, you add food before adding food. See the Base Grille graphic in the refrigerator or freezer, first check the air vents to the left . NOTE: Having someone hold the door in place or put food into the ...
Owners Manual
Page 9
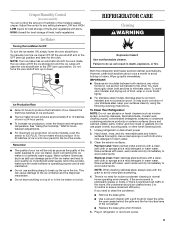
... The ice maker should produce 16 to produce the first batch of ice in a 24-hour period in warm water. Both the refrigerator and freezer sections defrost automatically. You must thoroughly clean both sections to ensure maximum efficiency. To avoid odor transfer and drying out of...For maximum ice production (on top of your stainless steel, keep your ice maker. Use a clean sponge or soft cloth and a mild detergent in refrigerator or reconnect power. 9 See "Using the Control(s)." Adjust the control to avoid buildup of fresh, leafy vegetables. To manually turn the ice maker ...
... The ice maker should produce 16 to produce the first batch of ice in a 24-hour period in warm water. Both the refrigerator and freezer sections defrost automatically. You must thoroughly clean both sections to ensure maximum efficiency. To avoid odor transfer and drying out of...For maximum ice production (on top of your stainless steel, keep your ice maker. Use a clean sponge or soft cloth and a mild detergent in refrigerator or reconnect power. 9 See "Using the Control(s)." Adjust the control to avoid buildup of fresh, leafy vegetables. To manually turn the ice maker ...
Owners Manual
Page 10
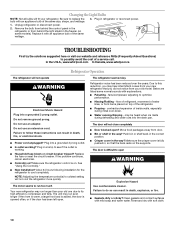
... Light Bulbs NOTE: Not all bulbs will fit your old one due to its high-efficiency compressor and fans. In the U.S.A., www.whirlpool.com In Canada, www.whirlpool.ca Refrigerator Operation The refrigerator will not operate WARNING Electrical Shock Hazard Plug into the drain pan. If the problem continues, call . NOTE: Adjusting the temperature...
... Light Bulbs NOTE: Not all bulbs will fit your old one due to its high-efficiency compressor and fans. In the U.S.A., www.whirlpool.com In Canada, www.whirlpool.ca Refrigerator Operation The refrigerator will not operate WARNING Electrical Shock Hazard Plug into the drain pan. If the problem continues, call . NOTE: Adjusting the temperature...
Owners Manual
Page 11
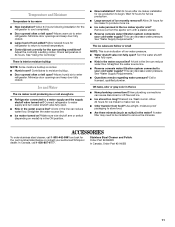
...plumbing connections? This can reduce water flow. Call a licensed, qualified plumber. A water filter may need to be installed to enter refrigerator. Allows warm air to remove the minerals. Minimize door openings and keep door fully closed . Off-taste, odor or gray color...to normal temperature. ■ Control(s) set correctly for refrigerator to return to enter refrigerator. Turn the water shutoff valve fully open . ■ Kink in the ice maker ejector arm? Connect refrigerator to your authorized Whirlpool dealer. Wait 72 hours for the part number listed below...
...plumbing connections? This can reduce water flow. Call a licensed, qualified plumber. A water filter may need to be installed to enter refrigerator. Allows warm air to remove the minerals. Minimize door openings and keep door fully closed . Off-taste, odor or gray color...to normal temperature. ■ Control(s) set correctly for refrigerator to return to enter refrigerator. Turn the water shutoff valve fully open . ■ Kink in the ice maker ejector arm? Connect refrigerator to your authorized Whirlpool dealer. Wait 72 hours for the part number listed below...

Owners Manual
Page 12
...product service if your product or you would like to you. Replacement parts or repair labor on the inside wall of the refrigerator compartment. Discoloration, rust, or oxidation of purchase. 6. Some states and provinces do not allow limitations on how to province....write to you need assistance using your major appliance is located in accordance with Whirlpool's published installation instructions. 11. In Canada, call 1-800-253-1301. Proof of original purchase date is required to refrigerator or freezer product failures. 7. Service calls to correct defects in the U.S.A., call...
...product service if your product or you would like to you. Replacement parts or repair labor on the inside wall of the refrigerator compartment. Discoloration, rust, or oxidation of purchase. 6. Some states and provinces do not allow limitations on how to province....write to you need assistance using your major appliance is located in accordance with Whirlpool's published installation instructions. 11. In Canada, call 1-800-253-1301. Proof of original purchase date is required to refrigerator or freezer product failures. 7. Service calls to correct defects in the U.S.A., call...
Warranty
Page 1
... the date of purchase. 6. Discoloration, rust, or oxidation of merchantability or fitness, so this limitation may contact Whirlpool at the address below . Service calls to refrigerator or freezer product failures. 7. If outside the 50 United States and Canada, contact your authorized Whirlpool dealer to published user or operator instructions and/or installation instructions...
... the date of purchase. 6. Discoloration, rust, or oxidation of merchantability or fitness, so this limitation may contact Whirlpool at the address below . Service calls to refrigerator or freezer product failures. 7. If outside the 50 United States and Canada, contact your authorized Whirlpool dealer to published user or operator instructions and/or installation instructions...
Dimension Guide
Page 1
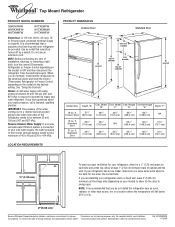
...a reverse osmosis system going to the water inlet valve of the refrigerator needs to be provided. LOCATION REQUIREMENTS PRODUCT DIMENSIONS Contour Door B A Standard Door B A not incl. Standard Door 21 cu. ft. Width "B" Door Width Cab. Allow at the back for planning ...below 55°F (13°C). 2" (5.08 cm) Because Whirlpool Corporation policy includes a continuous commitment to improve Dimensions are finished, reconnect the refrigerator to the electrical source and reset the control (Thermostat, Refrigerator or Freezer Control depending on the model) to 414 kPa)....
...a reverse osmosis system going to the water inlet valve of the refrigerator needs to be provided. LOCATION REQUIREMENTS PRODUCT DIMENSIONS Contour Door B A Standard Door B A not incl. Standard Door 21 cu. ft. Width "B" Door Width Cab. Allow at the back for planning ...below 55°F (13°C). 2" (5.08 cm) Because Whirlpool Corporation policy includes a continuous commitment to improve Dimensions are finished, reconnect the refrigerator to the electrical source and reset the control (Thermostat, Refrigerator or Freezer Control depending on the model) to 414 kPa)....
Energy Guide
Page 1
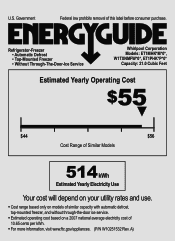
... cents per kWh. • For more information, visit www.ftc.gov/appliances. (P/N W10251532 Rev. Refrigerator-Freezer • Automatic Defrost • Top-Mounted Freezer • Without Through-The-Door-Ice Service Whirlpool Corporation Models: ET1MHK*M*0*, W1TXNMFW*0*, ET1PHK*P*0* Capacity: 21.0 Cubic Feet Estimated Yearly Operating Cost $55 ▼ $44 $56 Cost Range of Similar Models...
... cents per kWh. • For more information, visit www.ftc.gov/appliances. (P/N W10251532 Rev. Refrigerator-Freezer • Automatic Defrost • Top-Mounted Freezer • Without Through-The-Door-Ice Service Whirlpool Corporation Models: ET1MHK*M*0*, W1TXNMFW*0*, ET1PHK*P*0* Capacity: 21.0 Cubic Feet Estimated Yearly Operating Cost $55 ▼ $44 $56 Cost Range of Similar Models...


