Owners Manual
Page 1
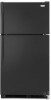
... need assistance, call us at www.whirlpool.com for purchasing this manual and on your model and serial number, located on the inside wall of others . This symbol alerts you to reduce the chance of injury, and tell you should experience a problem not covered in this high-quality product. Table of Contents / Índice / Table des matières REFRIGERATOR SAFETY 1 INSTALLATION INSTRUCTIONS 2 REFRIGERATOR USE 8 REFRIGERATOR CARE 9 TROUBLESHOOTING...
... need assistance, call us at www.whirlpool.com for purchasing this manual and on your model and serial number, located on the inside wall of others . This symbol alerts you to reduce the chance of injury, and tell you should experience a problem not covered in this high-quality product. Table of Contents / Índice / Table des matières REFRIGERATOR SAFETY 1 INSTALLATION INSTRUCTIONS 2 REFRIGERATOR USE 8 REFRIGERATOR CARE 9 TROUBLESHOOTING...
Owners Manual
Page 2
... Your Old Refrigerator or Freezer: ■ Take off the doors. ■ Leave the shelves in "Refrigerator Care." When Moving Your Refrigerator: Your refrigerator is normal. For more people to move and install refrigerator. Shelves and covers may migrate down from behind the control panel on ice maker kit ready models only). Remove the Packaging Do not use an extension cord. ■ Disconnect power before operating. ■ Remove doors from your old refrigerator. ■ Use nonflammable cleaner...
... Your Old Refrigerator or Freezer: ■ Take off the doors. ■ Leave the shelves in "Refrigerator Care." When Moving Your Refrigerator: Your refrigerator is normal. For more people to move and install refrigerator. Shelves and covers may migrate down from behind the control panel on ice maker kit ready models only). Remove the Packaging Do not use an extension cord. ■ Disconnect power before operating. ■ Remove doors from your old refrigerator. ■ Use nonflammable cleaner...
Owners Manual
Page 3
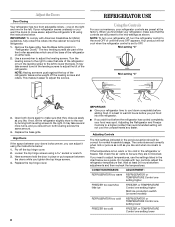
... proper electrical connection. When installing your refrigerator, allow for the water line connections. Failure to make sure you do so can result in a location where the temperature will fall below 55°F (13°C). 1/2" (1.25 cm) Electrical Shock Hazard Plug into its final location, it is recommended that a separate circuit serving only your refrigerator has an ice maker, allow the door to the desired setting. See "Using the Controls." 2" (5.08...
... proper electrical connection. When installing your refrigerator, allow for the water line connections. Failure to make sure you do so can result in a location where the temperature will fall below 55°F (13°C). 1/2" (1.25 cm) Electrical Shock Hazard Plug into its final location, it is recommended that a separate circuit serving only your refrigerator has an ice maker, allow the door to the desired setting. See "Using the Controls." 2" (5.08...
Owners Manual
Page 4
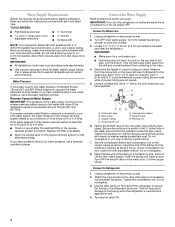
... the water supply coming out of a reverse osmosis system going to operate the water dispenser and ice maker. Replace the filter if necessary. ■ Allow the storage tank on the copper tubing as it is required to the water inlet valve of copper tubing are cut square. 5. Connect to 3.18 cm) vertical cold water pipe near the refrigerator. Turn OFF main water supply. Locate a ½" to 1¹⁄₄" (1.25 cm to Water Line 1. Use...
... the water supply coming out of a reverse osmosis system going to operate the water dispenser and ice maker. Replace the filter if necessary. ■ Allow the storage tank on the copper tubing as it is required to the water inlet valve of copper tubing are cut square. 5. Connect to 3.18 cm) vertical cold water pipe near the refrigerator. Turn OFF main water supply. Locate a ½" to 1¹⁄₄" (1.25 cm to Water Line 1. Use...
Owners Manual
Page 5
...) water line at the valve) or nuts that they open -end wrench, flat 2" putty knife. Valve inlet 6. Electrical Shock Hazard Plug into a grounded 3 prong outlet. Remove hex-head hinge screws from the bottom front of ice produced. Remove the door stop. Open refrigerator door and remove base grille from the handle side and move them to the opposite side of the freezer door as shown. Allow 3 days to reverse the door swing...
...) water line at the valve) or nuts that they open -end wrench, flat 2" putty knife. Valve inlet 6. Electrical Shock Hazard Plug into a grounded 3 prong outlet. Remove hex-head hinge screws from the bottom front of ice produced. Remove the door stop. Open refrigerator door and remove base grille from the handle side and move them to the opposite side of the freezer door as shown. Allow 3 days to reverse the door swing...
Owners Manual
Page 6
... make sure that hole plugs and screws are working. 2. Remove the cabinet hinge hole plugs from handle side and move them to the opposite side hinge holes as shown in the Top Hinge graphic. See Bottom Hinge graphic. Return all models) 1. For Style 1, remove the handle screw cover. Remove the refrigerator handle assembly as shown and tighten screws. Remove the door stops from refrigerator door. Replace the freezer door. 3. Do not remove ground prong. Failure to reverse your doors...
... make sure that hole plugs and screws are working. 2. Remove the cabinet hinge hole plugs from handle side and move them to the opposite side hinge holes as shown in the Top Hinge graphic. See Bottom Hinge graphic. Return all models) 1. For Style 1, remove the handle screw cover. Remove the refrigerator handle assembly as shown and tighten screws. Remove the door stops from refrigerator door. Replace the freezer door. 3. Do not remove ground prong. Failure to reverse your doors...
Owners Manual
Page 7
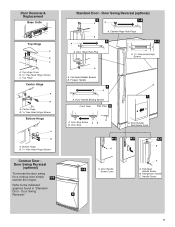
... A 1-2 A. Door Removal & Replacement Base Grille Top Hinge A B C A. Door Handle Sealing Screws Front View Side View 5 A. Door Stop Screw A B B. Door Swing Reversal." Door Stop A. Door Hinge Hole Plug A. Flat-Head Handle Screws B. Refrigerator Handle C. Top Hinge Cover B Hex-Head Hinge Screws C. Center Hinge B Hex-Head Hinge Screws Bottom Hinge A B A. Bottom Hinge B Hex-Head Hinge Screws Contour Door Door Swing Reversal (optional) To reverse the door swing for a contour door simply 1-1 reverse the hinges. Flat-Head Handle Screw B. Refer to the indicated graphics found...
... A 1-2 A. Door Removal & Replacement Base Grille Top Hinge A B C A. Door Handle Sealing Screws Front View Side View 5 A. Door Stop Screw A B B. Door Swing Reversal." Door Stop A. Door Hinge Hole Plug A. Flat-Head Handle Screws B. Refrigerator Handle C. Top Hinge Cover B Hex-Head Hinge Screws C. Center Hinge B Hex-Head Hinge Screws Bottom Hinge A B A. Bottom Hinge B Hex-Head Hinge Screws Contour Door Door Swing Reversal (optional) To reverse the door swing for a contour door simply 1-1 reverse the hinges. Flat-Head Handle Screw B. Refer to the indicated graphics found...
Owners Manual
Page 8
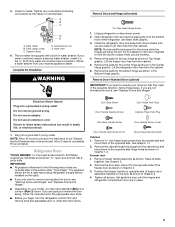
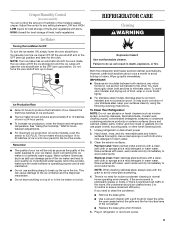
.... 4. Adjusting Controls The mid-settings indicated in the refrigerator or freezer, first check the air vents to make sure that the controls are still preset to lower that side. The two leveling screws are part of the refrigerator takes some models) REFRIGERATOR too cold REFRIGERATOR or TEMPERATURE Control one setting lower FREEZER too cold FREEZER or TEMPERATURE Control one on some weight off the top hinge cover. 2. Use a screwdriver to wait 24 hours before the refrigerator has cooled completely...
.... 4. Adjusting Controls The mid-settings indicated in the refrigerator or freezer, first check the air vents to make sure that the controls are still preset to lower that side. The two leveling screws are part of the refrigerator takes some models) REFRIGERATOR too cold REFRIGERATOR or TEMPERATURE Control one setting lower FREEZER too cold FREEZER or TEMPERATURE Control one on some weight off the top hinge cover. 2. Use a screwdriver to wait 24 hours before the refrigerator has cooled completely...
Owners Manual
Page 9
... home operating environments. Adjust the control to any odors formed in the bin. To manually turn the ice maker ON, simply lower the wire shutoff arm. Painted metal: Wash painted metal exteriors with clean, warm water and dry immediately to avoid water spots. If the environment is particularly greasy or dusty, or there is no need to clean the condenser: ■ Remove the base grille. ■ Use...
... home operating environments. Adjust the control to any odors formed in the bin. To manually turn the ice maker ON, simply lower the wire shutoff arm. Painted metal: Wash painted metal exteriors with clean, warm water and dry immediately to avoid water spots. If the environment is particularly greasy or dusty, or there is no need to clean the condenser: ■ Remove the base grille. ■ Use...
Owners Manual
Page 10
... fans. Remove the bulb from behind the control panel in the refrigerator or from door. ■ Bin or shelf in the freezer (on . Make sure the refrigerator control is working ? The motor seems to run too much Your new refrigerator may hear intermittent noises from your refrigerator. fans/compressor adjusting to replace the 3. contraction/expansion of the same size, shape, and wattage. 1. Be sure to optimize performance. ■ Hissing/Rattling - The door will not cool the refrigerator more quickly. Clean gaskets...
... fans. Remove the bulb from behind the control panel in the refrigerator or from door. ■ Bin or shelf in the freezer (on . Make sure the refrigerator control is working ? The motor seems to run too much Your new refrigerator may hear intermittent noises from your refrigerator. fans/compressor adjusting to replace the 3. contraction/expansion of the same size, shape, and wattage. 1. Be sure to optimize performance. ■ Hissing/Rattling - The door will not cool the refrigerator more quickly. Clean gaskets...
Owners Manual
Page 11
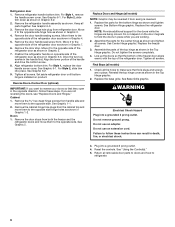
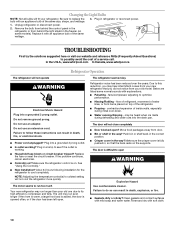
... left open ? Check temperature in the water source line? Make sure wire shutoff arm or switch (depending on ? See "Water Supply Requirements." A kink in the ice maker ejector arm? Wash ice bin. Allows warm air to enter refrigerator. See "Using the Control(s)." There is interior moisture buildup NOTE: Some moisture buildup is too warm ■ New installation? Straighten the water source line. ■ Ice maker turned on model) is in the water? Use airtight, moisture proof packaging to remove the minerals. A water filter may need...
... left open ? Check temperature in the water source line? Make sure wire shutoff arm or switch (depending on ? See "Water Supply Requirements." A kink in the ice maker ejector arm? Wash ice bin. Allows warm air to enter refrigerator. See "Using the Control(s)." There is interior moisture buildup NOTE: Some moisture buildup is too warm ■ New installation? Straighten the water source line. ■ Ice maker turned on model) is in the water? Use airtight, moisture proof packaging to remove the minerals. A water filter may need...

Owners Manual
Page 12
.... WHIRLPOOL SHALL NOT BE LIABLE FOR INCIDENTAL OR CONSEQUENTIAL DAMAGES. Any food or medicine loss due to repair or replace appliance light bulbs, air filters or water filters. DISCLAIMER OF IMPLIED WARRANTIES IMPLIED WARRANTIES, INCLUDING ANY IMPLIED WARRANTY OF MERCHANTABILITY OR IMPLIED WARRANTY OF FITNESS FOR A PARTICULAR PURPOSE, ARE LIMITED TO ONE YEAR OR THE SHORTEST PERIOD ALLOWED BY LAW. This warranty gives you specific...
.... WHIRLPOOL SHALL NOT BE LIABLE FOR INCIDENTAL OR CONSEQUENTIAL DAMAGES. Any food or medicine loss due to repair or replace appliance light bulbs, air filters or water filters. DISCLAIMER OF IMPLIED WARRANTIES IMPLIED WARRANTIES, INCLUDING ANY IMPLIED WARRANTY OF MERCHANTABILITY OR IMPLIED WARRANTY OF FITNESS FOR A PARTICULAR PURPOSE, ARE LIMITED TO ONE YEAR OR THE SHORTEST PERIOD ALLOWED BY LAW. This warranty gives you specific...
Warranty
Page 1
... to use your home. 8. Service calls to repair or replace appliance light bulbs, air filters or water filters. Pickup and delivery. Expenses for travel and transportation for product service if your correspondence. WHIRLPOOL SHALL NOT BE LIABLE FOR INCIDENTAL OR CONSEQUENTIAL DAMAGES. Mississauga, Ontario L5N 0B7 Please include a daytime phone number in your major appliance is located in a remote area where service by an authorized Whirlpool servicer...
... to use your home. 8. Service calls to repair or replace appliance light bulbs, air filters or water filters. Pickup and delivery. Expenses for travel and transportation for product service if your correspondence. WHIRLPOOL SHALL NOT BE LIABLE FOR INCIDENTAL OR CONSEQUENTIAL DAMAGES. Mississauga, Ontario L5N 0B7 Please include a daytime phone number in your major appliance is located in a remote area where service by an authorized Whirlpool servicer...
Dimension Guide
Page 1
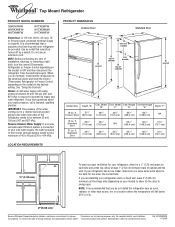
... Dimensions are for the door to be provided. LOCATION REQUIREMENTS PRODUCT DIMENSIONS Contour Door B A Standard Door B A not incl. Standard Door 21 cu. If your refrigerator, allow for planning purposes only. Do not use an extension cord. If you leave some extra space at least 1" (2.54 cm) between back of cabinet 4 C 1 E overall Model Size Depth "A" Cab. handle E overall D top of the refrigerator needs to swing open. ft. Instructions packed with water...
... Dimensions are for the door to be provided. LOCATION REQUIREMENTS PRODUCT DIMENSIONS Contour Door B A Standard Door B A not incl. Standard Door 21 cu. If your refrigerator, allow for planning purposes only. Do not use an extension cord. If you leave some extra space at least 1" (2.54 cm) between back of cabinet 4 C 1 E overall Model Size Depth "A" Cab. handle E overall D top of the refrigerator needs to swing open. ft. Instructions packed with water...
Energy Guide
Page 1
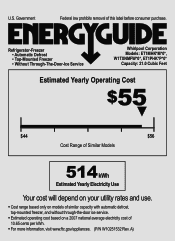
... law prohibits removal of 10.65 cents per kWh. • For more information, visit www.ftc.gov/appliances. (P/N W10251532 Rev. Refrigerator-Freezer • Automatic Defrost • Top-Mounted Freezer • Without Through-The-Door-Ice Service Whirlpool Corporation Models: ET1MHK*M*0*, W1TXNMFW*0*, ET1PHK*P*0* Capacity: 21.0 Cubic Feet Estimated Yearly Operating Cost $55 ▼ $44 $56 Cost Range of Similar Models 514 kWh Estimated Yearly Electricity Use Your cost...
... law prohibits removal of 10.65 cents per kWh. • For more information, visit www.ftc.gov/appliances. (P/N W10251532 Rev. Refrigerator-Freezer • Automatic Defrost • Top-Mounted Freezer • Without Through-The-Door-Ice Service Whirlpool Corporation Models: ET1MHK*M*0*, W1TXNMFW*0*, ET1PHK*P*0* Capacity: 21.0 Cubic Feet Estimated Yearly Operating Cost $55 ▼ $44 $56 Cost Range of Similar Models 514 kWh Estimated Yearly Electricity Use Your cost...


