
Use & Care Guide
Page 1
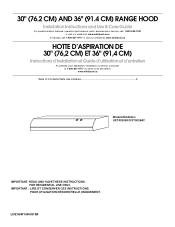
....4 CM) RANGE HOOD Installation Instructions and Use & Care Guide For questions about features, operation/performance, parts, accessories or service, call: 1-800-253-1301 or visit our website at www.whirlpool.com In Canada, call 1-800-807-6777 or visit our website at www.whirlpool.ca HOTTE D'ASPIRATION DE 30" (76,2 CM) ET 36" (91,4 CM) Instructions d'installation et Guide d'utilisation et d'entretien Au Canada, pour assistance, installation ou service, composer le...
....4 CM) RANGE HOOD Installation Instructions and Use & Care Guide For questions about features, operation/performance, parts, accessories or service, call: 1-800-253-1301 or visit our website at www.whirlpool.com In Canada, call 1-800-807-6777 or visit our website at www.whirlpool.ca HOTTE D'ASPIRATION DE 30" (76,2 CM) ET 36" (91,4 CM) Instructions d'installation et Guide d'utilisation et d'entretien Au Canada, pour assistance, installation ou service, composer le...
Use & Care Guide
Page 2
... hazard is the safety alert symbol. All safety messages will follow instructions. TABLE OF CONTENTS RANGE HOOD SAFETY 2 INSTALLATION REQUIREMENTS 4 Tools and Parts 4 Location Requirements 4 Venting Requirements 5 Electrical Requirements 5 INSTALLATION INSTRUCTIONS 6 Prepare Location 6 Install Range Hood 7 Make Electrical Connection 8 Complete Installation 8 RANGE HOOD USE 8 Range Hood Controls 8 RANGE HOOD CARE 9 Cleaning 9 WIRING DIAGRAM 10 ASSISTANCE OR SERVICE 11 In the U.S.A 11 In Canada 11 Accessories 11 WARRANTY 12 TABLE DES MATIÈRES SÉCURITÉ DE...
... hazard is the safety alert symbol. All safety messages will follow instructions. TABLE OF CONTENTS RANGE HOOD SAFETY 2 INSTALLATION REQUIREMENTS 4 Tools and Parts 4 Location Requirements 4 Venting Requirements 5 Electrical Requirements 5 INSTALLATION INSTRUCTIONS 6 Prepare Location 6 Install Range Hood 7 Make Electrical Connection 8 Complete Installation 8 RANGE HOOD USE 8 Range Hood Controls 8 RANGE HOOD CARE 9 Cleaning 9 WIRING DIAGRAM 10 ASSISTANCE OR SERVICE 11 In the U.S.A 11 In Canada 11 Accessories 11 WARRANTY 12 TABLE DES MATIÈRES SÉCURITÉ DE...
Use & Care Guide
Page 3
... the service panel. ■ Installation work and electrical wiring must always be allowed to accumulate on "Kitchen Fire Safety Tips" published by qualified person(s) in accordance with all applicable codes and standards, including fire-rated construction. ■ Do not operate any solid-state speed control device. Grease should not be vented outdoors. The fire is being switched on low or medium settings. ■ Always turn off at service panel...
... the service panel. ■ Installation work and electrical wiring must always be allowed to accumulate on "Kitchen Fire Safety Tips" published by qualified person(s) in accordance with all applicable codes and standards, including fire-rated construction. ■ Do not operate any solid-state speed control device. Grease should not be vented outdoors. The fire is being switched on low or medium settings. ■ Always turn off at service panel...
Use & Care Guide
Page 4
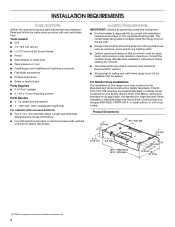
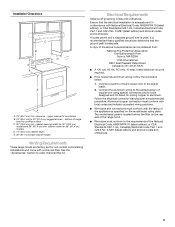
UL listed wire connectors ■ 1 - 75W max, 120V incandescent light bulb For cabinets with installation clearances specified on the left wall. ■ Range hood location should be away from strong draft areas, such as windows, doors and strong heating vents. ■ Cabinet opening dimensions that are shown must be used. Location Requirements IMPORTANT: Observe all governing codes and ordinances. ■ It is the installer's responsibility to comply with recessed bottoms...
UL listed wire connectors ■ 1 - 75W max, 120V incandescent light bulb For cabinets with installation clearances specified on the left wall. ■ Range hood location should be away from strong draft areas, such as windows, doors and strong heating vents. ■ Cabinet opening dimensions that are shown must be used. Location Requirements IMPORTANT: Observe all governing codes and ordinances. ■ It is the installer's responsibility to comply with recessed bottoms...
Use & Care Guide
Page 5
... the rear wall of the appliance as specified on the model/serial rating plate. clearance - cabinet width for 36" (91.4 cm) models D. 13" (33.0 cm) cabinet depth E. 36" (91.4 cm) base cabinet height Venting Requirements These range hoods are factory set for 30" (76.2 cm) models and 36" (91.4 cm) min. The model/serial plate is adequate and in conformance with local codes and industry accepted wiring practices. ■ Wire sizes and connections must conform to cooking...
... the rear wall of the appliance as specified on the model/serial rating plate. clearance - cabinet width for 36" (91.4 cm) models D. 13" (33.0 cm) cabinet depth E. 36" (91.4 cm) base cabinet height Venting Requirements These range hoods are factory set for 30" (76.2 cm) models and 36" (91.4 cm) min. The model/serial plate is adequate and in conformance with local codes and industry accepted wiring practices. ■ Wire sizes and connections must conform to cooking...
Use & Care Guide
Page 6
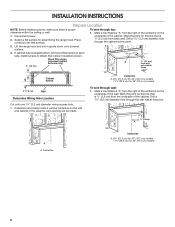
... covering over that is proper clearance within the ceiling or wall. 1. Drill a 1¼" (3.2 cm) diameter hole through top: 1. Mark a line distance "A" from wall, not cabinet frame Cabinet bottom 3" (7.6 cm) Wall Determine Wiring Hole Location Cut only one 1¹⁄₄" (3.2 cm) diameter wiring access hole. 1. INSTALLATION INSTRUCTIONS Prepare Location NOTE: Before making cutouts, make sure there is 2.2 cm) from back wall. Select a flat surface for assembling the range hood. If cabinet...
... covering over that is proper clearance within the ceiling or wall. 1. Drill a 1¼" (3.2 cm) diameter hole through top: 1. Mark a line distance "A" from wall, not cabinet frame Cabinet bottom 3" (7.6 cm) Wall Determine Wiring Hole Location Cut only one 1¹⁄₄" (3.2 cm) diameter wiring access hole. 1. INSTALLATION INSTRUCTIONS Prepare Location NOTE: Before making cutouts, make sure there is 2.2 cm) from back wall. Select a flat surface for assembling the range hood. If cabinet...
Use & Care Guide
Page 7
... enough wiring from the terminal box cover. Remove the screw from the fused disconnect (or circuit breaker) box to slide range hood into final position. A A. NOTE: Do not reconnect power until the installation is complete. 2. For optional power supply cord kit installations, follow the instructions in pilot holes. Using 2 or more people, lift the hood into place. ¹⁄₄" (6.4 mm) Non-vent (recirculating) installations - Install the 4 - 4.5 mm x 13 mm mounting screws in the "Make Electrical Connections" section. Install Range Hood 1.
... enough wiring from the terminal box cover. Remove the screw from the fused disconnect (or circuit breaker) box to slide range hood into final position. A A. NOTE: Do not reconnect power until the installation is complete. 2. For optional power supply cord kit installations, follow the instructions in pilot holes. Using 2 or more people, lift the hood into place. ¹⁄₄" (6.4 mm) Non-vent (recirculating) installations - Install the 4 - 4.5 mm x 13 mm mounting screws in the "Make Electrical Connections" section. Install Range Hood 1.
Use & Care Guide
Page 8
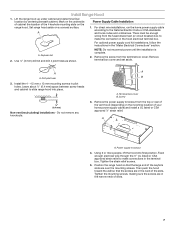
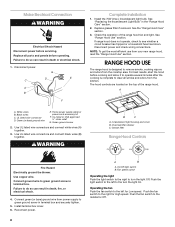
... the "Range Hood Care" section. 3. Disconnect power and check wiring connections. Black wires C. Home power supply cable or power cord accessory kit F. Use UL listed wire connectors and connect black wires (B) together. WARNING B C A. Reconnect power. 8 A B A. Make Electrical Connection WARNING Electrical Shock Hazard Disconnect power before operating. White wires B. Green ground screw 2. Push the light switch to the left for High speed. UL listed wire connector D. See "Replacing the Incandescent Light Bulb" in terminal box. Grease filter Range Hood...
... the "Range Hood Care" section. 3. Disconnect power and check wiring connections. Black wires C. Home power supply cable or power cord accessory kit F. Use UL listed wire connectors and connect black wires (B) together. WARNING B C A. Reconnect power. 8 A B A. Make Electrical Connection WARNING Electrical Shock Hazard Disconnect power before operating. White wires B. Green ground screw 2. Push the light switch to the left for High speed. UL listed wire connector D. See "Replacing the Incandescent Light Bulb" in terminal box. Grease filter Range Hood...
Use & Care Guide
Page 9
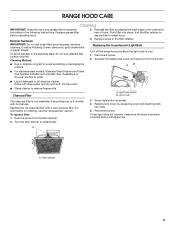
.... 3. Reconnect power. If new light does not operate, make sure the lamp is not washable. A A. Replace screw in the channel at rear of grain to remove fingerprints. Light bulb socket B. Remove screw from the hood. Exterior Surfaces: IMPORTANT: Do not use . Push filter into socket. 4. Filter retainer 9 RANGE HOOD CARE Cleaning IMPORTANT: Clean the hood and grease filters frequently according to range hood. 4. Replace grease filter before calling service. AB ■ For stainless steal models, Stainless Steel Cleaner and Polish Part Number 31462A...
.... 3. Reconnect power. If new light does not operate, make sure the lamp is not washable. A A. Replace screw in the channel at rear of grain to remove fingerprints. Light bulb socket B. Remove screw from the hood. Exterior Surfaces: IMPORTANT: Do not use . Push filter into socket. 4. Filter retainer 9 RANGE HOOD CARE Cleaning IMPORTANT: Clean the hood and grease filters frequently according to range hood. 4. Replace grease filter before calling service. AB ■ For stainless steal models, Stainless Steel Cleaner and Polish Part Number 31462A...
Use & Care Guide
Page 10
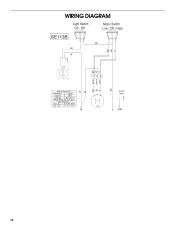
Off Motor Switch Low - Black 37.2 ±10% Ohms N W W Ground Screw C10 L GND 10 Off - WIRING DIAGRAM Light Switch On - Red 46.9 ±10% Ohms White - High SE113B BK BK W R BK BR R W BR Speed 1 Common Speed 2 BK R W BK Motor Characteristics Power Supply 120 VAC Frequency 60 Hz Amperage 0.35 ±10% A Wattage Rating 21 ±10% Watts Motor Resistance White -
Off Motor Switch Low - Black 37.2 ±10% Ohms N W W Ground Screw C10 L GND 10 Off - WIRING DIAGRAM Light Switch On - Red 46.9 ±10% Ohms White - High SE113B BK BK W R BK BR R W BR Speed 1 Common Speed 2 BK R W BK Motor Characteristics Power Supply 120 VAC Frequency 60 Hz Amperage 0.35 ±10% A Wattage Rating 21 ±10% Watts Motor Resistance White -
Use & Care Guide
Page 11
... and specifications on our full line of appliances. ■ Use and maintenance procedures. ■ Accessory and repair parts sales. ■ Referrals to build every new appliance. Accessories Stainless Steel Cleaner and Polish Order Part Number 31462A Charcoal Filter Kit Order Part Number W10355450 Power Cord Kit Order Part Number W10355452 11 To locate the Whirlpool designated service company in your area, you can also look in your nearest designated service center. If you need replacement parts If you need...
... and specifications on our full line of appliances. ■ Use and maintenance procedures. ■ Accessory and repair parts sales. ■ Referrals to build every new appliance. Accessories Stainless Steel Cleaner and Polish Order Part Number 31462A Charcoal Filter Kit Order Part Number W10355450 Power Cord Kit Order Part Number W10355452 11 To locate the Whirlpool designated service company in your area, you can also look in your nearest designated service center. If you need replacement parts If you need...
Use & Care Guide
Page 12
... not available. 10. The removal and reinstallation of the Use & Care Guide. If you on the product. Service calls to correct the installation of your major appliance, to instruct you need service, first see the "Troubleshooting" section of your major appliance, to replace or repair house fuses, or to the appliance. 9. Damage resulting from warranty coverage. 3. Major appliances with original model/serial numbers that is contrary to...
... not available. 10. The removal and reinstallation of the Use & Care Guide. If you on the product. Service calls to correct the installation of your major appliance, to instruct you need service, first see the "Troubleshooting" section of your major appliance, to replace or repair house fuses, or to the appliance. 9. Damage resulting from warranty coverage. 3. Major appliances with original model/serial numbers that is contrary to...

Warranty Information
Page 1
... instructions attached to or furnished with the product, Whirlpool Corporation or Whirlpool Canada LP (hereafter "Whirlpool") will need to repair or replace appliance light bulbs, air filters or water filters. Proof of purchase or installation date for repairs. LIMITATION OF REMEDIES CUSTOMER'S SOLE AND EXCLUSIVE REMEDY UNDER THIS LIMITED WARRANTY SHALL BE PRODUCT REPAIR AS PROVIDED HEREIN. If you ever need service, first see the "Troubleshooting" section of your major appliance, to replace or repair...
... instructions attached to or furnished with the product, Whirlpool Corporation or Whirlpool Canada LP (hereafter "Whirlpool") will need to repair or replace appliance light bulbs, air filters or water filters. Proof of purchase or installation date for repairs. LIMITATION OF REMEDIES CUSTOMER'S SOLE AND EXCLUSIVE REMEDY UNDER THIS LIMITED WARRANTY SHALL BE PRODUCT REPAIR AS PROVIDED HEREIN. If you ever need service, first see the "Troubleshooting" section of your major appliance, to replace or repair...


