
Use & Care Guide
Page 1
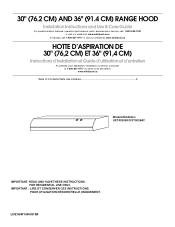
....4 CM) RANGE HOOD Installation Instructions and Use & Care Guide For questions about features, operation/performance, parts, accessories or service, call: 1-800-253-1301 or visit our website at www.whirlpool.com In Canada, call 1-800-807-6777 or visit our website at www.whirlpool.ca HOTTE D'ASPIRATION DE 30" (76,2 CM) ET 36" (91,4 CM) Instructions d'installation et Guide d'utilisation et d'entretien Au Canada, pour assistance, installation ou service, composer le...
....4 CM) RANGE HOOD Installation Instructions and Use & Care Guide For questions about features, operation/performance, parts, accessories or service, call: 1-800-253-1301 or visit our website at www.whirlpool.com In Canada, call 1-800-807-6777 or visit our website at www.whirlpool.ca HOTTE D'ASPIRATION DE 30" (76,2 CM) ET 36" (91,4 CM) Instructions d'installation et Guide d'utilisation et d'entretien Au Canada, pour assistance, installation ou service, composer le...
Use & Care Guide
Page 2
... messages. TABLE OF CONTENTS RANGE HOOD SAFETY 2 INSTALLATION REQUIREMENTS 4 Tools and Parts 4 Location Requirements 4 Venting Requirements 5 Electrical Requirements 5 INSTALLATION INSTRUCTIONS 6 Prepare Location 6 Install Range Hood 7 Make Electrical Connection 8 Complete Installation 8 RANGE HOOD USE 8 Range Hood Controls 8 RANGE HOOD CARE 9 Cleaning 9 WIRING DIAGRAM 10 ASSISTANCE OR SERVICE 11 In the U.S.A 11 In Canada 11 Accessories 11 WARRANTY 12 TABLE DES MATIÈRES SÉCURITÉ DE LA HOTTE DE CUISINIÈRE 13 EXIGENCES D'INSTALLATION 15 Outils et pi...
... messages. TABLE OF CONTENTS RANGE HOOD SAFETY 2 INSTALLATION REQUIREMENTS 4 Tools and Parts 4 Location Requirements 4 Venting Requirements 5 Electrical Requirements 5 INSTALLATION INSTRUCTIONS 6 Prepare Location 6 Install Range Hood 7 Make Electrical Connection 8 Complete Installation 8 RANGE HOOD USE 8 Range Hood Controls 8 RANGE HOOD CARE 9 Cleaning 9 WIRING DIAGRAM 10 ASSISTANCE OR SERVICE 11 In the U.S.A 11 In Canada 11 Accessories 11 WARRANTY 12 TABLE DES MATIÈRES SÉCURITÉ DE LA HOTTE DE CUISINIÈRE 13 EXIGENCES D'INSTALLATION 15 Outils et pi...
Use & Care Guide
Page 3
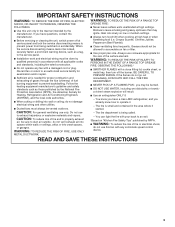
... cleaning the unit, switch power off at service panel and lock the service disconnecting means to duct air outside - You can fight the fire with a close fitting lid, cookie sheet, or metal tray, then turn hood ON when cooking at high settings. Discard fan or return to an exit. IMPORTANT SAFETY INSTRUCTIONS WARNING: TO REDUCE THE RISK OF FIRE, ELECTRIC SHOCK, OR INJURY TO PERSONS, OBSERVE THE FOLLOWING: ■ Use...
... cleaning the unit, switch power off at service panel and lock the service disconnecting means to duct air outside - You can fight the fire with a close fitting lid, cookie sheet, or metal tray, then turn hood ON when cooking at high settings. Discard fan or return to an exit. IMPORTANT SAFETY INSTRUCTIONS WARNING: TO REDUCE THE RISK OF FIRE, ELECTRIC SHOCK, OR INJURY TO PERSONS, OBSERVE THE FOLLOWING: ■ Use...
Use & Care Guide
Page 4
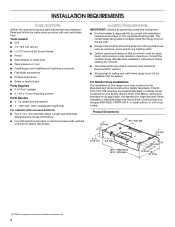
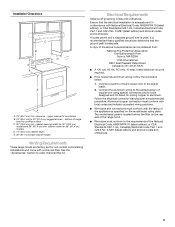
... mm mounting screws Parts Needed ■ 3 - Given dimensions provide minimum clearance. Location Requirements IMPORTANT: Observe all governing codes and ordinances. ■ It is located inside the range hood on the model/serial rating plate. The model/serial rating plate is the installer's responsibility to comply with local codes. See "Electrical Requirements" section. ■ All openings in ceiling and wall where range hood will be installed must be sealed. INSTALLATION REQUIREMENTS Tools and Parts Gather the required tools and parts before making any tools listed...
... mm mounting screws Parts Needed ■ 3 - Given dimensions provide minimum clearance. Location Requirements IMPORTANT: Observe all governing codes and ordinances. ■ It is located inside the range hood on the model/serial rating plate. The model/serial rating plate is the installer's responsibility to comply with local codes. See "Electrical Requirements" section. ■ All openings in ceiling and wall where range hood will be installed must be sealed. INSTALLATION REQUIREMENTS Tools and Parts Gather the required tools and parts before making any tools listed...
Use & Care Guide
Page 5
...) min. A copy of the appliance as specified on the rear wall of the range hood. ■ Wire sizes must conform with a charcoal filter. upper cabinet to countertop B. 18" (45.7 cm) to order charcoal filter kit. clearance - Connect a section of copper wire using special connectors and/or tools designed and UL listed for non-vented (recirculating) installations and come with the rating of the above code standards can be obtained from: National Fire Protection Association...
...) min. A copy of the appliance as specified on the rear wall of the range hood. ■ Wire sizes must conform with a charcoal filter. upper cabinet to countertop B. 18" (45.7 cm) to order charcoal filter kit. clearance - Connect a section of copper wire using special connectors and/or tools designed and UL listed for non-vented (recirculating) installations and come with the rating of the above code standards can be obtained from: National Fire Protection Association...
Use & Care Guide
Page 6
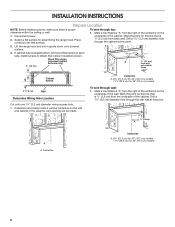
...) models To wire through the rear wall at this line that is 2.2 cm) from back wall. Select a flat surface for assembling the range hood. If cabinet has recessed bottom, add wood filler strips on the underside of the wall. Install screws to attach filler strips in the area the vent opening will be made. Mark the point on the underside of the cabinet. Disconnect power. 2. Place covering over...
...) models To wire through the rear wall at this line that is 2.2 cm) from back wall. Select a flat surface for assembling the range hood. If cabinet has recessed bottom, add wood filler strips on the underside of the wall. Install screws to attach filler strips in the area the vent opening will be made. Mark the point on the underside of the cabinet. Disconnect power. 2. Place covering over...
Use & Care Guide
Page 7
... mm mounting screws in the "Make Electrical Connections" section. Leave about ¹⁄₄" (6.4 mm) space between screw heads and cabinet to the National Electric Code or CSA standards and local codes and ordinances. A A. For optional power supply cord kit installations, follow the instructions in pilot holes. Set range hood aside on the range hood. Remove the power supply knockout from the terminal box cover. A Power Supply Cable Installation 1. A. Remove the screw from the top or rear of the vent hood (depending...
... mm mounting screws in the "Make Electrical Connections" section. Leave about ¹⁄₄" (6.4 mm) space between screw heads and cabinet to the National Electric Code or CSA standards and local codes and ordinances. A A. For optional power supply cord kit installations, follow the instructions in pilot holes. Set range hood aside on the range hood. Remove the power supply knockout from the terminal box cover. A Power Supply Cable Installation 1. A. Remove the screw from the top or rear of the vent hood (depending...
Use & Care Guide
Page 8
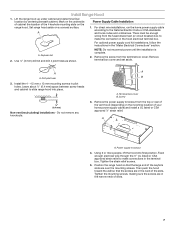
... terminal box. A A. UL listed wire connector D. Green (or bare) ground wire E. Green ground screw 2. Use UL listed wire connectors and connect black wires (B) together. Push the light switch to the left to remove smoke, cooking vapors and odors from power supply to the left for Off. Replace grease filter if removed. If range hood does not operate, check to green ground screw in death or electrical shock. 1. White wires B. Incandescent light housing and cover B. Connect ground wire to see whether a circuit breaker...
... terminal box. A A. UL listed wire connector D. Green (or bare) ground wire E. Green ground screw 2. Use UL listed wire connectors and connect black wires (B) together. Push the light switch to the left to remove smoke, cooking vapors and odors from power supply to the left for Off. Replace grease filter if removed. If range hood does not operate, check to green ground screw in death or electrical shock. 1. White wires B. Incandescent light housing and cover B. Connect ground wire to see whether a circuit breaker...
Use & Care Guide
Page 9
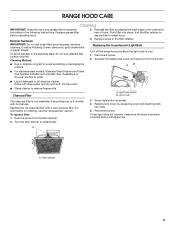
... new light does not operate, make sure the lamp is not washable. Exterior Surfaces: IMPORTANT: Do not use . Light bulb socket B. Replace lens cover by placing the back edge in the filter retainer. Replace grease filter before calling service. Reinstall the filter by squeezing cover and inserting tabs into slots. 5. Replacing the Incandescent Light Bulb Turn off the range hood and allow the light bulb to the following instructions. AB ■ For stainless steal models, Stainless Steel Cleaner and Polish Part Number 31462A...
... new light does not operate, make sure the lamp is not washable. Exterior Surfaces: IMPORTANT: Do not use . Light bulb socket B. Replace lens cover by placing the back edge in the filter retainer. Replace grease filter before calling service. Reinstall the filter by squeezing cover and inserting tabs into slots. 5. Replacing the Incandescent Light Bulb Turn off the range hood and allow the light bulb to the following instructions. AB ■ For stainless steal models, Stainless Steel Cleaner and Polish Part Number 31462A...
Use & Care Guide
Page 10
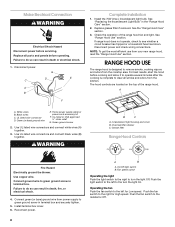
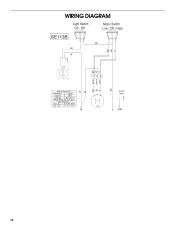
Off - High SE113B BK BK W R BK BR R W BR Speed 1 Common Speed 2 BK R W BK Motor Characteristics Power Supply 120 VAC Frequency 60 Hz Amperage 0.35 ±10% A Wattage Rating 21 ±10% Watts Motor Resistance White - Red 46.9 ±10% Ohms White - Black 37.2 ±10% Ohms N W W Ground Screw C10 L GND 10 WIRING DIAGRAM Light Switch On - Off Motor Switch Low -
Off - High SE113B BK BK W R BK BR R W BR Speed 1 Common Speed 2 BK R W BK Motor Characteristics Power Supply 120 VAC Frequency 60 Hz Amperage 0.35 ±10% A Wattage Rating 21 ±10% Watts Motor Resistance White - Red 46.9 ±10% Ohms White - Black 37.2 ±10% Ohms N W W Ground Screw C10 L GND 10 WIRING DIAGRAM Light Switch On - Off Motor Switch Low -
Use & Care Guide
Page 11
... designated service center. Whirlpool Canada LP designated service technicians are trained to local dealers, repair parts distributors, and service companies. If you need replacement parts If you need further assistance, you can write to fulfill the product warranty and provide after-warranty service, anywhere in your area, call us to better respond to local dealers, repair parts distributors and service companies. Accessories Stainless Steel Cleaner and Polish Order Part Number 31462A Charcoal Filter Kit Order Part Number W10355450 Power Cord Kit Order Part Number...
... designated service center. Whirlpool Canada LP designated service technicians are trained to local dealers, repair parts distributors, and service companies. If you need replacement parts If you need further assistance, you can write to fulfill the product warranty and provide after-warranty service, anywhere in your area, call us to better respond to local dealers, repair parts distributors and service companies. Accessories Stainless Steel Cleaner and Polish Order Part Number 31462A Charcoal Filter Kit Order Part Number W10355450 Power Cord Kit Order Part Number...
Use & Care Guide
Page 12
... light bulbs, air filters or water filters. DISCLAIMER OF IMPLIED WARRANTIES; If outside the 50 United States and Canada, contact your authorized Whirlpool dealer to obtain service under these excluded circumstances shall be repaired in the home and only in an inaccessible location or is void if the factory applied serial number has been altered or removed from your complete model number and serial number. Major appliances with published installation instructions...
... light bulbs, air filters or water filters. DISCLAIMER OF IMPLIED WARRANTIES; If outside the 50 United States and Canada, contact your authorized Whirlpool dealer to obtain service under these excluded circumstances shall be repaired in the home and only in an inaccessible location or is void if the factory applied serial number has been altered or removed from your complete model number and serial number. Major appliances with published installation instructions...

Warranty Information
Page 1
... major appliance is covered by a Whirlpool designated service company. The cost of repair or replacement under this information on the model and serial number label located on how to instruct you ever need it is installed in -home service is designed to be provided by this book and your major appliance, to use of consumables or cleaning products not approved by the customer. IMPLIED WARRANTIES, INCLUDING WARRANTIES OF MERCHANTABILITY...
... major appliance is covered by a Whirlpool designated service company. The cost of repair or replacement under this information on the model and serial number label located on how to instruct you ever need it is installed in -home service is designed to be provided by this book and your major appliance, to use of consumables or cleaning products not approved by the customer. IMPLIED WARRANTIES, INCLUDING WARRANTIES OF MERCHANTABILITY...


