
Warranty Information
Page 1
... accordance with original model/serial numbers that is not installed in a remote area where service by calling Whirlpool. In the U.S.A., call 1-800-807-6777. 9/07 Keep this limited warranty does not apply. Major appliances with published installation instructions. 11. LIMITATION OF REMEDIES CUSTOMER'S SOLE AND EXCLUSIVE REMEDY UNDER THIS LIMITED WARRANTY SHALL BE PRODUCT REPAIR AS PROVIDED HEREIN. If outside the 50 United States and Canada, contact your authorized...
... accordance with original model/serial numbers that is not installed in a remote area where service by calling Whirlpool. In the U.S.A., call 1-800-807-6777. 9/07 Keep this limited warranty does not apply. Major appliances with published installation instructions. 11. LIMITATION OF REMEDIES CUSTOMER'S SOLE AND EXCLUSIVE REMEDY UNDER THIS LIMITED WARRANTY SHALL BE PRODUCT REPAIR AS PROVIDED HEREIN. If outside the 50 United States and Canada, contact your authorized...

Installation Guide
Page 2
... are very important. TABLE OF CONTENTS GRILL VENT HOOD SAFETY 2 INSTALLATION REQUIREMENTS 4 Tools and Parts 4 Location Requirements 4 Venting Requirements 5 Electrical Requirements 5 INSTALLATION INSTRUCTIONS 6 Prepare Location 6 Install Grill Vent Hood 7 Make Electrical Connection 7 Install Duct Cover 8 Reinstall Grease Filters 8 Complete Installation 8 GRILL VENT HOOD USE 9 GRILL VENT HOOD CARE 9 Cleaning 9 Replacing a Halogen Lamp 10 WIRING DIAGRAMS 11 ASSISTANCE OR SERVICE 12 In the U.S.A 12 Accessories 12 In Canada 12 WARRANTY 13 TABLE DES MATIÈRES...
... are very important. TABLE OF CONTENTS GRILL VENT HOOD SAFETY 2 INSTALLATION REQUIREMENTS 4 Tools and Parts 4 Location Requirements 4 Venting Requirements 5 Electrical Requirements 5 INSTALLATION INSTRUCTIONS 6 Prepare Location 6 Install Grill Vent Hood 7 Make Electrical Connection 7 Install Duct Cover 8 Reinstall Grease Filters 8 Complete Installation 8 GRILL VENT HOOD USE 9 GRILL VENT HOOD CARE 9 Cleaning 9 Replacing a Halogen Lamp 10 WIRING DIAGRAMS 11 ASSISTANCE OR SERVICE 12 In the U.S.A 12 Accessories 12 In Canada 12 WARRANTY 13 TABLE DES MATIÈRES...

Installation Guide
Page 3
... will result. ■ Use an extinguisher ONLY if: - Crepes Suzette, Cherries Jubilee, Peppercorn Beef Flambé). ■ Clean ventilating fans frequently. Grease should not be vented outdoors. The fire is being switched on low or medium settings. ■ Always turn off at high settings. If the flames do not vent exhaust air into spaces within walls or ceilings, attics or into wall or ceiling; WARNING: TO REDUCE THE...
... will result. ■ Use an extinguisher ONLY if: - Crepes Suzette, Cherries Jubilee, Peppercorn Beef Flambé). ■ Clean ventilating fans frequently. Grease should not be vented outdoors. The fire is being switched on low or medium settings. ■ Always turn off at high settings. If the flames do not vent exhaust air into spaces within walls or ceilings, attics or into wall or ceiling; WARNING: TO REDUCE THE...

Installation Guide
Page 4
... transition duct piece ■ 8 - #10 Phillips transition duct screws ■ UL listed wire connectors (3) ■ Light bulb removal tool Location Requirements IMPORTANT: Observe all governing codes and ordinances. Have a qualified technician install the grill vent hood. It is the installer's responsibility to meet the ceiling or soffit height. See "Electrical Requirements" section. Distance "X" (30" [76.2 cm] min, suggested 36" [91.4 cm] max) *NOTE: The grill vent hood duct cover is located inside the grill vent hood on the model/serial rating plate. Tools needed ■ Level...
... transition duct piece ■ 8 - #10 Phillips transition duct screws ■ UL listed wire connectors (3) ■ Light bulb removal tool Location Requirements IMPORTANT: Observe all governing codes and ordinances. Have a qualified technician install the grill vent hood. It is the installer's responsibility to meet the ceiling or soffit height. See "Electrical Requirements" section. Distance "X" (30" [76.2 cm] min, suggested 36" [91.4 cm] max) *NOTE: The grill vent hood duct cover is located inside the grill vent hood on the model/serial rating plate. Tools needed ■ Level...

Installation Guide
Page 5
... not install 2 elbows together. ■ Use clamps to seal exterior wall or roof opening is required. 5 Wall cap D. 10" (25.4 cm) round vent transition Calculating Vent System Length To calculate the length of the system you need, add the equivalent feet (meters) for each vent piece used , it is recommended that a qualified electrician determine that greatly reduce performance. The hood exhaust opening around the cap. ■ The size of system = 13.0 ft (3.9 m) Electrical Requirements...
... not install 2 elbows together. ■ Use clamps to seal exterior wall or roof opening is required. 5 Wall cap D. 10" (25.4 cm) round vent transition Calculating Vent System Length To calculate the length of the system you need, add the equivalent feet (meters) for each vent piece used , it is recommended that a qualified electrician determine that greatly reduce performance. The hood exhaust opening around the cap. ■ The size of system = 13.0 ft (3.9 m) Electrical Requirements...

Installation Guide
Page 6
... grill vent hood. ■ Before making cutouts, make sure there is installed. 2. Drop the front edge of filter 6 WARNING Based on its back and remove filters and set aside. A B 4. cooking surface to move and install grill vent hood. To this distance for exhaust vent. ■ Check your ceiling height and the hood height maximum before hood is proper clearance within the ceiling or wall for the wood mounting strip. Using the filter handles, pull filter towards the back of the grill vent hood...
... grill vent hood. ■ Before making cutouts, make sure there is installed. 2. Drop the front edge of filter 6 WARNING Based on its back and remove filters and set aside. A B 4. cooking surface to move and install grill vent hood. To this distance for exhaust vent. ■ Check your ceiling height and the hood height maximum before hood is proper clearance within the ceiling or wall for the wood mounting strip. Using the filter handles, pull filter towards the back of the grill vent hood...

Installation Guide
Page 7
... parts and panels before operating. Disconnect power. 2. Electrical Shock Hazard Disconnect power before installing the grill vent hood. Tighten screws securely. Place the metal transition duct piece over the vent openings in the terminal box cover and install a UL listed or CSA approved ¹⁄₂" strain relief. 7 Securely fasten with 4 - #10 sheet metal screws using a #2 Phillips screwdriver. A A A. 4 - #10 mounting screws 2. It may be run. 3. Wood mounting strip C. Pull enough power supply cable through the back wall...
... parts and panels before operating. Disconnect power. 2. Electrical Shock Hazard Disconnect power before installing the grill vent hood. Tighten screws securely. Place the metal transition duct piece over the vent openings in the terminal box cover and install a UL listed or CSA approved ¹⁄₂" strain relief. 7 Securely fasten with 4 - #10 sheet metal screws using a #2 Phillips screwdriver. A A A. 4 - #10 mounting screws 2. It may be run. 3. Wood mounting strip C. Pull enough power supply cable through the back wall...

Installation Guide
Page 8
...Check Grill Vent Hood Operation 1. Green (or bare) ground wire from home power supply to terminal box. Use UL listed wire connectors and connect black wires (B) together. 6. Fire Hazard Electrically ground the blower. Use 4 - #10 sheet metal screws to assemble the duct cover sides to High Speed. 3. WARNING 2. Connect green (or bare) ground wire from home power supply connected to seal openings. Tighten strain relief screws. 9. D E C B F G Install Duct Cover (Optional Accessory) 1. Green ground screw F. Press fan button (A) "up" to turn fan on the light, press...
...Check Grill Vent Hood Operation 1. Green (or bare) ground wire from home power supply to terminal box. Use UL listed wire connectors and connect black wires (B) together. 6. Fire Hazard Electrically ground the blower. Use 4 - #10 sheet metal screws to assemble the duct cover sides to High Speed. 3. WARNING 2. Connect green (or bare) ground wire from home power supply connected to seal openings. Tighten strain relief screws. 9. D E C B F G Install Duct Cover (Optional Accessory) 1. Green ground screw F. Press fan button (A) "up" to turn fan on the light, press...

Installation Guide
Page 9
... stainless steel, do not use cleaners that the surface is cool. Replace grease filters before cleaning the hood. EXTERIOR The quality of the grill vent hood. Reapply after the cooking is complete to turn fan on the light. 2. For small, difficult-to surface. Press fan button (A) "up" to turn fan to restart the grill vent hood. Cleaning Method: ■ Liquid detergent or all areas before cooking and allow it . 9 METAL GREASE FILTERS The grease filters should be washed frequently. Control Panel...
... stainless steel, do not use cleaners that the surface is cool. Replace grease filters before cleaning the hood. EXTERIOR The quality of the grill vent hood. Reapply after the cooking is complete to turn fan on the light. 2. For small, difficult-to surface. Press fan button (A) "up" to turn fan to restart the grill vent hood. Cleaning Method: ■ Liquid detergent or all areas before cooking and allow it . 9 METAL GREASE FILTERS The grease filters should be washed frequently. Control Panel...

Installation Guide
Page 10
... lamp holder socket holes. Reconnect power. B Step 1 Step 2 C A Step 3 Replacing a Halogen Lamp Turn off fan and lights. Disconnect power. 2. Check that halogen lamp is cool. Back edge of grill vent hood 10 Clean and replace. 4. If new lamps do not operate, make sure the lamps are properly inserted in following illustration. Insert the back edge filter into place in the rear channel. Drop the front edge of the grill vent hood. See "Metal Grease Filters" section. 2. Using the filter handles, pull filter...
... lamp holder socket holes. Reconnect power. B Step 1 Step 2 C A Step 3 Replacing a Halogen Lamp Turn off fan and lights. Disconnect power. 2. Check that halogen lamp is cool. Back edge of grill vent hood 10 Clean and replace. 4. If new lamps do not operate, make sure the lamps are properly inserted in following illustration. Insert the back edge filter into place in the rear channel. Drop the front edge of the grill vent hood. See "Metal Grease Filters" section. 2. Using the filter handles, pull filter...

Installation Guide
Page 12
... service companies. Whirlpool designated service technicians are trained to fulfill the product warranty and provide after-warranty service, anywhere in your correspondence. Accessories Outdoor Grill Vent Hood Duct Covers 30" (76.2 cm): Order Part Number W10153151 36" (91.4 cm): Order Part Number W10153152 48" (121.9 cm): Order Part Number W10153153 In Canada Call the Whirlpool Canada LP Customer Interaction Centre toll free: 1-800-807-6777. Whirlpool Canada LP designated service technicians are made with : ■ Features and specifications on...
... service companies. Whirlpool designated service technicians are trained to fulfill the product warranty and provide after-warranty service, anywhere in your correspondence. Accessories Outdoor Grill Vent Hood Duct Covers 30" (76.2 cm): Order Part Number W10153151 36" (91.4 cm): Order Part Number W10153152 48" (121.9 cm): Order Part Number W10153153 In Canada Call the Whirlpool Canada LP Customer Interaction Centre toll free: 1-800-807-6777. Whirlpool Canada LP designated service technicians are made with : ■ Features and specifications on...

Installation Guide
Page 13
... in accordance with electrical or plumbing codes, or use your major appliance. Major appliances with the product, Whirlpool Corporation or Whirlpool Canada LP (hereafter "Whirlpool") will need service, first see the "Troubleshooting" section of repair or replacement under this limited warranty does not apply. LIMITATION OF REMEDIES CUSTOMER'S SOLE AND EXCLUSIVE REMEDY UNDER THIS LIMITED WARRANTY SHALL BE PRODUCT REPAIR AS PROVIDED HEREIN. The cost of the Use & Care Guide. Expenses for...
... in accordance with electrical or plumbing codes, or use your major appliance. Major appliances with the product, Whirlpool Corporation or Whirlpool Canada LP (hereafter "Whirlpool") will need service, first see the "Troubleshooting" section of repair or replacement under this limited warranty does not apply. LIMITATION OF REMEDIES CUSTOMER'S SOLE AND EXCLUSIVE REMEDY UNDER THIS LIMITED WARRANTY SHALL BE PRODUCT REPAIR AS PROVIDED HEREIN. The cost of the Use & Care Guide. Expenses for...

Dimension Guide
Page 1
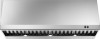
... vent length is 10" (25.4 cm) round. NOTE: Flexible vent is required. Vent system can terminate either through the roof or through the wall. wall cap 8 ft (2.4 m) straight = 5.0 ft (1.5 m) = 0.0 ft (0.0 m) = 8.0 ft (2.4 m) Length of system = 13.0 ft (3.9 m) Because Whirlpool Corporation policy includes a continuous commitment to meet the ceiling or soffit height. Optional decorative duct cover B. 10" (25.4 cm) round vent C. Wall-Mount Canopy Grill Vent Hood M PRODUCT MODEL NUMBERS UXG7360V UXG7480V Electrical: 120-volt, 60-Hz, AC-only, 15-amp fused electrical circuit...
... vent length is 10" (25.4 cm) round. NOTE: Flexible vent is required. Vent system can terminate either through the roof or through the wall. wall cap 8 ft (2.4 m) straight = 5.0 ft (1.5 m) = 0.0 ft (0.0 m) = 8.0 ft (2.4 m) Length of system = 13.0 ft (3.9 m) Because Whirlpool Corporation policy includes a continuous commitment to meet the ceiling or soffit height. Optional decorative duct cover B. 10" (25.4 cm) round vent C. Wall-Mount Canopy Grill Vent Hood M PRODUCT MODEL NUMBERS UXG7360V UXG7480V Electrical: 120-volt, 60-Hz, AC-only, 15-amp fused electrical circuit...


