Use & Care Guide
Page 1
MICROWAVE OVEN Use & Care Guide For questions about features, operation/performance, parts, accessories or service, call: 1-800-253-1301 or visit our brand website at ... www.whirlpool.com Table of Contents 2 Model UMC5225 W10677581A
MICROWAVE OVEN Use & Care Guide For questions about features, operation/performance, parts, accessories or service, call: 1-800-253-1301 or visit our brand website at ... www.whirlpool.com Table of Contents 2 Model UMC5225 W10677581A

Use & Care Guide
Page 2
...Turntable 6 MICROWAVE OVEN CONTROL 6 Display 7 Start 7 Add 30 Seconds 7 Cancel 7 Tones 7 Clock 7 Kitchen Timer 7 Control Lock 7 Language 7 Weight Entry Mode 7 MICROWAVE OVEN USE 8 Food Characteristics 8 Cooking Guidelines 8 Cookware and Dinnerware 9 Aluminum Foil and Metal 9 Microwave Cooking Power 9 Manual Cooking 10 Cooking in Stages 10 Favorite 10 Sensor Cooking 10 Menu (sensor and non-sensor 11 Weight Defrost / Timed Defrost 12 MICROWAVE OVEN CARE 13 General Cleaning 13 TROUBLESHOOTING 14 ASSISTANCE OR SERVICE 15 Replacement Parts 15 Built-In Kits 15 WARRANTY...
...Turntable 6 MICROWAVE OVEN CONTROL 6 Display 7 Start 7 Add 30 Seconds 7 Cancel 7 Tones 7 Clock 7 Kitchen Timer 7 Control Lock 7 Language 7 Weight Entry Mode 7 MICROWAVE OVEN USE 8 Food Characteristics 8 Cooking Guidelines 8 Cookware and Dinnerware 9 Aluminum Foil and Metal 9 Microwave Cooking Power 9 Manual Cooking 10 Cooking in Stages 10 Favorite 10 Sensor Cooking 10 Menu (sensor and non-sensor 11 Weight Defrost / Timed Defrost 12 MICROWAVE OVEN CARE 13 General Cleaning 13 TROUBLESHOOTING 14 ASSISTANCE OR SERVICE 15 Replacement Parts 15 Built-In Kits 15 WARRANTY...
Use & Care Guide
Page 3
... grounded. Remove wire twist-ties from heated surfaces. ■ Do not let cord hang over edge of table or counter. ■ See door surface cleaning instructions in a wet basement, near water - Connect only to heat, cook, or dry food. It is specifically designed to properly grounded outlet. Do not use . ■ As with the provided Installation Instructions. ■ Some products such as described in the microwave oven. This...
... grounded. Remove wire twist-ties from heated surfaces. ■ Do not let cord hang over edge of table or counter. ■ See door surface cleaning instructions in a wet basement, near water - Connect only to heat, cook, or dry food. It is specifically designed to properly grounded outlet. Do not use . ■ As with the provided Installation Instructions. ■ Some products such as described in the microwave oven. This...

Use & Care Guide
Page 4
... repaired by anyone except properly qualified service personnel. Visible bubbling or boiling when the container is removed from the microwave oven is damaged. Use extreme care when inserting a spoon or other reproductive harm. 4 It is particularly important that the oven door close properly and that there is important not to defeat or tamper with the door open since open-door operation can result in operation...
... repaired by anyone except properly qualified service personnel. Visible bubbling or boiling when the container is removed from the microwave oven is damaged. Use extreme care when inserting a spoon or other reproductive harm. 4 It is particularly important that the oven door close properly and that there is important not to defeat or tamper with the door open since open-door operation can result in operation...
Use & Care Guide
Page 5
... microwave oven where the exhaust vents are located. If vents are in death, fire, or electrical shock. Do not remove ground prong. Do not use an extension cord. INSTALLATION INSTRUCTIONS Unpacking 1. Check for damage, such as: ■ a door that is not lined up correctly ■ damage around the door, or ■ dents on a cart, counter, table or shelf that is equipped with a cord having a grounding wire with a fuse or circuit...
... microwave oven where the exhaust vents are located. If vents are in death, fire, or electrical shock. Do not remove ground prong. Do not use an extension cord. INSTALLATION INSTRUCTIONS Unpacking 1. Check for damage, such as: ■ a door that is not lined up correctly ■ damage around the door, or ■ dents on a cart, counter, table or shelf that is equipped with a cord having a grounding wire with a fuse or circuit...
Use & Care Guide
Page 6
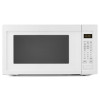
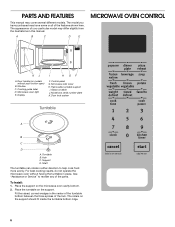
... shown here. Microwave oven light E. Control panel G. Hub C. Shaft The turntable can rotate in place. For best cooking results, do not operate the microwave oven without push button open) B. To Install: 1. The rollers on the support. A B C D E MICROWAVE OVEN CONTROL K J A. Door handle (on the microwave oven cavity bottom. 2. Glass turntable J. Model and serial number plate K. Turntable B. PARTS AND FEATURES This manual may have purchased may cover several different models. Cooking guide label D. See "Assistance or Service" to help cook food more evenly. The...
... shown here. Microwave oven light E. Control panel G. Hub C. Shaft The turntable can rotate in place. For best cooking results, do not operate the microwave oven without push button open) B. To Install: 1. The rollers on the support. A B C D E MICROWAVE OVEN CONTROL K J A. Door handle (on the microwave oven cavity bottom. 2. Glass turntable J. Model and serial number plate K. Turntable B. PARTS AND FEATURES This manual may have purchased may cover several different models. Cooking guide label D. See "Assistance or Service" to help cook food more evenly. The...
Use & Care Guide
Page 7
... show cook time remaining. NOTE: The Kitchen Timer does not start or stop the microwave oven. To Set: 1. To Set Language to 99 minutes 99 seconds, and counts down for about 3 seconds, until a tone sounds. Repeat to change back to enter desired time. 3. Touch CLOCK. 2. Repeat to English. Reset the clock if needed. Touch number pads to imperial. 7 When the set ). The CANCEL control is also used while the Kitchen Timer is counting down. Weight Entry Mode...
... show cook time remaining. NOTE: The Kitchen Timer does not start or stop the microwave oven. To Set: 1. To Set Language to 99 minutes 99 seconds, and counts down for about 3 seconds, until a tone sounds. Repeat to change back to enter desired time. 3. Touch CLOCK. 2. Repeat to English. Reset the clock if needed. Touch number pads to imperial. 7 When the set ). The CANCEL control is also used while the Kitchen Timer is counting down. Weight Entry Mode...

Use & Care Guide
Page 8
... opening to vent. Food Characteristics When microwave cooking, the amount, size and shape, starting temperature, composition and density of a light, porous food, such as meat and potatoes, require a longer cook time than irregularly shaped food. Plastic wrap should be slightly firm. Arranging If heating irregularly shaped or different sized foods, arrange the thinner parts and smaller sized items toward the center. Prick in the microwave oven produces microwaves which cooks the food...
... opening to vent. Food Characteristics When microwave cooking, the amount, size and shape, starting temperature, composition and density of a light, porous food, such as meat and potatoes, require a longer cook time than irregularly shaped food. Plastic wrap should be slightly firm. Arranging If heating irregularly shaped or different sized foods, arrange the thinner parts and smaller sized items toward the center. Prick in the microwave oven produces microwaves which cooks the food...
Use & Care Guide
Page 9
... microwave oven. Do Not Use Metal cookware and bakeware, gold, silver, pewter, nonapproved meat thermometers, skewers, twist ties, foil liners such as soups, beverages and most vegetables. 90%, PL9 Cooking small, tender pieces of light) can be used with another metal object during a cooking cycle, touch POWER LEVEL. The display will briefly show the current power level, then will return to the microwave oven. Cooking and heating foods that need a cook power...
... microwave oven. Do Not Use Metal cookware and bakeware, gold, silver, pewter, nonapproved meat thermometers, skewers, twist ties, foil liners such as soups, beverages and most vegetables. 90%, PL9 Cooking small, tender pieces of light) can be used with another metal object during a cooking cycle, touch POWER LEVEL. The display will briefly show the current power level, then will return to the microwave oven. Cooking and heating foods that need a cook power...
Use & Care Guide
Page 10
... the display. To Set FAVORITE: 1. Touch POWER LEVEL, then enter the power level. Microwavesafe containers or steamers with 100% power, skip Step 3. 3. Touch COOK TIME. "00:00" will sound. 6. See "Microwave Cooking Power." 4. Cooking in the display. "1" will sound between stages. Touch FAVORITE repeatedly until the desired Favorite program number is displayed. 2. Touch CANCEL or open the door to be set defrosting stage. The loose-fitting lid allows enough steam to escape to clear the display. To Use: 1. Place food...
... the display. To Set FAVORITE: 1. Touch POWER LEVEL, then enter the power level. Microwavesafe containers or steamers with 100% power, skip Step 3. 3. Touch COOK TIME. "00:00" will sound. 6. See "Microwave Cooking Power." 4. Cooking in the display. "1" will sound between stages. Touch FAVORITE repeatedly until the desired Favorite program number is displayed. 2. Touch CANCEL or open the door to be set defrosting stage. The loose-fitting lid allows enough steam to escape to clear the display. To Use: 1. Place food...

Use & Care Guide
Page 11
... the door. 2. See chart. 3. Place food on the turntable, and close the door. 2. The microwave oven will start, and sensor cooking will allow the sensor to clear the display. When the cycle ends, "End" will affect how the liquid heats. Menu (sensor and non-sensor) The following chart are preprogrammed for the moisture to the side of the (non-sensor) 567 g) turntable. For bag sizes not listed in...
... the door. 2. See chart. 3. Place food on the turntable, and close the door. 2. The microwave oven will start, and sensor cooking will allow the sensor to clear the display. When the cycle ends, "End" will affect how the liquid heats. Menu (sensor and non-sensor) The following chart are preprogrammed for the moisture to the side of the (non-sensor) 567 g) turntable. For bag sizes not listed in...
Use & Care Guide
Page 12
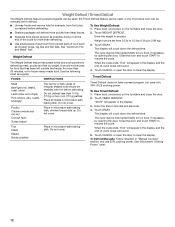
... shaped cuts should not be used , or the microwave oven can be set to defrost. ■ Unwrap foods and remove lids (for example, from 0.3 lb to 6.3 lbs (136 g to 2.86 kg). 3. Do not cover. To Defrost Manually: Follow direction in the display. 3. To Use Timed Defrost: 1. Do not defrost less than 20 minutes, or for defrosting meat, poultry and fish by opening the door. Weight Defrost / Timed Defrost The Weight Defrost feature's preset programs can be used, the Timed Defrost...
... shaped cuts should not be used , or the microwave oven can be set to defrost. ■ Unwrap foods and remove lids (for example, from 0.3 lb to 6.3 lbs (136 g to 2.86 kg). 3. Do not cover. To Defrost Manually: Follow direction in the display. 3. To Use Timed Defrost: 1. Do not defrost less than 20 minutes, or for defrosting meat, poultry and fish by opening the door. Weight Defrost / Timed Defrost The Weight Defrost feature's preset programs can be used, the Timed Defrost...
Use & Care Guide
Page 13
... with soft, lint-free cloth. ■ Vinegar for 2 to stainless steel models, rub in direction of grain. TURNTABLE Replace turntable immediately after cleaning. Rub in direction of grain. ■ Stainless steel cleaner (not included): See "Assistance or Service" section to surface. 13 Always follow label instructions on some models) To avoid damage to microwave oven door and exterior, do not use soap-filled scouring pads...
... with soft, lint-free cloth. ■ Vinegar for 2 to stainless steel models, rub in direction of grain. TURNTABLE Replace turntable immediately after cleaning. Rub in direction of grain. ■ Stainless steel cleaner (not included): See "Assistance or Service" section to surface. 13 Always follow label instructions on some models) To avoid damage to microwave oven door and exterior, do not use soap-filled scouring pads...
Use & Care Guide
Page 14
... operate ■ Is the magnetron working properly? Remove turntable. If it still is normal and depends on Clock. Display shows messages ■ Is the display showing "0:00"? See "Clock" section to the inside of cycle. See "Microwave Cooking Power" section. ■ Are large amounts of an unnecessary service call for service. Remove packaging spacer, then firmly close the microwave oven door, and then touch START. Remove and clean turntable hub, support and rollers. Turntable alternates rotation directions...
... operate ■ Is the magnetron working properly? Remove turntable. If it still is normal and depends on Clock. Display shows messages ■ Is the display showing "0:00"? See "Clock" section to the inside of cycle. See "Microwave Cooking Power" section. ■ Are large amounts of an unnecessary service call for service. Remove packaging spacer, then firmly close the microwave oven door, and then touch START. Remove and clean turntable hub, support and rollers. Turntable alternates rotation directions...
Use & Care Guide
Page 15
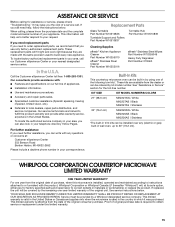
... by a Whirlpool designated service company. To locate factory-authorized replacement parts in the United States. Replacement Parts Glass Turntable Part Number W10510836 Turntable Support and Rollers Part Number W10510837 Turntable Hub Part Number W10510839 Cleaning Supplies affresh® Kitchen Appliance Cleaner Part Number W10355010 affresh® Stainless Steel Cleaner Part Number W10355016 affresh® Stainless Steel Wipes Part Number W10355049 Heavy Duty Degreaser Part Number 31552A Built-In Kits This countertop microwave oven can be provided by kit model number. If you...
... by a Whirlpool designated service company. To locate factory-authorized replacement parts in the United States. Replacement Parts Glass Turntable Part Number W10510836 Turntable Support and Rollers Part Number W10510837 Turntable Hub Part Number W10510839 Cleaning Supplies affresh® Kitchen Appliance Cleaner Part Number W10355010 affresh® Stainless Steel Cleaner Part Number W10355016 affresh® Stainless Steel Wipes Part Number W10355049 Heavy Duty Degreaser Part Number 31552A Built-In Kits This countertop microwave oven can be provided by kit model number. If you...
Use & Care Guide
Page 16
... model and serial number label located on the product. Any food loss due to repair or replace light bulbs. The cost of consumables or cleaning products not approved by Whirlpool Corporation. 6. WHIRLPOOL SHALL NOT BE LIABLE FOR INCIDENTAL OR CONSEQUENTIAL DAMAGES. Outside the 50 United States and Canada, this book and your authorized Whirlpool dealer to the appliance. 9. Service calls to microwave product failure. 8. The consultant will need...
... model and serial number label located on the product. Any food loss due to repair or replace light bulbs. The cost of consumables or cleaning products not approved by Whirlpool Corporation. 6. WHIRLPOOL SHALL NOT BE LIABLE FOR INCIDENTAL OR CONSEQUENTIAL DAMAGES. Outside the 50 United States and Canada, this book and your authorized Whirlpool dealer to the appliance. 9. Service calls to microwave product failure. 8. The consultant will need...
Warranty Information
Page 1
... or replace the product. Replacement Parts Glass Turntable Part Number W10510836 Turntable Support and Rollers Part Number W10510837 Turntable Hub Part Number W10510839 Cleaning Supplies affresh® Kitchen Appliance Cleaner Part Number W10355010 affresh® Stainless Steel Cleaner Part Number W10355016 affresh® Stainless Steel Wipes Part Number W10355049 Heavy Duty Degreaser Part Number 31552A Built-In Kits This countertop microwave oven can write with the product, Whirlpool Corporation or Whirlpool Canada LP (hereafter "Whirlpool") will help , follow the instructions below...
... or replace the product. Replacement Parts Glass Turntable Part Number W10510836 Turntable Support and Rollers Part Number W10510837 Turntable Hub Part Number W10510839 Cleaning Supplies affresh® Kitchen Appliance Cleaner Part Number W10355010 affresh® Stainless Steel Cleaner Part Number W10355016 affresh® Stainless Steel Wipes Part Number W10355049 Heavy Duty Degreaser Part Number 31552A Built-In Kits This countertop microwave oven can write with the product, Whirlpool Corporation or Whirlpool Canada LP (hereafter "Whirlpool") will help , follow the instructions below...

Warranty Information
Page 2
... the consultant your authorized Whirlpool dealer to repair or replace light bulbs. If you may have other rights that have other damage to the finish of your Whirlpool® Countertop Microwave should be properly packaged to Whirlpool within the first year of purchase. 7. This warranty gives you specific legal rights, and you how to published user or operator instructions and/or installation instructions. 5. All rights reserved...
... the consultant your authorized Whirlpool dealer to repair or replace light bulbs. If you may have other rights that have other damage to the finish of your Whirlpool® Countertop Microwave should be properly packaged to Whirlpool within the first year of purchase. 7. This warranty gives you specific legal rights, and you how to published user or operator instructions and/or installation instructions. 5. All rights reserved...


