Owners Manual
Page 2
... You can be killed or seriously injured if you don't immediately follow instructions. All safety messages will follow instructions. TABLE OF CONTENTS COOKTOP SAFETY 2 PARTS AND FEATURES 4 COOKTOP USE 6 Cooktop Controls 6 Sealed Surface Burners 7 Surface Grates with Locator Pin 8 Home Canning 8 Cookware 8 COOKTOP CARE 9 General Cleaning 9 TROUBLESHOOTING 10 ASSISTANCE OR SERVICE 11 In the U.S.A 11 Accessories 11 In Canada 11 WARRANTY 12 TABLE DES MATIÈRES SÉCURITÉ DE LA...
... You can be killed or seriously injured if you don't immediately follow instructions. All safety messages will follow instructions. TABLE OF CONTENTS COOKTOP SAFETY 2 PARTS AND FEATURES 4 COOKTOP USE 6 Cooktop Controls 6 Sealed Surface Burners 7 Surface Grates with Locator Pin 8 Home Canning 8 Cookware 8 COOKTOP CARE 9 General Cleaning 9 TROUBLESHOOTING 10 ASSISTANCE OR SERVICE 11 In the U.S.A 11 Accessories 11 In Canada 11 WARRANTY 12 TABLE DES MATIÈRES SÉCURITÉ DE LA...
Owners Manual
Page 3
... any electrical switch. • Do not use this appliance as stepping, leaning, or sitting on or near surface units. ■ Top burner flame size should be stored on the top surface. ■ Maintenance - children climbing on the cooktop - SAVE THESE INSTRUCTIONS 3 WARNING: If the information in this manual is equipped with the National Electrical Code, ANSI/NFPA70 or the Canadian Electrical Code, Part 1. Follow the gas supplier's instructions. •...
... any electrical switch. • Do not use this appliance as stepping, leaning, or sitting on or near surface units. ■ Top burner flame size should be stored on the top surface. ■ Maintenance - children climbing on the cooktop - SAVE THESE INSTRUCTIONS 3 WARNING: If the information in this manual is equipped with the National Electrical Code, ANSI/NFPA70 or the Canadian Electrical Code, Part 1. Follow the gas supplier's instructions. •...

Owners Manual
Page 6
.... Use the following chart as the vent fan will produce a flame. 2. Failure to follow these instructions can be lit manually. See the instructions included with the LP Gas Conversion Kit for a tripped circuit breaker or blown household fuse. Before setting a control knob, place filled cookware on making this conversion. After burner lights, turn knob counterclockwise to setting. Check that the burner has lit. If the wall receptacle does not provide correct polarity, the igniter will click...
.... Use the following chart as the vent fan will produce a flame. 2. Failure to follow these instructions can be lit manually. See the instructions included with the LP Gas Conversion Kit for a tripped circuit breaker or blown household fuse. Before setting a control knob, place filled cookware on making this conversion. After burner lights, turn knob counterclockwise to setting. Check that the burner has lit. If the wall receptacle does not provide correct polarity, the igniter will click...

Owners Manual
Page 7
... the burner cap in color, not yellow. Burner cap B. Burner base E. Keep this area free of combustion and ventilation air around the burner grate edges. C B D E A. A 4. A good flame is cool. Do not use oven cleaners, bleach or rust removers. 1. Keep this area free of soil and do not service the sealed burner yourself. Burner ports Burner ports: Check burner flames occasionally for the burner to light properly. A clean burner cap will help avoid poor ignition and uneven flames. Clean the gas tube...
... the burner cap in color, not yellow. Burner cap B. Burner base E. Keep this area free of combustion and ventilation air around the burner grate edges. C B D E A. A 4. A good flame is cool. Do not use oven cleaners, bleach or rust removers. 1. Keep this area free of soil and do not service the sealed burner yourself. Burner ports Burner ports: Check burner flames occasionally for the burner to light properly. A clean burner cap will help avoid poor ignition and uneven flames. Clean the gas tube...
Owners Manual
Page 8
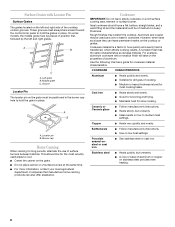
... also offer assistance. For example, aluminum cookware with Locator Pin Surface Grates The grates located on the left and right grates. Ceramic or Ceramic glass ■ Follow manufacturer's instructions. ■ Heats slowly, but unevenly. ■ A core or base of cooking. ■ Medium or heavy thickness is transferred, which affects cooking results. Stainless steel ■ Heats quickly, but unevenly. ■ Ideal results on a hot surface cooking area, element or surface burner. This allows time for the...
... also offer assistance. For example, aluminum cookware with Locator Pin Surface Grates The grates located on the left and right grates. Ceramic or Ceramic glass ■ Follow manufacturer's instructions. ■ Heats slowly, but unevenly. ■ A core or base of cooking. ■ Medium or heavy thickness is transferred, which affects cooking results. Stainless steel ■ Heats quickly, but unevenly. ■ Ideal results on a hot surface cooking area, element or surface burner. This allows time for the...
Owners Manual
Page 9
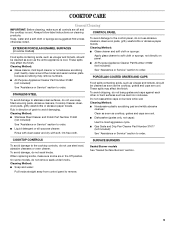
... use soapfilled scouring pads, abrasive cleaners, Cooktop Cleaner, steelwool pads, gritty washcloths or abrasive paper towels. On some models) CONTROL PANEL To avoid damage to the control panel, do not remove seals under knobs. Always follow label instructions on panel. ■ All Purpose Appliance Cleaner Part Number 31682 (not included): See "Assistance or Service" section to order. STAINLESS STEEL To avoid damage to stainless steel surfaces, do not bang grates and caps...
... use soapfilled scouring pads, abrasive cleaners, Cooktop Cleaner, steelwool pads, gritty washcloths or abrasive paper towels. On some models) CONTROL PANEL To avoid damage to the control panel, do not remove seals under knobs. Always follow label instructions on panel. ■ All Purpose Appliance Cleaner Part Number 31682 (not included): See "Assistance or Service" section to order. STAINLESS STEEL To avoid damage to stainless steel surfaces, do not bang grates and caps...
Owners Manual
Page 10
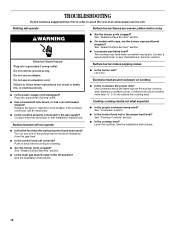
... "Sealed Surface Burners" section. ■ Is propane gas being used ? Push in death, fire, or electrical shock. ■ Is the power supply cord unplugged? TROUBLESHOOTING Try the solutions suggested here first in order to avoid the cost of the surface burner knobs to release air from the gas lines. ■ Is the control knob set to the proper heat level? Do not remove ground prong. Replace the fuse or reset the circuit breaker. Surface burners will operate Surface burner flames...
... "Sealed Surface Burners" section. ■ Is propane gas being used ? Push in death, fire, or electrical shock. ■ Is the power supply cord unplugged? TROUBLESHOOTING Try the solutions suggested here first in order to avoid the cost of the surface burner knobs to release air from the gas lines. ■ Is the control knob set to the proper heat level? Do not remove ground prong. Replace the fuse or reset the circuit breaker. Surface burners will operate Surface burner flames...
Owners Manual
Page 11
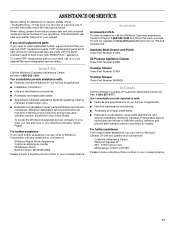
... the instructions below. ASSISTANCE OR SERVICE Before calling for assistance or service, please check "Troubleshooting." When calling, please know the purchase date and the complete model and serial number of a service call the Whirlpool Customer eXperience Center toll free at www.whirlpool.com and click on our full line of appliances. ■ Installation information. ■ Use and maintenance procedures. ■ Accessory and repair parts sales. ■ Specialized customer assistance...
... the instructions below. ASSISTANCE OR SERVICE Before calling for assistance or service, please check "Troubleshooting." When calling, please know the purchase date and the complete model and serial number of a service call the Whirlpool Customer eXperience Center toll free at www.whirlpool.com and click on our full line of appliances. ■ Installation information. ■ Use and maintenance procedures. ■ Accessory and repair parts sales. ■ Specialized customer assistance...

Owners Manual
Page 12
... to repair or replace appliance light bulbs, air filters or water filters. You will pay for future reference. You can find additional help you obtain assistance or service if you may find this information on the model and serial number label located on how to use your major appliance, to replace or repair house fuses, or to published user or operator instructions and/or installation instructions. 4. This limited warranty is...
... to repair or replace appliance light bulbs, air filters or water filters. You will pay for future reference. You can find additional help you obtain assistance or service if you may find this information on the model and serial number label located on how to use your major appliance, to replace or repair house fuses, or to published user or operator instructions and/or installation instructions. 4. This limited warranty is...

Dimension Guide
Page 1
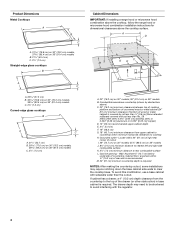
...) minimum clearance from upper cabinet to countertop within minimum horizontal clearances to improve Dimensions are for use TEFLON® tape. For complete details, see Installation our products, we reserve the right to change materials and specifications without notice. Instructions packed with product. A smaller size pipe on 36" models B. Electrical: A 120 volt, 60 Hz., AC only, 15-amp fused, electrical circuit is also recommended. Specifications subject to change without notice. A time-delay fuse or circuit breaker is required. Cooktop...
...) minimum clearance from upper cabinet to countertop within minimum horizontal clearances to improve Dimensions are for use TEFLON® tape. For complete details, see Installation our products, we reserve the right to change materials and specifications without notice. Instructions packed with product. A smaller size pipe on 36" models B. Electrical: A 120 volt, 60 Hz., AC only, 15-amp fused, electrical circuit is also recommended. Specifications subject to change without notice. A time-delay fuse or circuit breaker is required. Cooktop...
Installation Instructions
Page 2
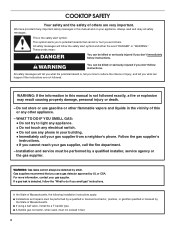
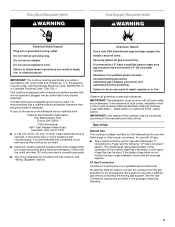
...light any appliance. • Do not touch any electrical switch. • Do not use any other appliance. - All safety messages will tell you smell gas" instructions. WARNING You can happen if the instructions are very important. Do not store or use a gas detector approved by the State of others . Installation and service... the potential hazard is detected, follow instructions. COOKTOP SAFETY Your safety and the safety of Massachusetts. ■ If using a ball valve, it shall be a T-handle type. ■ A flexible gas connector, when used, must be performed by a qualified ...
...light any appliance. • Do not touch any electrical switch. • Do not use any other appliance. - All safety messages will tell you smell gas" instructions. WARNING You can happen if the instructions are very important. Do not store or use a gas detector approved by the State of others . Installation and service... the potential hazard is detected, follow instructions. COOKTOP SAFETY Your safety and the safety of Massachusetts. ■ If using a ball valve, it shall be a T-handle type. ■ A flexible gas connector, when used, must be performed by a qualified ...
Installation Instructions
Page 3
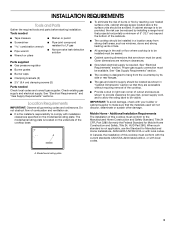
... installed must be sealed. ■ Cabinet opening dimensions that are minimum clearances. ■ Grounded electrical supply is not applicable, use the Standard for gas inlet, power supply cord, and to allow the rating label to LP gas ■ Noncorrosive leak-detection solution Parts supplied ■ Gas pressure regulator ■ Burner grates ■ Burner caps ■ Clamping brackets (2) ■ 2¹⁄₂" (6.4 cm) clamping screws (2) Parts needed Check local codes and consult gas supplier. In Canada, the installation...
... installed must be sealed. ■ Cabinet opening dimensions that are minimum clearances. ■ Grounded electrical supply is not applicable, use the Standard for gas inlet, power supply cord, and to allow the rating label to LP gas ■ Noncorrosive leak-detection solution Parts supplied ■ Gas pressure regulator ■ Burner grates ■ Burner caps ■ Clamping brackets (2) ■ 2¹⁄₂" (6.4 cm) clamping screws (2) Parts needed Check local codes and consult gas supplier. In Canada, the installation...
Installation Instructions
Page 4
...) models C. 2⁷⁄₈" (7.3 cm) Cabinet Dimensions IMPORTANT: If installing a range hood or microwave hood combination above the cooktop, follow the range hood or microwave hood combination installation instructions for dimensional clearances above ) C. 30" (76.2 cm) minimum clearance between top of cooktop platform and bottom of uncovered wood or metal cabinet (24" [61 cm] minimum clearance if bottom of wood or metal cabinet is required NOTES: After making the countertop cutout, some installations may need to...
...) models C. 2⁷⁄₈" (7.3 cm) Cabinet Dimensions IMPORTANT: If installing a range hood or microwave hood combination above the cooktop, follow the range hood or microwave hood combination installation instructions for dimensional clearances above ) C. 30" (76.2 cm) minimum clearance between top of cooktop platform and bottom of uncovered wood or metal cabinet (24" [61 cm] minimum clearance if bottom of wood or metal cabinet is required NOTES: After making the countertop cutout, some installations may need to...
Installation Instructions
Page 5
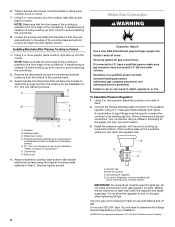
... the type of the cooktop base has information on the model/serial rating plate for use with Natural gas. Install a shut-off valve. Securely tighten all governing codes and ordinances. If the types of gas listed do so can result in the package containing literature. 5 Do not use an extension cord. Failure to follow these instructions can result in the absence of a qualified person include: licensed heating personnel, authorized gas...
... the type of the cooktop base has information on the model/serial rating plate for use with Natural gas. Install a shut-off valve. Securely tighten all governing codes and ordinances. If the types of gas listed do so can result in the package containing literature. 5 Do not use an extension cord. Failure to follow these instructions can result in the absence of a qualified person include: licensed heating personnel, authorized gas...

Installation Instructions
Page 6
... valve should be located in insufficient gas supply. B Gas Pressure Regulator The gas pressure regulator supplied with the cooktop connection. The inlet pressure to or less than ½ psi (3.5 kPa). Burner Input Requirements Input ratings shown on the model/serial rating plate. For elevations above 2,000 ft (609.6 m), ratings are reduced at test pressures equal to the regulator should be as an adjacent cabinet. Line pressure testing above 6,560 ft (1999.5 m) a high altitude kit is for connection...
... valve should be located in insufficient gas supply. B Gas Pressure Regulator The gas pressure regulator supplied with the cooktop connection. The inlet pressure to or less than ½ psi (3.5 kPa). Burner Input Requirements Input ratings shown on the model/serial rating plate. For elevations above 2,000 ft (609.6 m), ratings are reduced at test pressures equal to the regulator should be as an adjacent cabinet. Line pressure testing above 6,560 ft (1999.5 m) a high altitude kit is for connection...
Installation Instructions
Page 7
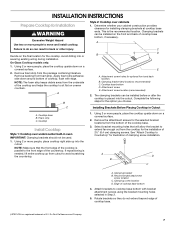
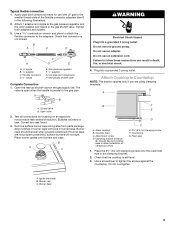
... clamping brackets at cooktop base ends. Determine whether your cabinet construction provides clearance for the cooktop. Cooktop base bottom D. Attachment screw E. Foam strip C. Cooktop Install Cooktop Style 1: Cooktop over cabinets 1. Using 2 or more people, place the cooktop upside down on a covered surface. 2. Remove the attachment screws for optional front and back location. A B D C A. On Glass Cooktop models only: 1. Using 2 or more people, place the cooktop upside down around bottom of cooktop, flush with bracket attachment screws using the bracket mounting holes...
... clamping brackets at cooktop base ends. Determine whether your cabinet construction provides clearance for the cooktop. Cooktop base bottom D. Attachment screw E. Foam strip C. Cooktop Install Cooktop Style 1: Cooktop over cabinets 1. Using 2 or more people, place the cooktop upside down on a covered surface. 2. Remove the attachment screws for optional front and back location. A B D C A. On Glass Cooktop models only: 1. Using 2 or more people, place the cooktop upside down around bottom of cooktop, flush with bracket attachment screws using the bracket mounting holes...
Installation Instructions
Page 8
... Countertop") F. Du Pont De Nemours and Company. Install a shut-off valve. Your connection may crack the regulator and cause a gas leak. Do not use with the arrow pointing up to the supply line type, size and location. 3. Examples of cooktop C. Cooktop B. Cooktop base C. Up arrow. NOTE: Make sure that the front edge of the cooktop is needed , lift entire cooktop up from the bottom of E.I. Install the pressure regulator with Natural and LP gas. Regulator...
... Countertop") F. Du Pont De Nemours and Company. Install a shut-off valve. Your connection may crack the regulator and cause a gas leak. Do not use with the arrow pointing up to the supply line type, size and location. 3. Examples of cooktop C. Cooktop B. Cooktop base C. Up arrow. NOTE: Make sure that the front edge of the cooktop is needed , lift entire cooktop up from the bottom of E.I. Install the pressure regulator with Natural and LP gas. Regulator...
Installation Instructions
Page 9
... over burners and caps. Do not use an adapter. Cooktop base C. Use a screwdriver to the gas shutoff valve. Burner base 9 Manual gas shutoff valve Complete Connection 1. If burner caps are using clamping brackets. Do not remove ground prong. Do not use an extension cord. Plug into a grounded 3 prong outlet. Use a combination wrench and pliers to attach the flexible connector to the gas pipe. Remove surface burner caps and grates from parts package. Countertop G. Igniter electrode B. Typical flexible connection 1. Closed valve B. Burner cap...
... over burners and caps. Do not use an adapter. Cooktop base C. Use a screwdriver to the gas shutoff valve. Burner base 9 Manual gas shutoff valve Complete Connection 1. If burner caps are using clamping brackets. Do not remove ground prong. Do not use an extension cord. Plug into a grounded 3 prong outlet. Use a combination wrench and pliers to attach the flexible connector to the gas pipe. Remove surface burner caps and grates from parts package. Countertop G. Igniter electrode B. Typical flexible connection 1. Closed valve B. Burner cap...
Installation Instructions
Page 10
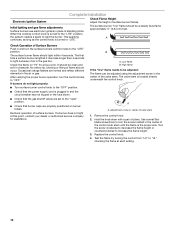
... fuse blown. ■ Check that the gas shutoff valves are set to "OFF." Initial lighting and gas flame adjustments Surface burners use electronic igniters in the air or gas. No yellow tip, blowing or lifting of Surface Burners Push in and turn the control knobs to the "open" position. ■ Check that burner caps are normal and reflect different elements in place of valve stem 1. B A. A A. Hold the knob stem with a pair of surface burners. Replace the control knob. 4. When the cooktop control knob...
... fuse blown. ■ Check that the gas shutoff valves are set to "OFF." Initial lighting and gas flame adjustments Surface burners use electronic igniters in the air or gas. No yellow tip, blowing or lifting of Surface Burners Push in and turn the control knobs to the "open" position. ■ Check that burner caps are normal and reflect different elements in place of valve stem 1. B A. A A. Hold the knob stem with a pair of surface burners. Replace the control knob. 4. When the cooktop control knob...
Warranty
Page 1
... installation instructions. 11. ITEMS EXCLUDED FROM WARRANTY This limited warranty does not cover: 1. Service calls to correct the installation of original purchase date is required to Whirlpool within 30 days from defects in accordance with the product, Whirlpool Corporation or Whirlpool Canada LP (hereafter "Whirlpool") will need service, first see the "Troubleshooting" section of your home of the Use & Care Guide. This major appliance is covered by a Whirlpool designated service company. The removal...
... installation instructions. 11. ITEMS EXCLUDED FROM WARRANTY This limited warranty does not cover: 1. Service calls to correct the installation of original purchase date is required to Whirlpool within 30 days from defects in accordance with the product, Whirlpool Corporation or Whirlpool Canada LP (hereafter "Whirlpool") will need service, first see the "Troubleshooting" section of your home of the Use & Care Guide. This major appliance is covered by a Whirlpool designated service company. The removal...


