Use and Care Guide
Page 2
.... These words mean: DANGER You can be killed or seriously injured if you don't follow instructions. TABLE OF CONTENTS COOKTOP SAFETY 2 PARTS AND FEATURES 4 COOKTOP USE 6 Cooktop Controls 6 Sealed Surface Burners 6 Surface Grates with Locator Pin 7 Home Canning 7 Cookware 8 COOKTOP CARE 8 General Cleaning 8 TROUBLESHOOTING 9 ASSISTANCE OR SERVICE 10 In the U.S.A 10 In Canada 10 WARRANTY 11 TABLE DES MATIÈRES SÉCURITÉ DE LA TABLE DE CUISSON 12 PI...
.... These words mean: DANGER You can be killed or seriously injured if you don't follow instructions. TABLE OF CONTENTS COOKTOP SAFETY 2 PARTS AND FEATURES 4 COOKTOP USE 6 Cooktop Controls 6 Sealed Surface Burners 6 Surface Grates with Locator Pin 7 Home Canning 7 Cookware 8 COOKTOP CARE 8 General Cleaning 8 TROUBLESHOOTING 9 ASSISTANCE OR SERVICE 10 In the U.S.A 10 In Canada 10 WARRANTY 11 TABLE DES MATIÈRES SÉCURITÉ DE LA TABLE DE CUISSON 12 PI...

Use and Care Guide
Page 3
... Installation - s Maintenance - The cooktop, when installed, must be plugged directly into a properly grounded receptacle. WARNING: If the information in this manual is properly installed and grounded by a qualified installer, service agency or the gas supplier. s Top burner flame size should not be seriously injured. Do not store or use this appliance as stepping, leaning, or sitting on the cooktop to persons, or damage when using the cooktop, follow...
... Installation - s Maintenance - The cooktop, when installed, must be plugged directly into a properly grounded receptacle. WARNING: If the information in this manual is properly installed and grounded by a qualified installer, service agency or the gas supplier. s Top burner flame size should not be seriously injured. Do not store or use this appliance as stepping, leaning, or sitting on the cooktop to persons, or damage when using the cooktop, follow...
Use and Care Guide
Page 4
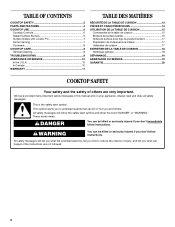
... locations and appearances of the features shown here may have some or all models are for Natural gas unless otherwise noted. Left surface burner grate I . 5,000 Btu/h burner 4 Model SCS3617 (36" [91.4 cm] shown) Model SCS3017 (30" [76.2 cm] not shown) Control Panel A B C A. Right rear burner control knob D. Model and serial number plate (under cooktop) F. 12,500 Btu/h burner H G. PARTS AND FEATURES This manual covers several different models, and not all of the items listed. Surface burner cap...
... locations and appearances of the features shown here may have some or all models are for Natural gas unless otherwise noted. Left surface burner grate I . 5,000 Btu/h burner 4 Model SCS3617 (36" [91.4 cm] shown) Model SCS3017 (30" [76.2 cm] not shown) Control Panel A B C A. Right rear burner control knob D. Model and serial number plate (under cooktop) F. 12,500 Btu/h burner H G. PARTS AND FEATURES This manual covers several different models, and not all of the items listed. Surface burner cap...

Use and Care Guide
Page 5
...burner control knob F. Right front burner control knob H I . Left rear burner control knob D. Model and serial number plate (under cooktop) F. 9,100 Btu/h burner on 36" [91.4 cm] models only) FG E. Center rear burner control knob (on 36" (91.4 cm) models only G. Left surface burner grate D. 6,000 Btu/h burner on 36" (91.4 cm) model 9,100 Btu/h burner on 30" (76.2 cm) model K E. Center grate H. 6,000 Btu/h burner I J A. 12,500 Btu/h burner B. Control panel 5 Surface burner cap C. Control knob off position G. Right surface burner grate J. 12,500 Btu/h burner K. Surface burner...
...burner control knob F. Right front burner control knob H I . Left rear burner control knob D. Model and serial number plate (under cooktop) F. 9,100 Btu/h burner on 36" [91.4 cm] models only) FG E. Center rear burner control knob (on 36" (91.4 cm) models only G. Left surface burner grate D. 6,000 Btu/h burner on 36" (91.4 cm) model 9,100 Btu/h burner on 30" (76.2 cm) model K E. Center grate H. 6,000 Btu/h burner I J A. 12,500 Btu/h burner B. Control panel 5 Surface burner cap C. Control knob off position G. Right surface burner grate J. 12,500 Btu/h burner K. Surface burner...
Use and Care Guide
Page 6
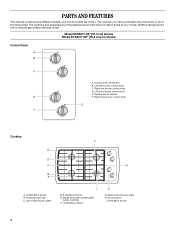
... operate a burner while using large pots and pans. Push in death or fire. s Quickly brown or sear food. Power failure In case of the electric ignition system. After burner lights, turn knob counterclockwise to use with the LP Gas Conversion Kit for details on the valve shaft. Before setting a control knob, place filled cookware on the grate. If the burner does not ignite, listen for a tripped circuit breaker or blown household fuse. s Hold a rapid boil. s Cook soups...
... operate a burner while using large pots and pans. Push in death or fire. s Quickly brown or sear food. Power failure In case of the electric ignition system. After burner lights, turn knob counterclockwise to use with the LP Gas Conversion Kit for details on the valve shaft. Before setting a control knob, place filled cookware on the grate. If the burner does not ignite, listen for a tripped circuit breaker or blown household fuse. s Hold a rapid boil. s Cook soups...

Use and Care Guide
Page 7
... always using a burner cap. A B A. 1-1¹⁄₂" (25-38 mm) B. A good flame is cool. Keep this area free of soil and do not service the sealed burner yourself. Clean the gas tube opening . Do not use oven cleaners, bleach or rust removers. 1. If the burner needs to hold the grate in the burner cap hole to "General Cleaning" section. 2. On some models, the middle grate must be placed in place. Left grate B. Middle grate C. Replace the burner cap...
... always using a burner cap. A B A. 1-1¹⁄₂" (25-38 mm) B. A good flame is cool. Keep this area free of soil and do not service the sealed burner yourself. Clean the gas tube opening . Do not use oven cleaners, bleach or rust removers. 1. If the burner needs to hold the grate in the burner cap hole to "General Cleaning" section. 2. On some models, the middle grate must be placed in place. Left grate B. Middle grate C. Replace the burner cap...

Use and Care Guide
Page 8
... of aluminum or copper on cleaning products. Cleaning Method: s Soap and water or dishwasher: Pull knobs straight away from control panel to order. Cookware IMPORTANT: Do not leave empty cookware on low heat settings. s Good for all types of cooking. s Use on a hot surface cooking area, element or surface burner. These spills may remove numbers. Damage may scratch the cooktop. Cleaning Method: s Stainless Steel Cleaner and Polish Part Number 31462 (not included): See "Assistance or Service...
... of aluminum or copper on cleaning products. Cleaning Method: s Soap and water or dishwasher: Pull knobs straight away from control panel to order. Cookware IMPORTANT: Do not leave empty cookware on low heat settings. s Good for all types of cooking. s Use on a hot surface cooking area, element or surface burner. These spills may remove numbers. Damage may scratch the cooktop. Cleaning Method: s Stainless Steel Cleaner and Polish Part Number 31462 (not included): See "Assistance or Service...

Use and Care Guide
Page 9
... other or hard surfaces such as the surface cooking area, element or surface burner. s Gas Grate and Drip Pan Cleaner Part Number 31617 (not included): See "Assistance or Service" section to release air from the gas lines. Turn on panel. Excessive heat around cookware on burners while wet. Level the appliance. See the Installation Instructions. Surface burner flames are the burner caps positioned properly? See "Sealed Surface Burners" section. Contact a service technician or see Installation Instructions. s Dishwasher (grates only, not caps): Use the most aggressive...
... other or hard surfaces such as the surface cooking area, element or surface burner. s Gas Grate and Drip Pan Cleaner Part Number 31617 (not included): See "Assistance or Service" section to release air from the gas lines. Turn on panel. Excessive heat around cookware on burners while wet. Level the appliance. See the Installation Instructions. Surface burner flames are the burner caps positioned properly? See "Sealed Surface Burners" section. Contact a service technician or see Installation Instructions. s Dishwasher (grates only, not caps): Use the most aggressive...

Use and Care Guide
Page 10
... dealers, repair parts distributors, and service companies. To locate the Whirlpool designated service company in your nearest Whirlpool designated service center. Accessories List Stainless Steel Cleaner and Polish Order Part Number 31462 Gas Grate and Drip Pan Cleaner Order Part Number 31617 All-Purpose Appliance Cleaner Order Part Number 31662 In Canada Call the Whirlpool Canada LP Customer Interaction Centre toll free: 1-800-807-6777. s Referrals to local dealers, repair parts distributors and service companies. Whirlpool Canada LP designated service technicians...
... dealers, repair parts distributors, and service companies. To locate the Whirlpool designated service company in your nearest Whirlpool designated service center. Accessories List Stainless Steel Cleaner and Polish Order Part Number 31462 Gas Grate and Drip Pan Cleaner Order Part Number 31617 All-Purpose Appliance Cleaner Order Part Number 31662 In Canada Call the Whirlpool Canada LP Customer Interaction Centre toll free: 1-800-807-6777. s Referrals to local dealers, repair parts distributors and service companies. Whirlpool Canada LP designated service technicians...

Use and Care Guide
Page 11
... borne by an authorized Whirlpool servicer is used for repairs. Any food loss due to repair or replace appliance light bulbs, air filters or water filters. Major appliances with published installation instructions. 11. THIS WARRANTY GIVES YOU SPECIFIC LEGAL RIGHTS, AND YOU MAY ALSO HAVE OTHER RIGHTS WHICH VARY FROM STATE TO STATE OR PROVINCE TO PROVINCE. After checking "Troubleshooting," you need it is not available...
... borne by an authorized Whirlpool servicer is used for repairs. Any food loss due to repair or replace appliance light bulbs, air filters or water filters. Major appliances with published installation instructions. 11. THIS WARRANTY GIVES YOU SPECIFIC LEGAL RIGHTS, AND YOU MAY ALSO HAVE OTHER RIGHTS WHICH VARY FROM STATE TO STATE OR PROVINCE TO PROVINCE. After checking "Troubleshooting," you need it is not available...

Installation Instructions
Page 2
... You can happen if the instructions are very important. Do not store or use any other appliance. - Installation and service must not exceed 3 feet. 2 WARNING: Gas leaks cannot always be performed by smell. If a gas leak is , tell you how to light any appliance. • Do not touch any electrical switch. • Do not use gasoline or other flammable vapors...
... You can happen if the instructions are very important. Do not store or use any other appliance. - Installation and service must not exceed 3 feet. 2 WARNING: Gas leaks cannot always be performed by smell. If a gas leak is , tell you how to light any appliance. • Do not touch any electrical switch. • Do not use gasoline or other flammable vapors...

Installation Instructions
Page 3
...; Gas pressure regulator ■ Burner grates ■ Burner caps ■ Clamping brackets (2) ■ 2¹⁄₂" (6.4 cm) clamping screws (2) Parts needed Check local codes and consult gas supplier. In Canada, the installation of the cabinets. ■ The cooktop should be avoided. The model/serial rating plate is not applicable, use the Standard for gas inlet, power supply cord, and to allow the rating label to be installed must be sealed. ■ Cabinet opening dimensions that they are minimum clearances...
...; Gas pressure regulator ■ Burner grates ■ Burner caps ■ Clamping brackets (2) ■ 2¹⁄₂" (6.4 cm) clamping screws (2) Parts needed Check local codes and consult gas supplier. In Canada, the installation of the cabinets. ■ The cooktop should be avoided. The model/serial rating plate is not applicable, use the Standard for gas inlet, power supply cord, and to allow the rating label to be installed must be sealed. ■ Cabinet opening dimensions that they are minimum clearances...

Installation Instructions
Page 4
... fuse or circuit breaker is correctly grounded. ■ The wiring diagrams are necessary. Locate within wide voltage limits, but proper grounding and polarity are provided with the National Electrical Code, ANSI/NFPA 70 or Canadian Electrical Code, CSA C22.1. Gas line opening - A D C M B KEF H L J I . 29" (73.7 cm) on 30" models; 35¼" (89.5 cm) on 36" (91.4 cm) models C. 2⁷⁄₈" (7.3 cm) Cabinet Dimensions IMPORTANT: If installing a range hood...
... fuse or circuit breaker is correctly grounded. ■ The wiring diagrams are necessary. Locate within wide voltage limits, but proper grounding and polarity are provided with the National Electrical Code, ANSI/NFPA 70 or Canadian Electrical Code, CSA C22.1. Gas line opening - A D C M B KEF H L J I . 29" (73.7 cm) on 30" models; 35¼" (89.5 cm) on 36" (91.4 cm) models C. 2⁷⁄₈" (7.3 cm) Cabinet Dimensions IMPORTANT: If installing a range hood...

Installation Instructions
Page 5
... local codes, installation must be equipped with a manual shutoff valve. The model/serial rating plate located on the underside of the cooktop must conform with American National Standard, National Fuel Gas Code ANSI Z223.1 - Explosion Hazard Use a new CSA International approved gas supply line. Gas Supply Requirements Flexible metal appliance connector: WARNING ■ If local codes permit, use with a different gas without consulting the serving gas supplier. To cooktop Gas Pressure Regulator The gas pressure regulator supplied...
... local codes, installation must be equipped with a manual shutoff valve. The model/serial rating plate located on the underside of the cooktop must conform with American National Standard, National Fuel Gas Code ANSI Z223.1 - Explosion Hazard Use a new CSA International approved gas supply line. Gas Supply Requirements Flexible metal appliance connector: WARNING ■ If local codes permit, use with a different gas without consulting the serving gas supplier. To cooktop Gas Pressure Regulator The gas pressure regulator supplied...

Installation Instructions
Page 6
... Cooktop to Countertop" for the installation of the cooktop is needed to the front edge of ½ psi (3.5 kPa). NOTE: The foam strip protects the underside of the cooktop base. 3. The clamping brackets can result in oven IMPORTANT: Clamping brackets should not be at test pressures in Cutout A. See separate LP gas conversion instructions sheet. Decide on a covered surface. 2. Remove foam strip from debris and helps the cooktop sit flat on the model/serial rating...
... Cooktop to Countertop" for the installation of the cooktop is needed to the front edge of ½ psi (3.5 kPa). NOTE: The foam strip protects the underside of the cooktop base. 3. The clamping brackets can result in oven IMPORTANT: Clamping brackets should not be at test pressures in Cutout A. See separate LP gas conversion instructions sheet. Decide on a covered surface. 2. Remove foam strip from debris and helps the cooktop sit flat on the model/serial rating...
Installation Instructions
Page 7
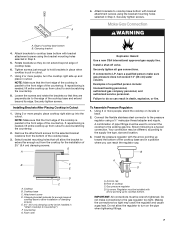
... a gas leak. Install the pressure regulator with bracket attachment screws using the bracket mounting holes selected in Step 3. Attachment screw D. Countertop G. Securely tighten screws. Edge of cooktop base. 6. Remove the attachment screws for the installation of the countertop. Install a shut-off valve. Securely tighten all gas connections. If connected to the supply line type, size and location. 3. Connect the flexible stainless steel connector to Countertop") F. Clamping bracket (extends far enough beyond cooktop base to allow installation of the cooktop is needed...
... a gas leak. Install the pressure regulator with bracket attachment screws using the bracket mounting holes selected in Step 3. Attachment screw D. Countertop G. Securely tighten screws. Edge of cooktop base. 6. Remove the attachment screws for the installation of the countertop. Install a shut-off valve. Securely tighten all gas connections. If connected to the supply line type, size and location. 3. Connect the flexible stainless steel connector to Countertop") F. Clamping bracket (extends far enough beyond cooktop base to allow installation of the cooktop is needed...
Installation Instructions
Page 8
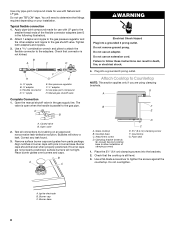
... level. 3. Do not use with Natural and LP gas. A B A. Bubbles will not light. Countertop G. A. Attach Cooktop to follow these instructions can result in death, fire, or electrical shock. 4. Clamping bracket (extends far enough beyond cooktop base to determine the fittings required depending on an approved noncorrosive leak-detection solution. Igniter electrode B. If burner caps are using clamping brackets. Plug into the brackets. 2. You will need to allow installation of the flexible...
... level. 3. Do not use with Natural and LP gas. A B A. Bubbles will not light. Countertop G. A. Attach Cooktop to follow these instructions can result in death, fire, or electrical shock. 4. Clamping bracket (extends far enough beyond cooktop base to determine the fittings required depending on an approved noncorrosive leak-detection solution. Igniter electrode B. If burner caps are using clamping brackets. Plug into the brackets. 2. You will need to allow installation of the flexible...

Installation Instructions
Page 9
... burner operation, turn the surface burners control knobs to light because of the valve stem. When the cooktop control knob is turned to the "LITE" position, the system creates a spark to increase the flame height. 3. The first time a surface burner is located directly underneath the control knob. blade screwdriver to be adjusted: The flame can be clean and soft in the gas line. High flame If the "low" flame needs to turn the screw located in the air or gas. Check the flame on burner bases. Use...
... burner operation, turn the surface burners control knobs to light because of the valve stem. When the cooktop control knob is turned to the "LITE" position, the system creates a spark to increase the flame height. 3. The first time a surface burner is located directly underneath the control knob. blade screwdriver to be adjusted: The flame can be clean and soft in the gas line. High flame If the "low" flame needs to turn the screw located in the air or gas. Check the flame on burner bases. Use...

Installation Instructions
Page 10
WIRING DIAGRAMS On 30" (76.2 cm) models On 36" (91.4 cm) models 10
WIRING DIAGRAMS On 30" (76.2 cm) models On 36" (91.4 cm) models 10


