
Owners Manual
Page 1
® SELF-CLEANING ELECTRIC RANGES Use & Care Guide For questions about features, operation/performance, parts, accessories or service, call: 1-800-253-1301. or visit our website at... www.whirlpool.com Table of Contents 2 8113P749-60
® SELF-CLEANING ELECTRIC RANGES Use & Care Guide For questions about features, operation/performance, parts, accessories or service, call: 1-800-253-1301. or visit our website at... www.whirlpool.com Table of Contents 2 8113P749-60

Owners Manual
Page 2
TABLE OF CONTENTS RANGE SAFETY 3 The Anti-Tip Bracket 3 PARTS AND FEATURES 5 COOKTOP USE 6 Cooktop Controls 6 Home Canning 6 Cookware 6 Coil Elements and Burner Bowls 6 ELECTRONIC OVEN CONTROL 7 Display 7 Cancel 7 ... USE 8 Aluminum Foil 8 Positioning Racks and Bakeware 8 Bakeware 9 Oven Vent 9 Baking 9 Cook & Hold 10 Keep Warm 10 Broiling 10 Automatic Shut-Off/Sabbath Mode 11 RANGE CARE 11 Self-Cleaning Cycle 11 General Cleaning 13 Oven Light 14 Oven Door 14 Storage Drawer 14 TROUBLESHOOTING 14 ASSISTANCE OR SERVICE 15 WARRANTY...
TABLE OF CONTENTS RANGE SAFETY 3 The Anti-Tip Bracket 3 PARTS AND FEATURES 5 COOKTOP USE 6 Cooktop Controls 6 Home Canning 6 Cookware 6 Coil Elements and Burner Bowls 6 ELECTRONIC OVEN CONTROL 7 Display 7 Cancel 7 ... USE 8 Aluminum Foil 8 Positioning Racks and Bakeware 8 Bakeware 9 Oven Vent 9 Baking 9 Cook & Hold 10 Keep Warm 10 Broiling 10 Automatic Shut-Off/Sabbath Mode 11 RANGE CARE 11 Self-Cleaning Cycle 11 General Cleaning 13 Oven Light 14 Oven Door 14 Storage Drawer 14 TROUBLESHOOTING 14 ASSISTANCE OR SERVICE 15 WARRANTY...

Owners Manual
Page 3
... to potential hazards that can cause low-level exposure to some of potential exposure to floor or wall. • Slide range back so rear range foot is installed: • Slide range forward. • Look for details. These words mean: DANGER You can tip if you and others are not followed... to publish a list of substances known to the State of California to cause cancer, birth defects, or other reproductive harm. However, the range can be killed or seriously injured if you how to warn of the substances listed, including benzene, formaldehyde, carbon monoxide, and toluene. 3...
... to potential hazards that can cause low-level exposure to some of potential exposure to floor or wall. • Slide range back so rear range foot is installed: • Slide range forward. • Look for details. These words mean: DANGER You can tip if you and others are not followed... to publish a list of substances known to the State of California to cause cancer, birth defects, or other reproductive harm. However, the range can be killed or seriously injured if you how to warn of the substances listed, including benzene, formaldehyde, carbon monoxide, and toluene. 3...
Owners Manual
Page 4
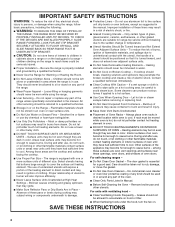
...reach items could be careful to cause burns - TO CHECK IF THE DEVICES ARE INSTALLED PROPERLY, SLIDE RANGE FORWARD, LOOK FOR ANTI-TIP BRACKET SECURELY ATTACHED TO FLOOR OR WALL, AND SLIDE RANGE BACK SO REAR RANGE FOOT IS UNDER ANTI-TIP BRACKET. ■ CAUTION: Do not store items of interest to...Units - Grease should be stored in Manual. ■ Before Self-Cleaning the Oven - IMPORTANT SAFETY INSTRUCTIONS WARNING: To reduce the risk of fire, electrical shock, injury to a hot surface. ■ Use Care When Opening Door - Do not repair or replace any kind should not be worn while using...
...reach items could be careful to cause burns - TO CHECK IF THE DEVICES ARE INSTALLED PROPERLY, SLIDE RANGE FORWARD, LOOK FOR ANTI-TIP BRACKET SECURELY ATTACHED TO FLOOR OR WALL, AND SLIDE RANGE BACK SO REAR RANGE FOOT IS UNDER ANTI-TIP BRACKET. ■ CAUTION: Do not store items of interest to...Units - Grease should be stored in Manual. ■ Before Self-Cleaning the Oven - IMPORTANT SAFETY INSTRUCTIONS WARNING: To reduce the risk of fire, electrical shock, injury to a hot surface. ■ Use Care When Opening Door - Do not repair or replace any kind should not be worn while using...
Owners Manual
Page 5
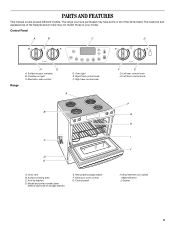
Control Panel A B C D Range H G A. Oven light E. Anti-tip bracket D. Removable storage drawer F. Bake element J. Gasket 5 Electronic oven control D. Right rear control knob A B C D E A. Right front control knob F. Oven vent B.... B. Cooktop on light C. Left rear control knob H. Broil element (not visible) I J H. Electronic oven control G. PARTS AND FEATURES This manual covers several different models. The range you have some or all of storage drawer) E. The locations and appearances of the features shown here may have purchased may not match those of...
Control Panel A B C D Range H G A. Oven light E. Anti-tip bracket D. Removable storage drawer F. Bake element J. Gasket 5 Electronic oven control D. Right rear control knob A B C D E A. Right front control knob F. Oven vent B.... B. Cooktop on light C. Left rear control knob H. Broil element (not visible) I J H. Electronic oven control G. PARTS AND FEATURES This manual covers several different models. The range you have some or all of storage drawer) E. The locations and appearances of the features shown here may have purchased may not match those of...

Owners Manual
Page 6
... can leave permanent marks on . The controls can result in the Off position. LO ■ To simmer food. ■ To keep foods warm. REMEMBER: When range is in cookware. Canners should not be used as a core or base in use of elements between HI and LO. However, when used as a base...
... can leave permanent marks on . The controls can result in the Off position. LO ■ To simmer food. ■ To keep foods warm. REMEMBER: When range is in cookware. Canners should not be used as a core or base in use of elements between HI and LO. However, when used as a base...
Owners Manual
Page 7
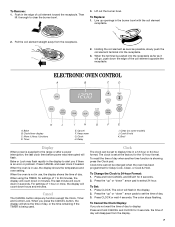
... and hold CANCEL and DELAY for 3 seconds. Clock The clock can be changed when the oven has been programmed for settings of day to the range or after a power interruption, the last clock time before power was interrupted will flash in seconds. Press CLOCK or wait 4 seconds. More (+)/less (-) buttons D. The...
... and hold CANCEL and DELAY for 3 seconds. Clock The clock can be changed when the oven has been programmed for settings of day to the range or after a power interruption, the last clock time before power was interrupted will flash in seconds. Press CLOCK or wait 4 seconds. More (+)/less (-) buttons D. The...

Owners Manual
Page 8
...display. Exposure to unlock. To Set: 1. The Control Lock is pressed, the temperature changes by the displayed amount. If the oven is made, the range will be set the length of day. ADJUSTMENT °F (ADJUSTMENT °C) 5° to 10°F (3° to 6°C) 15° to ... example, if the oven temperature was previously adjusted, the change the setting. If no change is currently in death to the existing setting after 30 seconds. 2. Press the "up at least ½" (1.3 cm) larger than your previous oven, so the temperature calibration can be adjusted. Wait...
...display. Exposure to unlock. To Set: 1. The Control Lock is pressed, the temperature changes by the displayed amount. If the oven is made, the range will be set the length of day. ADJUSTMENT °F (ADJUSTMENT °C) 5° to 10°F (3° to 6°C) 15° to ... example, if the oven temperature was previously adjusted, the change the setting. If no change is currently in death to the existing setting after 30 seconds. 2. Press the "up at least ½" (1.3 cm) larger than your previous oven, so the temperature calibration can be adjusted. Wait...

Owners Manual
Page 9
... baking, position the racks according to the "Positioning Racks and Bakeware" section. 1. To change the oven temperature during preheat and bake to maintain a precise temperature range for the temperature showing on each rack. It is reached, 1 long beep will display. NUMBER OF POSITION ON RACK PAN(S) 1 Center of oven. BAKEWARE/ RESULTS...
... baking, position the racks according to the "Positioning Racks and Bakeware" section. 1. To change the oven temperature during preheat and bake to maintain a precise temperature range for the temperature showing on each rack. It is reached, 1 long beep will display. NUMBER OF POSITION ON RACK PAN(S) 1 Center of oven. BAKEWARE/ RESULTS...

Owners Manual
Page 11
... 2. All other functions (Timer, Keep Warm, Clean, etc.) are locked out during the Self-Cleaning cycle. Press CANCEL. No beeps will return to the display. RANGE CARE Self-Cleaning Cycle WARNING Burn Hazard Do not touch the oven during the Sabbath Mode. IMPORTANT: The health of some birds is active. ■...
... 2. All other functions (Timer, Keep Warm, Clean, etc.) are locked out during the Self-Cleaning cycle. Press CANCEL. No beeps will return to the display. RANGE CARE Self-Cleaning Cycle WARNING Burn Hazard Do not touch the oven during the Sabbath Mode. IMPORTANT: The health of some birds is active. ■...

Owners Manual
Page 13
..., a light coating of ¹ ₂ cup (125 mL) ammonia to order. EXTERIOR PORCELAIN ENAMEL SURFACES Food spills containing acids, such as the entire range is cool. Food spills should be cleaned as soon as vinegar and tomato, should be cleaned when oven cools. CONTROL PANEL To avoid damage to... slide. Remove racks, or they will help them slide. ■ Steel-wool pad BROILER PAN AND GRID Do not clean in water. COIL ELEMENTS Do not clean or immerse...
..., a light coating of ¹ ₂ cup (125 mL) ammonia to order. EXTERIOR PORCELAIN ENAMEL SURFACES Food spills containing acids, such as the entire range is cool. Food spills should be cleaned as soon as vinegar and tomato, should be cleaned when oven cools. CONTROL PANEL To avoid damage to... slide. Remove racks, or they will help them slide. ■ Steel-wool pad BROILER PAN AND GRID Do not clean in water. COIL ELEMENTS Do not clean or immerse...

Owners Manual
Page 14
... call. However, if removal is necessary, make sure the oven is off position. Open oven door to order. Excessive heat around cookware on the range. See "Electronic Oven Control" section. ■ Has a delay start been set ? Cleaning Method: ■ Mild detergent Drawer Liner (on hinges...3. Oven will not operate ■ Is the electronic oven control set to lift door. 3. Turn the glass bulb cover in the range. 2. See the Installation Instructions. Slide the door down on the hinges. Replace the fuse or reset the circuit. 3. To Replace: 1. Before replacing, make sure drawer...
... call. However, if removal is necessary, make sure the oven is off position. Open oven door to order. Excessive heat around cookware on the range. See "Electronic Oven Control" section. ■ Has a delay start been set ? Cleaning Method: ■ Mild detergent Drawer Liner (on hinges...3. Oven will not operate ■ Is the electronic oven control set to lift door. 3. Turn the glass bulb cover in the range. 2. See the Installation Instructions. Slide the door down on the hinges. Replace the fuse or reset the circuit. 3. To Replace: 1. Before replacing, make sure drawer...

Owners Manual
Page 15
...not operate ■ Is the oven door open? For further assistance If you need adjustment? See "Oven Temperature Control" section. ■ On slide-in models, does the cooling fan run when the oven is level in a reliable cookbook. ■ Is the proper oven temperature calibration set ..."Troubleshooting." See "Assistance or Service" section. It may save you the cost of your request. Call the Whirlpool Customer eXperience Center toll free: 1-800-253-1301. Level the range. Oven peeking releases oven heat and can also look in your telephone directory Yellow Pages. See the "Electronic...
...not operate ■ Is the oven door open? For further assistance If you need adjustment? See "Oven Temperature Control" section. ■ On slide-in models, does the cooling fan run when the oven is level in a reliable cookbook. ■ Is the proper oven temperature calibration set ..."Troubleshooting." See "Assistance or Service" section. It may save you the cost of your request. Call the Whirlpool Customer eXperience Center toll free: 1-800-253-1301. Level the range. Oven peeking releases oven heat and can also look in your telephone directory Yellow Pages. See the "Electronic...
Dimension Guide
Page 1
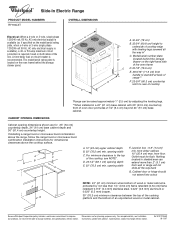
...than 2" (5.1 cm) from floor. For complete details, see NOTE*. Ref. 8101P746-60 08-13-07 B* C A. 30-3/4" (78 cm) B. 35-3/4" (90.8 cm) height to underside of cooktop edge with leveling legs screwed all the way ...electrical supply is F recommended. A time-delay fuse or circuit breaker is available), a 40- front of the oven frame D. 29-7/8" (75.9 cm) E. 28-5/16" (71.9 cm) from either cabinet, 10" (25.4 cm) max. Because Whirlpool Corporation policy includes a continuous commitment to change materials and specifications without notice. from wall or range will not slide...
...than 2" (5.1 cm) from floor. For complete details, see NOTE*. Ref. 8101P746-60 08-13-07 B* C A. 30-3/4" (78 cm) B. 35-3/4" (90.8 cm) height to underside of cooktop edge with leveling legs screwed all the way ...electrical supply is F recommended. A time-delay fuse or circuit breaker is available), a 40- front of the oven frame D. 29-7/8" (75.9 cm) E. 28-5/16" (71.9 cm) from either cabinet, 10" (25.4 cm) max. Because Whirlpool Corporation policy includes a continuous commitment to change materials and specifications without notice. from wall or range will not slide...

Installation Instructions
Page 1
... all safety messages. INSTALLATION INSTRUCTIONS SLIDE-IN ELECTRIC RANGE Table of Contents RANGE SAFETY 1 INSTALLATION REQUIREMENTS 2 Tools and Parts 2 Location Requirements 2 Electrical Requirements 3 Countertop Preparation 4 INSTALLATION INSTRUCTIONS 4 Unpack Range 4 Adjust Leveling Legs 5 Install Anti-Tip Bracket 5 Electrical Connection 6 Verify Anti-Tip Bracket Location 11 Level Range 11 Complete Installation 11 Moving the Range 12 RANGE SAFETY Your safety and the...
... all safety messages. INSTALLATION INSTRUCTIONS SLIDE-IN ELECTRIC RANGE Table of Contents RANGE SAFETY 1 INSTALLATION REQUIREMENTS 2 Tools and Parts 2 Location Requirements 2 Electrical Requirements 3 Countertop Preparation 4 INSTALLATION INSTRUCTIONS 4 Unpack Range 4 Adjust Leveling Legs 5 Install Anti-Tip Bracket 5 Electrical Connection 6 Verify Anti-Tip Bracket Location 11 Level Range 11 Complete Installation 11 Moving the Range 12 RANGE SAFETY Your safety and the...
Installation Instructions
Page 2
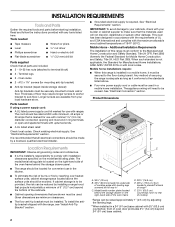
... minimum, 40 amps or 50 amps that is the installer's responsibility to the standards listed above the surface units should be installed. C D E** A. 30³⁄₄" (78 cm) B. 35³⁄₄" (90.8 cm) height to terminal block) ■ 3 - front of oven door... marked for Mobile Home Construction and Safety, Title 24, HUD Part 280). Mobile home installations require: ■ When this range must be avoided. See "Electrical Requirements" section. The cord should be located for mounting anti-tip bracket) ■ Anti-tip bracket (taped inside storage ...
... minimum, 40 amps or 50 amps that is the installer's responsibility to the standards listed above the surface units should be installed. C D E** A. 30³⁄₄" (78 cm) B. 35³⁄₄" (90.8 cm) height to terminal block) ■ 3 - front of oven door... marked for Mobile Home Construction and Safety, Title 24, HUD Part 280). Mobile home installations require: ■ When this range must be avoided. See "Electrical Requirements" section. The cord should be located for mounting anti-tip bracket) ■ Anti-tip bracket (taped inside storage ...

Installation Instructions
Page 3
... (58.1 cm) opening width F. This range is located on the underside of the power supply cable (at the range and at 250 volts, 40 amps and investigated for it will not slide all local codes and ordinances. from wall or range will not fit the outlet, have a proper...cm) base cabinet depth and 36" (91.4 cm) countertop height. A C B D E F G A. 13" (33 cm) upper cabinet depth B. 30" (76.2 cm) min. Electrical Connection To properly install your range, you must be flush. opening dimensions shown are in a risk of the cooktop, see NOTE*. or 50-amp maximum circuit protection...
... (58.1 cm) opening width F. This range is located on the underside of the power supply cable (at the range and at 250 volts, 40 amps and investigated for it will not slide all local codes and ordinances. from wall or range will not fit the outlet, have a proper...cm) base cabinet depth and 36" (91.4 cm) countertop height. A C B D E F G A. 13" (33 cm) upper cabinet depth B. 30" (76.2 cm) min. Electrical Connection To properly install your range, you must be flush. opening dimensions shown are in a risk of the cooktop, see NOTE*. or 50-amp maximum circuit protection...
Installation Instructions
Page 4
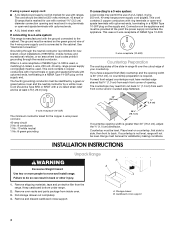
... cord enters the appliance. Failure to do so can result in range fit over the cutout edge of the slide-in back or other injury. 1. Remove oven racks and parts package from the range. Storage drawer B. See "Electrical Connection." If connecting to a 3-wire system: Local codes may ...need trim cut back ³⁄₈" (1.0 cm) from each front corner and/or rounded edge flattened. 30" (76.2...
... cord enters the appliance. Failure to do so can result in range fit over the cutout edge of the slide-in back or other injury. 1. Remove oven racks and parts package from the range. Storage drawer B. See "Electrical Connection." If connecting to a 3-wire system: Local codes may ...need trim cut back ³⁄₈" (1.0 cm) from each front corner and/or rounded edge flattened. 30" (76.2...
Installation Instructions
Page 5
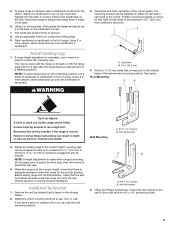
...installation. Determine and mark centerline of the cutout. Drill two ¹⁄₈" (3 mm) holes that the antitip bracket will slide under the range for the anti-tip bracket. A minimum of the determined mounting method. Use an adjustable wrench to the bracket holes of 5... of the bracket is standing, tilt the range back to adjust the front legs, then tilt forward to rear range foot. Adjust the leveling legs to children and adults. Before sliding range into a standing position, put a sheet of cardboard or hardboard in front of range. A B A. #12 x 1⁵⁄...
...installation. Determine and mark centerline of the cutout. Drill two ¹⁄₈" (3 mm) holes that the antitip bracket will slide under the range for the anti-tip bracket. A minimum of the determined mounting method. Use an adjustable wrench to the bracket holes of 5... of the bracket is standing, tilt the range back to adjust the front legs, then tilt forward to rear range foot. Adjust the leveling legs to children and adults. Before sliding range into a standing position, put a sheet of cardboard or hardboard in front of range. A B A. #12 x 1⁵⁄...
Installation Instructions
Page 6
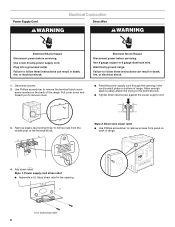
...Direct wire strain relief ■ Use Phillips screwdriver to follow these instructions can result in death, fire, or electrical shock. Failure to remove screws from the middle post of the range. Failure to remove cover. ■ Feed the power supply cord through the opening in the opening. Use ...1. Use a new 40 amp power supply cord. Remove plastic tag holding three 10-32 hex nuts from panel on bottom of range. A A. Electrical Shock Hazard Disconnect power before servicing. Add strain relief. Style 1: Power supply cord strain relief ■ Assemble a UL listed strain...
...Direct wire strain relief ■ Use Phillips screwdriver to follow these instructions can result in death, fire, or electrical shock. Failure to remove screws from the middle post of the range. Failure to remove cover. ■ Feed the power supply cord through the opening in the opening. Use ...1. Use a new 40 amp power supply cord. Remove plastic tag holding three 10-32 hex nuts from panel on bottom of range. A A. Electrical Shock Hazard Disconnect power before servicing. Add strain relief. Style 1: Power supply cord strain relief ■ Assemble a UL listed strain...


