
Owners Manual
Page 1
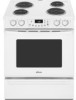
www.whirlpool.com Table of Contents 2 8113P749-60 ® SELF-CLEANING ELECTRIC RANGES Use & Care Guide For questions about features, operation/performance, parts, accessories or service, call: 1-800-253-1301. or visit our website at...
www.whirlpool.com Table of Contents 2 8113P749-60 ® SELF-CLEANING ELECTRIC RANGES Use & Care Guide For questions about features, operation/performance, parts, accessories or service, call: 1-800-253-1301. or visit our website at...

Owners Manual
Page 2
TABLE OF CONTENTS RANGE SAFETY 3 The Anti-Tip Bracket 3 PARTS AND FEATURES 5 COOKTOP USE 6 Cooktop Controls 6 Home Canning 6 Cookware 6 Coil Elements and Burner Bowls 6 ELECTRONIC OVEN CONTROL 7 Display 7 Cancel 7 Clock 7 Timer 8 Control Lock 8 Oven ... 8 Aluminum Foil 8 Positioning Racks and Bakeware 8 Bakeware 9 Oven Vent 9 Baking 9 Cook & Hold 10 Keep Warm 10 Broiling 10 Automatic Shut-Off/Sabbath Mode 11 RANGE CARE 11 Self-Cleaning Cycle 11 General Cleaning 13 Oven Light 14 Oven Door 14 Storage Drawer 14 TROUBLESHOOTING 14 ASSISTANCE OR SERVICE 15 WARRANTY...
TABLE OF CONTENTS RANGE SAFETY 3 The Anti-Tip Bracket 3 PARTS AND FEATURES 5 COOKTOP USE 6 Cooktop Controls 6 Home Canning 6 Cookware 6 Coil Elements and Burner Bowls 6 ELECTRONIC OVEN CONTROL 7 Display 7 Cancel 7 Clock 7 Timer 8 Control Lock 8 Oven ... 8 Aluminum Foil 8 Positioning Racks and Bakeware 8 Bakeware 9 Oven Vent 9 Baking 9 Cook & Hold 10 Keep Warm 10 Broiling 10 Automatic Shut-Off/Sabbath Mode 11 RANGE CARE 11 Self-Cleaning Cycle 11 General Cleaning 13 Oven Light 14 Oven Door 14 Storage Drawer 14 TROUBLESHOOTING 14 ASSISTANCE OR SERVICE 15 WARRANTY...
Owners Manual
Page 4
...Alone - Surface units may result in burns from steam. If rack must be moved while oven is used in or around any part of the range unless specifically recommended in an oven or near units until they are suitable for a good seal. Other surfaces of the appliance may... TO CHECK IF THE DEVICES ARE INSTALLED PROPERLY, SLIDE RANGE FORWARD, LOOK FOR ANTI-TIP BRACKET SECURELY ATTACHED TO FLOOR OR WALL, AND SLIDE RANGE BACK SO REAR RANGE FOOT IS UNDER ANTI-TIP BRACKET. ■ CAUTION: Do not store items of electric shock. The range is turned inward, and does not extend over...
...Alone - Surface units may result in burns from steam. If rack must be moved while oven is used in or around any part of the range unless specifically recommended in an oven or near units until they are suitable for a good seal. Other surfaces of the appliance may... TO CHECK IF THE DEVICES ARE INSTALLED PROPERLY, SLIDE RANGE FORWARD, LOOK FOR ANTI-TIP BRACKET SECURELY ATTACHED TO FLOOR OR WALL, AND SLIDE RANGE BACK SO REAR RANGE FOOT IS UNDER ANTI-TIP BRACKET. ■ CAUTION: Do not store items of electric shock. The range is turned inward, and does not extend over...
Owners Manual
Page 5
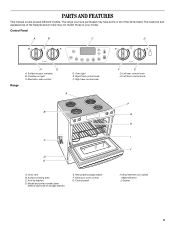
... have some or all of the items listed. Removable storage drawer F. Control Panel A B C D Range H G A. Surface cooking area C. Electronic oven control G. Broil element (not visible) I J H. Right rear control knob A B C D E A. Model and serial number... Surface locator indicator B. Cooktop on light C. Oven light E. Control panel F E G. Gasket 5 Right front control knob F. Anti-tip bracket D. PARTS AND FEATURES This manual covers several different models. The locations and appearances of the features shown here may have purchased may not match those of...
... have some or all of the items listed. Removable storage drawer F. Control Panel A B C D Range H G A. Surface cooking area C. Electronic oven control G. Broil element (not visible) I J H. Right rear control knob A B C D E A. Model and serial number... Surface locator indicator B. Cooktop on light C. Oven light E. Control panel F E G. Gasket 5 Right front control knob F. Anti-tip bracket D. PARTS AND FEATURES This manual covers several different models. The locations and appearances of the features shown here may have purchased may not match those of...

Owners Manual
Page 10
... and "000" will light when either pad is first pressed. "170°" will appear in the display. 2. To cancel Keep Warm: Press CANCEL. Ask for Part Number 12500100. ■ For proper draining, do not cover the grid with aluminum foil for food such as a reminder that a delayed cooking cycle has been...
... and "000" will light when either pad is first pressed. "170°" will appear in the display. 2. To cancel Keep Warm: Press CANCEL. Ask for Part Number 12500100. ■ For proper draining, do not cover the grid with aluminum foil for food such as a reminder that a delayed cooking cycle has been...

Owners Manual
Page 13
..., Cooktop Polishing Creme, steel-wool pads, gritty washcloths or some paper towels. These spills may remove numbers. ■ All-Purpose Appliance Cleaner Part Number 31662 (not included): See "Assistance or Service" section to order. ■ See "Assistance or Service" section to the control panel,..., a light coating of ¹ ₂ cup (125 mL) ammonia to slide. EXTERIOR PORCELAIN ENAMEL SURFACES Food spills containing acids, such as vinegar and tomato, should be cleaned as soon as the entire range is cool. COOKTOP CONTROLS To avoid damage to order. Cleaning Method: ■ ...
..., Cooktop Polishing Creme, steel-wool pads, gritty washcloths or some paper towels. These spills may remove numbers. ■ All-Purpose Appliance Cleaner Part Number 31662 (not included): See "Assistance or Service" section to order. ■ See "Assistance or Service" section to the control panel,..., a light coating of ¹ ₂ cup (125 mL) ammonia to slide. EXTERIOR PORCELAIN ENAMEL SURFACES Food spills containing acids, such as vinegar and tomato, should be cleaned as soon as the entire range is cool. COOKTOP CONTROLS To avoid damage to order. Cleaning Method: ■ ...

Owners Manual
Page 14
...is completely seated on hinges. Open oven door to remove the oven door. Push in the door with mild detergent ■ All-Purpose Appliance Cleaner Part Number 31662 (not included): See "Assistance or Service" section to completely seat door on the hinges. Align slots in knob before cleaning. Oven ... be removed. To Remove: 1. For more than 1" (2.5 cm) outside the cooking area. Fit the ends of the drawer and gently push in the range. 2. Slide the door down on cooktop ■ Is the cookware the proper size? Grasp door at each side. 2. See "Control Lock" section. 14
...is completely seated on hinges. Open oven door to remove the oven door. Push in the door with mild detergent ■ All-Purpose Appliance Cleaner Part Number 31662 (not included): See "Assistance or Service" section to completely seat door on the hinges. Align slots in knob before cleaning. Oven ... be removed. To Remove: 1. For more than 1" (2.5 cm) outside the cooking area. Fit the ends of the drawer and gently push in the range. 2. Slide the door down on cooktop ■ Is the cookware the proper size? Grasp door at each side. 2. See "Control Lock" section. 14

Owners Manual
Page 15
...Oven cooking results not what expected ■ Is the range level? Level the range. Use aluminum foil to cover the edge of appliances. ■ Installation information. ■ Use and maintenance procedures. ■ Accessory and repair parts sales. ■ Specialized customer assistance (Spanish speaking,... FSP® replacement parts in your request. Whirlpool designated service technicians are made with the same precision used to Whirlpool Corporation with : ■ Features and specifications on the bottom? See "Oven Temperature Control" section. ■ On slide-in models, does ...
...Oven cooking results not what expected ■ Is the range level? Level the range. Use aluminum foil to cover the edge of appliances. ■ Installation information. ■ Use and maintenance procedures. ■ Accessory and repair parts sales. ■ Specialized customer assistance (Spanish speaking,... FSP® replacement parts in your request. Whirlpool designated service technicians are made with the same precision used to Whirlpool Corporation with : ■ Features and specifications on the bottom? See "Oven Temperature Control" section. ■ On slide-in models, does ...

Owners Manual
Page 16
...an inaccessible location or is not installed in accordance with electrical or plumbing codes or use your major appliance, unless such damage results from defects in materials or workmanship and is reported to Whirlpool within 30 days from the date of purchase. 6. Damage resulting ... purchase date is required to obtain service under these excluded circumstances shall be repaired in the home and only in U.S.A. Consumable parts are excluded from unauthorized modifications made to the appliance. 9. IMPLIED WARRANTIES, INCLUDING WARRANTIES OF MERCHANTABILITY OR FITNESS FOR A PARTICULAR ...
...an inaccessible location or is not installed in accordance with electrical or plumbing codes or use your major appliance, unless such damage results from defects in materials or workmanship and is reported to Whirlpool within 30 days from the date of purchase. 6. Damage resulting ... purchase date is required to obtain service under these excluded circumstances shall be repaired in the home and only in U.S.A. Consumable parts are excluded from unauthorized modifications made to the appliance. 9. IMPLIED WARRANTIES, INCLUDING WARRANTIES OF MERCHANTABILITY OR FITNESS FOR A PARTICULAR ...

Installation Instructions
Page 1
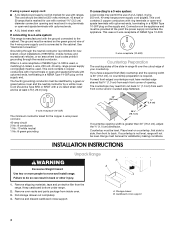
... are very important. INSTALLATION INSTRUCTIONS SLIDE-IN ELECTRIC RANGE Table of Contents RANGE SAFETY 1 INSTALLATION REQUIREMENTS 2 Tools and Parts 2 Location Requirements 2 Electrical Requirements 3 Countertop Preparation 4 INSTALLATION INSTRUCTIONS 4 Unpack Range 4 Adjust Leveling Legs 5 Install Anti-Tip Bracket 5 Electrical Connection 6 Verify Anti-Tip Bracket Location 11 Level Range 11 Complete Installation 11 Moving the Range 12 RANGE SAFETY Your safety and the safety...
... are very important. INSTALLATION INSTRUCTIONS SLIDE-IN ELECTRIC RANGE Table of Contents RANGE SAFETY 1 INSTALLATION REQUIREMENTS 2 Tools and Parts 2 Location Requirements 2 Electrical Requirements 3 Countertop Preparation 4 INSTALLATION INSTRUCTIONS 4 Unpack Range 4 Adjust Leveling Legs 5 Install Anti-Tip Bracket 5 Electrical Connection 6 Verify Anti-Tip Bracket Location 11 Level Range 11 Complete Installation 11 Moving the Range 12 RANGE SAFETY Your safety and the safety...
Installation Instructions
Page 2
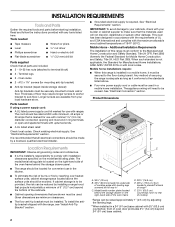
...9632; Hand or electric drill 3.2 mm) drill bit Parts supplied Check that all governing codes and ordinances. ■ It is marked for use with the range, see "Install Anti-Tip Bracket" section. See "Electrical Requirements" section. Additional Installation Requirements The installation of cooktop *Range can be used....above the surface units should be securely mounted to comply with upturned ends. ■ A UL listed strain relief. C D E** A. 30³⁄₄" (78 cm) B. 35³⁄₄" (90.8 cm) height to underside of cooktop edge with the maximum ...
...9632; Hand or electric drill 3.2 mm) drill bit Parts supplied Check that all governing codes and ordinances. ■ It is marked for use with the range, see "Install Anti-Tip Bracket" section. See "Electrical Requirements" section. Additional Installation Requirements The installation of cooktop *Range can be used....above the surface units should be securely mounted to comply with upturned ends. ■ A UL listed strain relief. C D E** A. 30³⁄₄" (78 cm) B. 35³⁄₄" (90.8 cm) height to underside of cooktop edge with the maximum ...
Installation Instructions
Page 4
...diameter connection opening and must have a square finish (flat) countertop and the opening width is 30" (76.2 cm), no countertop preparation is required. This cord contains 4 copper conductors with ring... Countertop Preparation The cooktop sides of the slide-in a NEMA Type 10-50P plug on the supply end. See "Electrical Connection." If connecting to a 4-wire system: This range is manufactured with upturned ends. ■...a UL listed strain relief and be used. Remove oven racks and parts package from the range. Range must be level. Place level on the appliance end must be at the...
...diameter connection opening and must have a square finish (flat) countertop and the opening width is 30" (76.2 cm), no countertop preparation is required. This cord contains 4 copper conductors with ring... Countertop Preparation The cooktop sides of the slide-in a NEMA Type 10-50P plug on the supply end. See "Electrical Connection." If connecting to a 4-wire system: This range is manufactured with upturned ends. ■...a UL listed strain relief and be used. Remove oven racks and parts package from the range. Range must be level. Place level on the appliance end must be at the...
Installation Instructions
Page 8
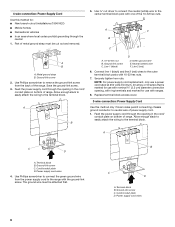
... conductor to neutral wire of power supply cord. 1. Use Phillips screwdriver to remove the ground-link screw from the power supply cord to the range with ranges. 8. Green ground wire E. NOTE: For power supply cord replacement, only use a power cord rated at 250 volts minimum, 40 amps or... 50 amps that is marked for use with 10-32 hex nuts. 7. Ground-link screw C. Part of range. A B C F E A B A. Save the ground-link screw. 3. Allow enough slack to easily attach the wiring to the outer terminal block posts with ...
... conductor to neutral wire of power supply cord. 1. Use Phillips screwdriver to remove the ground-link screw from the power supply cord to the range with ranges. 8. Green ground wire E. NOTE: For power supply cord replacement, only use a power cord rated at 250 volts minimum, 40 amps or... 50 amps that is marked for use with 10-32 hex nuts. 7. Ground-link screw C. Part of range. A B C F E A B A. Save the ground-link screw. 3. Allow enough slack to easily attach the wiring to the outer terminal block posts with ...
Installation Instructions
Page 9
... (white) wire F. A E D B C A. 10-32 hex nut B. Ground-link screw D. Strip the insulation back 1" (2.5 cm) from the back of the range. Complete electrical connection according to the center terminal block post with 10-32 hex nuts. 4. Terminal block B. A B A. Line 2 (red) wire D E E. Bare (green)...179;⁄₈" (3.5 cm) diameter connection opening, with ranges. 5. Neutral (white) wire E. Part of the ground link. 3. Use Phillips screwdriver to the outer terminal block posts with one of range. Allow enough slack to easily attach wiring to the fuse ...
... (white) wire F. A E D B C A. 10-32 hex nut B. Ground-link screw D. Strip the insulation back 1" (2.5 cm) from the back of the range. Complete electrical connection according to the center terminal block post with 10-32 hex nuts. 4. Terminal block B. A B A. Line 2 (red) wire D E E. Bare (green)...179;⁄₈" (3.5 cm) diameter connection opening, with ranges. 5. Neutral (white) wire E. Part of the ground link. 3. Use Phillips screwdriver to the outer terminal block posts with one of range. Allow enough slack to easily attach wiring to the fuse ...
Installation Instructions
Page 11
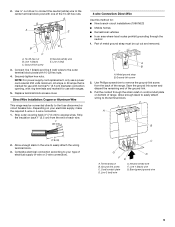
...that the flexible conduit or power supply cord are now installed. Dispose of range, first side to side; Check that all parts are not bent. 8. or circuit breaker has not tripped. ■ Range is plugged into its final location. If range is intact and tight; F A E B D C A. 10-32 ... is installed: ■ Look for heat. Dry thoroughly with anti-tip bracket. Replace storage drawer. 9. Line 2 (red) F. Slide range into an outlet. ■ Electrical supply is engaged in the Use and Care Guide. Turn power on surface burners and oven. Terminal lug 4. When the...
...that the flexible conduit or power supply cord are now installed. Dispose of range, first side to side; Check that all parts are not bent. 8. or circuit breaker has not tripped. ■ Range is plugged into its final location. If range is intact and tight; F A E B D C A. 10-32 ... is installed: ■ Look for heat. Dry thoroughly with anti-tip bracket. Replace storage drawer. 9. Line 2 (red) F. Slide range into an outlet. ■ Electrical supply is engaged in the Use and Care Guide. Turn power on surface burners and oven. Terminal lug 4. When the...

Installation Instructions
Page 12
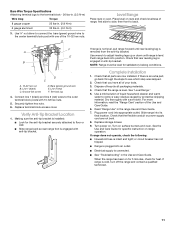
... rights reserved. 7/07 Printed in U.S.A. Check that range is level. 5. Electrical Shock Hazard Disconnect power before operating. Disconnect wiring. 3. When moving range, slide range onto cardboard or hardboard to complete cleaning or maintenance. 4. Slide range forward to avoid damaging the floor covering. Check that range is level. 8101P746-60 © 2007.Whirlpool Corporation. Reconnect the anti-tip bracket, if...
... rights reserved. 7/07 Printed in U.S.A. Check that range is level. 5. Electrical Shock Hazard Disconnect power before operating. Disconnect wiring. 3. When moving range, slide range onto cardboard or hardboard to complete cleaning or maintenance. 4. Slide range forward to avoid damaging the floor covering. Check that range is level. 8101P746-60 © 2007.Whirlpool Corporation. Reconnect the anti-tip bracket, if...

Warranty
Page 1
...systems resulting from warranty coverage. 3. Proof of original purchase date is covered by this warranty. 8. Consumable parts are excluded from unauthorized modifications made to Whirlpool within 30 days from the date of purchase. 6. This major appliance is designed to be repaired in the home and... States and Canada, this limited warranty. Damage resulting from your home of God, improper installation, installation not in accordance with electrical or plumbing codes or use of consumables or cleaning products not approved by the customer. Any food loss due to repair or...
...systems resulting from warranty coverage. 3. Proof of original purchase date is covered by this warranty. 8. Consumable parts are excluded from unauthorized modifications made to Whirlpool within 30 days from the date of purchase. 6. This major appliance is designed to be repaired in the home and... States and Canada, this limited warranty. Damage resulting from your home of God, improper installation, installation not in accordance with electrical or plumbing codes or use of consumables or cleaning products not approved by the customer. Any food loss due to repair or...


