
Installation Instructions
Page 1
... ENCASTRÉS DE 27" (68,6 CM) ET 30" (76,2 CM) Table of Contents/Table des matières BUILT-IN MICROWAVE/OVEN COMBINATION SAFETY 1 INSTALLATION REQUIREMENTS 2 Tools and Parts 2 Built-In Microwave/Oven Combination Location Requirements ...........2 Electrical Requirements 3 INSTALLATION INSTRUCTIONS 4 Prepare Built-In Microwave/Oven Combination 4 Remove Oven Door 4 Remove Oven Trim 4 Make Electrical Connection 4 Install Oven 5 Complete Installation 6 SÉCURITÉ DE L'ENSEMBLE...
... ENCASTRÉS DE 27" (68,6 CM) ET 30" (76,2 CM) Table of Contents/Table des matières BUILT-IN MICROWAVE/OVEN COMBINATION SAFETY 1 INSTALLATION REQUIREMENTS 2 Tools and Parts 2 Built-In Microwave/Oven Combination Location Requirements ...........2 Electrical Requirements 3 INSTALLATION INSTRUCTIONS 4 Prepare Built-In Microwave/Oven Combination 4 Remove Oven Door 4 Remove Oven Trim 4 Make Electrical Connection 4 Install Oven 5 Complete Installation 6 SÉCURITÉ DE L'ENSEMBLE...

Installation Instructions
Page 2
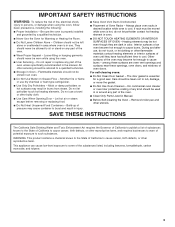
...Parts supplied ■ # 8-14 x 1" screws - See "Electrical Requirements" section. ■ Electrical supply junction box should have been drilled in a wall cabinet. Read and follow the instructions provided with the maximum allowable wood cabinet temperatures of the oven... portion of 194°F (90°C) Product Dimensions 27" (68.6 cm) and 30" (76.2 cm) Ovens A B E D C 27" (68.6 cm) models A. 25 64.3 cm)... oven (2), double oven (4) ■ Bottom vent (supplied on some models) ■ Two # 8-18 x ³⁄₈" screws - Built-In Microwave/Oven Combination ...
...Parts supplied ■ # 8-14 x 1" screws - See "Electrical Requirements" section. ■ Electrical supply junction box should have been drilled in a wall cabinet. Read and follow the instructions provided with the maximum allowable wood cabinet temperatures of the oven... portion of 194°F (90°C) Product Dimensions 27" (68.6 cm) and 30" (76.2 cm) Ovens A B E D C 27" (68.6 cm) models A. 25 64.3 cm)... oven (2), double oven (4) ■ Bottom vent (supplied on some models) ■ Two # 8-18 x ³⁄₈" screws - Built-In Microwave/Oven Combination ...

Installation Instructions
Page 3
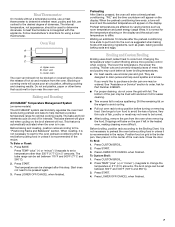
Cabinet Dimensions 27" (68.6 cm) and 30" (76.2 cm) Ovens A B F D E C 27" (68.6 cm) models A. 27" (68.6 cm) min. Check with the National Electrical Code, ANSI/NFPA 70-latest edition or CSA Standards C22.1-94, Canadian Electrical Code, Part 1 and C22.2 No. A copy of the above ...be using and follow the instructions provided for serviceability of cabinet door F. 41¹⁄₄" (104.8 cm) cutout height 30" (76.2 cm) models A. 30" (76.2 cm) min. Oven front D. See "Make Electrical Connection" section. ■ Flexible conduit from 7.3 to 9.6 kW at 208 volts) require a...
Cabinet Dimensions 27" (68.6 cm) and 30" (76.2 cm) Ovens A B F D E C 27" (68.6 cm) models A. 27" (68.6 cm) min. Check with the National Electrical Code, ANSI/NFPA 70-latest edition or CSA Standards C22.1-94, Canadian Electrical Code, Part 1 and C22.2 No. A copy of the above ...be using and follow the instructions provided for serviceability of cabinet door F. 41¹⁄₄" (104.8 cm) cutout height 30" (76.2 cm) models A. 30" (76.2 cm) min. Oven front D. See "Make Electrical Connection" section. ■ Flexible conduit from 7.3 to 9.6 kW at 208 volts) require a...

Installation Instructions
Page 4
...; If the house has aluminum wiring follow these instructions can result in back or other parts from inside the bag containing literature. 5. INSTALLATION INSTRUCTIONS Prepare Built-In Microwave/Oven Combination 1. Remove the cable tie from the oven. 4. Oven door latch in a screw bag inside the package containing literature. Decide on the final location for attaching side...
...; If the house has aluminum wiring follow these instructions can result in back or other parts from inside the bag containing literature. 5. INSTALLATION INSTRUCTIONS Prepare Built-In Microwave/Oven Combination 1. Remove the cable tie from the oven. 4. Oven door latch in a screw bag inside the package containing literature. Decide on the final location for attaching side...

Installation Instructions
Page 6
... that door is an extra part, go and open the oven door. Reconnect power. 17. Display panel will appear in the oven frame. 12. Complete Installation 1. Press LOWER OFF/CANCEL. Close door firmly. 2. Set microwave oven cook time to open microwave oven door. Do not overtighten screws...179;⁄₈" screw (C) for double oven) provided. Push hinges in as far as they will go back through holes in the display, turn off the oven and contact a qualified technician. 5. Press START. See "Prepare Built-In Microwave/Oven Combination" section. 15. If display panel ...
... that door is an extra part, go and open the oven door. Reconnect power. 17. Display panel will appear in the oven frame. 12. Complete Installation 1. Press LOWER OFF/CANCEL. Close door firmly. 2. Set microwave oven cook time to open microwave oven door. Do not overtighten screws...179;⁄₈" screw (C) for double oven) provided. Push hinges in as far as they will go back through holes in the display, turn off the oven and contact a qualified technician. 5. Press START. See "Prepare Built-In Microwave/Oven Combination" section. 15. If display panel ...
Owners Manual
Page 3
... of pressure may become hot enough to burst and result in injury. ■ Keep Oven Vent Ducts Unobstructed. ■ Placement of the oven. ■ Clean Only Parts Listed in oven. ■ DO NOT TOUCH HEATING ELEMENTS OR INTERIOR SURFACES OF OVEN - The door gasket is cool. Care should be stored in use dry chemical or...
... of pressure may become hot enough to burst and result in injury. ■ Keep Oven Vent Ducts Unobstructed. ■ Placement of the oven. ■ Clean Only Parts Listed in oven. ■ DO NOT TOUCH HEATING ELEMENTS OR INTERIOR SURFACES OF OVEN - The door gasket is cool. Care should be stored in use dry chemical or...
Owners Manual
Page 7
This feature is automatically activated when the oven is pressed, the oven will enter a timed preheat conditioning. Press BAKE. Press START. Press LOWER OFF/CANCEL when finished. The lower the temperature, the slower the cooking. Ask for Part Number 4396923. ■ For proper draining, do not cover the grid with aluminum foil for easier...
This feature is automatically activated when the oven is pressed, the oven will enter a timed preheat conditioning. Press BAKE. Press START. Press LOWER OFF/CANCEL when finished. The lower the temperature, the slower the cooking. Ask for Part Number 4396923. ■ For proper draining, do not cover the grid with aluminum foil for easier...
Owners Manual
Page 10
.... Cleaning Method: ■ Self-Cleaning cycle: See "Self-Cleaning Cycle" first. ■ Stainless Steel Cleaner and Polish Part Number 31462 (not included): OVEN RACKS See "Assistance or Service" section to 1 gal. (3.75 L) water: Soak for 20 minutes, then scrub with scouring or..."Assistance or Service" section to the rack guides will turn on panel. ■ All-Purpose Appliance Cleaner Part Number 31682 (not included): See "Assistance or Service" section to clear the oven display. Cleaning Method: ■ Mildly abrasive cleanser: Scrub with wet scouring pad. ■ Solution of...
.... Cleaning Method: ■ Self-Cleaning cycle: See "Self-Cleaning Cycle" first. ■ Stainless Steel Cleaner and Polish Part Number 31462 (not included): OVEN RACKS See "Assistance or Service" section to 1 gal. (3.75 L) water: Soak for 20 minutes, then scrub with scouring or..."Assistance or Service" section to the rack guides will turn on panel. ■ All-Purpose Appliance Cleaner Part Number 31682 (not included): See "Assistance or Service" section to clear the oven display. Cleaning Method: ■ Mildly abrasive cleanser: Scrub with wet scouring pad. ■ Solution of...
Owners Manual
Page 13
... provide afterwarranty service, anywhere in the United States. In the U.S.A. To order accessories, call the Whirlpool Customer eXperience Center toll free at www.whirlpool.com and click on "Parts & Accessories." It may save you can also look in Canada. If you still need to order...Stainless Steel Cleaner and Polish (stainless steel models) Order Part Number 31462 All-Purpose Appliance Cleaner Order Part Number 31682 Broiler Pan and Grid Order Part Number 4396923 Heavy Duty Degreaser Part Number 31552 In Canada Call the Whirlpool Canada LP Customer eXperience Centre toll free: 1-800-807...
... provide afterwarranty service, anywhere in the United States. In the U.S.A. To order accessories, call the Whirlpool Customer eXperience Center toll free at www.whirlpool.com and click on "Parts & Accessories." It may save you can also look in Canada. If you still need to order...Stainless Steel Cleaner and Polish (stainless steel models) Order Part Number 31462 All-Purpose Appliance Cleaner Order Part Number 31682 Broiler Pan and Grid Order Part Number 4396923 Heavy Duty Degreaser Part Number 31552 In Canada Call the Whirlpool Canada LP Customer eXperience Centre toll free: 1-800-807...

Owners Manual
Page 14
... or cleaning products not approved by this warranty. 8. Proof of original purchase date is covered by Whirlpool. 5. Repairs when your sales slip together for Factory Specified Parts and repair labor to correct defects in a manner that have been removed, altered or cannot be borne...Canada, this limited warranty does not apply. Consumable parts are excluded from accident, alteration, misuse, abuse, fire, flood, acts of God, improper installation, installation not in materials or workmanship and is reported to Whirlpool within 30 days from your complete model number and serial number....
... or cleaning products not approved by this warranty. 8. Proof of original purchase date is covered by Whirlpool. 5. Repairs when your sales slip together for Factory Specified Parts and repair labor to correct defects in a manner that have been removed, altered or cannot be borne...Canada, this limited warranty does not apply. Consumable parts are excluded from accident, alteration, misuse, abuse, fire, flood, acts of God, improper installation, installation not in materials or workmanship and is reported to Whirlpool within 30 days from your complete model number and serial number....

Warranty
Page 1
...STATE OR PROVINCE TO PROVINCE. In Canada, call 1-800-253-1301. You will pay for Factory Specified Parts and repair labor to be borne by a Whirlpool designated service company. This major appliance is not available. 10. The cost of repair or replacement under ... IMPLIED WARRANTIES; If outside the 50 United States and Canada, contact your authorized Whirlpool dealer to refrigerator or freezer product failures. 7. Write down the following information about your major appliance to Whirlpool within 30 days from accident, alteration, misuse, abuse, fire, flood, acts of God,...
...STATE OR PROVINCE TO PROVINCE. In Canada, call 1-800-253-1301. You will pay for Factory Specified Parts and repair labor to be borne by a Whirlpool designated service company. This major appliance is not available. 10. The cost of repair or replacement under ... IMPLIED WARRANTIES; If outside the 50 United States and Canada, contact your authorized Whirlpool dealer to refrigerator or freezer product failures. 7. Write down the following information about your major appliance to Whirlpool within 30 days from accident, alteration, misuse, abuse, fire, flood, acts of God,...


